Here we're going to draw the connection between using Android Neural Networks API (NNAPI) in the latest Android ML APIs, and Arm NN functionality contributed directly to the Android codebase by Arm engineers. In this article we demonstrate that the Arm NN features provide a significant performance boost for ML use cases like image recognition and classification.
Today’s mobile devices are amazing supercomputers capable of incredible, hardware-enabled machine learning applications. What you might not know is that Arm developers have been contributing to core Android development, including adding Arm NN functionality and to the Android Neural Networks API (NNAPI) in the Android NDK. If you’re leveraging NN on the latest Android devices, you’re already using Arm NN and getting a performance boost.
Let’s look at an example that shows the performance benefits of being able to use Arm NN natively in your Android application.
Using Arm NN on Android
The Arm NN SDK is a set of open-source tools that enable ML workloads on power-efficient devices. It provides a bridge between existing NN frameworks and Arm Cortex-A CPUs, Arm Mali GPUs, and Ethos NPUs. Arm NN technology is available on standard consumer mobile devices using the latest hardware with Cortex processors and latest Android libraries.
Using Arm NN should be transparent — you are calling the same standard Android APIs, Arm NN is there by default.
For NNAPI to take full advantage of a device’s hardware, drivers for the hardware must be present. On newer devices from Samsung running Android Q (Android 10), the drivers are available out of the box. For older devices, developers can compile and install the drivers themselves. To complete this procedure root access to the device is needed. The source code for the drivers is available at https://github.com/ARM-software/android-nn-driver.
Image Classification with NNAPI
Let's take a look at an image classification example and how it can take advantage of NNAPI. Within an Android application, at a high level, you will need to do the following to use a TensorFlow Lite model with NNAPI.
- Load the labels for the TensorFlow Lite Model
- Create a TensorFlow interpreter options object and add an NNAPI delegate to it
- Create the TensorFlow interpreter object
- Pre-process image to be recognized
- Run the interpreter against the image
- Examine the results
The labels for a model are often stored in a text file. In the example code, the labels are stored with each label being on a separate line. These are added to a variable holding a list of strings named labelList within the code.
The Interpreter.Options object is used to specify settings for how the TensorFlow Lite interpreter will execute. Among the settings that it can control is whether to run the model on the CPU or on other hardware. This is done through creating a delegate object and adding it to the options object.
A delegate object can be used to accelerate a model on a device’s GPU, Digital Signal Processor (DSP), or Neural Processing Unit (NPU). The NNAPI delegate will determine which of these is the best for running a specific model. If none of these are available, then NNAPI will fall back to evaluating the model on the CPU.
Before creating the Interpreter, the bytes containing the model must be loaded to a ByteBuffer. The ByteBuffer and the Options object are passed together to a constructor for an Interpreter. The Interpreter is ready to begin processing data provided to it.
void prepareInterpretor()  {
    Interpreter.Options options  = new Interpreter.Options();
    nnApiDelegate = new NnApiDelegate();
    options.addDelegate(nnApiDelegate);
    MappedByteBuffer tfLiteModel =
        FileUtil.loadMappedFile(context, MODEL_FILE_NAME);
    tfLiteInterpreter = new Interpreter(tfLiteModel, options);
}
For the model used for this code, the images are expected to be of the size 224x224 pixels. The images could be set to an appropriate size before being provided to the application or resized by the application. When resizing the image within memory and making other adjustments, such as shifting the value range or data type of the pixels, the ImageProcessor class can perform the necessary transformations.
The input image for the interpreter is coming from a TFImage that was initialized from a Bitmap. The TFImage provides a byte buffer used for input to our model. For output, we must create a byte array of the size the model is expecting. For this mode, the output will be written to a byte array of 1,001 bytes.
sourceImage = sourceImage.copy(Bitmap.Config.ARGB_8888, true);
final byte outputBuffer[][] = new byte[1][1001];

ImageProcessor imageProcessor = new ImageProcessor.Builder()
    .add(new ResizeOp(IMAGE_HEIGHT, IMAGE_WIDTH, ResizeOp.ResizeMethod.BILINEAR))
    .build();

TensorImage tfImage = new TensorImage(DataType.UINT8);
tfImage.load(sourceImage);
tfImage = imageProcessor.process(tfImage);
tfLiteInterpreter.run(inputBuffer, outputBuffer);
Each position of the output is associated with one of the classes of objects that the network recognizes. The number at the position indicates the confidence that the image contains an object that is of that class.
To interpret the results, the largest value in the output array must be found. Once the position of the largest value is known, the same position within labelList contains a string describing the class.
For example, if the value at position 3 had the highest value, the label at index 3. The first four lines in the file containing the labels follow, with line numbers.
0:unclassified
1:tench, Tinca tinca
2:goldfish, Carassius auratus
3:great white shark, white shark, man-eater, man-eating shark, Carcharodon carcharias
In this case, if value 3 has the highest index, then the model has concluded that the image likely contains a shark.
The first item in the list (position 0) is the position for background noise. If this is the position with the highest confidence, the image is not recognizable. Note that our model returns unsigned byte values. To ensure these are interpreted correctly, they are being cast to an integer so that values above 127 are not misinterpreted as negative values.
public int getStongestPosition(byte[][] output) {
    byte[] results = output[0];

    int maxIndex = 0;
    int  maxValue = 0;


    for(int i=0;i<results.length;++i) {
        int unsignedResult = results[i] & 0xFF;

        if(unsignedResult >maxValue) {
            maxIndex = i;
            maxValue = unsignedResult;
        }
    }
    return maxIndex;
}
For the sample program, the execution time of the interpreter is measured and displayed with the results.
To see how the model executes without NNAPI, create the interpreter without adding the NNAPI delegate to the options object. With NNAPI enabled, the execution time for a model can be up to four times faster.
Testing without Arm NN
To execute without using NNAPI, create an Interpreter whose Option object has not had the NNAPI delegate added to it. With a conditional statement, a program can enable or disable the usage of NNAPI within code.
void prepareInterpretor()  {
    Interpreter.Options options  = new Interpreter.Options();
    if(Build.VERSION.SDK_INT >= Build.VERSION_CODES.P && this.useNNAPI) {
        nnApiDelegate = new NnApiDelegate();
        options.addDelegate(nnApiDelegate);
    }
    MappedByteBuffer tfLiteModel = FileUtil.loadMappedFile(
        context, MODEL_FILE_NAME);
    tfLiteInterpreter = new Interpreter(tfLiteModel, options);
}
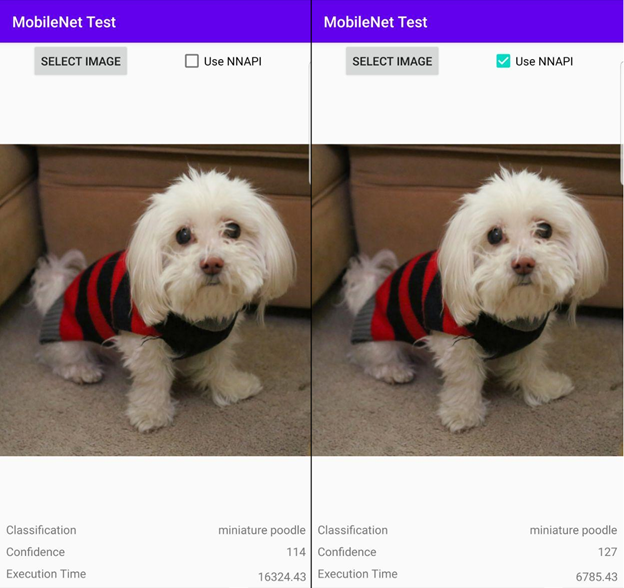
The difference in performance when NNAPI is enabled and not enabled is noticeable. Screenshots of the output of the program from running on two images are below. The results for these two tests were produced by running the code on a Samsung Galaxy Note 20.
In the first image, the program has run on an image of a cup. For the first image, the model was run only on the CPU while the image on the right was run with NNAPI. Comparing the execution time units for the output of both, we see that with NNAPI enabled the program ran almost 3 times faster (2.807).

Running the program against another image, we still see a performance gain between running with NNAPI enabled or disabled. For this second image, the program runs 2.405 times faster with NNAPI turned on.
Wrapping Up
I’ve shown that it is easy to begin making use of NNAPI in your Android projects. Since NNAPI is built in, why might a developer not use it to accelerate their applications? You might be targeting an older version of Android. But here's a good example why targeting the most recent version gives access to NNAPI and a performance boost.
While this example has been focused on image recognition, potential applications are not limited to recognition. It could be applied to a range of applications, including ML Super Resolution for providing a sharp image from a lower resolution image or for pose recognition for detecting where and how someone is positioned within an image or video feed (TF PoseNet).
You can continue to learn more about using neural networks from the Neural Network API page. For more information on optimization and how to deploy the neural network driver take a look at this article titled Implement a neural style transfer on Android with Arm NN APIs.


