Introduction
As promised in the previous article, I’ll continue presenting Google Guice also for web applications. In order to do this, you’ll need to get the servlet extension – part of the standard distribution, along with other extensions like JMX, JNDI, Persist, Struts or Spring. Using Guice, the web.xml will be reduced at minimum – just make the Guice container start. The rest of the configurations will be easily done in Java in the same type-safe manner presented in the previous article.
The servlets will benefit from:
- Constructor injection
- Type-safe configuration
- Modularization
- AOP
In this article, I’ll present the following scenarios:
- Developing a web application from scratch
- Adding Guice to an existing web application
Starting a New Web Application using Guice
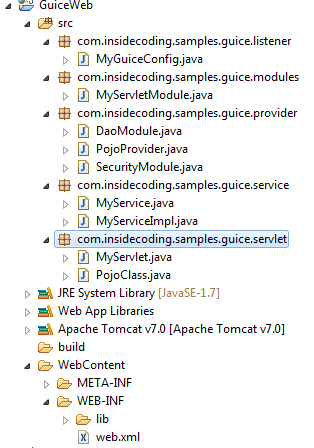
Check the below image for an Eclipse screenshot with the project structure:
Besides the core Guice libraries presented in the previous article, we must also add the guice-servlet.jar in the application’s class path (please check the end of the article for the Maven dependency).
After the class path is properly configured, we must first define the Guice Filter in web.xml. This will actually be the only configuration present in this file.
This is the web.xml:
==?
<webapp xmlns="http://java.sun.com/xml/ns/javaee"
xmlns:xsi="http://www.w3.org/2001/XMLSchema-instance"
xsi:schemaLocation="http://java.sun.com/xml/ns/javaee
http://java.sun.com/xml/ns/javaee/web-app_3_0.xsd"
version="3.0">
<display-name>Guice Web</display-name>
<filter>
<filter-name>guiceFilter</filter-name>
<filter-class>com.google.inject.servlet.GuiceFilter
</filter-class>
</filter>
<filter-mapping>
<filter-name>guiceFilter</filter-name>
<url-pattern>/*</url-pattern>
</filter-mapping>
</web-app>
We are sure now that all requests will be processed by Guice.
The next step is creating the Injector and defining the Modules. Besides the “normal” modules used by an application – presented in the previous article – in order to actually use the Guice Servlet module, we must declare an instance of com.google.inject.servlet.ServletModule. This Module is responsible for setting the Request and Sessions scopes and this is the place where we’ll configure the servlets and filters within the application.
Considering that we write a web application, the most logical and intuitive place to create the Injector is within a ServletContextListener. A ServletContextListener is a component that fires just after the application is deployed and before any request received by the server. Guice comes with its own class that must be extended in order to create a valid injector. As we’ll use Servlet 3.0 API, we’ll annotate this class with @WebListener – we won’t need to declare it in web.xml.
I was saying that the ServletModule is the place where we configure our servlets and filters. This is the content of the class that it will extend this module. It will configure a servlet mapped to all the .html requests:
package com.insidecoding.samples.guice.modules;

import com.insidecoding.samples.guice.servlet.MyServlet;

import com.google.inject.servlet.ServletModule;

public class MyServletModule extends ServletModule {

   @Override
   protected void configureServlets() {
          serve("*.html").with(MyServlet.class);
   }
}
The ServletContextListener:
package com.insidecoding.samples.guice.listener;

import javax.servlet.annotation.WebListener;

import com.insidecoding.samples.guice.modules.MyServletModule;

import com.google.inject.Guice;
import com.google.inject.Injector;
import com.google.inject.servlet.GuiceServletContextListener;

@WebListener
public class MyGuiceConfig extends GuiceServletContextListener {

   @Override
   protected Injector getInjector() {
          return Guice.createInjector(new MyServletModule());
   }
}
Please note inside the getInjector() method, the creation of the Injector is based on the servlet module defined before. If the application has many other modules, all of them must be declare here.
Also, you can see how intuitive the declaration of the servlet mapping is.
This is the MyServlet class:
package com.insidecoding.samples.guice.servlet;

import java.io.IOException;

import javax.servlet.ServletException;
import javax.servlet.http.HttpServlet;
import javax.servlet.http.HttpServletRequest;
import javax.servlet.http.HttpServletResponse;

import com.insidecoding.samples.guice.service.MyService;

import com.google.inject.Inject;
import com.google.inject.Singleton;

@Singleton
public class MyServlet extends HttpServlet {

   private static final long serialVersionUID = 1861227452784320290L;

   @Inject
   private MyService myService;

   protected void service(HttpServletRequest request,
                 HttpServletResponse response)

throws ServletException, IOException {
          response.getWriter().println(
                       "Service: " + myService.doStuff());
   }
}
Let’s analyze this code:
- A servlet must be a singleton – mark it using the
@Singleton annotation – otherwise, the application will throw an Excepton - We use field injection in order to get a
MyService instance - The class extends
HttpServlet just like any other servlet
The MyService interface:
package com.insidecoding.samples.guice.service;

import com.google.inject.ImplementedBy;

@ImplementedBy(MyServiceImpl.class)
public interface MyService {

   String doStuff();
}
And its implementation:
package com.insidecoding.samples.guice.service;

public class MyServiceImpl implements MyService {

   @Override
   public String doStuff() {
          return "doing stuff!";
   }
}
The application is ready to be deployed. This is the result of calling index.html:

Integrating Guice into an Existing Web Application
In order to integrate Google Guice into an existing web application, we must make sure that everything is in place:
- The required jar is in classpath
- The Guice filter is defined in web.xml
- We have a
ServletContextListener that extends GuiceServletContextListener
At this stage, all these configurations will not have any impact on the application – everything will work as before.
We can have two directions:
- Use Guice only for new things – of course, this is not a best practice, but this is a normal scenario for big applications with legacy code
- Guicefy the entire application – ideal case
For the second case, you must follow the same path presented in the first part of the article.
For the first case, we’ll end up using DI in servlet classes that are not instrumented by Guice. We can access the Injector instance using the ServletContext:
Injector injector = (Injector) request.getServletContext().getAttribute(Injector.class.getName());
In order to get all the dependencies injected, you can:
- Call
injector.injectMembers(this) – this will inject all the dependencies - Call
injector.getInstance(clazz) for each instance that needs to be injected
Request and Session Scope
The servlet extension adds 2 new scopes: Request and Session. We’ll see next an example of using the Session scope.
We’ll slightly modify some of the classes presented before. Considering that we’ll need to mix scopes and we want to access an object with a narrower scope from an object with a wider scope (access a Session scoped object from a Singleton), we’ll use Providers (see the Note section for details).
The servlet module will look like this:
package com.insidecoding.samples.guice.modules;

import com.insidecoding.samples.guice.provider.PojoProvider;
import com.insidecoding.samples.guice.servlet.MyServlet;
import com.insidecoding.samples.guice.servlet.PojoClass;

import com.google.inject.servlet.ServletModule;
import com.google.inject.servlet.ServletScopes;

public class MyServletModule extends ServletModule {

   @Override
   protected void configureServlets() {
          serve("*.html").with(MyServlet.class);

          bind(PojoClass.class).toProvider(PojoProvider.class).in(
                       ServletScopes.SESSION);
   }
}
Please note the ServletScopes.SESSION binding.
The PojoProvider class:
package com.insidecoding.samples.guice.provider;

import com.insidecoding.samples.guice.servlet.PojoClass;

import com.google.inject.Provider;

public class PojoProvider implements Provider<PojoClass> {

   public PojoClass get() {
          return new PojoClass();
   }

}
The PojoClass class:
package com.insidecoding.samples.guice.servlet;

public class PojoClass {

   private String name;

   public void setName(String s) {
          this.name = s;
   }

   public String getName() {
          return this.name;
   }
}
In order to prove that the application is actually working, we’ll modify the MyServlet class to display additional information:
package com.insidecoding.samples.guice.servlet;

import java.io.IOException;

import javax.servlet.ServletException;
import javax.servlet.http.HttpServlet;
import javax.servlet.http.HttpServletRequest;
import javax.servlet.http.HttpServletResponse;

import com.insidecoding.samples.guice.service.MyService;

import com.google.inject.Inject;
import com.google.inject.Provider;
import com.google.inject.Singleton;

@Singleton
public class MyServlet extends HttpServlet {

   private static final long serialVersionUID = 1861227452784320290L;

   @Inject
   private Provider pojoClass;

   @Inject
   private MyService myService;

   protected void service(HttpServletRequest request,
                 HttpServletResponse response)

throws ServletException, IOException {
      response.getWriter().println(
                   "Service: " + myService.doStuff() + " with ");
      if (pojoClass.get().getName() == null) {
             pojoClass.get().setName("name");
      } else {
             pojoClass.get().setName("existing name");
      }
      response.getWriter().println(pojoClass.get().getName());
   }
}
In order to demo the functionality, we’ll access the application twice in the same session. The first time it will display the below result:
The second time it will display the following result:
This example can be easily changed in order to use Request scope instead of Session scope.
This is how a simple Guice web application looks like. I tried to touch the most important points from the Guice Servlet extension. As mentioned in the previous article, this is just a small introduction. You can continue experimenting different situations and you’ll learn the most by actually using Guice into a real project.
Notes
Guice as a Maven Dependency
<dependency>
 <groupId>com.google.inject</groupId>
 <artifactId>guice</artifactId>
 <version>3.0</version>
 </dependency>
Providers
Providers address the following situations:
- A client needs more instances of the same dependency per injection
- A client wants to get the dependency when it will actually use it (lazy loading)
- You want to inject a narrower scoped object into a wider scoped object
- Additional logic is needed in order to create the object being injected
- You want to control the process of creating instance per binding
As you can see in the previous examples, it is very easy to write a Provider. You just need to implement the Provider<T> interface, where T is the concrete type of the object being injected.
Recommendations
My name is Madalin Ilie. Currently I'm a Development Lead at Endava Romania (www.endava.com).


