Introduction
This is a quick guide on how to build a curved shaped tooltip with selection options using nothing but the Canvas element. The look and feel is distinctive among other comparable widgets.
Background
To carry on with this tutorial, you’ll need to know a little about HTML5/Canvas and JavaScript technology.
A live example of this implementation can be found here: demo.
Getting Started
First we need to create a Canvas element on which we are going to draw:
var element = document.createElement("canvas");
Then we append the canvas to the body:
var tbody = document.body;
tbody.appendChild(element);
Drawing on the Canvas
- What we basically do is to draw three curved shapes (we could draw more but I like three) , to draw each one I came up with my own function which calculates the different path points on which the lines must be drawn then by making usage of the
quadraticCurveTo method we draw the shape (please note that this might be easily improved but I have to be honest I have never been that good at math/geometry)
function drawSegment(instance, segmentIndex) {
    var radius = instance.radius;
    var arcRadius = instance.arcRadius;
    var startAngle = GetAngle(instance, segmentIndex, 1);
    var endAngle = GetAngle(instance, segmentIndex, 0);
    var xCenter = instance.cX;
    var yCenter = instance.cY / .5
    var fol = parseInt(instance.segments / 2) == segmentIndex;
    var context = instance.context;
    var middleAngle = (startAngle + endAngle) / 2;
    var outterSX = getX(startAngle, radius, xCenter);
    var outterSY = getY(startAngle, radius, yCenter);
    var innerSX = getX(startAngle, radius - arcRadius, xCenter);
    var innerSY = getY(startAngle, radius - arcRadius, yCenter);
    var outterEX = getX(endAngle, radius, xCenter);
    var outterEY = getY(endAngle, radius, yCenter);
    var innerEX = getX(endAngle, radius - arcRadius, xCenter);
    var innerEY = getY(endAngle, radius - arcRadius, yCenter);

    var outterMX = getX(middleAngle, radius + instance.ctxFactor , xCenter);
    var outterMY = getY(middleAngle, radius + instance.ctxFactor , yCenter);
    var innerMX = getX(middleAngle, radius - arcRadius + instance.ctxFactor, xCenter);
    var innerMBX = getX(middleAngle + 4, radius - arcRadius, xCenter);
    var innerMPX = getX(middleAngle - 4, radius - arcRadius, xCenter);
    var innerMBY = getY(middleAngle + 4, radius - arcRadius, yCenter);
    var innerMPY = getY(middleAngle - 4, radius - arcRadius, yCenter);
    var innerMCX = getX(middleAngle, radius - arcRadius + instance.ctxFactor, xCenter);
    var innerMCY = getY(middleAngle, radius - arcRadius + instance.ctxFactor, yCenter + 8);
    var innerMY = getY(middleAngle, radius - arcRadius + instance.ctxFactor, yCenter);

    context.moveTo(outterSX, outterSY);
    context.quadraticCurveTo(outterSX, outterSY, innerSX, innerSY);
    context.moveTo(innerSX, innerSY);

    context.quadraticCurveTo(innerMX, innerMY, innerEX, innerEY);
    context.quadraticCurveTo(innerEX, innerEY, outterEX, outterEY);
    context.quadraticCurveTo(outterMX, outterMY, outterSX, outterSY);
};
The idea behind this function is to calculate the path points that will define the slice/shape based on the angle coordinates.
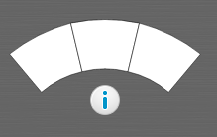
This is how it should look after drawing the three shapes together on the canvas
Now we draw the tip in the middle of the three shapes
if (fol) {
    context.quadraticCurveTo(innerSX, innerSY, innerMPX, innerMPY);
    context.lineTo(innerMCX, innerMCY);
    context.lineTo(innerMBX, innerMBY);
    context.quadraticCurveTo(innerEX, innerEY, innerEX, innerEY);
}
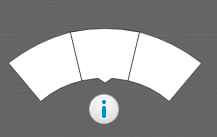
This is how it should look after drawing on the canvas.
Now we give some color to the Canvas, I liked the idea to have a gradient styled background instead of a solid color. in order to accomplish this look we need to specify
the gradient color right before we draw the shapes (drawSegment).
var gradient = this.context.createLinearGradient(0, 0, 0, this.cY / .75);
gradient.addColorStop(0, "rgb(255, 255, 255)");
gradient.addColorStop(1, this.backColor);
this.context.lineWidth = .5;
this.context.fillStyle = gradient;
this.context.strokeStyle = "black";
Then we add a shadow effect , in order to draw a shadow on our surface we are going to redraw the same shapes separately this is because we don't want
to give a shadow to our original shapes as our surface is not completely solid (shapes are separated) and shadow would be reflected between slices
if (this.hasShadow) {
    this.context.save();
    this.context.beginPath();
    this.context.shadowColor = this.shadowColor;
    this.context.shadowBlur = 5;
    this.context.shadowOffsetX = 0;
    this.context.shadowOffsetY = 5;
    for (var i = 0; i < this.segments; i++) {
        drawSegment(this, i);
    }
    this.context.closePath();
    this.context.fill();
    this.context.restore();
}
In order to draw the images for each section, we use the drawImage function, but with add a shadow to it in order to give it a very little embossed effect,
for this to happen we need to calculate the position of the image based on the shape angle position.
for (var i = 0; i < this.segments; i++) {
var stAngle = GetAngle(this, i, 1);
var edAngle = GetAngle(this, i, 0);
var xCenter = this.cX;
var yCenter = this.cY / .5
var middleAngle = (stAngle + edAngle) / 2;
var outterMX = getX(middleAngle, this.radius - (this.arcRadius / 2), xCenter);
var outterMY = getY(middleAngle, this.radius - (this.arcRadius / 2), yCenter);
if (typeof this.tiles[i] != 'undefined') {
this.context.save();
this.context.shadowColor = 'rgb(0, 0, 0)';
this.context.shadowOffsetX = 0;
this.context.shadowOffsetY = -1;
this.context.shadowBlur = 1;
this.context.translate(outterMX, outterMY)
this.context.rotate(-this.rotation * TO_RADIANS);
this.context.drawImage(this.tiles[i], -(this.tiles[i].width / 2), -(this.tiles[i].height / 2));
this.context.restore();
}
}
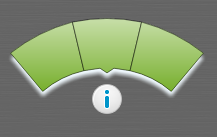
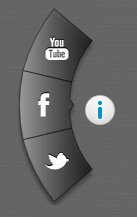
This is how the final result should show up (our CurvyTip). 
Position Manipulation
- Rotation: Rotating the CurvyTip is actually very simple, all we need to do is to rotate the canvas it self. to do this we first translate our context to the center,
and then rotate is as shown:
this.clearCvs();
this.context.save();
this.context.translate(this.cX, this.cY);
this.context.rotate(this.rotation * TO_RADIANS);
this.context.translate(-this.cX, -this.cY);
this.context.scale(this.scale, this.scale);
this.drawCanvas();
this.context.restore();
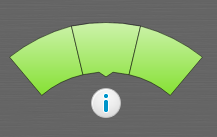
but we also want the images to rotate as well otherwise the images would be rotated when the canvas rotates as shown:
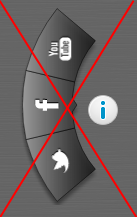
To avoid this we need to rotate the image when is being drawn (just before the canvas rotation)
if (typeof this.tiles[i] != 'undefined') {
this.context.save();
this.context.shadowColor = 'rgb(0, 0, 0)';
this.context.shadowOffsetX = 0;
this.context.shadowOffsetY = -1;
this.context.shadowBlur = 1;
this.context.translate(outterMX, outterMY)
this.context.rotate(-this.rotation * TO_RADIANS);
this.context.drawImage(this.tiles[i], -(this.tiles[i].width / 2), -(this.tiles[i].height / 2));
this.context.restore();
}
Anchor: We can also position our canvas right/left/above/below to our trigger element (usually a div), we do this by calculating the location
of our trigger element (target) and identifying its offset position on screen.
function SetPosition(instance) {

    var position = instance.anchor;
    var padding = 10;
    var offset = getOffset(instance.target);
    var twidth = instance.target.offsetWidth;
    var theight = instance.target.offsetHeight;
    var fol = parseInt(instance.segments / 2);
    var startAngle = GetAngle(instance, fol, 1);
    var endAngle = GetAngle(instance, fol, 0);
    var middleAngle = (startAngle + endAngle) / 2;

    var yCenter = instance.cY / .5;
    var xCenter = instance.cX;
    var innerMCY = getY(middleAngle, instance.radius - instance.arcRadius + instance.ctxFactor, yCenter + 8);

    var left = 0;
    var top = 0;

    switch (position) {
        case "top":
        case null:
        default:
            left = (offset.left - (instance.canvas.width / 2)) + (instance.target.offsetWidth / 2);
            top = offset.top - innerMCY - padding;
            break;
        case "bottom":
            left = (offset.left - (instance.canvas.width / 2)) + (instance.target.offsetWidth / 2);
            top = offset.top + theight - (instance.canvas.height - innerMCY) + padding;
            break;
        case "left":
            left = offset.left - padding - innerMCY;
            top = offset.top + (theight / 2) - innerMCY;
            break;
        case "right":
            left = offset.left + twidth - (instance.canvas.width - innerMCY) + padding;
            top = offset.top + (theight / 2) - innerMCY;
            break;
    }
}
Mouse Interaction
Even though the canvas it self doesn't have a strict way of listening on the Mouse events there a a few ways to accomplish this.
Basically we'll create a Region that will reference the position of each area, then making usage of the
isPointInPath function we compare the mouse coordinates against the Regions Areas.
- This is a very rough example of how it is accomplished:
var pos = this.mousePos;
if (pos != null && this.context.isPointInPath(pos.x, pos.y)) {
if (this.mouseClick && this.currentRegion.onclick !== undefined) {
}
else if (!this.mouseOver && this.currentRegion.onmouseover !== undefined) {
}
}
else {
if (this.currentRegion.onmouseout !== undefined) {
}
}
Being able to capture mouse events lets us interact with each of the sections on our canvas allowing us to do hover events as shown:
if (this.hitSegment == i) {
    this.context.save();
    this.context.beginPath();
    drawSegment(this, i);
    this.context.fillStyle = this.mouseOverColor;
    this.context.fill();
    this.context.closePath();
    this.context.restore();
}

How to Use it
Initializing the curvyTip
var opts = {
alwaysVisible: true,
images: ['t.png', 'f.png', 'r.png']
};
var curvyTip = new CurvyTip('targetElementId');
curvyTip.setOptions(opts);
Capturing Events
var curvyTip = new CurvyTip('targetElementId');
curvyTip.addListener("click", function (index) {
});
curvyTip.addListener("mouseover", function (index) {
});
curvyTip.addListener("mouseout", function (index) {
});
curvyTip.removeListener("click");
curvyTip.removeListener("mouseover");
curvyTip.removeListener("mouseout");
Summary
I have talked about some of the details of the CurvyTip (HTML5 Canvas experiment) I hope you have enjoyed this article.
Changes
Version 1.1 (18.03.2013)
OnLoad position fix, there was a problem when CurvyTip was shown on load.- Refactored code a bit to make it more flexible. The
Gradient property is now exposed and can be used to override default gradient style.
This member has not yet provided a Biography. Assume it's interesting and varied, and probably something to do with programming.


 General
  News
News  Suggestion
  Question
  Bug
Bug  Answer
  Joke
Joke  Praise
  Rant
Rant  Admin
Admin 


