Introduction
SaaS applications (Software as a Service) are the latest model in web architectures. However, common components such as authentication are not readily available to .NET developers, forcing them to constantly create their own. This constant re-invention of the wheel results in wasted time with development and testing, and also introduces the potential for security issues with each new implementation.
Here, we will look at using the existing MembershipProvider model as a foundation for our authentication model. It provides a well-known basis for authentication systems within ASP.NET, as well as a collection of controls that will speed development. For this article, we will be using the SqlMembershipProvider with an ASP.NET WebForms, as they are among the more common of implementations. That said
however, these examples should work under ASP.NET MVC with minimal changes.
What is SaaS?
What makes SaaS applications different than a traditional application is the concept of Multitenancy: a principle in software architecture where a single instance of the software runs on a server, supporting multiple client organizations (tenants). In a typical application, all users are effectively sharing the same data, while in a SaaS application, data is compartmentalized in such a way that multiple groups (i.e. companies, departments, etc.) can use the application without everyone knowing the other groups exists.
Defining a Tenant
The SqlMembershipProvider released with .NET 2.0 provided an easy-to-use and easy-to-integrate implementation of authentication. While readily available, it was not designed with the multi-tenancy aspects required in many modern applications.
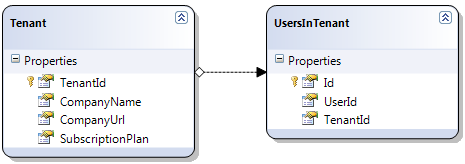
To utilize the SqlMembershipProvider, we must first add a new element to the data model called a Tenant. A Tenant defines the group of users within the application. For our application, a Tenant has the following attributes:
- Tenant ID
- Company Name (e.g., Acme Industries)
- Company URL (e.g., www.AcmeIndustries.biz)
- Subscription Plan (ex. Enterprise)
Note: Many SaaS applications have a monthly fee which is based on tiers, where example tiers would be “Basic,” “Professional,” and “Enterprise,” with monthly fees increasing respectively. The Subscription Plan attribute reflects this fact.
Thoughts on referring to your Tenant during a login
Ideally, users could have the same username across different Tenants, for example, both Tenant1 and Tenant2 can both have user 'Bob'. The obvious question: "How would the application know which 'Bob' was trying to log in?" There are several different solutions, each with their pros and cons:
- Force all usernames to be unique across the application. This would remove the issue of collisions but could annoy users.
- Give users the option to choose their tenant. For example, the login screen could include a drop list of tenants using the application. While this would work, it would also be a potential breach of privacy, as some of your customers may not want this information disclosed.
- Use a custom sub-domain to define the each tenant (e.g., http://tenant1.myapp.com) .
For our examples, we will be using the first solution, treating an email address as the username and banning duplicate addresses. However, if you were to use a solution that allowed for username collisions, one of the easiest ways to ensure uniqueness at the data layer would be to prepend the username with the tenant (e.g., Tenant1/bob).
Creating new Users/Tenants
Now that we’ve covered how our Tenants will look and how we will handle users within our Tenant, we can step into the implementation.
In our database we’re going to create two tables, Tenants and UsersTenants:
Now that we have the data layer for our Tenants and can associate our users to a Tenant, we will start writing the code. The first part we will implement will be the registration process.
AuthenticationEntitiesDataContext ctx = new AuthenticationEntitiesDataContext();
Tenant tenant = new Tenant();
tenant.TenantId = Guid.NewGuid();
tenant.CompanyName = txtCompanyName.Text;
tenant.CompanyUrl = txtCompanyUrl.Text;
tenant.SubscriptionPlan = ddlSubscriptionPlan.SelectedValue;
ctx.Tenants.InsertOnSubmit(tenant);
ctx.SubmitChanges();
MembershipUser user = Membership.CreateUser(Email.Text, Password.Text, Email.Text);
UsersInTenant userTenant = new UsersInTenant();
userTenant.TenantId = tenant.TenantId;
userTenant.UserId = (Guid)user.ProviderUserKey;
ctx.UsersInTenants.InsertOnSubmit(userTenant);
ctx.SubmitChanges();
ctx.Dispose();
With this, we will create our user, tenant and associate the two. From here, logging into the site can be done with the normal <asp:login> control. Note that we are able to use the Login control because we are not allowing duplicate usernames. If you allow duplicates in your design, this functionality must be handled manually.
Referencing the User/Tenant after login
Once a user has authenticated, you can reference them the same as a traditional MembershipProvider application (i.e., for WebForms, you would simply use
this.User
within the page code-behind). The Tenant, on the other hand, will have to be referenced manually.
(Note that this example is for WebForms and would require changes for ASP.Net MVC.)
We will start by creating a class inheriting from System.Web.UI.Page called
AuthenticatedPage. This class will encapsulate retrieving the Tenant information for use within the page. Two public attributes will be added, TenantId and TenantName, that will lazy the tenant data. The LINQ context object (named
_ctx) is initialized in Page_PreInit and disposed of in
Page_Unload.
private Guid _TenantId = Guid.Empty;
public Guid TenantId {
    get
    {
        Guid retVal;

        if (_TenantId == Guid.Empty)
        {

            GetTenantInfo(out _TenantId, out _TenantName);

            retVal = _TenantId;
        }
        else
        {
            retVal = _TenantId;
        }

        return retVal;
    }

}

private string _TenantName = String.Empty;
public string TenantName
{
    get
    {
        string retVal;

        if (_TenantName == String.Empty)
        {

            GetTenantInfo(out _TenantId, out _TenantName);

            retVal = _TenantName;
        }
        else
        {
            retVal = _TenantName;
        }

        return retVal;
    }

}

private void GetTenantInfo(out Guid tenantId, out string tenantName)
{
    Guid userId = (Guid)Membership.GetUser(this.User.Identity.Name).ProviderUserKey;
    var query = (from tenants in _ctx.UsersInTenants where
                     tenants.UserId == userId select tenants.Tenant).FirstOrDefault();

    if (query == null)
    {
        throw new Exception("This User doesn't belong to a Tenant!");
    }

    tenantId = query.TenantId;
    tenantName = query.CompanyName;
}
With a web page inheriting from AuthenticatedPage, the tenant information can be accessed in similarly to the membership data:
public partial class Default : AuthenticatedPage
{
    protected void Page_Load(object sender, EventArgs e)
    {
        lblTenantName.Text = TenantName;
    }
}
About the Sample Code
To run the application, first use the DatabaseScript.sql in the solution to create your sample database. Then update the connection strings element within the web config file.
Disclaimer: The sample code provided is a simple implementation meant to explain the concepts provided and are not meant for use in a production environment.
A technologist and entrepreneur, Joel is the president and founder of Forge Ventures. Founded in 2009, Forge Ventures started with a simple goal: to improve the way people run their business. Many businesses are started with very simple tools and processes...sometimes as simple as a whiteboard or spreadsheet to manage mission critical aspects of their company. But as your business grows, the very tools that got you off the ground could actually be holding you back, preventing you from reaching your full potential. We believe that just because something isn't broken doesn't mean it can't be improved.


 General
  News
News  Suggestion
  Question
  Bug
Bug  Answer
  Joke
Joke  Praise
  Rant
Rant  Admin
Admin 


