Download Note
The Visual Studio solution file was 22 MB in size, but with help from people on this forum, it is now 246 Kilo bytes;
All Four Articles
This is a short summary of all four articles and a link to each. I have completed four articles on asynchronous TCP/IP and Microsoft's class ASyncSocket. Part 1 describes the necessary concepts. Part 2 describes a single project that incorporates a server and a client in a single project and a single dialog. The user can walk through a transaction one step at a time. In parts 3 and 4 the Server and Client are separated into two projects residing in one solution. The Server and Client can run on separate computers. That project introduces the concept of multiple projects in a single solution. It introduces the concept of using source code from a separate directory. If you are not well versed in TCP/IP and with ASyncSocket, the first two articles are a must read. If you have not worked with multiple projects in one solution, or with Additional Include Directories, Part 3 is must read. If that sentence looks weird, please read Part 3.
Here is a link to each article and to two programming tips that are essential to this article.
Introduction
This article shows how to use MFC class CAsyncSocket in a real world application. It presents some of the problems that result from asynchronous operations. It demonstrates the use of a common code directory/library, and the use of multiple projects in a single solution.
Please note that I still consider myself a novice at writing code for TCP/IP operations and with class CAsyncSocket. This demonstration application is as complex as my job requires. I wrote the application to learn, then wrote these articles so that I could remember what I did and why and because I did not find any articles that were this simple and complete. There are other articles that create what might be called heavy weight or comprehensive classes. I wanted one as simple as possible.
If you see a significant flaw or can make the operations more simple and elegant, feel free. Please write it up and post your improvements.
Prerequisites
This is written for the reader that has a fundamental understanding of TCP/IP, but not a working knowledge of writing that type of code. The reader should be able to write programs to accomplish simple to medium complexity tasks in Visual Studio, MFC, and C++.
Environment
Windows 7, Visual Studio 2008, MFC, C++
Introduction
In Part 1 of this four part series I described the core methods of the class ASycnSocket and what they do. Article two showed them in a simplified working environment. That environment was fairly well instrumented to show how the ASyncsocket operated. However, Server and Client were both in a single project and all actions were initiated by the user.
Unlike the code of the first two articles, in these two the Server and Client are two separate exe files and can be run on separate computers. This provides a far more realistic test environment than running both on the same host.
Part 4, discusses the Client end and is found here.
Sender Difficulties
Applications that communication between multiple computers using TCP/IP can be categorized into several groups. Those that send and receive data based on user inputs and controls are relatively low data rate. There is seldom a problem with bandwidth at the TCP/IP level. Many applications such as file transfer or down/up loads “prefer” high bandwidth. These applications can be throttled back at any of several places with no ill effect other than the time required to complete the task. For example, when sending a large file the application can easily wait on a slow hard drive on the sender end or on the receiver end with no ill effect.
My application is telemetry data. The data arrives at a specific rate whether the application is ready or not. If the TCP/IP utility is not ready to send data when it arrives, then the data must be buffered somewhere. This is what caused me to become acquainted with the return code WSAEWOULDBLOCK. When the ASyncSocket method Send() generates that error, the application must be able to buffer the data until ASyncSocket method OnSend() is called.
When the application was sending only two or so messages per millisecond things were OK. When the rate was increased the Send() method started returning the WSAEWOULDBLOCK value. That error code has two meanings. The application must stop sending data, and, the last send was not successful. The data from the last send attempt must be saved to be sent again later. This article presents a method used to buffer the data.
Client Difficulties
The OS (Operating System, for this article the term OS include everything in the host computer(s) other than our application) has the prerogative of combining two or more payload packets into a single TCP/IP packet, and the prerogative of splitting payload packets across TCP/IP packets. The Client must re-assemble the split packets. An implementation to do that is in the Client. The Client also checks the payload packets to ensure that none were dropped. Putting a check into the payload data is not required, but I strongly recommend it. I advise the programmer to design the payload packet structure to provide that ability. If this description leaves you with questions, be assured that answers will be provided when describing the Client.
In theory TCP/IP should never lose a packet. That is probably true when we isolate and consider just the TCP/IP portion. But when the entire application is considered, payloads can be lost. The application for which these classes were created is telemetry data. When sending is suspended, via the return value WSAEWOULDBLOCK, the data just keeps on coming. (I will explain shortly) The server must be able to deal with that event.
Freebies
Two other topics are thrown in just because I needed them. They are how to create and use a directory of shared or common code, and how to create and test multiple projects in one solution.
Caution
My specific applications will never be used outside the USA. I don’t want to deal with the added complexities of Unicode and disable it for everything I do. To get an error free compile disable Unicode. If you want Unicode, then some changes will be required. If you incorporate a method of enabling these classes to compile with and without Unicode, and if they are not too onerous, notify me and I will probably include them.
Common Code
The solution contains two projects, a server and a client. However, the stated projects of the server and client are really no more than test articles with the purpose of developing and testing the real code, the code that will be put in other applications. There is a way to do that without copying code to every new project. That was is easier than expected.
The zip file contains two directories, the solution directory and another named COMMON_CODE. In the common directory are all the .H and .CPP files needed for the classes: Log_Writer, Client, Server_Manager, and Server_Sender. Place this COMMON_CODE directory in some location, then put the solution directory somewhere else.
The first step is to tell VS (Visual Studio) that there are additional directories containing code. Begin with Solution Explorer and right click on your project. Remember that in this solution there are two projects. Then select Configuration Properties -> C/C++ -> General. In the field Additional Include Directories, add the path to the common code directory.
Caution:
There is a rather significant difficulty with the use of Using Additional Include Directories. I wrote a programming tip on this that is found on this site
here.
This project will not successfully build until you understand this idiosyncrasy of Visual Studio. If the build errors mention that the include files could not be found, the answer is almost certainly found in that programming tip.
NOTICE: For this version of the download zip file, I zipped everything and put it in C:\TEMP. After going through the Additional Directories exercises just mentioned, and getting a clean build, I ran the batch file clean.bat (included in the zip) and zipped the results. The zip file is now down to 246 Kbytes.
Then everything but the zip was deleted, the zip file unzipped, and a clean build resulted. SOooo, and hopefully, the reader will be able to download the zip file to C:\TEMP and get a good build. When you move the solution or the COMMON_CODE directory to anywhere else, you must go through the exercises of the programming tip, link provided just above.
I will be appreciative if someone does this and posts the results.
Multiple Projects
My next minor task was to have multiple projects in one solution. That also was easier than expected. I wrote a tip on this subject also, found
here. This process is more straightforward than for the include directories tip, still, reading it can save you some trouble.
Let us begin
Download the project to directory C:\TEMP, unzip it, and read that programming tip here.
Open the solution in Visual Studio and you are read to go.
When the project is ready, right click on the solution line of Solution Explorer and select Set Startup Projects. That dialog controls how each project is started when you press F5 or click the run button. Click in the Action column to get some startup options. Explore that dialog and the various options before continuing with your project. It is easier to browse around than to describe everything. The Server Project: download the entire project, then in Solution Explorer close all the expansion/explorer boxes to leave three lines in the Solution Explorer. It will look like this:
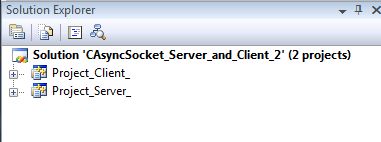
There are two projects and a build will compile and link both. Each has its own subdirectory and executable, both debug and release. When both are set up to start then each one has its own dialog. The TCP/IP Server and Client must meet each other’s expectations. Development and coordination of the two together in a single project was much easier than separate solutions.
Expand the Server project and the Solution Explorer should look like this:

Browse around a bit to get familiar with all the files.
Log Writer
Before jumping into the Server take a look at the utility C_Log_Writer. Its purpose is to provide a class common to the entire project that can be used to log any information that might be needed. Look in the dot H file while reading this. The “complete” constructor (read the comments) takes two arguments, a directory name and a prefix string. The log file is opened in the directory you specify in the first argument: new_directory_name. When opening a file the utility gets the current time from the OS then builds a text string consisting of the current year, month, day, hour, minute, and second. That string is prefixed with the second argument: new_name_prefix. This solution has two projects that run at the same time. When the log writer is created by the server the prefix is TCP_Server. In the client the prefix is TCP_Client. If you use this for other projects change the value of the second argument.
Following that are two methods to change the directory and prefix string. Easy enough. The Open_Log_File() method is rather obvious. Re_Open_Log_File() can be used at any point where you might want to restart the log file and put some event right at the top of a file. If you application has a GUI, add a button to restart the log file. Go down a bit to Write_Log_File_Entry() and go to the definition. The method gets the current time and builds a prefix for each log entry showing the time down to the millisecond. To that string it adds the user supplied text to make the entire entry and writes it to the file. Look a little further down to find:
if( ( m_log_entry_count ++ ) > LOG_FILE_RESTART_COUNT )
{
    m_log_entry_count = 0;
    Re_Open_Log_File();
}
Each write to the log file increments the counter. When the counts exceeds LOG_FILE_RESTART_COUNT, the log file is closed and a new log file opened. Feel free to change that value to meet your needs. Hopefully the remainder of this class is self-evident.
Format WSA Text
Upon looking up WSAGetLastError and GetLastError, I found there is a formatter to get a text statement about the various error codes. I found it easier to write a simple class that provides the text of the errors my application is likely to solicit. That method is C_TCP_Format_WSA_Text.>. It is simple.
Project Server Dialog
This project is the server end of the pair of projects. Bear in mind that its purpose is only to exercise the two server classes C_TCP_Server_Manager and C_TCP_Server_Sender. If you use these classes, use the code in the common code directory and forget the two dialog projects.
Be Advised
The class C_TCP_Server_Manager is the core of the Server part of this solution. It manages the TCP connection. When creating a new connection it is created first. I will call it Server Manager or maybe just the manager. Class C_TCP_Server_Sender is created by the manager to send data to the client. Just to remind the reader, my application need only send data to the client. It has no need to receive data. I will call this class Server Sender or just the sender.
When the Server has been started the dialog will look like this:
There is a button to start the Server and one to stop it. The Send One Burst button sends a short burst of payload packets. The various text fields are described starting on the left side. Port Number indicates the port number that the Server uses for its listen. It is controlled by a constant in the code. Pointer refers to the pointer to the object of C_Server_Manager. It will be Unknown or Valid. The Server has an FSM (Finite State Machine) to control its operations and Manager State shows the current state of that FSM. It was helpful for development to show the state of the Manager.
Below that are a series of text fields to show the number of times the On*() methods have been called. Those are described in the first two articles.
The class C_TCP_Server_Manager is created by the Server project dialog. It listens for the client to connect then creates class C_TCP_Server_Sender to continue the conversation with the client. The first two articles discuss that concept. Use the link at the top of this article to find those articles. This article skips all that theory and now we jump into the purpose of this third article, the additional behaviors needed to use class CAsyncSocket in a working project.
Getting started
After starting the Server application (project) the user clicks button Start TCP Server. This causes the server object to be created. Upon startup the Server Manager begins listening for the client to connect. This operation is independent of the main application. When the client connects the Server Manager creates the Server Sender. That pointer to the Sender must be given to the main app.
In this demonstration project the main application is the dialog itself. Look in Project_Server_Dlg.cpp to find method OnTimer(). Near the top is:
if( mp_C_TCP_Server_Sender == NULL && mp_C_TCP_Server_Manager != NULL )
{
mp_C_TCP_Server_Sender = mp_C_TCP_Server_Manager-> Get_Sender_Pointer();
m_send_data_status = READY_TO_SEND;
}
If the Sender pointer is null, the Manager is queried. When the Sender has been created, the pointer to the Sender is returned. After getting that pointer the main app can send data.
Client Has Closed Connection
The client can close the connection at any time. Look at the bottom of OnTimer() to find:
if( m_send_data_status == SENDER_READY_TO_EXIT )
{
  if( mp_C_TCP_Server_Sender != NULL )
  {
     m_send_data_status = SENDER_HAS_EXITED;
     delete mp_C_TCP_Server_Sender;
     mp_C_TCP_Server_Sender = NULL;
  }
}
When the Sender has returned the value SENDER_READY_TO_EXIT, the Sender is telling the main application that it must be deleted. The main application does so, and the pointer is set back to NULL again.
To see how that chain of events is initiated look in the Server Sender code and method OnClose().
CAsyncSocket::OnClose(nErrorCode);
m_tcp_state = SENDER_MUST_EXIT;
This simply sets the Sender’s internal state to indicate that it must exit. The next time method Class_Send() is called:
if( m_tcp_state == SENDER_MUST_EXIT )
return SENDER_READY_TO_EXIT;
It simply returns the appropriate value. This notifies the main app which then deletes the Sender. Note that there is an enumeration for the state of the Sender object:
enum C_TCP_TD_TCP_STATE
{
SEND_ENDIAN,
SEND_FRAME,
SEND_DATA,
SENDER_MUST_EXIT
};
And a separate enumeration for the values returned to the main application:
enum C_TCP_TD_SEND_STATUS
{
   READY_TO_SEND,
   SEND_OKAY,
   SEND_FAIL,
   SEND_BLOCKED,
   SENDER_READY_TO_EXIT,
   SENDER_HAS_EXITED,
   SENDER_NOT_READY,
   OTHER_ERROR
};
Think about those enumerations for a bit before continuing.
Client Sends To Server
At this point we have looked at the code needed for the main application to start the TCP Manager and for it to start the Sender object. The pointer to the Sender is passed up to the main application and the main app can start sending data. When the Client closes the connection, the Sender informs the main app which then deletes the Sender.
However, the Sender cannot detect that the client has closed the connection unless the Sender has posted a read on the socket. My application did not need to read data from the client, but for completeness a return path has been created. Not having an inherent need to send data from Client to Server I elected to provide the Client with a method of controlling the amount of data sent from Server to Client. The mechanism to initiate that transaction is discussed in the article about the Client. For now, we look at the receipt of that data in the main dialog and in method OnTimer().
if( mp_C_TCP_Server_Sender != NULL )
{
int received_count = 0;
received_count = mp_C_TCP_Server_Sender->Class_Receive(
&receive_packet.both.char_format[0],
C_IADS_SIZE_OF_PAYLOAD_PACKET );
if(received_count >= 0 )
{
unsigned int received_word = receive_packet.both.iads_format.header.packet_size;
if( received_count = C_IADS_ONE_PARAMETER_PACKET_SIZE )
{
int new_count = receive_packet.both.iads_format.body[0].value.ui;
if( new_count >= 0 && new_count < 100 )
{
m_packet_send_count = new_count;
}
}
memset( &receive_packet, 0, C_IADS_ONE_PARAMETER_PACKET_SIZE );
}
}
The main app asks the Sender for any received data from the client. When it does receive data, the received payload packet is validated by checking the size of the packet received. The value received is loaded in member variable m_packet_send_count. Look at the top of OnTimer() to see that this controls.
History
- March 2013, First version submitted.
- 26 May 2013, Updated zip file with reducde size, added common code, added link to programming tips.
This member has not yet provided a Biography. Assume it's interesting and varied, and probably something to do with programming.


 General
  News
News  Suggestion
  Question
  Bug
Bug  Answer
  Joke
Joke  Praise
  Rant
Rant  Admin
Admin 


