Introduction
ThinkUino (Thinking Arduino) is an open source project that allows to connect the Arduino board with Mindwave headset. The cognitive application opens new frontiers for control the electronic circuits through the reading of brainwaves. With this article I explain how to make a cognitive application for control a single LED light.
Background
Mindwave... what is it?
Mindwave is an innovative headset produced by Neurosky. Mindwave converts the brainwaves into digital electronic signals. There are two version of this device:
Mindwave... two versions, but which i should choose?
For the scope of this project the Mindwave Mobile is indispensable. That device supports the bluetooth connection, through the bluetooth connection it send the data in RAW mode to the connected devices. With the retrieved data we can parse the various frequency reading by the headset.
What do i need to implement this project?
The fundamental elements to create this project are:
- Mindwave Mobile Headset
- Arduino 2009 or higher
- Led
Using the code
Follow the below steps to create the architecture of this project.
Configure the Arduino board:
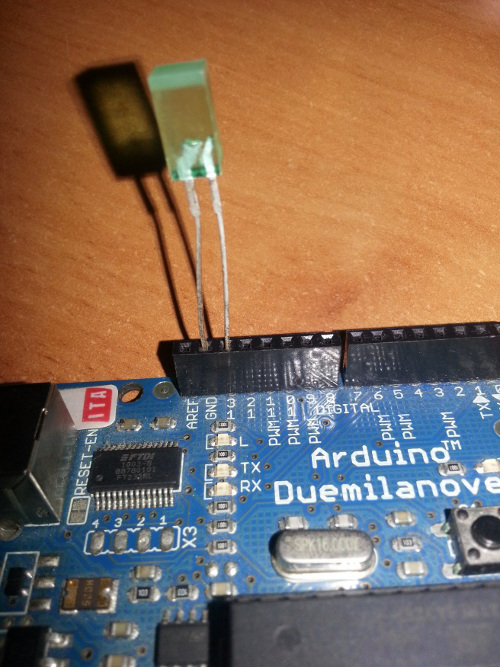
Connect the LED light on the board. Insert the anode in the thirteenth pin (called pin Led) and the cathode in the GND (ground) pin. See the picture below if you have doubts:
After that, connect the Arduino to USB port and upload this code:
int val;
void setup()
{
  Serial.begin(9600);
  pinMode(13,OUTPUT);
}

void loop()
{
  if(Serial.available()>0){
    val = Serial.read();
    if(val==1){
     digitalWrite(13,HIGH);
    }else{
      digitalWrite(13,LOW);
    }
}
As you can see, the code is so simply. The board read a single byte set the LED, then:
- byte is set to 0: set the pin led to LOW
- byte is set to 1: set the pin led to HIGH
Configure the Mindwave headset:
For first we must pairing the bluetooth headset to the computer. Follow this step for pairing the device:
- Set the headset in discoverable mode. Hold the button for three seconds. See the below image:

- Open the Bluetooth option on control panel and search all discoverable device, when the headset, named MindWave Mobile, if is on the list, add it.
Now.. let's analyze the code!
You can to download the source code from this article, see the attachments..
This project uses the ThinkGear.net library. This library retrieved the RAW data from the headset and parse it, than we can to access with simplicity to all frequency and states. The headset uses the eSense protocol. The eSense elaborates all frequency and returns two type of state, Attention and Meditation. We use the Attention variable to change the led's state.
See the comment in the code for understand it:
using System;
using System.Collections.Generic;
using System.ComponentModel;
using System.Data;
using System.Drawing;
using System.Linq;
using System.Text;
using System.Windows.Forms;
using ThinkGearNET;
using System.Threading;
using System.IO;
namespace ThinkUino
{
public partial class Form1 : Form
{
private ThinkGearWrapper thinkGearWrapper = new ThinkGearWrapper();
private bool comando = false;
private const string ARDUPORT = "COM5";
private const string MINDPORT = "COM7";
public Form1()
{
InitializeComponent();
}
private void btnHeadsetConnect_Click(object sender, EventArgs e)
{
if (thinkGearWrapper.Connect(MINDPORT, 57600, true))
{
btnHeadsetConnect.Enabled = false;
btnHeadsetDisconnect.Enabled = true;
txtHeadsetDebug.AppendText("Headset connected." + Environment.NewLine);
thinkGearWrapper.EnableBlinkDetection(true);
thinkGearWrapper.ThinkGearChanged += new EventHandler<ThinkGearChangedEventArgs>(
thinkGearWrapper_ThinkGearChanged);
}
else
txtHeadsetDebug.AppendText("Could not connect to headset" + Environment.NewLine);
}
void thinkGearWrapper_ThinkGearChanged(object sender, ThinkGearChangedEventArgs e)
{
BeginInvoke(new MethodInvoker(delegate
{
if ((thinkGearWrapper.ThinkGearState.BlinkStrength > 60) )
{
comando = !comando;
txtHeadsetDebug.AppendText("Command: " + Convert.ToByte(comando) + Environment.NewLine);
thinkGearWrapper.ThinkGearState.BlinkStrength = 0;
}
if (thinkGearWrapper.ThinkGearState.Attention > 60)
{
serialArduino.Write(new byte[] { Convert.ToByte(comando) }, 0, 1);
txtHeadsetDebug.AppendText("Command sendend: " + Convert.ToByte(comando) + Environment.NewLine);
txtArduinoDebug.AppendText("Command received: " +Convert.ToByte(comando));
thinkGearWrapper.ThinkGearState.Attention = 0;
}
lblAttention.Text = "Attention: " + thinkGearWrapper.ThinkGearState.Attention;
lblMeditation.Text = "Meditation: " + thinkGearWrapper.ThinkGearState.Meditation;
}));
Thread.Sleep(10);
}
private void btnHeadsetDisconnect_Click(object sender, EventArgs e)
{
thinkGearWrapper.Disconnect();
txtHeadsetDebug.AppendText("Disconnected." + Environment.NewLine);
btnHeadsetDisconnect.Enabled = false;
btnHeadsetConnect.Enabled = true;
}
private void bntArduinoConnect_Click(object sender, EventArgs e)
{
try
{
serialArduino.PortName = ARDUPORT;
serialArduino.Open();
txtArduinoDebug.AppendText("Arduino connected" + Environment.NewLine);
btnArduinoDisconnect.Enabled = true;
btnArduinoConnect.Enabled = false;
}
catch (IOException)
{
txtArduinoDebug.AppendText("Could not connect to Arduino" + Environment.NewLine);
}
}
private void btnArduinoDisconnect_Click(object sender, EventArgs e)
{
if (serialArduino.IsOpen)
{
serialArduino.Close();
txtArduinoDebug.AppendText("Disconnected." + Environment.NewLine);
btnArduinoConnect.Enabled = true;
btnArduinoDisconnect.Enabled = false;
}
}
}
}
The application has only one window:
To use correctly the application connect for first the devices, Mindwave and Arduino, than click on the both button on the window. Blink your eyes to change the led's state and erase from your mind all the think, except the LED!!
Bye!
Software developer with great passion for innovative technology. Open source application writer for disabilities person.(www.blesciasw.it)


 General
  News
News  Suggestion
  Question
  Bug
Bug  Answer
  Joke
Joke  Praise
  Rant
Rant  Admin
Admin 


 thank you so much in advance <3