Introduction
Implementing drag and drop can be done with procedural codes or without any procedural codes by attached property based library called attached behavior. Since setting properties is more easier than writing procedural codes, the latter is more easy to use. This is another attached behavior. The DragSource class provides attached properties for drag operation. Major differences of this class are as follows:
- It provides extensive attached properties that give you more control of drag operation.
- It provides auto generated drag image called visual feedback that is based on dragged element.
- It uses a window to show visual feedback. So it can be shown outside of host application.
This class is a part of the Nicenis project. You can find the latest information from the CodePlex project at https://nicenis.codeplex.com. If you just want a short version tutorial, you can skip this article and check this tip.
Basics
If you write procedural codes to make an element draggable, you have to handle an event such as PreviewMouseDown. Furthermore, you must track the mouse movement to see whether it is a drag gesture. If it is a drag gesture, you also have to call the following DragDrop.DoDragDrop method.
public static DragDropEffects DoDragDrop
(
DependencyObject dragSource,
Object data,
DragDropEffects allowedEffects
)
In most attached behaviors, these codes are packaged into a attached property changed callback. DragSource provides the AllowDrag attached property for this purpose. When AllowDrag is set to true, it attaches required event handlers.
static void AllowDragProperty_Changed(DependencyObject d, DependencyPropertyChangedEventArgs e)
{
UIElement target = d as UIElement;
target.PreviewMouseDown -= AllowDragProperty_PropertyHost_PreviewMouseDown;
if ((bool)e.NewValue)
target.PreviewMouseDown += AllowDragProperty_PropertyHost_PreviewMouseDown;
}
For required parameters of the DoDragDrop method, DragSource provides the Data and AllowedEffects attached properties. So you can make a draggable element like the following XAML without any procedural code.
<Window
x:Class="DragSourceSample.MainWindow"
xmlns="http://schemas.microsoft.com/winfx/2006/xaml/presentation"
xmlns:x="http://schemas.microsoft.com/winfx/2006/xaml"
xmlns:n="clr-namespace:Nicenis.Windows;assembly=Nicenis"
Title="MainWindow" Height="200" Width="200">
<Border
n:DragSource.AllowDrag="True"
n:DragSource.Data="Test Data"
n:DragSource.AllowedEffects="Copy"
Margin="30"
Background="Green"
/>
</Window>
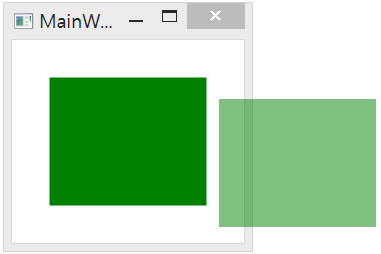
AllowedEffects is not a required property so you can omit it. It will look like this image if you drag the border.
Recognizing drag gesture
A drag operation is started by pressing an element and moving it. Pressing an element can be archived by various means such as mouse, touch, etc. It is important to control which can start drag operation. DragSource provides the AllowedInitiators attached property of which type is the DragInitiators enumeration.
[Flags]
public enum DragInitiators
{
MouseLeftButton = DragInitiator.MouseLeftButton,
MouseMiddleButton = DragInitiator.MouseMiddleButton,
MouseRightButton = DragInitiator.MouseRightButton,
MouseXButton1 = DragInitiator.MouseXButton1,
MouseXButton2 = DragInitiator.MouseXButton2,
Mouse = MouseLeftButton
| MouseMiddleButton
| MouseRightButton
| MouseXButton1
| MouseXButton2,
Default = MouseLeftButton,
All = Mouse,
}
Currently, the only supported device is mouse. The following XAML shows a rectangle that can be dragged by the right mouse button.
<Window
x:Class="DragSourceSample.MainWindow"
xmlns="http://schemas.microsoft.com/winfx/2006/xaml/presentation"
xmlns:x="http://schemas.microsoft.com/winfx/2006/xaml"
xmlns:n="clr-namespace:Nicenis.Windows;assembly=Nicenis"
Title="MainWindow" Height="200" Width="200">
<Border
n:DragSource.AllowDrag="True"
n:DragSource.Data="Test Data"
n:DragSource.AllowedEffects="Copy"
n:DragSource.AllowedInitiators="MouseRightButton"
Margin="30"
Background="Green"
/>
</Window>
When you start moving an element, it doesn't start a drag operation immediately. There are some movement thresholds which are set by the following attached properties.
- MinimumHorizontalDragDistance: The width of a rectangle centered on a drag point to allow for limited movement of the pointer before a drag operation begins.
- MinimumVerticalDragDistance: The height of a rectangle centered on a drag point to allow for limited movement of the pointer before a drag operation begins.
The following image shows how these values are applied.

If you drag the point out of the dotted rectangle, a drag operation is started. The following image shows a movement that starts a drag operation.
There are two relevant coordinates when you try to start a drag operation:
- ContactPosition: The first coordinate you were pressing.
- DraggedPosition: The coordinate you were dragging inside the rectangle before starting a drag operation.
These values are provided as read only attached properties. The ContactPosition is especially useful. By default, the position you clicked in dragged element is not preserved when it is dragged. You can set the ContactPosition to the following attached property to solve it.
- VisualFeedbackOffset: An offset that is pointed by a pointing device in the visual feedback.
The following XAML shows a rectangle that preserves the clicked position when it is dragged.
<Window
x:Class="DragSourceSample.MainWindow"
xmlns="http://schemas.microsoft.com/winfx/2006/xaml/presentation"
xmlns:x="http://schemas.microsoft.com/winfx/2006/xaml"
xmlns:n="clr-namespace:Nicenis.Windows;assembly=Nicenis"
Title="MainWindow" Height="200" Width="200">
<Border
n:DragSource.AllowDrag="True"
n:DragSource.Data="Test Data"
n:DragSource.AllowedEffects="Copy"
n:DragSource.VisualFeedbackOffset="{Binding (n:DragSource.ContactPosition), RelativeSource={RelativeSource Self}}"
Margin="30"
Background="Green"
/>
</Window>
To see whether it leaves the dotted rectangle, the movement must be monitored. In most cases, handling a move event such as PreviewMouseMove is enough. But if you try to drag near edge of an element, it will not work without capturing device.
Capturing device is not cheap. For example, only one element at a time can capture the mouse. So it is very likely to break other UI logic if a device is captured to monitor movement. DragSource does not capture any device. Instead, it uses a timer to check movement periodically. The timer is enabled when it leaves an element and disabled when it enters an element.
static void AllowDragProperty_PropertyHost_MouseLeave(object sender, MouseEventArgs e)
{
GetSafeContext(sender as UIElement).ProcessMoveForDragSensingTimer.Start();
}
static void AllowDragProperty_PropertyHost_MouseEnter(object sender, MouseEventArgs e)
{
GetSafeContext(sender as UIElement).ProcessMoveForDragSensingTimer.Stop();
}
The following is the timer used in DragSource. You can see it checks movement for every 100ms.
DispatcherTimer _processMoveForDragSensingTimer;

public DispatcherTimer ProcessMoveForDragSensingTimer
{
    get
    {
        if (_processMoveForDragSensingTimer == null)
        {
            _processMoveForDragSensingTimer = new DispatcherTimer();
            _processMoveForDragSensingTimer.Interval = TimeSpan.FromMilliseconds(100);
            _processMoveForDragSensingTimer.Tick += (_, __) => ProcessDragSensing(_target, Mouse.GetPosition(_target));
        }

        return _processMoveForDragSensingTimer;
    }
}
If a drag gesture is recognized, a drag operation is started and the following readonly attached property is set to true.
- IsDragging: Indicates whether the drag is in progress.
It can be used to show that a drag operation is started like the following:
<Window
x:Class="DragSourceSample.MainWindow"
xmlns="http://schemas.microsoft.com/winfx/2006/xaml/presentation"
xmlns:x="http://schemas.microsoft.com/winfx/2006/xaml"
xmlns:n="clr-namespace:Nicenis.Windows;assembly=Nicenis"
Title="MainWindow" Height="200" Width="200">
<Border
n:DragSource.AllowDrag="True"
n:DragSource.Data="Test Data"
n:DragSource.AllowedEffects="Copy"
n:DragSource.VisualFeedbackOffset="{Binding (n:DragSource.ContactPosition), RelativeSource={RelativeSource Self}}"
Margin="30"
>
<Border.Style>
<Style TargetType="Border">
<Style.Triggers>
<Trigger Property="n:DragSource.IsDragging" Value="True">
<Setter Property="Background" Value="Red" />
</Trigger>
</Style.Triggers>
<Setter Property="Background" Value="Green" />
</Style>
</Border.Style>
</Border>
</Window>
Visual feedback
By default, DragSource shows a generated visual feedback while you are dragging an element. The generated visual feedback is created by using the VisualBrush. The following is the method used in DragSource. It returns a rectangle of which Fill is set to a VisualBrush of a dragged element.
private static FrameworkElement CreateGeneratedContent(UIElement dragSource)
{
if (dragSource == null)
return null;
Rectangle rectangle = new Rectangle()
{
StrokeThickness = 0d,
Fill = new VisualBrush(dragSource),
HorizontalAlignment = HorizontalAlignment.Left,
VerticalAlignment = VerticalAlignment.Top,
};
Binding widthBinding = new Binding("ActualWidth");
widthBinding.Source = dragSource;
rectangle.SetBinding(Rectangle.WidthProperty, widthBinding);
Binding heightBinding = new Binding("ActualHeight");
heightBinding.Source = dragSource;
rectangle.SetBinding(Rectangle.HeightProperty, heightBinding);
return rectangle;
}
The two bindings in the above method are used to size the visual feedback properly. If you need to change the visual feedback size, you can use the following attached properties.
- VisualFeedbackWidth: The width of the visual feedback.
- VisualFeedbackHeight: The height of the visual feedback.
- VisualFeedbackMinWidth: The minimum width of the visual feedback.
- VisualFeedbackMinHeight: The minimum height of the visual feedback.
- VisualFeedbackMaxWidth: The maximum width of the visual feedback.
- VisualFeedbackMaxHeight: The maximum height of the visual feedback.
If you want to customize the visual feedback, you can use the following attached property.
- VisualFeedback: An object that is set to the content of the visual feedback.
The following XAML uses an ellipse as a custom visual feedback.
<Window
x:Class="DragSourceSample.MainWindow"
xmlns="http://schemas.microsoft.com/winfx/2006/xaml/presentation"
xmlns:x="http://schemas.microsoft.com/winfx/2006/xaml"
xmlns:n="clr-namespace:Nicenis.Windows;assembly=Nicenis"
Title="MainWindow" Height="200" Width="200"
>
<Border
n:DragSource.AllowDrag="True"
n:DragSource.Data="Test Data"
n:DragSource.VisualFeedbackOffset="70 70"
Margin="30"
Background="Green"
>
<n:DragSource.VisualFeedback>
<Ellipse Fill="Red" Width="140" Height="140" />
</n:DragSource.VisualFeedback>
</Border>
</Window>
It will look like the following if you drag the border.
Visual feedback inherits data context from dragged element by default. You can override it with the following attached property.
- VisualFeedbackDataContext: An object that is set to the data context of the visual feedback.
This XAML uses a custom data context for visual feedback.
<Window
x:Class="DragSourceSample.MainWindow"
xmlns="http://schemas.microsoft.com/winfx/2006/xaml/presentation"
xmlns:x="http://schemas.microsoft.com/winfx/2006/xaml"
xmlns:sys="clr-namespace:System;assembly=mscorlib"
xmlns:n="clr-namespace:Nicenis.Windows;assembly=Nicenis"
Title="MainWindow" Height="200" Width="200"
>
<Border
n:DragSource.AllowDrag="True"
n:DragSource.Data="Test Data"
n:DragSource.VisualFeedbackOffset="0 0"
n:DragSource.VisualFeedbackDataContext="Custom data context"
Margin="30"
Background="Green"
>
<n:DragSource.VisualFeedback>
<TextBlock Text="{Binding}" />
</n:DragSource.VisualFeedback>
</Border>
</Window>
It is possible to apply a data template to visual feedback by using the following attached properties.
- VisualFeedbackTemplate: A data template for the content of the visual drag feedback.
- VisualFeedbackTemplateSelector: A template selector for the content of the visual drag feedback.
This XAML uses a custom data template for visual feedback.
<Window
x:Class="DragSourceSample.MainWindow"
xmlns="http://schemas.microsoft.com/winfx/2006/xaml/presentation"
xmlns:x="http://schemas.microsoft.com/winfx/2006/xaml"
xmlns:sys="clr-namespace:System;assembly=mscorlib"
xmlns:n="clr-namespace:Nicenis.Windows;assembly=Nicenis"
Title="MainWindow" Height="200" Width="200"
>
<Border
n:DragSource.AllowDrag="True"
n:DragSource.Data="Test Data"
n:DragSource.VisualFeedbackOffset="0 0"
n:DragSource.VisualFeedback="Custom data template"
Margin="30"
Background="Green"
>
<n:DragSource.VisualFeedbackTemplate>
<DataTemplate>
<TextBlock Text="{Binding}" />
</DataTemplate>
</n:DragSource.VisualFeedbackTemplate>
</Border>
</Window>
Visual feedback is hosted in a window. The host window must be transparent to any input. If you try to set the IsHitTestVisible property of the Window class to false, you may know it does not work. The only way is to use the SetWindowLong function with the WS_EX_TRANSPARENT extended window style by P/Invoke. This is the codes exceprted from DragSource. It creates a host window for visual feedback.
Window hostWindow = new Window()
{
ShowInTaskbar = false,
Topmost = true,
IsHitTestVisible = false,
AllowsTransparency = true,
WindowStyle = WindowStyle.None,
Background = Brushes.Transparent,
SizeToContent = SizeToContent.WidthAndHeight,
WindowStartupLocation = WindowStartupLocation.Manual,
};
hostWindow.SourceInitialized += (_, __) =>
{
IntPtr hWnd = new WindowInteropHelper(hostWindow).Handle;
IntPtr windowLongPtr = Win32.GetWindowLong(hWnd, Win32.GWL_EXSTYLE);
if (windowLongPtr == IntPtr.Zero)
{
Trace.WriteLine("DragSource: GetWindowLongPtr has failed. Error code " + Marshal.GetLastWin32Error());
return;
}
if (IntPtr.Size == 4)
windowLongPtr = (IntPtr)(windowLongPtr.ToInt32() | Win32.WS_EX_TRANSPARENT);
else
windowLongPtr = (IntPtr)(windowLongPtr.ToInt64() | Win32.WS_EX_TRANSPARENT);
Win32.SetLastError(0);
if (Win32.SetWindowLong(hWnd, Win32.GWL_EXSTYLE, windowLongPtr) == IntPtr.Zero)
{
int lastWin32Error = Marshal.GetLastWin32Error();
if (lastWin32Error != 0)
{
Trace.WriteLine("DragSource: SetWindowLong has failed. Error code " + lastWin32Error);
return;
}
}
};
Moving host window to follow the mouse cursor is another issue in WPF. The Mouse.GetPosition method can not be used because drag-and-drop operation is in progress. According to the MSDN, the GetCursorPos function must be used by P/Invoke.
BOOL WINAPI GetCursorPos
(
_Out_ LPPOINT lpPoint
);
It returns a native coordinate that must be converted into a device independent coordinate. The PresentationSource class provides a Matrix for this purpose. The following is the method excerpted from DragSource. It returns a Matrix for the conversion.
private static Matrix GetTransformFromDevice(Window window)
{
Debug.Assert(window != null);
PresentationSource windowPresentationSource = PresentationSource.FromVisual(window);
if (windowPresentationSource == null)
{
Trace.WriteLine("PresentationSource.FromVisual has failed in DragSource.");
return Matrix.Identity;
}
return windowPresentationSource.CompositionTarget.TransformFromDevice;
}
This is the method used in DragSource to position host window.
private void UpdateHostWindowLocation(Point offset)
{
Win32.POINT cursorPosition;
if (Win32.GetCursorPos(out cursorPosition) == 0)
{
Trace.WriteLine("DragSource: GetCursorPos has failed. Error code " + Marshal.GetLastWin32Error());
return;
}
Point windowPosition = GetTransformFromDevice(HostWindow).Transform(new Point(cursorPosition.x, cursorPosition.y));
windowPosition.X = windowPosition.X - offset.X;
windowPosition.Y = windowPosition.Y - offset.Y;
HostWindow.Left = windowPosition.X;
HostWindow.Top = windowPosition.Y;
}
Lazy data object creation
When you create a data object for a drag operation, you should consider all possible consumers. In most cases, it is expensive to support various data formats. It will be more worse if you have many draggable items. So you should avoid creating it in early stage. The IDataObjectProvider interface is provided for this purpose.
namespace Nicenis.Windows
{
public interface IDataObjectProvider
{
object GetDataObject();
}
}
If you implement it and set the implementation to the Data attached property, the GetDataObject method is called right before a drag operation is started. This is a sample data context that implements IDataObjectProvider.
public class SampleDataContext : IDataObjectProvider
{
    public object GetDataObject()
    {
        return "Test Data";
    }
}
The following shows how to bind it to the Data attached property.
public partial class MainWindow : Window
{
public MainWindow()
{
InitializeComponent();
DataContext = new SampleDataContext();
}
}
<Window
x:Class="DragSourceSample.MainWindow"
xmlns="http://schemas.microsoft.com/winfx/2006/xaml/presentation"
xmlns:x="http://schemas.microsoft.com/winfx/2006/xaml"
xmlns:n="clr-namespace:Nicenis.Windows;assembly=Nicenis"
Title="MainWindow" Height="200" Width="200">
<Border
n:DragSource.AllowDrag="True"
n:DragSource.Data="{Binding}"
n:DragSource.VisualFeedbackOffset="{Binding (n:DragSource.ContactPosition), RelativeSource={RelativeSource Self}}"
Margin="30"
Background="Green"
/>
</Window>
Events
DragSouce raises several routed events with preview events during drag operation. The first is the DragSensing event. It is raised when user starts some action that can initiate a drag operation.
- DragSensing: The routed event that is raised when drag gesture recognition is in progress.
It is a cancelable event. If you set the Cancel property of the event arguments to true, it prevents drag operation.
private void Border_DragSensing(object sender, DragSourceDragSensingEventArgs e)
{
e.Cancel = true;
}
When a drag gesture is recognized, a Dragging event is raised before starting a drag operation.
- Dragging: The routed event that is raised when a dragging is about to start.
It is also a cancelable event like DragSensing. The event arguments provides various properties that are similar to DragSource's attached properties. So you can use it to override most values set by DragSource's attached properties. It allows you to create a data object in a Dragging event handler instead of XAML.
private void Border_Dragging(object sender, DragSourceDraggingEventArgs e)
{
e.Data = "The Data";
}
If a drag operation is started, GiveFeedback and QueryContinueDrag event are raised periodically.
- GiveFeedback: The routed event that is raised when the DragDrop.GiveFeedback event is raised.
- QueryContinueDrag: The routed event that is raised that is raised when the DragDrop.QueryContinueDrag event is raised.
As you can see in the above description, these events are just wrapper events. It just provides additional properties related to DragSource. The following updates VisualFeedback to show the current time.
private void Border_GiveFeedback(object sender, DragSourceGiveFeedbackEventArgs e)
{
e.VisualFeedback = DateTime.Now.ToString();
}
When a drag operation is over, a Dragged event is raised.
- Dragged: The routed event that is raised when a drag-and-drop operation is finished.
You can use the FinalEffects property of the event arguments to check how a drag operation is finished.
private void Border_Dragged(object sender, DragSourceDraggedEventArgs e)
{
if (e.FinalEffects == DragDropEffects.Copy)
{
}
if (e.FinalEffects == DragDropEffects.Move)
{
}
}
History
- 25th August, 2015
- DragSource.Dropped is renamed DragSource.Dragged.
- DragSource.PreviewDropped is renamed DragSource.PreviewDragged.
- 15th September, 2013
This member has not yet provided a Biography. Assume it's interesting and varied, and probably something to do with programming.


 General
  News
News  Suggestion
  Question
  Bug
Bug  Answer
  Joke
Joke  Praise
  Rant
Rant  Admin
Admin 


