Introduction
In this article we are going to learn how to use Python inside Programming Without Coding Technology (PWCT) environment through PythonPWCT.
Python is a free open source general purpose scripting language (known and widely used by many programmers and software developers). Python is a text based programming language where the programmer type text based instructions using the language syntax to determine the function of the program and get the required results. Python is known as easy to learn scripting language with powerful features like Multi-paradigm (Imperative, Object-Oriented, Functional, etc), rich standard library and extension system using the C programming language.
There are many tools and libraries for Python that can be used based on the application domain to get the task done in short time, for example we can use a GUI framework like wxPython, PyQt, PySide or PyGTK to create rich GUI applications, We can use a web framework like Django, TurboGears, Zope2, or web2py to create web applications. What ever the domain you may find python frameworks to help you in your task.
Programming Without Coding Technology is a free open source general purpose visual programming system. Inside PWCT we can create programs using visual programming without typing text based source code. This seems to be an attractive feature for novice programmers, but PWCT is designed to take in mind some of the expert programmer needs (Productivity and Customization). When we create applications using PWCT we can see/edit the generated source code (optional). PWCT system contains more than one visual programming language (HarbourPWCT, PythonPWCT, C#PWCT, SupernovaPWCT & CPWCT). from the name of the visual language we can guess the text based language that are used in the code generation process. PythonPWCT is a visual programming language that generate the source code in the Python programming language.
We will learn how to create our first application using PythonPWCT, how to see/edit the generated source code and how to play with the environment to get more productivity and get advantages from customization.
Background
You can get a quick background about PWCT from this article.
Using the code
The next code is a very simple program written in Python. The first line print "Hello World" message on the screen, then we have a For loop start from 0 to 9 using range(10), inside this loop we print the loop variable (x) and before printing the variable value we check if the variable value equal three, if this happens (must happen)
we print the message "this is number three".
print "Hello World"
for x in range ( 10 ):
   if x == 3 :
      print "This is number three"
   print x
The program is just a test for the print command, for loop and if statement. This program is text based (As we said before Python is a text based programming language).
Using PythonPWCT, the program representation (after create it using visual programming step by step) will be as in the next figure
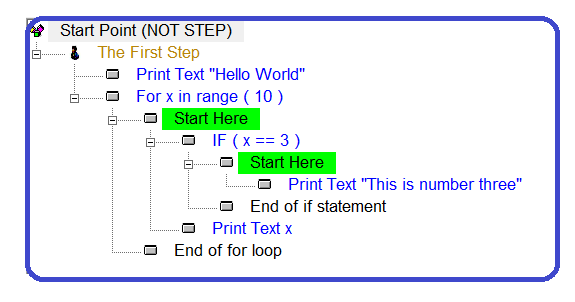
We see that inside the PWCT visual programming environment, the program representation is done using a tree of steps, each node inside this tree have properties (Type, Text & Color).
When we write Python code directly, we have only the Text and this text must follow the Python Syntax rules but using the steps tree, the visual representation is a layer between the programmer and the text based code. this layer gives as the ability to customize the program representation without restriction from the Python language syntax. We have the freedom to change the step text, we can write it using a natural language (English, French, Arabic etc). we can keep it very short or too long or something in the middle based on what we prefer, we can change the order and put keywords first or the data first.
You will see that the steps tree contains steps like (End of if statement) and (End of for loop) and we know that the Python language don't use keywords to end a block. Using the steps tree we can get this feature, also we can avoid it and remove these steps. This decision is left for the programmer.
One of the ideas behind PWCT is to let the programmer control the process, the programmer decide how the program representation looks, select the keywords that will be used to create the program, control the generated source code, work with a team on the same project where each programmer see the program in his own language without confusing other programmers.
Now we will create this program step by step to see how we can do this at the practical side
[1] Download PWCT, we will work using PWCT 1.9 (Art) Rev. 2013.10.15 , you don't need to have Python, PWCT comes with Python 2.7
PWCT is a MS-Windows product, when you download the software you can install it using the Setup program, you can determine the path of the installation, the default path is C:\PWCT19
After installing PWCT, you will find Python in
C:\PWCT19\SSBUILS\Python27, but we will not use Python directly, we will work through PWCT environment.
[2] After installing PWCT, we will get the environment shortcut, use it to run the PWCT environment

[3] The PWCT environment looks as in the next figure, the default visual programming language is HarbourPWCT, this visual language generate the source code in the Harbour programming language, we will switch to PythonPWCT to generate the source code in the Python programming language.
To change the active visual programming language, from the toolbar we have a combobox where we can select the visual language. When you install PWCT you will find HarbourPWCT, CPWCT, C#PWCT, PythonPWCT, and SupernovaPWCT (WebPWCT still under development ).
[4] When we select PythonPWCT, we can start developing our application, from the file menu select new, then select the template "PWCT Application - Main Goal" then determine the project file name, for example ( Lesson1.ssf ) and you can put the project file in a folder to see the project files in one place.
In the start, when we create Lesson1.ssf we will have two files inside the application folder (Lesson1.ssf
and Lesson1.fpt) these files will be used for storing information about the visual source of the program
When we run the program we will get Lesson1.py (the Python program file).
Inside PWCT environment, the default active window is the "Goal Designer" window, inside the visual programming world of PWCT, you can
consider the Goal Designer as the tool that will replace your code editor when you write the code directly. You can call the Goal Designer as the Visual Editor of the program.
This visual editor can work in two modes, The first mode is "Syntax Directed Editor" mode, where you create the program and the editor put restrictions
about what you can do to avoid the errors (Syntax Errors, here in visual programming a syntax error is an error that happens when you put a component in an incorrect location). The second mode is "Free Editor + VPL Compiler" where the Syntax Directed Editor is off and you have the freedom to make errors then you can use the VPL (Visual Programming Language) compiler to discover these errors. The default mode is the first mode "Syntax Directed Editor is ON".
[5] The active step in the step tree is called "The First Step", the step type is a comment, we have two types of steps inside the step tree, the first is a comment and the other step is instruction where each step of type instruction hide a block of the generated code.
The step text "The First Step" can be changed by the programmer using the edit button.
[6] Now we will go forward towards creating our program, at first we want to print "Hello World" message on the screen, to do this we will generate a new step inside the step tree.
The process of adding new generated steps in the steps tree is called "Interaction", to start new interaction process, we click on the interact button, or we can press CTRL+T
Another method instead of clicking on the button or pressing CTRL+T we can start the interaction process by typing the required component name. for example we want to generate a step that print text on the screen. the component that can be used to do this is called "Print Text", we can start the interaction processing by typing the first letter in the component name, in this situation the first letter is "P" so we can just press "P".
[7] When we start new interaction process, we get the components browser window. You can consider the components browser as a "Toolbox". We have the Domain Tree and each item in the Domain Tree contains list of components. We can explore the components using the mouse and we can quickly select a component using the keyboard through the interactive search process.
Now we have the domain "Console" and we are going to use the component "Print Text in New Line".
When we select a component we can click Ok to use it, or we can press "ENTER"
We can press "ESC" or click on Cancel to end the interaction process without doing anything.
[8] When we select a component using the components browser, we will get the "Interaction Using Transporter" window. this window is a date-entry form where we enter the data to the component. the name "Transporter" is just another name replacement for "component" inside PWCT. this name comes because the component get data from the programmer then transport this data two times, one time for the visual representation of the program "steps tree" and another time for the generated source code.
In the interaction page we will type the text "Hello World" then we can click on the Ok button or we can press CTRL+W.
We can use the same component more than one time by clicking on the Again button or by pressing CTRL+A.
This component is very simple, the component do one function (print text) and contains one interaction page, other components may do more than one function and may contails more than one interaction page.
[9] When we enter the required data to the component then click on OK, we come back to the Goal Designer window, but this time we see a new step is generated in the steps tree
To run the program use the button "!" from the toolbar or press CTRL+R
To see the generated source code after running the program, see the file
Lesson1.py in the application folder.
To see the generated source code behind a step, select the step then click on the "Step Code" button
[10] Now we will continue creating our program, select the first step then start new interaction process, at this time we will select the "For Loop" component.
In the interaction page, we will see that the component contains default values, these values are the values that we need in our program so we will not change anything
We will get the next steps tree, and the active step will be the step "Start Here", from this step we can start new interaction process.
[11] We will use the "IF Statement" component to check the for loop variable value.
The if statement component will ask us to enter the conditon, we wil type x==3
After using the IF Statement component, we will get the next steps tree
[12] We can use the component "Print Text" from the step "Start Here" inside the IF Step and from the Step "Start Here" inside the For step to get the final steps tree of our program
Now we can run the program (CTRL+R) and we can look at the generated source code (Lesson1.py)
The next figure is a screen shot for the program during the runtime.
In the next figure we see the file Lesson1.py opened using Python IDE.
Now we will create another application, this time we will create a GUI application
At first we will create new project (Lesson2.SSF)
From the first step we will start new interaction process, select the domain "Window" then the component "Window", we can do this quickly by typing "w" from the steps tree.
When we use the window component, we will get the next interaction page, enter the window title "PythonPWCT" then press CTRL+W
In this interaction page we see more options, we can determine the window properties, window name and window type.
We can select the window type from the listbox
After entering the data to the component, we get the next steps tree
We can open the Form Designer, using the form designer button or by pressinf CRTL+F
Using the form designer window we can quickly design the user interface
We can add new controls, select one or more of controls, set the position, font and colors
To add new controls to the window, you can add it using interaction process from the steps tree or using "Add control" button from the form designer.
To change the backcolor of the window, you can use the "Back color" button.
We will add a Label control to our window, then we will set the font size of this control using the Font dialog
From the interaction page, set the label caption to "Welcome"
After adding the label control to the window, click on the Font button to set the font size
We will add a button to our window, when the user click on this button, the application will be closed.
We will set the checkbox Comman status to be True (ON) and we will type the command function to be master.quit
Using the form designer we will set the position of the label and the button. we will set the label color and the button color and backcolor
The next figure presents the final steps tree of our program
We can press CTRL+R to run the program, and we can see the generated source code in the file Lesson2.py
The next figure is a screen shot for the application during the runtime.
The next figure is a screen shot for the generated source code (Lesson2.py) opened using Python IDE
Points of Interest
We learned how to see the generated source code (written in Python) behind the program or behind one step, you will notice that when you see the generated code behind a step that the generated code is read only (you can't modify it). this is just be cause the Syntax Directed Editor is ON, if you want to modify the generated code just set the Syntax Direct Editor OFF and you can do that but this is not a good practice unless you want to do quick
something for test.
When you create a step as comment, you can (if you want) add a block of code behind this step.
The advantage from using PWCT environment is Productivity and Customization, you can work faster using the keyboard
shortcuts and you can use the mouse to explore the environment when you forget
something, and you can use customization to set the environment options that let you be more productive.
In this section of our article
I will talk about some of PWCT features that let you customize the environment:
- You can change the component name
To change a component name, from the menubar select "Domain Tree" then "Reinstall component"
You will get the next window
from the "Reinstall component" window, you can select any component and change the component name in the domain tree.
Using this feature you can rename components names then you can quickly find these components using the components browser by typing the component name in the search line.
- You can change the generated steps names and the generated source code
When you reinstall a component, you can open this component by clicking on the button "Open"
This will move you to the transporter designer window. inside this window the component is created and can be
modified.
From the transporter designer, you will see the interaction pages that are used by the component.
You can open the interaction page using the interaction designer, you can modify the data-entry forms.
You can set the default values, resize controls and set colors.
Using the transporter designer, in the Code Mask section, you can modify the script that controls the steps generation process and the code generation process
PWCT environment contains a scripting language (domain-specific) for writing the code mask script. this language contains simple commands that can be use to control the process of generating steps and code.
- You can select steps colors, Show/Hide steps based on what you are doing.
From the goal designer window, you can click on the Steps Colors button to get a window to select the steps colors
An important feature in this window is that you can hide some steps based on the step type, for example you can hide steps of type Generated (Leaf), you can do this by selecting "Read Mode" from the styles or by setting the font color as the back color to the White color.
Doing this with PythonPWCT will hide steps like (End of IF Statement) and (End of For Loop)
When we apply this feature to the first application created in this article, we will get the next steps tree
- The Time Dimension
One of the advantages of PWCT environment is that you can use the time dimension. In the Goal Designer environment you have the time slider where you can move along the application
construction process, move to a point in the past then you can run the program at this point
Also you can play the program as movie (step by step) to learn how to create the program.
During playing the program as movie you can ask PWCT to document the program, this way the documentation of PWCT samples is generated and
available online (documentation is written by PWCT).
For more information about this point, you can read this article.
History
PWCT started as a research project in Dec. 2005, the first version released in 2008, the latest release released in 2013. Unlike many visual programming languages
that are developed for novice programmers, PWCT is designed for novice and expert programmer who is looking for productivity and customization.
As any programming tool you need to try PWCT then decide for yourself if it is useful or not. I hope that some Python programmers will find that PythonPWCT
is useful for them and they will like this article as an introduction to PythonPWCT.
This member has not yet provided a Biography. Assume it's interesting and varied, and probably something to do with programming.


