Introduction
Welcome to Part 3 in my series on learning JavaScript. In this article, I'm going to show you how to implement the Langton's Ant simulation in JavaScript. I'm also going to use the framework AngularJS to help with the client side logic. You can take a look at the finished result here.
I'm also going to introduce Bower for handling client side components.
The Learn JavaScript Series
This is part three of my Learn JavaScript series:
The series is all about learning JavaScript and the HTML5 tech stack with hands on projects.
What is Langton's Ant?
Langton's Ant is a simple mathematical simulation, it's a little bit like Conway's Game of Life. Basically, we imagine an infinite two dimensional plane of squares, all of them white. The ant sits on the square in the middle. Every time we advance the simulation, we move the ant forward. If the ant leaves a white tile, it turns left, if it leaves a black tile, it turns right. When it leaves the tile, it toggles it between black and white.
We can extend the simulation by including more states for tiles.
What's interesting about this simulation? Well, it's really the behaviour of the universe we find interesting. It only has three rules, but shows quite complex behaviour. For the first few hundred moves, we see what looks to be like a pattern, there appears to be symmetry and order. After a little while, the system becomes chaotic - the ant is wandering with seemingly no order, disturbing the earlier made patterns. After about 11000 moves, the final state of the behaviour is seen - emergent order. From the chaos before, the ant builds a pattern that repeats and slowly moves in one direction. This is called the highway.
It is not known whether all initial configurations produce a highway. What is fascinating is that we know the 'theory of everything' for this universe, but there is still much we don't know - do all configurations lead to a highway? Knowing all of the rules of a system is not enough to understand it.
Part 1 - Getting Started
The first thing we will do is put together the structure of our application. We'll have a file and folder structure like this:
-langtonsant/
  -client/
    -index.htm
    -js/
      -langtonsant.js
The index.html file will contain the presentation of the simulation and its controls - langtonsant.js will contain a class that represents the simulation and offers functionality to start/stop it, etc.
What else are we going to need? Well, we're going to use two third party libraries.
Bootstrap is one of the most popular packages for web development. At its core, it is a set of CSS styles that greatly clean up 'standard' HTML, by using cleaner fonts, better paragraph spacings, better link styles and so on. It then adds on this by giving a large set of UI components you can drop into HTML, such as tabs and carousels. I wrote an article called Create Clean Webpages with Twitter Bootstrap if you want to read more.
We'll use Bootstrap for the clean styling of text and form controls, as well as the 'accordion' component that shows an item that can be dropped down to show more UI.
AngularJS is a framework for building HTML/JS applications on the client. It supports data binding and so on, meaning that you can change the state of a JavaScript object and the UI updates accordingly.
AngularJS is a big topic, we'll be using only a few of its features. I have an entire series on AngularJS on my website, Practical AngularJS - I'd recommend the Introduction to AngularJS if you've not heard of it.
Part 2 - Installing Client Side Components with Bower
We're going to use Bower to install Angular and Bootstrap for us. What is Bower? Bower is a package manager for the web - it's like Nuget if you use C#, Gem if you use Ruby, Pip if you use Python, etc.
To install Bower, make sure you have NodeJS installed. If you've not used or heard of NodeJS before, don't worry - for the purposes of what we're doing, it's just going to offer a way to install Bower. I'm planning a big series on Node as well.
Now install Bower as a global NodeJS package with the following command line command:
npm install -g bower
The '-g' flag indicates that this package should be installed globally - we want to use bower from any location.
Now comes to the cool bit. Navigate to the 'client' folder in langtonsant and run the following commands:
bower init
bower install angular#1.2.x --save
bower install bootstrap#3.0.x --save
When we use 'bower install', we install the package that follows into the current directory. Bower creates a 'bower_components' folder and drops the required files in there. We can use a hash after the package name to use a specific version - in this case, I know I want Angular 1.2 and Bootstrap 3.0, and I'm happy to take bugfixes and minor non breaking updates (that's why I use 'x' at the end) but don't want any larger updates.
Including the '--save' flag in the command means bower creates a bower.json file in the folder that lists the packages I've installed, this means the next person to use the code can just use:
bower install
And Angular and Bootstrap will be installed, because they're in the bower.json file. Easy!
Because we've installed the packages, we can now reference them in our index.html file:
<!DOCTYPE html>
<html >
<head>
<title>Langton's Ant</title>
<link rel="stylesheet" type="text/css"
href="bower_components/bootstrap/dist/css/bootstrap.min.css">
<script src="bower_components/angular/angular.min.js"></script>
</head>
<body>
<!--
<script src="bower_components/jquery/jquery.min.js"></script>
<script src="bower_components/bootstrap/dist/js/bootstrap.min.js"></script>
</body>
</html>
We know all of our third party stuff lives in the bower_components folder, nice and separate from our own code.
Part 2 - Creating the Simulation
We need an object that will represent the simulation. Now in the last two articles, we've gone into quite a bit of detail on creating objects in JavaScript, so for this section, I'm going to go very quickly - we're not going to dissect every part of the simulation. I'll show the code and highlight key points, but then we'll move onto what's new for this part of the series.
Let's start by creating the langtonsant.js file and making a class:
function LangtonsAnt() {
this.antPosition = {x: 0, y: 0};
this.antDirection = 0;
this.tiles = [];
this.states = [];
this.bounds = {
xMin: 0,
xMax: 0,
yMin: 0,
yMax: 0
};
this.ticks = 0;
this.offsetX = 0;
this.offsetY = 0;
this.zoomFactor = 1.0;
This defines the LangtonsAnt class and the state it will have. We'll need the position of the ant, the direction of the ant, an array of tiles and the bounds of the system.
Why do we have the bounds and an array of tiles? Well, we don't want to limit the system to a certain size, so what we'll do is assume the universe is infinite, and we get the state of any tile, it's white. As we change the state of tiles, we'll save it in the 'tiles' array. This means that the tiles array is sparse - if we have a universe that is 100x100 tiles, we don't need 10000 tiles, we only need tiles that have a non-default state.
What do we store in a tile? Just the index of the state. Each tile can have two states, white or black, but we can have more complex simulations with more tile states, in this case, the index is just larger. This lets us define the next function, which initialises the universe.
this.initialise = function (configuration) {
this.antPosition = {
x: 0,
y: 0
};
this.antDirection = 0;
this.tiles = [];
this.bounds = {
xMin: 0,
xMax: 0,
yMin: 0,
yMax: 0
};
this.states = [];
this.offsetX = 0;
this.offsetY = 0;
if(configuration.states !== undefined) {
this.states = configuration.states;
} else {
this.states = [
{direction: 'L', colour: '#FFFFFF'},
{direction: 'R', colour: '#000000'}
];
}
};
Initialising the universe must reset all of the values, as we might call it on a universe we've already created. If we pass a states array, we use it, otherwise we create a default array of states - one white tile (where we turn left) one black tile (where we turn right).
From here, it's trivial to define helper functions that get a tile state index or a tile state:
this.getTileStateIndex = function(x, y) {
if(this.tiles[x] === undefined) {
this.tiles[x] = [];
}
var stateIndex = this.tiles[x][y];
return stateIndex === undefined ? 0 : stateIndex;
};
this.getTileState = function(x, y) {
return this.states[this.getTileStateIndex(x, y)];
};
So far so good - now we can use helpers to set a tile state.
this.setTileStateIndex = function(x, y, stateIndex) {
if(this.tiles[x] === undefined) {
this.tiles[x] = [];
}
this.tiles[x][y] = stateIndex;
if(x < this.bounds.xMin) {this.bounds.xMin = x;}
if(x > this.bounds.xMax) {this.bounds.xMax = x;}
if(y < this.bounds.yMin) {this.bounds.yMin = y;}
if(y > this.bounds.yMax) {this.bounds.yMax = y;}
};
Next, we can write a helper to advance a tile to the next state, going back to the first if we've rolled over each state.
this.advanceTile = function(x, y) {
var stateIndex = this.getTileStateIndex(x, y)+1;
stateIndex %= this.states.length;
this.setTileStateIndex(x, y, stateIndex);
};
The next function moves the simulation forwards one step. We get the tile state, change direction based on the state, move the ant and then advance the tile.
this.stepForwards = function() {
var state = this.getTileState(this.antPosition.x, this.antPosition.y);
if(state.direction === 'L') {
this.antDirection -= 90;
} else if(state.direction === 'R') {
this.antDirection += 90;
}
this.antDirection %= 360;
if(this.antDirection === 0) {
this.antPosition.y++;
} else if (this.antDirection === 90 || this.antDirection === -270) {
this.antPosition.x++;
} else if (this.antDirection === 180 || this.antDirection === -180) {
this.antPosition.y--;
}
else {
this.antPosition.x--;
}
this.advanceTile(this.antPosition.x, this.antPosition.y);
this.ticks++;
};
The last function renders the simulation to a canvas. I won't include it here as it's rather long, but you can see the code if you want to check it here. This code is not particularly helpful to the article as we've already gone over canvas drawing in the last two articles.
We've now created the simulation. The next step is to create a controller the user interface can use to control the simulation.
Part 3 - Creating a Controller
A controller is an object AngularJS builds to create and manipulate state in the scope. The scope is a data context for binding operations in the view. Controllers contain fields, which the view binds to, and functions, which the view also binds to. This lets us write HTML to write up UI elements to data or UI elements to activate functionality.
We'll need two new files - app.js and controllers.js. App.js will be the main angular app and will depend on the controllers. The controllers.js file will define the main controller for the app.
Let's start with app.js:
var app = angular.module('langtonsant',
['langtonsant.controllers',
'langtonsant.directives']);
Angular uses a module system to allow us to split up the app. We've defined 'langtonsant' as the main module, and said that it depends on the 'langtonsant.controllers' module, as well as the 'langtonsant.directives' module, which we'll see later. Now let's write a controller.
We're going to create the main controller - it'll have a simulation object and a function to start it, stop it and reset it.
Here's how controllers.js starts:
angular.module('langtonsant.controllers', [])
.controller('MainController', function($interval, $timeout) {
var self = this;
We've defined a new module, 'langtonsant.controllers'. The second parameter is an array of modules that this one depends on, which is nothing. Next, we add a controller called 'MainController'. The controller definition function returns an instance of the controller. It's parameters are its dependencies. Angular will automatically inject these dependencies for us. Every dependency that starts with a dollar sign is a built in Angular dependency.
We depend on $interval, which is for repeating timers, and $timeout, which is for calling a function after a given amount of time.
Next, we can define the data on the controller. If we assign it to this, we'll be able to bind the view to it. Normal var definitions are for data we use internally.
this.tickFrequency = 10;
this.defaultStateColours = [
'#FFFFFF',
'#49708A',
'#88ABC2',
'#D0E0EB',
'#EBF7F8'
];
this.states = [
{direction:'L', colour: this.defaultStateColours[0]},
{direction:'R', colour: this.defaultStateColours[1]}
];
this.info = {
currentTicks: 0
};
var currentState = "stopped";
var tickIntervalId = null;
var simulation = new LangtonsAnt();
var canvas = null;
simulation.initialise({states: this.states});
$timeout(function() {
canvas = document.getElementById('antcanvas');
self.render();
});
We need the frequency - that's how many times per second we 'tick' the universe. We define a set of colours to use by default for tiles. We create two initial tile states, which we'll give to the initialise function of the simulation. We keep track of information we might want to see (the number of ticks).
We also store the current state, whether we're running or stopped. We keep an interval id (as we'll set a timer to tick and we'll need to stop it later). We create an instance of the simulation and then something clever...
Using $timeout(function() {}) is a little trick. It registers a function to call immediately, but because we're using the angular $timeout rather than the one on the window, we get a special free behaviour - it's called after the DOM is loaded and after the angular app is loaded. If we didn't do this, we'd probably not have the canvas ready in the DOM, and we want to grab the canvas ASAP so we can draw to it. We also call out 'render' function when we've got it - which we'll write later.
Why self sometimes instead of this? Well in JavaScript, this isn't what you'd always expect. For example, in a timer callback function, this will be the global object. As we want to change our class instance, we store it in self straightaway, so we can refer to it explicitly in callback functions. Nice trick! This is something you'll see very regularly in JavaScript.
Next, let's create a function that runs the simulation:
this.run = function() {
if(currentState === 'running') {
return;
}
tickIntervalId = $interval(function() {
simulation.stepForwards();
self.info.currentTicks = simulation.ticks;
self.render();
}, 1000 / this.tickFrequency);
currentState = 'running';
};
This function makes sure we're not already running, then starts a timer. Each time the timer fires, we step the simulation forwards, update how many steps we've taken and draw. Then we set the state to running.
Because this function is defined on 'this', we can bind to it in the view, for example making a click fire the function.
We'll need to know the current state in the view, so we can show or hide the run/pause buttons based on whether we're already running. We also need a render function that tells the simulation to render to the canvas (if we've got it yet).
this.getCurrentState = function() {
return currentState;
};
this.render = function() {
if(canvas !== null && canvas !== undefined) {
simulation.render(canvas);
}
};
By now, we're pretty comfortable with functions, so let's add one to pause the simulation:
this.pause = function() {
if(currentState === 'paused') {
return;
}
$interval.cancel(tickIntervalId);
currentState = 'paused';
};
Why are we using $interval to create timers? Well, it's just a wrapper around the standard interval function, but it works with Angular so that Angular will update the bindings after the timer fires. If we don't use this, we have to tell Angular explicitly to update its bindings after every tick.
We've now got enough to build the view!
Part 4 - Creating the View
This is where the power of Angular will become apparent. Let's write the index.html file - first including all of our JavaScript and CSS files:
<!DOCTYPE html>
<html ng-app="langtonsant">
<head>
    <title>Langton's Ant</title>
    <link rel="stylesheet" type="text/css"
          href="bower_components/bootstrap/dist/css/bootstrap.min.css">
    <script src="bower_components/angular/angular.min.js"></script>
    <script src="js/langtonsant.js"></script>
    <script src="js/app.js"></script>
    <script src="js/controllers.js"></script>
    <script src="js/directives.js"></script>
</head>
We're just including our JavaScript files here and the CSS for bootstrap. Notice the ng-app directive? This tells Angular that everything in the HTML element should be considered part of our langtonsant application - from here on, we can use Angular directives to bind the view to the controller.
Now we can create the canvas for the simulation to draw to:
<body>
<canvas id="antcanvas"></canvas>
<div id="controls" ng-controller="MainController as main">
There is CSS needed to keep the canvas fullscreen, but we've seen that already in the last two articles. What is new is ng-controller directive. We're telling Angular that it must create an instance of the MainController and call it main. We can use this controller for any element in the div from now on. This means we can do some wildly cool stuff, like this:
<button type="button" ng-click="main.getCurrentState() == 'running' ? main.pause() : main.run()"
                        class="btn btn-default">
<span ng-show="main.getCurrentState() == 'running'" class="glyphicon glyphicon-pause"></span>
<span ng-show="main.getCurrentState() != 'running'" class="glyphicon glyphicon-play"></span>
</button>
<button type="button" ng-click="main.reset()"
                        class="btn btn-default"><span class="glyphicon glyphicon-refresh">
                        </span></button>
<input type="text" class="form-control" ng-model="main.tickFrequency">
This is very nice - we create a button, and wire up the click event with ng-click. When we click, we check the state of the simulation. If it's running we pause it, if it's paused we run it. Within the button, we include two spans - one that shows a 'play' icon and one that shows a 'pause' icon. We show each icon only if the state is appropriate, using the ng-show directive. We also have a text input bound to the tick frequency via the ng-model attribute. This means if we change the input, Angular changes the JavaScript object for us.
Everything that starts with ng- is Angular, and we can see how powerful it is - we don't need to turn things on or off or hide them, we let Angular do it for us, based on the results of simple expressions that use the MainController called main.
If you're new to Angular, this is core functionality and you can find more at Practical AngularJS Part 1 - Introducing AngularJS.
Part 5 - More Advanced Functionality
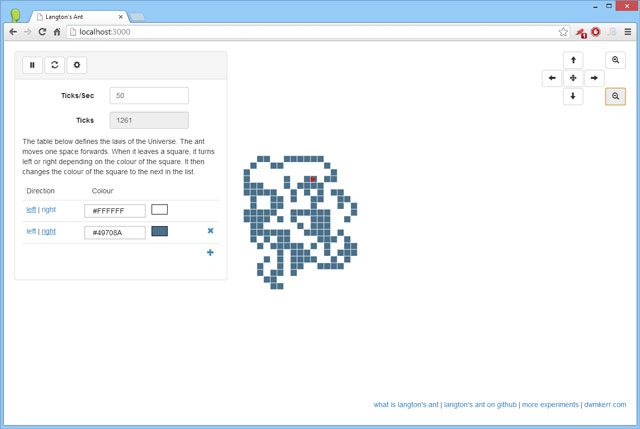
If you open Langton's Ant link, you'll see that you can click the cog at the top left to see more settings:

One thing we can do is add and remove tile states - let's wire that up now. First, we'll add controller functions to add and remove a state:
this.removeState = function(state) {
var index = this.states.indexOf(state);
if(index !== -1) {
this.states.splice(index, 1);
}
};
this.addState = function() {
var colourIndex = this.states.length % this.defaultStateColours.length;
this.states.push({
direction: 'L',
colour: this.defaultStateColours[colourIndex]
});
};
remoteState takes a state object and removes it from the list. addState adds a new state with the next colour in the list. That's it! Now we can create a table of states in the view with functionality to add or remove them:
<table>
    <thead>
        <tr>
            <td>Direction</td>
            <td>Colour</td>
            <td></td>
        </tr>
    </thead>
    <tr ng-repeat="state in main.states">
        <td><la-leftright value="state.direction"></la-leftright></td>
        <td><la-colourpicker colour="state.colour"></la-colourpicker></td>
        <td><a href="" ng-hide="$first" ng-click="main.removeState(state)">
            <span class="glyphicon glyphicon-remove"></span></a></td>
    </tr>
    <tr>
        <td></td>
        <td></td>
        <td><a href="" ng-click="main.addState()">
        <span class="glyphicon glyphicon-plus">
                       </span></a></td>
    </tr>
</table>
Here, we've made a table of three columns - the direction, colour and a space for buttons. We add a heading for each. Then we show each state in a row, by using the ng-repeat directive. This directive lets us loop through an array and show content for each element. So we can build a table row for each state.
For the first column, I'm using a <la-leftright> control. Doesn't look familiar? That's because we're going to create it! I bind the value of the leftright control to the state direction. Then I show a colour picker control, bound to the state colour. Finally, I show a 'delete' button, which calls removeState on click via ng-click. Also, I hide the button if we're on the first row, by using ng-hide="$first". ng-hide hides the element if the expression evaluates to true - and $first is a special variable angular provides for us which is true for the first row. $first is only available in an ng-repeat area - and Angular has other useful ones like $index, $last, $even, $odd and so on.
Finally, we add a row to the table that just includes a plus button that calls addState.
That's it!
We add or remove states, Angular updates the DOM for us - which means we can add complex functionality like the above with ease.
Hang on though, I used to bizarre elements - la-leftright and la-colourpicker - these are not standard HTML so what are they? Well this is the last part - Angular directives.
Part 6 - Custom Directives
I wrote la-leftright and la-colourpicker because that's how I want my HTML to look - it's fairly clear that they're for a left/right control and a colour picker control. This is how I want my HTML to look and Angular can help with that.
Custom Directives are elements or attributes you add to your HTML that Angular wires up for you. ng-repeat, ng-click and so on are directives, and we can create our own.
Let's start by defining the leftright directive - I want it to show the text "left | right" and underline the selected direction, changing it if the user clicks on it. We created a 'controllers.js' file, now let's create a 'directives.js' file:
angular.module('langtonsant.directives', [])
    .directive('laLeftright', function() {
        return {
            restrict: 'E',
            scope: {
                'value': '='
            },
            templateUrl: "js/laLeftright.html"
        };
    });
That's a directive - we use 'restrict' to specify we want to use this directive as an element ('E') - we could also use an attribute 'A' or class 'C', or all of them - we can even use comments for directives.
By setting scope, I am saying 'In my directive, I want a scope. It has a property called 'value' and it is bound two way to the attribute 'value''. I could use 'value':'=leftorright' to use the attribute name 'leftorright' as the input to the scope, as I've used just '=' on its own, it assumes that name of the attribute is value. There are other options too - for example 'value':'@something' would bind the attribute 'something' to value, but one way only.
Finally, I specify a template url - this is a url to the HTML to use for the directive content, and it's really simple HTML:
<a href=""
	ng-style="{'text-decoration':value == 'L' ? 'underline' : 'none'}"
    ng-click="value = 'L'">left</a> |
<a href=""
	ng-style="{'text-decoration':value == 'R' ? 'underline' : 'none'}"
   	ng-click="value = 'R'">right</a>
We have two links. The first uses ng-style to set the text decoration to underline if value is 'L', none otherwise. It uses ng-click to set value to 'L' if it's clicked. The second link does the same for 'R'.
That's how easy directives can be! They can be extremely advanced as well, but you can see how quickly we can use them to create reusable client side logic or presentation markup.
Conclusion
There are a few bits missing here - moving the simulation around, zooming and the colour picker, but if you've ready the article, you will be able to understand all of the extra code, we've shown the key new parts and that's the most important thing. We've seen how Bower can help us with third party libraries and Angular can help us with client side logic and binding.
There's some other stuff in the code too - there's a NodeJS server to serve the content of the page when testing, but this is something we'll look into in a later article!
If you've enjoyed seeing what Angular can do, follow my series on Practical AngularJS - I'm working on it at the moment and going through all parts of the framework.
As always, comments and suggestions are welcome, I hope you've enjoyed this article! Next time, we'll be taking a look into Server Side JavaScript with NodeJS.
History
- 30th December, 2013: Initial version


 General
  News
News  Suggestion
  Question
  Bug
Bug  Answer
  Joke
Joke  Praise
  Rant
Rant  Admin
Admin 


