Introduction
This C# program demonstrates the effect of using the ColorMatrix operator on an image. This program contains several sample matrix filters which you can select and modify. The top portion of the program interface contains three images. A background image, an overlay and the result of applying the color matrix on the overlay rendered on top of the background image.
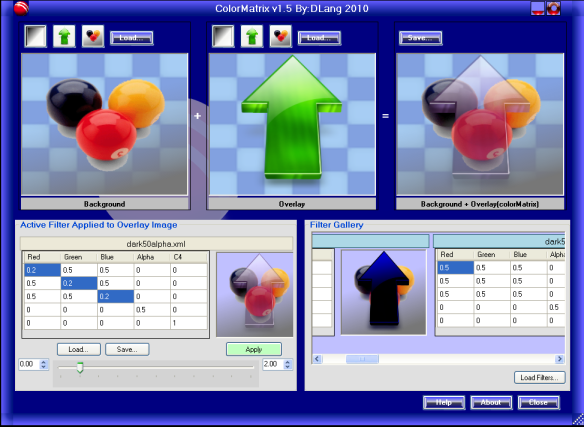
Each of the three panels display their image over a checkerboard background to make it easier to see partial transparent areas (alpha < 255). The bottom section of the interface shows the active color matrix filter on the left and a gallery of pre-built filters on the right.
Program Features
Color Matrix Features
- Buttons to load several internal images into the background or overlay
- Ability to load user images into background or overlay
- Save final image
- Edit color matrix
- Select one or more matrix cells and use slider bar to modify group
- Save and Load color matrix from disk, including sample thumbnail image
- Select from sample filters
- Load additional sample filters
Other Non-Graphic Features
- Embedded HTML help with images (solves age old problem of embedding graphical help documentation)
- Spinning "about" dialog when it opens and closes (eye candy)
- Custom window frame
- Embedded compressed data file contains collection of color matrix filter objects
When you want to draw an image on top of another image, you first create a graphic object from the base image and call DrawImage on the second image.
Image baseImage;
Image topImage;
Graphics graphics = Graphics.FromImage(baseImage);
Rectangle rect = new Rectangle(Point.Empty, baseImage.Size);
graphics.DrawImage(topImage, rect);
If you want to modify the colors of the top image, such as forcing a 50% blend, you can use the Color Matrix version of DrawImage. Here is a code fragment which shows how you can call DrawImage with a ColorMatrix.
float[][] dataArray;
float gamma = 1.0f;
ImageAttributes imageAttributes = new ImageAttributes();
imageAttributes.ClearColorMatrix();
imageAttributes.SetColorMatrix(new ColorMatrix(dataArray),
ColorMatrixFlag.Default, ColorAdjustType.Bitmap);
imageAttributes.SetGamma(gamma, ColorAdjustType.Bitmap);
Rectangle rect = new Rectangle(Point.Empty, image.Size);
graphics.DrawImage(image, rect, 0, 0, image.Width, image.Height, GraphicsUnit.Pixel,
imageAttributes);
As an image is rendered using the color matrix, each pixel color channel (Red, Green, Blue, Alpha) is transformed by the color matrix. The color matrix transformation executes several math operations on the pixel color.
out(r,g,b,a) = (in(r,g,b,a)/255 * matrix_scale + matrix_offset) * 255
Before applying the matrix, the input source color channels are scaled from their native range of 0..255 to a range of 0.0 to 1.0. After applying the matrix transformation, the value is scaled by 255 to return it to its natural range, clamping it between 0 and 255.
The upper left 4x4 zone of the matrix is multiplied against the color's 4 channels (Red, Green, Blue, Alpha). The right column of the matrix is not used. The bottom row of the matrix is used as an offset to shift the color.
The color matrix can have negative numbers and numbers greater than 1. It is easier to follow the math by looking at the samples below and there are other good explanations on the web, see reference links at the bottom of this article.
Modify Color Matrix
To change the color matrix, click on the cell you want to change and enter a new value. The typical value is in the range of -1.0 to 1.0, thou any value is allowed. If you hold the control key down, you can select multiple cells and use the slider bar to adjust all of them together. The slider bar will adjust the selected grid cells between the lower value in the left numeric box and the upper value in the right numeric box.

If you change cells, press the Apply button to apply the new matrix to the overlay image. If you use the slider bar, it will automatically apply the changes.
Load and Save
You can save your color matrix by pressing the Save... button. The matrix is saved as an XML file with a copy of the current result image. I provide a Filter directory where sample filters are stored.
Color Matrix Math
The color matrix is applied to every pixel in the image as it is drawn into the graphics buffer. The following figure shows how a single source pixel is converted to a single destination pixel. Further down, I show specific sample matrix filters.
Unit Matrix which Leaves the Image with its Original Colors
In all of these examples, the color matrix is only applied to the 2nd image (overlay). The first image is the background, second is the overlay, and third is the result of drawing the overlay with the color matrix over the background image.
The 4 numbers under the source column is a sample Red, Green, Blue, Alpha pixel value. The 4 numbers under the destination column is the result of applying the matrix to the sample source pixel.
| Background | Overlay | Bg + Overlay(colorMatrix) |
| | |
Example of the Unit Matrix which Shifts Colors
Red becomes Green, Green becomes Blue and Blue becomes Red.
| Background | Overlay | Bg + Overlay(colorMatrix) |
| | |
Example to Exclude all Colors but Green and Invert Green Magnitude
| Background | Overlay | Bg + Overlay(colorMatrix) |
| | |
Example Matrix to Blend 50% of Overlay Image Using Alpha
When the overlay is drawn on top of the background, the alpha of the overlay controls how much of the overlay colors is stored in the destination pixel. When the alpha is less than 100% (native color value of 255) the destination pixel is calculated as follows:
destColor = overlayColor * alphaPercent + backgroundColr * (100% - alphaPercent)
Example with Alpha=60%
| | Overlay | Background | Equation | Result |
| Red | 10 | 20 | 10*0.6 + 20*0.4 | 14 |
| Green | 20 | 20 | 20*0.6 + 20*0.4 | 20 |
| Blue | 30 | 20 | 30*0.6 + 20*0.4 | 26 |
An overlay color(10,20,30) blended at 60% on top of a gray color(20,20,20) becomes (14,20,26).
| Background | Overlay | Bg + Overlay(colorMatrix) |
| | |
Grey Scale
By setting the upper 3x3 section of the color matrix to the same value, it produces a grey scale image. All three color channels (red, green, blue) are set to the sum of the source channels (Rs+Gs+Bs). To reduce saturation (color exceeding maximum range), I included a -0.5 in the offset row. By using a negative offset, I reduce the intensity.
(Red * 1 + Blue * 1 + Green * 1) -0.5 * 256 = destination_color_channel
100 + 20 + 30 - 128 = 22
| Background | Overlay | Bg + Overlay(colorMatrix) |
| | |
The following are non-graphic coding enhancements I made to the program.
Embedded HTML Help File with Images
The web is full of questions like:
How do I embed and view an HTML file which contains images?
The answer is two part:
- The .NET webbrowser component supports a data stream which can be an internal embedded resource.
Assembly a = Assembly.GetExecutingAssembly();
Stream htmlStream = a.GetManifestResourceStream("ColorMatrix_ns.colormatrix.html");
this.webBrowser.DocumentStream = htmlStream;
- HTML supports inline base64 encoded images.
<img src="data:image/jpg;base64,......." alt="image.jpg" />
To produce the embedded HTML file used by ColorMatrix, I downloaded a base64 encoder and convert all of my images. There are tons of base64 utilities on the web. I used the following one: http://www.f2ko.de/English/b64/index.php.
I then searched and replaced all of the original image tags which looked something like:
<img src="image.jpg" alt="image.jpg" />
With the following, where the ...... is the base64 image text.
<img src="data:image/jpg;base64,......." alt="image.jpg" />
I don't know how important it is to include the /jpg or what every type of your original image is.
<img src="data:image/jpg;base64,......." alt="image.jpg" />
The reason I says this is I often used the wrong type for my encoded images and the image still displayed.
The base64 image is a text file which you can open with your favorite text editor and paste into your HTML file. Here is a sample of a few lines of a base64 encoded image:
2VDDoOw/Kuk8N2zqVncbUHTPU1zXh+y+0TZIG1ecGu1jbyolTOSOpFTgadTHVVia/TY48ZKnhIOh
S6l9pqheb3qo83vUTTV9CeKeiNNULze9VGm96haagC281cL8RrL+0LeLzEV4cFWBGea6l5veqlwE
mjZJBlGGCKAPCD4UtoZCYowvsK4L4zWyafa6DEgw8pnZvw2AV9IX3h5JCTBNt9mH9a+df2hoJLXX
dItZCG8uNyCOhBI/wqJbo3pWcZ37fqjy+2UmQ4qWMsrOKm06ImbHrVt7M+Y5AqzAyRK/lsM9DVhL
uRI4zk8VLFZkhxipGsW+y9OlAHf/AA68u6sVmkbJW5miK+zpEc/+Q67LSUuGlZJ9oAbAKg1wvwrt
The base64 can be spread across multiple lines, as in the example above. The exception is if you add a base64 encoded image to a style sheet. Inside a style sheet, you must remove the line breaks in your base64 image and produce a single super long line.
For more examples, look at the colormatrix.html file which is part of the Visual Studio project for this program.
WARNING - Your embedded base64 images have to be smallish. I ran into problems with large images not displaying or getting cut in half. I had to reduce the image complexity and shrink its size before encoding to produce a smaller data payload. I could not find the webbrowser base64 maximum length, so you will have to experiment.
Spinning Dialog Box
If you want to add some eye candy to your application, consider adding some animation to your dialog boxes as they open and close. The About dialog in ColorMatrix uses a spin up animation. The following image is a time-lapsed capture of a demo dialog running the spin up animation.
The code to implement the animation does the following:
- Draw dialog to an image. This can be done while the dialog is either visible or invisible.
- Using a timer object, draw the image scaled and rotated every timer tick. The image is displayed in a simple frame-less dialog box.
- When the rotation or scaling completes:
- Stop the timer.
- Hide the auxilary dialog.
- Show or hide the main dialog depending on whether you are spinning up on an open animation or a close animation.
Here is the code which grabs an image of the dialog being animated:
public Bitmap MakeScreenImage()
{
    Bitmap image = new Bitmap(this.Width, this.Height);
    this.DrawToBitmap(image, new Rectangle(Point.Empty, image.Size));
    image.MakeTransparent(this.TransparencyKey);
    return image;
}
Here is the code to rotate the image capture using the code above:
private Bitmap rotateImage
(Bitmap b, Size size, float angle, float scale, Image prevImage)
{
Bitmap returnBitmap;
if (prevImage == null)
returnBitmap = new Bitmap(size.Width, size.Height);
else
returnBitmap = new Bitmap(prevImage, size.Width, size.Height);
Graphics g = Graphics.FromImage(returnBitmap);
if (prevImage == null)
g.Clear(Color.Transparent);
g.SmoothingMode = SmoothingMode.HighSpeed;
Size deltaSize = size - b.Size;
g.TranslateTransform((float)deltaSize.Width / 2, (float)deltaSize.Height / 2);
g.TranslateTransform((float)b.Width / 2, (float)b.Height / 2);
g.RotateTransform(angle);
g.TranslateTransform(-(float)b.Width / 2, -(float)b.Height / 2);
g.ScaleTransform(scale, scale);
g.DrawImage(b, new Point(0, 0));
return returnBitmap;
}
See the rest of the details in about.cs code in the ColorMatrix project.
Custom Window Frame
It is fairly easy to make your own dialog frame. The first step is to hide your default frame by setting your dialog FormBorderStyle. to none.
Next I create a tableLayout object with 3 columns and 3 rows.
The top and bottom row and left and right columns were set to 20 absolute size. The center row and column was set to 100% size to allow the center cell to resize.
The rest of the work is to attach panels to the four edges and four corner zones of the table layout. Each panel gets an image and optionally you can attach mouse enter, leave and move handlers to support resizing or moving the dialog. You place all of your user interface components on a panel attached to the center zone. See MainForms.cs for examples of the mouse handlers.
Final Words
Additional source code and information is available on my home website: http://home.comcast.net/~lang.dennis.
I want to thank the authors of the web links below for their documentation, which helped me with this article.
Links to Related Information
Color Matrix Links
Other Draw Operations (BitBlt & Emboss)
I love C/C++ for its speed and power and C#/Visual Studio for quick application development.
Unix/Linux is my favorite OS
Android Studio is the best IDE I have used.


 General
  News
News  Suggestion
  Question
  Bug
Bug  Answer
  Joke
Joke  Praise
  Rant
Rant  Admin
Admin 


 , I reduced the project too much and left the images out.