Introduction
This is the second part of the series. The first part is located here. We will begin exactly where we left off last time. Now that we have a ASP.NET MVC Hello World website let us make it useful. In this part will we
- Add a menu bar to our website.
- Create a data entry form.
- Display a data table.
Background
This article is part of a series that introduces web programming concepts to hardcore desktop application developers. The series attempts to present information that a WinForms/WPF developer can easily relate to. As the concepts are introduced we delve into the why and how questions to get a in depth understanding of what is happening behind the scenes. The point here is to stay in control and be able to dictate what should happen with your ASP.NET MVC website rather than be surprised.
The Navigation Bar
The first thing that comes to my mind as a desktop application developer
is how do I add a menu bar to my website? In the web world it is called
a navigation bar. Based on the website design the navigation bar can be
placed anywhere on the website. To keep it simple we will place it on the
top. Our Index.cshtml is the default view that gets called when a user lands up on the website. We will work on this view to add the navigation bar and touch up a few more items.
So it is about time to fire up the graphical editor where we can drag and drop the menu bar on to our view, right? Wrong! here comes the shocker. There are no graphical drag-n-drop editors in ASP.NET MVC. At least not at the time this article went to press. You type HTML in Visual Studio editor and see the results by refreshing the web browser. Talk about progressing backwards! WinForms has a drag-n-drop editor built in, for WPF we have the amazing Expression Blend. "But we have Expression Web!", unfortunately it does not work with ASP.NET MVC. Expression Web 4.0 cannot even open CSHTML files. Take a deep breath, close your eyes, take a coffee break or go for a walk. Do everything you can to get over this and come back to continue. It is not as bad as it sounds the first time. I got over it eventually!
Now that you are over with the sighing , sulking and shock let us get the navigation bar working. Type in the below code into Index.cshtml.
@{
ViewBag.Title = "My first Hello World website!";
}
<h2>Welcome to my Hello World website!</h2>
<table>
<tr>
<td><a href="">Home</a></td>
<td> </td>
<td> </td>
<td><a href="/login">Login</a></td>
<td> </td>
<td> </td>
<td><a href="">About & Help</a></td>
</tr>
</table> In the very first line you will notice the @{} section. This is the section for the Razor view engine which allows us to insert C# or VB.NET code in the view. In this section you can write C#/VB.NET code to generate dynamic HTML for the view. At present it does very little like helping us set the web page title. The title is generally displayed by a web browser in the window frame and as a tab heading. This magic happens due to the highlighted code in _Layout.cshtml located in the Views/Shared folder.
<!DOCTYPE html>
<html>
<head>
    ....
    <title>@ViewBag.Title</title>
    ....
</head>
<body>
    @RenderBody()
    ....
    ....
</body>
</html>
The second entry inside the <h2></h2> is the page heading followed by a HTML table to layout the navigation bar. Using tables for layout is a subject of heated debate in the web programming world. I am not an authority to comment, but I would like to keep things simple here and hence am using it. Running the web site now should bring up something similar to the below.
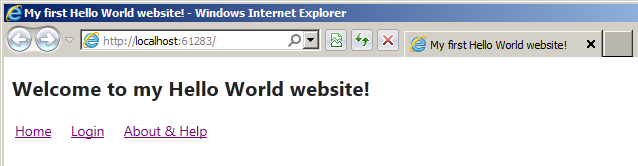
Clicking the Home and About & Help links will just refresh the same page again and again. Before we can make these links functional we have to create views for them.
And before we go ahead and create a view for the login we need a model to
store the username and password. Right click the Models folder and
click Add->Class. Name the file LoginModel.cs. Type in the below code inside LoginModel.cs.
using System;
using System.Collections.Generic;
using System.Linq;
using System.Web;

namespace MvcApplication1.Models
{
    public class LoginModel
    {
        public string Username { get; set; }
        public string Password { get; set; }
    }
}
To keep things simple, we will not delve into the security implications of dealing with plain-text passwords.
The Login Form
Now let us create a login view. Right click on the View folder and click Add->New Folder. Name the folder Login. Right click the new Login folder and click Add->View. Type the view name as Login.

The entry in Solution Explorer should look like this.
The HTML plus C# code to create a data entry form/login dialog is below.
@using MvcApplication1.Models;

@model LoginModel

@{
    ViewBag.Title = "Login";
}

<h2>User Login Page</h2>

<table>
@using(Html.BeginForm("DoLogin","Login", FormMethod.Post))
{
    <tr>
        <td>Username</td>
        <td></td>
        <td>@Html.EditorFor(lm => lm.Username)</td>
    </tr>
    <tr>
        <td>Password</td>
        <td></td>
        <td>@Html.PasswordFor(lm=>lm.Password)</td>
    </tr>
    <tr>
        <td></td>
        <td></td>
        <td><input type="submit" value="Login" /></td>
    </tr>
}
</table>
Let us go over the above code line by line. The first entry is like any other using directive in a C# source code file that allows us to use the types inside a namespace without explicit qualification.. In this case we want to refer to the LoginModel without having to fully qualify it everywhere. The @ symbol instructs the Razor view engine to treat the following text as C# code and not HTML. Google Razor view engine and Razor syntax for more details.
The @model directive is used to specify a strongly typed model that will be referenced by this view. In this case our model is called LoginModel. Notice there is no semicolon after this directive. If you happen to put one by mistake be prepared to waste hours figuring out what went wrong. I speak from personal experience! You should now be familiar with the next two entries (web page title and heading) so am going to skip explaining them.
Final entry is the HTML table that is used to display a login form. In the desktop world one would call this a login dialog box. We have a Razor block inside the table to enable use of HtmlHelper class. As the name suggests this class helps us write C# code that actually generates the HTML. In the web world if you need to collect user input using a web browser we need to use HTML Forms. Once the user clicks the Submit/Login button the data travels from the web browser to the web server. All this is built into the HTML protocol.
BeginForm helps us generate the HTML required to render the Form on the web browser and also direct the data back to one of the actions inside a chosen controller. In this case we want the DoLogin action to be invoked inside the Login controller. And we want the form to send data using the Post method. Google HTML Form GET vs POST to find out more details. EditorFor and PasswordFor help generate HTML that binds the HTML control with LoginModel. This makes sure the value typed by the user is automatically bound to the property. PasswordFor creates a text box that masks user input.
Now it is time to create a login controller. Remember all requests received by the web server are directed to a controller in MVC. Right click the Controllers folder and click Add->Controller. Name it the LoginController.
Replace the contents of LoginControler.cs with the following.
using System;
using System.Collections.Generic;
using System.Linq;
using System.Web;
using System.Web.Mvc;
using MvcApplication1.Models;
namespace MvcApplication1.Controllers
{
public class LoginController : Controller
{
public ActionResult Index()
{
return View("Login");
}
}
}The Index action will explicitly return the Login view because that is what we called it, Login.cshtml.
Run the website now and click the Login link in the Home page. you
should see something similar to this. I have typed in a name and
password to highlight the masked password.
If you click the Login button you should get an expected error. This is because we have not yet coded the DoLogin action in the login controller. Before we do that let us create a model for the Home page/controller that will hold a list of logged in user names. Right click the Models folder click Add->Class and name the file HomeModel.cs. Type in the below code inside HomeModel.cs.
using System;
using System.Collections.Generic;
using System.Linq;
using System.Web;

namespace MvcApplication1.Models
{
    public class HomeModel
    {
        public List<string> UsersOnline { get; set; }

        public HomeModel()
        {
            UsersOnline = new List<string>();
        }
    }
}
The Data Table
Now we need to modify the corresponding view Index.cshtml to use this model.
@using MvcApplication1.Models;
@model HomeModel
@{
ViewBag.Title = "My first Hello World website!";
}
<h2>Welcome to my Hello World website!</h2>
<table>
<tr>
<td><a href="">Home</a></td>
<td> </td>
<td> </td>
<td><a href="/login">Login</a></td>
<td> </td>
<td> </td>
<td><a href="">About & Help</a></td>
</tr>
</table>
<hr />
<h3>List of users currently online</h3>
<table>
@foreach (string username in Model.UsersOnline)
{
<tr>
<td>@username</td>
</tr>
}
</table> I am using Razor to generate the HTML table entries to display users who are logged in. Notice how Razor syntax allows us to mix HTML and C#. This is a very powerful feature. We are not done yet if you run the website now you will get a nasty Object reference not set to an instance of an object. error! This is because we have not created and passed an object of HomeModel to this view. The place to does this is the HomeController class. Modify the code in the HomeController.cs file like this.
using System;
using System.Collections.Generic;
using System.Linq;
using System.Web;
using System.Web.Mvc;
using MvcApplication1.Models;
namespace MvcApplication1.Controllers
{
public class HomeController : Controller
{
public ActionResult Index()
{
var homeModel = new HomeModel();
return View(homeModel);
}
}
} All that I did is create an instance of the HomeModel class and pass it to the View. Running the website now should produce something like this.
It is time to code the final pieces to get this all working. In the real world you will persist the user session information in a database. But to keep it simple I am going to cheat and save this data in the web server cache which we will substitute for a real database.
Add a DoLogin action in the Login controller in LoginController.cs file.
using System;
using System.Collections.Generic;
using System.Linq;
using System.Web;
using System.Web.Mvc;
using MvcApplication1.Models;
namespace MvcApplication1.Controllers
{
public class LoginController : Controller
{
public ActionResult Index()
{
return View("Login");
}
public ActionResult DoLogin(LoginModel model)
{
TempData["username"] = model.Username;
return RedirectToAction("ShowUsers", "Home");
}
}
}The DoLogin action has parameter model of the type LoginModel. So how does this work? Remember we bound LoginModel to the view in the Login.cshtml file and used the BeginForm method from the Htmlhelper class. Behind the scenes there is a model binder provided by ASP.NET MVC that binds the values. TempData is a dictionary used to pass data between controllers. We will save the username in the dictionary which will be used by the other controller.
In our case we redirect the Login click action to the home page where the user can see the list of users currently online. Also note we are going to invoke the ShowUsers action in the Home controller. Since this is not present we will go ahead and code that now. Replace the code in HomeController.cs with the following.
using System;
using System.Collections.Generic;
using System.Linq;
using System.Web;
using System.Web.Mvc;
using MvcApplication1.Models;
namespace MvcApplication1.Controllers
{
public class HomeController : Controller
{
private const string CACHE_KEY = "HomeModelData";
public ActionResult Index()
{
var homeModel = new HomeModel();
return View(homeModel);
}
public ActionResult ShowUsers()
{
var homeModel = (HomeModel)HttpContext.Cache[CACHE_KEY];
if (homeModel == null)
{
homeModel = new HomeModel();
HttpContext.Cache[CACHE_KEY] = homeModel;
}
string username = TempData["username"] as string;
if (username != null)
{
homeModel.UsersOnline.Add(username);
}
return View("Index", homeModel);
}
}
}The ShowUsers actions tries to retrieve the user session information from the web server cache, our substitute for a actual database. The newly logged in user is then appended to the list of users online. The username is retrieved from TempData. Since we want to reuse the Index view I am explicitly specifying it the View constructor along with the model object.
Run the code now and login with your name. If you click the Login link again and login as somebody else you should now see two names like this.
I will leave the About & Help link as an excercise for you to complete!
This concludes the second part of the series. Let me know if you liked it? What would you like me to cover in the next part?
Points of Interest
While this article covered a lot of ground there is a lot more to go. Especially when it comes to building a public website which is used by thousands of users. The current website is no where close to its modern day counterparts. Cutting edge websites like Gmail work with a single page almost like a desktop application. Time permitting and with enough encouragement I will try to cover them in future!
History
First published 4th April 2014
Nothing to brag about, just another passionate software developer.
Work to make a living, don't live to work!


