In the previous article, we learned the basics of creating a simple Windows Phone app. In this post, we will look at how to perform navigation between different pages in Windows Phone app. We will use the same Visual Studio solution used in the previous post and continue from there.
Open the MyFirstWPApp solution in Visual Studio. We will be adding a new page in our solution to which we can navigate to. Right click on the project name in solution explorer –> Select Add –> New Item.
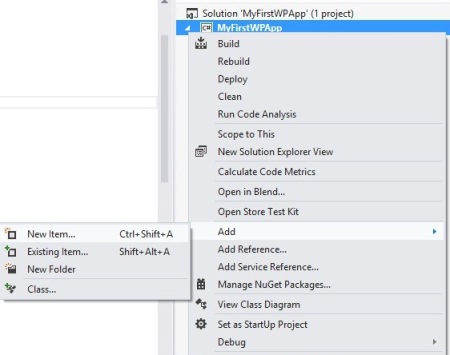
In the window that opens, select “Windows Phone Portrait Page”, name the page as “SecondPage.xaml” and click on Add.

In the designer view that opens, we will change the Text property of the Textblock from “page title” to “Second Page”. Let's also add a StackPanel inside the ContentPanel grid and add a TextBlock control and a button control.
<StackPanel Grid.Row="0" Margin="12,17,0,28">
<TextBlock Text="MY APPLICATION" Style="{StaticResource PhoneTextNormalStyle}"/>
<TextBlock Text="Second Page" Margin="9,-7,0,0" Style="{StaticResource PhoneTextTitle1Style}"/>
</StackPanel>
<Grid x:Name="ContentPanel" Grid.Row="1" Margin="12,0,12,0">
<StackPanel>
<TextBlock Name="txtDisplay" Text="Display Greeting" />
<Button Content="Go Back" Name="btnBack" />
</StackPanel>
</Grid>Our second page will appear as shown below:
Let's go back to our MainPage.xaml.cs file. Currently, we were displaying the greeting to the user in a message box. Let's change the behavior and add code to navigate the user to our SecondPage.xaml. Sometimes, we also need to send some data across the page. We will also pass the name entered by the user as a parameter to the second page.
Open MainPage.xaml.cs file and change the ‘Click Me’ button event handler as shown below:
private void btnClickMe_Tap_1(object sender, System.Windows.Input.GestureEventArgs e)
{
    if (txtName.Text.Length > 0)
    {
        NavigationService.Navigate(new Uri("/SecondPage.xaml?name=" + txtName.Text, UriKind.Relative));
    }
    else
    {
        MessageBox.Show("Please enter your Name");
    }
}
We are using the “NavigationService” class Navigate method to move to another page and we are passing the text entered by the user as query string. The following code will navigate the user to second page, but we also need to read the query string which has been passed by the user. Open “SecondPage.xaml.cs” file and add the following method.
protected override void OnNavigatedTo(System.Windows.Navigation.NavigationEventArgs e)
        {
            base.OnNavigatedTo(e);
            string name = "";

            if (NavigationContext.QueryString.TryGetValue("name", out name))
            {
                txtDisplay.Text = "Welcome " + name;
            }
        }
The “OnNavigatedTo” method is called when user navigates to the second page. We use the “TryGetValue” method to read the value from the query string if it exists. If the query string is present, we are displaying the greeting to the user in the textblock.
Add the following code to the “btnBack” tap event which takes the user back to the previous page.
private void btnBack_Tap_1(object sender, System.Windows.Input.GestureEventArgs e)
        {
            NavigationService.GoBack();
        }
On clicking the button, the user will be redirected to the previous page “MainPage”. The same behaviour will also be shown when the user presses the back button of the Phone hardware.
Let's run the app in the emulator to see how it behaves. Enter the name in the textbox and click on the button. You will be navigated to the second page and the greeting will be displayed along with the name which we have passed as parameter. To go back to the previous page, click the “GoBack” button.
Madhur is Technology Lead by profession having around 9+ yrs of experience in IT industry working on Microsoft Technologies. Apart from Microsoft Technologies, he also likes to work on Mobile Development in Android.
His Technical expertise include .Net technologies including MVC, WebAPI, Azure.
Apart from coding, he like to play Xbox Games, strum guitar or read books.
My Blog : http://www.codingparadox.com


