Introduction
This tutorial will show how to use the CListBox class in a very basic dialog based application. It will cover the following points:
- Adding a
CListBox to your dialog
- The difference in behavior of the different Selection styles of
CListBox
- Other
CListBox Styles
- Changing list box Styles at runtime
- Inserting/Adding items to the
CListBox and deleting items
- Determining which item is selected
- Using item data
- Selecting items
- Handling
CListBox messages
- Enhancements
This tutorial assumes the you are comfortable with creating a dialog based application using the VC++ 6 Class Wizard. If you require information on this topic, consult the article A Beginners Guide to Dialog Based Applications - Part 1.
Adding a CListBox to your dialog
When your dialog-based application is generated, go to the Resources in the Workspace window. Select the dialog IDD_LISTBOXTUTORIAL_DIALOG in the Dialog section. To insert the list box control, select it from the Control palette. The cross shaped cursor indicates where the centre of the list box will be placed.
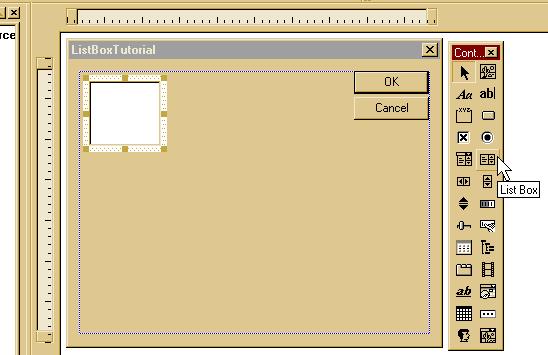
Drag the edges of the control out to the desired size.
The difference in behavior of the different Selection styles of CListBox
There are 4 different styles of list box with different selection properties. To change the style of the list box, right click on it and select Properties. Then select the Styles tab.

- Single allows only a single item to be selected.
- Multiple allows any number of items to be selected in the list box. The selection is toggled each time the user clicks or double-clicks on a string. Each time, the
LBN_SELCHANGE notification is sent to the parent dialog. When a double click is used, a LBN_DBLCLK notification is sent as well.
- Extended allows multiple items to be selected using the SHIFT key and the mouse or special key combinations.
- None will place only a focus rectangle around the selected item, but it is not highlighted. Notifications are like for the Single selection box.
If you want a Read Only list box, use None along with the Notify style turned off, so no notification messages will sent.
Other CListBox Styles
- Notify - to send notification messages to the parent window (usually a dialog box).
- Sort - Sorts the strings in the list box alphabetically. Note, however when numeric strings are used, the sorting may not be what you want. In that case, don't use sort, and add the strings in the order you want.
- Multi Column - Specifies a multicolumn list box that is scrolled horizontally. The
SetColumnWidth member function sets the width of the columns. Vertical scroll is ignored and if you want a scroll bar, set the Horizontal Scroll style.
- Use Tabstops - This style allows the list box to recognize tab characters that are part of the string. Whilst it can be used to display items in columns, it is not the same as Multi column above.
- Horizontal scroll - enables horizontal scroll bar to be displayed. Use this in conjunction with Multi column or if you know that some of the text may be too long to fit the width of the box. The list will still scroll when using the arrow keys when the scroll bar is not displayed.
- Vertical scroll - enables vertical scroll bar to be displayed. The list will still scroll when using the arrow keys when the scroll bar is not displayed.
- Disable no scroll - By default the list boxes only show a scroll bar when the number of lines exceeds the size of the list box. With this style, it will always have the scroll bar(s).
- No integral height - is a default style and sets the size of the list box exactly as it is in the resource entry. If this is turned off, the height is adjusted so that the nearest number of full lines are shown to be less than the size in the resource specification. This is used in the list box labeled None.
- Ownerdrawn - list boxes are discussed in other projects.
Changing List box Styles at Runtime
It is not possible to change these styles at runtime even though ModifyStyle() may give the impression it does. If you want, turn the Sort style on and off. For example, it is best to construct the list box by calling new and Create, then deleting it and creating a new one when the style is to be changed. Alternatively, you can have 2 list boxes superimposed and hide the one with the incorrect style.
In the Demo, the list box headed 'Toggle List Style' changes the LBN_SORT style. The code deletes the old list box and creates a new one each time the Toggle button is clicked.
void CListBoxTutorialDlg::OnToggleListStyle()
{
TRACE("CListBoxTutorialDlg::OnToggleListStyle( )\n");
if( m_pFlyList )
delete m_pFlyList;
CRect rc;
CString str = _T("");
m_Template.GetWindowRect( &rc );
ScreenToClient( &rc );
m_pFlyList = new CListBox;
m_ListStyle ^= LBS_SORT;
m_pFlyList->Create( m_ListStyle, rc, this, IDC_LIST1 );
m_pFlyList->ModifyStyleEx( 0, WS_EX_CLIENTEDGE );
m_pFlyList->SetFont( GetFont() );
for( int j=0; j<10; j++ )
{
str.Format( "Item %d", j+1 );
int idx = m_pFlyList->AddString( str );
m_pFlyList->SetItemData( idx, j+1 );
}
m_InsertRemove = 0;
UpdateData(FALSE);
}
Inserting/Adding items to the CListBox and Deleting items
Adding a string to the list box is quite straight forward by simply calling the AddString() function. If the list box has the LBN_SORT style, the new item is inserted to its correct place. Otherwise, it is added to the end of the list.
CString str;
for( int i=0; i<NumOfLists; i++ )
    for( int j=0; j<10; j++ )
    {
        str.Format( "Item %d", j+1 );
        m_List[i].AddString( str );
    }
Unless you are appending new items to an existing list, it is a good idea to call ResetContent() first, in order to be sure that the list is empty to start with.
m_List[5].ResetContent();
Inserting a string is just as straight forward. The difference is however that the item is merely inserted at the specified index and is NOT sorted even if the style is set to LBN_SORT.
void CListBoxTutorialDlg::OnInsertRemove()
{
    TRACE("CListBoxTutorialDlg::OnInsertRemove( )\n");
    UpdateData();

    if( m_InsertRemove )
    {
        int idx = m_pFlyList->InsertString( 4, "Item 11" );
        m_pFlyList->SetItemData( idx, 11 );
    }
    else
    {
        int idx = m_pFlyList->FindString( -1, "Item 11" );
        m_pFlyList->DeleteString( idx );
    }
}
In the code snippet above, there is also an example of the use of DeleteString() which simply removes the item at the specified index. Use FindString() or FindStringExact() to find the index of the string to be deleted if it is not known.
Determining which item is selected
If you use Data Exchange, the string variable will be filled with the selected string when you call UpdateData(TRUE).
Add an OnSelChanged function for the list box with Class Wizard.
In the demo project, you will see the use of the macro ON_CONTROL_RANGE(LBN_SELCHANGED,.. which is not inserted by Class Wizard but is a way of handling all list boxes in the one handler, provided their IDs are sequential.
Single selection list boxes simply load the string variable with the selected string when UpdateData(TRUE) is called, as shown in the middle part of the function.
m_strReport.Format( "The selection in List %d has changed to %s",
                           list+1, m_strSelection[list]);
In a list box where Data Exchange is not available, as shown in the Style Toggle List, call GetCurSel() and then GetText().
{
    CString str;
    int idx = m_pFlyList->GetCurSel();
    m_pFlyList->GetText( idx, str );
    DWORD dw = m_pFlyList->GetItemData( idx );
    m_strReport.Format( "The selection in List 7 "
      "has changed to %s\n  Index = %d,
      and  ItemData = %d", str, idx, dw);
}
For multiple and extended selection list boxes, you must first determine how many items are selected. The indexes are then loaded into an array and then use these to retrieve the strings.
.
.
int list = nID - IDC_LIST2;
if( list == 1 || list == 2 )
{
int count = m_List[list].GetSelCount();
CArray< int,int > arrayListSel;
arrayListSel.SetSize(count);
m_List[list].GetSelItems(count,
arrayListSel.GetData());
CString str = _T("");
for( int i=0; i< count; i++ )
{
CString tmp = _T("");
m_List[list].GetText( arrayListSel[i], tmp );
str += (tmp + _T(", "));
}
m_strReport.Format( "The selection in List %d has changed to %s",
list+1, str);
}
else
.
.
Using item data
A list box returns the string of the selected item as shown above. Often the program actually uses a value other than the string or the index, and what's more, you need to get this value correct whether the items in the list are sorted or not. If the application is to support multiple languages, this is even more important because sorting can be different.
To assist with this, each item in the list can have a DWORD associated with it, and this remains attached to the string regardless of the sorting.
Use SetItemData( idx, dwData ) and GetItemData( idx ). When setting the data, use the index returned by the AddString() or InsertString() functions to ensure you get it right.
for( int j=0; j<10; j++ )
{
    str.Format( "Item %d", j+1 );
    int idx = m_pFlyList->AddString( str );
    m_pFlyList->SetItemData( idx, j+1 );
}
To retrieve the data, get the item index and call GetItemData(idx).
.
.
    {
        CString str;
        int idx = m_pFlyList->GetCurSel();
        m_pFlyList->GetText( idx, str );
        DWORD dw = m_pFlyList->GetItemData( idx );
        m_strReport.Format( "The selection in List 7 "
          "has changed to %s\n  Index = %d,
          and  ItemData = %d", str, idx, dw);
    }
.
.
Selecting items
Selecting an item can be done by setting the index as below:
You can use SetCurSel( idx ) for single selection.
OR use SelectString( after, str ) where after is the index after which to start searching. As you can see from the demo, the items are added in a different order to which they are displayed and the data remains matched.
m_List[0].SetCurSel( 2 );

m_pFlyList->SelectString( -1, "Item 4" );
In multi selection and extended selection, call SelItemRange(BOOL bSelect, int nFirstItem, int nLastItem ). If bSelect is TRUE, the items are selected and highlighted and if FALSE, the items are deselected. If the nFirstItem, nLastItem are the same, only a single item is done.
m_List[1].SelItemRange( TRUE, 3, 8 );
m_List[1].SelItemRange( FALSE, 5, 5 );
Handling CListBox messages
The notification messages available for list boxes are the following. The list box must have LB_NOTIFY style.
LBN_ERRSPACE notification message when a list box cannot allocate enough memory to meet a specific request.
LBN_SELCHANGE notification message when the selection in a list box is about to change.
LBN_DBLCLK notification message when the user double-clicks a string in a list box.
LBN_SETFOCUS notification message when a list box receives the keyboard focus.
LBN_KILLFOCUS notification message when a list box loses the keyboard focus.
LBN_SELCANCEL notification message when the user cancels the selection in a list box.
The demo handles the LBN_SELCHANGE and LBN_DBLCLK messages.
Enhancements
You may like to experiment with the VKeyToItem and CharToItem.
VKeyToItem - Override to provide custom WM_KEYDOWN handling for list boxes with the LBS_WANTKEYBOARDINPUT style set.
CharToItem - Override to provide custom WM_CHAR handling for owner-draw list boxes which don't have strings.
Conclusion
The message handlers in this tutorial are the most commonly used and should indicate that they need not be very complex. More complex issues are handled elsewhere on this site.
Happy programming!
Started working with computers when I/O was with punched paper tape, using Algol. Then learned Fortran, Basic, various Assemblers, Forth and Postscript. Built a robot in the early '80s. When I finally got a PC I learned C, C++ and more recently worked on a variety of .NET and PHP projects. Senior Software Engineer at MedTech Global in Melbourne, Australia.


 General
  News
News  Suggestion
  Question
  Bug
Bug  Answer
  Joke
Joke  Praise
  Rant
Rant  Admin
Admin 


