Introduction
SQL Table Toolkit is a Class Library offering a quite large amount of tools for fast and easy work with SQL Tables. More about it, you can find here. On that article we explain the main functionality and usage of STT. I recomment to every one to read first the main article and then continue with this because the Demo Application is also continuing on the application we created in the main Article.
The STT uses a default tables to manage all users and to give a login dialog box. Also all user permissions and table settings are saved in STT default tables. We showed in the main STT Article that also the table change protocol is using the integrated user management to save who has made what change.
To make a DLL Library obtaining all functionality to manipulate SQL Tables and create an ERP like system a User management is necessary. It is no high-level security feature but for fast application deployment a usable tool.
Background
At the same beginning of the STT development an User Login and user Management module where necessary to accomplish all needs of our company. Most of the functionalities are linked to a User ID, like change protocol, menu permissions, table columns settings…
For the password check we use the STT integrated filters and data manipulations.
Using the code
To show how the login works we will continue on where we stopped with the main article of the STT. There we have a Demo application with one table. However, when we make a change in the table we do not know witch user made them. We will now show how we use the code to login with a user. Later how to get user data or permissions and how to manage user permissions and data.
Showing login dialog
The STT is made for fast development so to check if a user is logged we use just a static Boolean parameter that runs the login dialog:
User.UserSuccessfullyLoged
The property is saying all we need to know. if the user is successfully logged it returns true and if not false.
Now we will add the login code in our Demo application from the main article and se how it works. We change in the Demo application only one line of code in the Program.cs file:
if (!User.UserSuccessfullyLoged)
                return;
The whole Program.cs file:
using System;
using System.Collections.Generic;
using System.Linq;
using System.Threading.Tasks;
using System.Windows.Forms;
using STT;
using System.Reflection;
namespace STTDemoProject
{
static class Program
{
[STAThread]
static void Main()
{
Application.EnableVisualStyles();
Application.SetCompatibleTextRenderingDefault(false);
SQLConnectionForm frmConnection = new SQLConnectionForm(Properties.Settings.Default.Connection);
frmConnection.ShowDialog();
if (frmConnection.DialogResult != DialogResult.OK)
return;
Properties.Settings.Default.Connection = frmConnection.ConnectionString;
Properties.Settings.Default.Save();
Initialization.Start(Assembly.Load("STT"), Properties.Settings.Default.Connection);
Initialization.Start(Assembly.Load("STTDemoProject"), Properties.Settings.Default.Connection);
Language.SetLanguage(Languages.EN);
if (!User.UserSuccessfullyLoged)
return;
Application.Run(new Form1());
}
}
}
By starting the Demo application (after successfully connectiing to the database), we will see a login dialog box:
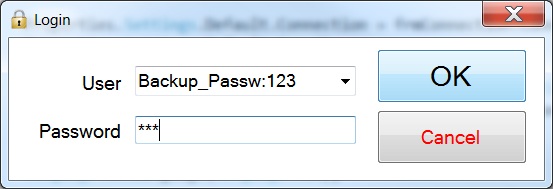
Without any adjustment of the users, it will show only one available user "Backup_Passw:123". That user is automatically added if the STT does not recognize any other users. As shown, the password of the user is “123”. That user can later be changed in the user management.
Get data of current user
To get the ID of the current user we Just call this code:
User.ID;
To get the info if a user is a Admin we use this code:
User.IsAdmin
It gives a Boolean value that shows if a user is a admin or not.
Manage users
To manage our users we need just to display them in a table that is integrated in the STT. We will demonstrate that in out Demo application. The demo application is starting where we ended last time in our STT main Artikle.
The first thing we are going to to is to make a Main Form where we can chose what we will do after we open the application and log in as a user. We name that form MainForm.
To that form we add a button taht we name btnTable1 and add a OnClick event to open our Table1 if we click on taht button. Because the Table1 is still in the Form1 we leave the form name as it is.
private void btnTable1_Click(object sender, EventArgs e)
       {
           Form1 frm1 = new Form1();
           frm1.Show();
       }
The next step is to say the application taht we want the MainForm as startup form of the application. That we accomplishe by changing the code in the Program.cs file:
The part where
Application.Run(new Form1());
stays, we change to:
Application.Run(new MainForm());
Now if we open our application and log in this form will be shown:

By clicking on the Table1 button our Form with the Demo table Table1 will be shown.
To manage our users we need also a form where we will shows the users table in a DataGridView. For that we create a Form and name it UsersForm. As in the main STT Article we initialize the table Users and bind it to the dataGridView1 that we previously added to the form. The whole code of the UsersForm:
using System;
using System.Collections.Generic;
using System.ComponentModel;
using System.Data;
using System.Drawing;
using System.Linq;
using System.Text;
using System.Threading.Tasks;
using System.Windows.Forms;
using STT;

namespace STTDemoProject
{
    public partial class UsersForm : Form
    {

        Users tblUsers = new Users();

        public UsersForm()
        {
            InitializeComponent();

            tblUsers.BindTableToDataGridView(dataGridView1);
        }
    }
}
To have access to the Users table we need to set the:
using STT;
Now we need a second button in our MainForm with witch we will open our UsersForm. For that we add a second button and name it btnUsers. For that button we add also a OnClick event with following code:
private void btnUsers_Click(object sender, EventArgs e)
       {
           UsersForm frmUsers = new UsersForm();
           frmUsers.Show();
       }
If we now start our application, login and click on the Users button we will se our users table:
In that table we can add as much users we want. Change their permissions, names, passwords etc... We will leave or default user as he is.
User permissions
By playing with the users table you will notice that the column is a ComboBox Column of the possible user permissions. The STT automatically adds a permission "Administrator" if the table is empty. That permission is also set to the default user on startup "Backup_Passw:123". Later in a other article we will show how we can adjust ComboBoxes with DataSources that will be integrated in a table no matter where we call it.
Now we would like to manage also our user permissions to not have only Admins in our App. For that we make a new Form where we will show them and call it PermissionsForm. To that form like by the UsersForm we add a DataGridView, initialize our PermissionGroups table and bind it to that DataGridView. And don't forget the using STT. The whole code look like this:
using System;
using System.Collections.Generic;
using System.ComponentModel;
using System.Data;
using System.Drawing;
using System.Linq;
using System.Text;
using System.Threading.Tasks;
using System.Windows.Forms;
using STT;

namespace STTDemoProject
{
    public partial class PermissionsForm : Form
    {
        PermissionGroups tblPermissionGroups = new PermissionGroups();

        public PermissionsForm()
        {
            InitializeComponent();

            tblPermissionGroups.BindTableToDataGridView(dataGridView1);
        }
    }
}
We need also a third button in our MainForm with witch we will open our user permissions. We name it btnPermissions and add a OnClick event with following code:
private void btnPermissions_Click(object sender, EventArgs e)
{
    PermissionsForm frmPermissions = new PermissionsForm();
    frmPermissions.Show();
}
If we now open our application, login and press on out permissions button we will see this table:
In the table we can se that we can manage the names of our permissions. We can set if the permission has admin rights or not, add a description and a default permission that it has.
It now looks seamles to do all this without any kind of function we have set to our application that uses our permissions. STT has an integrated TreeView permission adapter that allows us to add permissions to a TreeView menu. That we will do in a other article wehere we will show how to implement a TreewView that opens Forms in a TabControl.
The Default permission column is also a ComoBox but with a custom source that can not be changed because it can have only 4 possible values.
We have now our MainForm finished and lets have a look at the whole code:
using System;
using System.Collections.Generic;
using System.ComponentModel;
using System.Data;
using System.Drawing;
using System.Linq;
using System.Text;
using System.Threading.Tasks;
using System.Windows.Forms;

namespace STTDemoProject
{
    public partial class MainForm : Form
    {
        public MainForm()
        {
            InitializeComponent();
        }

        private void btnTable1_Click(object sender, EventArgs e)
        {
            Form1 frm1 = new Form1();
            frm1.Show();
        }

        private void btnUsers_Click(object sender, EventArgs e)
        {
            UsersForm frmUsers = new UsersForm();
            frmUsers.Show();
        }

        private void btnPermissions_Click(object sender, EventArgs e)
        {
            PermissionsForm frmPermissions = new PermissionsForm();
            frmPermissions.Show();
        }
    }
}
User restrictions demo
Lets make a new permission and call it "Normal" (where Admin is not checked) and lets make a user and name it "User1" and set to that user the permission "Normal" and password as we want. Lets say we do not want that a normal user can manage the permissions and users table and that only admin users can do it no matter what kind of admin it is. In this demo application we can just hide the Users and Permission buttons if the user that is logged on is no admin user. Let's go again to our main form and add this code to it's initialization part:
btnUsers.Visible = User.IsAdmin;
btnPermissions.Visible = User.IsAdmin;
Do not to forget the using STT! We need that every time we want to access the User class.
The whole MainForm code will look like this:
using System;
using System.Collections.Generic;
using System.ComponentModel;
using System.Data;
using System.Drawing;
using System.Linq;
using System.Text;
using System.Threading.Tasks;
using System.Windows.Forms;
using STT;

namespace STTDemoProject
{
    public partial class MainForm : Form
    {
        public MainForm()
        {
            InitializeComponent();

            btnUsers.Visible = User.IsAdmin;
            btnPermissions.Visible = User.IsAdmin;
        }

        private void btnTable1_Click(object sender, EventArgs e)
        {
            Form1 frm1 = new Form1();
            frm1.Show();
        }

        private void btnUsers_Click(object sender, EventArgs e)
        {
            UsersForm frmUsers = new UsersForm();
            frmUsers.Show();
        }

        private void btnPermissions_Click(object sender, EventArgs e)
        {
            PermissionsForm frmPermissions = new PermissionsForm();
            frmPermissions.Show();
        }
    }
}
If we now open our application and log in with our default user we will se every button. But if we log in with the new User1 with normal permissions we will se only the Table1 button.
That kind of restrictions we can use to separate non admin users from sensitive data without manually managing user permissions in a ERP application.
Points of Interest
In this article we showed the main functionalities of the user and user permissions management of the STT Library. The Demo application is just for demonstration purpose and there was no afford to make it look better or like a "real" application. In our next article we will show how to integrate a TreeView and TabControl to take advantage of our user permissions and to make out demo application look a ready shell for a application that we can use in production. After that we will show more about creating ComboBoxes and binding Form Controls to STT table columns.
Restrictions
The STT login module is just for user separation in the front end. It is not a serious security feature!
History
19.03.2015 - First release.
Born in Bosnia and Herzegowina where I studied Traffic and Communication in the University of Sarajevo. After the Bachelor, found a Job in a Logistic Company in Germany where I live and work now as an Software developer for our Company needs.
With programming I started as an hoby at work. For now I have almost 2 years programing experience. First with excel then VBA in Excel. That growed up to VBA with Access and a first Access DB. Then an SQL Server camed in and VBA with Access could not handle it. The next move was of cource VB.Net but with Visual Studio I came in contact with C#.


