Introduction
The purpose of this article is to demonstrate how one can use the input: file control to select an image file, then use FileReader method to read the file contents, uploading the file to a server using PHP and displaying the file to an image/picture control for preview. The saved image is then used to display a thumbnail in a listview. The image file will be uploaded to a server when a user selects it and a link to the saved path used to reference the thumbnail and preview image.
For this we will create a simple Books database using PHP to store single json records per book on a web server. I first discussed this method of CRUD functionality here.
Some silly assumptions: You are familiar with JQuery Mobile, Javascript, PHP and that you have gone through my article of Create a CRUD Web App using JQuery Mobile and PHP Ajax Calls.
Noticeable with this article's JQuery Mobile App are the following:
1. Left Side Menu/Panel icons are aligned to the left. A listview has been used for each button and a class attribue used for the definition of each of the buttons.
2. A control group has been used on the header right button to add an extra button to the header. This is the export button on the Books Report table.
3. A Right Side Menu/Panel has been added to enable easy access to the added records. Selecting each record opens up the saved record in the database.
Download LibraryJSON.zip
Background
I wanted to have a functionality where a user can select an image file and then this image file can be uploaded and stored on a server and the web app references it and displays it in a listview as a thumbnail and as a preview image. Also I wanted to display this in an image/picture box. Due to this web app using PHP to store the image files on the server, I have opted for the single json records approach I earlier wrote about. This approach can be used with other backends like WebSQL, IndexedDB, LocalStorage, however you will still need PHP to upload the image file to a server.
We will define a simple Books Catalog app to store details for our books. Each book will have some simple fields, for example, Title, Author, ISBN, Condition (bad, fair, good), price, and then the Book image. We will use input: file to allow the user to select an image file from the device and also an image to preview it. Let's look at the resulting output below. The images below have cues in red.
Figure 1: Creating Books (adding books to the books collection)
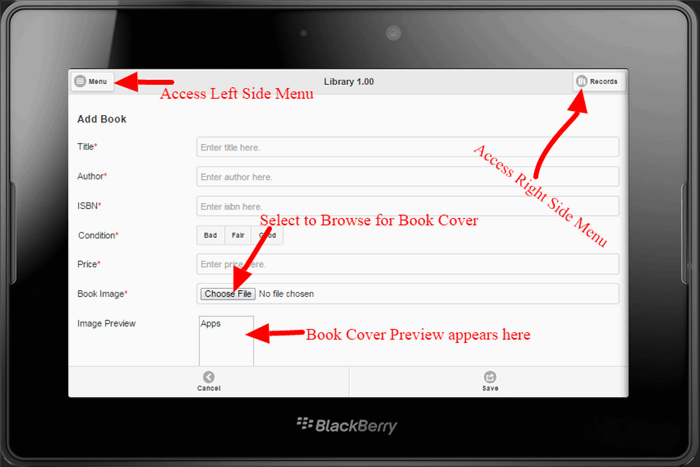
This screen is used to add new books to the collection. One specifies the book title, author, isbn, condition, price and is able to choose a file from available image files in the device. On Apple devices, this basically goes to the gallery. The image preview enables one to preview the image file that was selected before everything is saved. Selecting Records on top right enables one to access the Right Side Panel to view list of available books.
Figure 1.1 Choose File (opens up when Choose File prompt is selected)

This is the file selector that appears when Choose File is selected, which enables one to select the image they want. This is how this looks running inside google chrome on my laptop. It might be different from device to device.
Figure 2: Left Side Panel (Adding multiple books)
This left side panel is used to:
New - add a new book record
New Multiple - add multiple book titles at once
Report - view an exportable report of available books
Back - go back to the book listing
Figure 3: Books Listing (listview showing book cover thumbnail, title, sub title, price and condition)
This screen lists available or captured books within the device. As you will see, all the books are listed in a listview with thumbnails for each book based on what was uploaded in the system. The right side of the screen shows the condition of the book in the side-content and also the price of the book in the count bubble. For each book there is a main title and also a subtitle too.
Figure 4: Right Side Panel (Accessing Book Records)
The right side panel within the add screen enables one to access all records that have been added for the books. One can select "The Penguins", "The Tullips" for example to access those records, the book details will change and show details of the book selected. This Right Side panel is accessible by selecting Records button at top right.
Figure 5: Books Report (Exportable books table report with thumbnails)
I also wanted to have the book covers shown in my report, and thus included them in each cell of the table. The width and height is currently based on 100px for both the preview image when adding each book and this list here. The Export button has been added in the header using a control-group class. I will also show you how this is done.
Figure 6. Adding multiple book titles
I've created this screen for multiple book title entries. For example if one has multiple records, especially meta data, such screens can be used for such entries. The book titles should be separated by semicolon for the app to recognise each book title from this screen. For example from the screen above, 4 books will be added which will later be updated with their contents. I've used such screens where I have to define dynamic droplist / selectmenus items and then refer such details to screens that use them.
The Primary Key for each book is the book title, thus this method has been followed. Now lets look at the source code for each of these screens in detail.
Using the code
1. Creating Books
In creating an app of this nature you follow the usual boiler-plate methodology of creating your JQuery Mobile apps by first defining your main index.html file with respective links to css files, js files and image files. In our library, each book is stored as a single json file record within the Book folder of the server. This folder gets created as soon as a book is added. One should ensure that the server has permissions to write and read using php. We will be using a couple of php files to attain our objective with this application.
1.1 Creating Books - html definition
    <div id="pgAddBook" data-role="page">
      <div data-position="left" data-display="overlay" data-position-fixed="true" id="pgAddBookLeftPnl" data-role="panel">
        <ul data-role="listview" id="pgAddBookLeftPnlLV">
          <li>
            <a data-transition="slide" href="#pgAddBook" class="ui-btn ui-icon-plus ui-btn-icon-left">New</a>
          </li>
          <li>
            <a data-transition="slide" href="#pgAddMultBook" class="ui-btn ui-icon-plus ui-btn-icon-left">New Multiple</a>
          </li>
          <li>
            <a data-transition="slide" href="#pgRptBook" class="ui-btn ui-icon-eye ui-btn-icon-left">Report</a>
          </li>
          <li>
            <a data-transition="slide" href="#pgBook" class="ui-btn ui-icon-carat-l ui-btn-icon-left">Back</a>
          </li>
        </ul>
      </div>
      <div data-position="right" data-display="overlay" data-position-fixed="true" id="pgAddBookRightPnl" data-role="panel">
        <ul data-role="listview" id="pgAddBookRightPnlLV"></ul>
      </div>
      <header id="pgAddBookHdr" data-role="header" data-position="fixed" data-tap-toggle="false">
      <h1>Library 1.00</h1>
      <a data-role="button" id="pgAddBookMenu" data-icon="bars" href="#pgAddBookLeftPnl" class="ui-btn-left">Menu</a>
      <a data-role="button" id="pgAddBookRightMenu" data-icon="records" href="#pgAddBookRightPnl"
      class="ui-btn-right">Records</a></header>
      <div id="pgAddBookCnt" data-role="content">
        <h3>Add Book</h3>
        <div id="pgAddBookForm">
          <div data-role="fieldcontain">
          <label for="pgAddBookTitle">Title
          <span class='red'>*</span></label>
          <input required="" name="pgAddBookTitle" title="Enter title here." type="text" id="pgAddBookTitle"
          placeholder="Enter title here." autocomplete="off" data-clear-btn="true" /></div>
          <div data-role="fieldcontain">
          <label for="pgAddBookAuthor">Author
          <span class='red'>*</span></label>
          <input required="" name="pgAddBookAuthor" title="Enter author here." type="text" id="pgAddBookAuthor"
          placeholder="Enter author here." autocomplete="off" data-clear-btn="true" /></div>
          <div data-role="fieldcontain">
          <label for="pgAddBookISBN">ISBN
          <span class='red'>*</span></label>
          <input required="" name="pgAddBookISBN" title="Enter isbn here." type="text" id="pgAddBookISBN"
          placeholder="Enter isbn here." autocomplete="off" data-clear-btn="true" /></div>
          <div data-role="fieldcontain">
            <fieldset id="fspgAddBookCondition" data-role="controlgroup" data-type="horizontal" data-mini="true">
              <legend>Condition
              <span class='red'>*</span></legend>
              <div id="fsDivpgAddBookCondition" class="borderdv">
              <input type="radio" id="pgAddBookConditionbad" name="pgAddBookCondition" autocomplete="off" value="bad" />
              <label for="pgAddBookConditionbad">Bad</label>
              <input type="radio" id="pgAddBookConditionfair" name="pgAddBookCondition" autocomplete="off" value="fair" />
              <label for="pgAddBookConditionfair">Fair</label>
              <input type="radio" id="pgAddBookConditiongood" name="pgAddBookCondition" autocomplete="off" value="good" />
              <label for="pgAddBookConditiongood">Good</label></div>
            </fieldset>
          </div>
          <div data-role="fieldcontain">
          <label for="pgAddBookPrice">Price
          <span class='red'>*</span></label>
          <input required="" name="pgAddBookPrice" title="Enter price here." type="number" id="pgAddBookPrice"
          placeholder="Enter price here." autocomplete="off" data-clear-btn="true" /></div>
          <div data-role="fieldcontain">
          <label for="pgAddBookBookImage">Book Image
          <span class='red'>*</span></label>
          <input required="" name="pgAddBookBookImage" title="Enter book image here." type="file" id="pgAddBookBookImage"
          placeholder="Enter book image here." autocomplete="off" data-clear-btn="true" /></div>
          <div data-role="fieldcontain">
          <label for="pgAddBookImagePreview">Image Preview</label>
          <img name="pgAddBookImagePreview" id="pgAddBookImagePreview" height="100px" width="100px" src="apps.png"
          alt="Apps" /></div>
        </div>
      </div>
      <footer id="pgAddBookFtr" data-role="footer" data-position="fixed" data-tap-toggle="false">
        <div id="pgAddBookFtrNavBar" data-role="navbar">
          <ul>
            <li>
              <a id="pgAddBookBack" data-icon="carat-l">Cancel</a>
            </li>
            <li>
              <a type="submit" id="pgAddBookSave" data-icon="action">Save</a>
            </li>
          </ul>
        </div>
      </footer>
    </div>
Above is the screen definition for Adding each of the books. We have indicated that this screen has a left side panel and a right side panel and these have listviews that reference some particular actions.
Left Side Panel
    <div data-position="left" data-display="overlay" data-position-fixed="true" id="pgAddBookLeftPnl" data-role="panel">
      <ul data-role="listview" id="pgAddBookLeftPnlLV">
        <li>
          <a data-transition="slide" href="#pgAddBook" class="ui-btn ui-icon-plus ui-btn-icon-left">New</a>
        </li>
        <li>
          <a data-transition="slide" href="#pgAddMultBook" class="ui-btn ui-icon-plus ui-btn-icon-left">New Multiple</a>
        </li>
        <li>
          <a data-transition="slide" href="#pgRptBook" class="ui-btn ui-icon-eye ui-btn-icon-left">Report</a>
        </li>
        <li>
          <a data-transition="slide" href="#pgBook" class="ui-btn ui-icon-carat-l ui-btn-icon-left">Back</a>
        </li>
      </ul>
    </div>
We have defined this panel with an overlay display property. Inside it there is a listview which has buttons, New, New Multiple, Report and Back and indicated before. Instead us using most data- attributes for the buttons in this listview we have used a class to define the buttons as we wanted the buttons to have left sided icons. By specifying data-position="left" the panel will be placed on the left side of the page.
<li><a data-transition="slide" href="#pgAddBook" class="ui-btn ui-icon-plus ui-btn-icon-left">New</a></li>
We did this by adding a class with these properties: "ui-btn ui-icon-plus ui-btn-icon-left" so that the icon appears on the left side of the text for example and also defining our anchor as a button.
Right Side Panel
We have also defined a right side panel within this page to be used to list all available book records.
<div data-position="right" data-display="overlay" data-position-fixed="true" id="pgAddBookRightPnl" data-role="panel">
  <ul data-role="listview" id="pgAddBookRightPnlLV"></ul>
</div>
Within this panel, we also added a listview with name "pgAddBookRightPnlLV". As you can see this panel is empty however as soon as you add more and more books it gets updated as through code it gets loaded. I will explain this later.
Horizontal Radio Button Group
We have also defined a horizontal radio button group in our form for a user to select the condition of the book. This was defined like this.
<div data-role="fieldcontain">
   <fieldset id="fspgAddBookCondition" data-role="controlgroup" data-type="horizontal" data-mini="true">
     <legend>Condition<span class='red'>*</span></legend>
     <div id="fsDivpgAddBookCondition" class="borderdv">
      <input type="radio" id="pgAddBookConditionbad" name="pgAddBookCondition" autocomplete="off" value="bad" />
      <label for="pgAddBookConditionbad">Bad</label>
      <input type="radio" id="pgAddBookConditionfair" name="pgAddBookCondition" autocomplete="off" value="fair" />
      <label for="pgAddBookConditionfair">Fair</label>
      <input type="radio" id="pgAddBookConditiongood" name="pgAddBookCondition" autocomplete="off" value="good" />
      <label for="pgAddBookConditiongood">Good</label>
     </div>
   </fieldset>
 </div>
For some reasons, the control groups become larger than other controls and thus I have decided to add data-mini="true" to them for proper appearance.
File Input
For us to be able to choose an image file for each book, we needed a file input control. We defined it like this.
<div data-role="fieldcontain">
    <label for="pgAddBookBookImage">Book Image<span class='red'>*</span></label>
    <input required="" name="pgAddBookBookImage" title="Enter book image here." type="file" id="pgAddBookBookImage"
    placeholder="Enter book image here." autocomplete="off" data-clear-btn="true" />
</div>
and to be able to preview our image, added an image control like this.
<div data-role="fieldcontain">
   <label for="pgAddBookImagePreview">Image Preview</label>
   <img name="pgAddBookImagePreview" id="pgAddBookImagePreview" height="100px" width="100px" src="apps.png" alt="Apps"></img>
</div>
That concludes the crux of our book creation screen definition.
When adding a new book, a user will enter the details of the book, select the image for the book and this gets loaded and previewed on the image. The loading and preview of the image happens on the "pgAddBookBookImage_onchange" event of the file control. This is defined with this js.
File OnChange Event
$('#pgAddBookBookImage').on('change', function () {
$.mobile.loading("show", {
text : "Loading file...",
textVisible : true
});
var fName = document.getElementById('pgAddBookBookImage').files[0];
if (typeof(fName) === 'undefined')
fName = '';
if (Len(fName) > 0) {
var ofName = fName.name;
var ofExt = Mid(ofName, InStrRev(ofName, '.'));
var reader = new FileReader();
reader.onload = function () {
var dataURL = reader.result;
var req = Ajax("savepng.php", "POST", "file=" + ofName + "&content=" + dataURL);
if (req.status == 200) {
fName = req.responseText;
$('#pgAddBookImagePreview').attr('src', dataURL);
toastr.success(ofName + ' file uploaded.', 'Library');
} else {
fName = '';
toastr.error(ofName + ' file NOT uploaded.', 'Library');
}
$('#pgAddBookBookImage').data('file', fName);
};
reader.readAsDataURL(fName);
} else {}
$.mobile.loading("hide");
});
After a user selects a file, the onchange event fires. The selected file details are assigned to fName variable. A FileReader variable is created to read the file contents and the reader.onload function called with reader.readAsDataURL. When that is finished the file contents are assigned to dataURL from reader.result. This then gets passed to savepnp.php to save on the server. When uploaded to the server, the image preview is shown using the file path of the image file that has been saved, toasting to the user whether the file was saved or not.
You should note that the preview image receives the actual base64 string contents of the file and a data-file attribute is assigned to it of the file name.
savepng.php
This php script is passed the file name and the contents of the file to process. Let's look at it.
<?php
if (!is_dir('./Files/')) {
mkdir('./Files/');
}
$file = basename($_REQUEST['file']);
$file = 'Files/'. $file;
$content = $_REQUEST['content'];
$content = str_replace('data:image/png;base64,', '', $content);
$content = str_replace('data:image/jpeg;base64,', '', $content);
$content = str_replace('data:image/gif;base64,', '', $content);
$content = str_replace(' ', '+', $content);
$content = base64_decode($content);
$success = file_put_contents($file, $content);
echo $file;
?>
From above, a folder named Files is created on the root of our app folder in the web server. Ensure that permissions are set properly for this to work. The passed file name and file contents are extracted. As this is currently text, there is some clean up that we need to perform. We assume that the files can be png, jpeg and gif, this we clean the base64 image string, by removing these from the content. We then decode the cleaned image by using base64_decode and then save this using the image file name.
By using the actual image file name, this ensures that no duplicate images are stored on the server.
All of this happens before a book record is saved. For now we assume that all selected images will be for the books that will be saved.
1.2. Creating Books - javascript
Saving the books to the back end json files happens like this as soon as the user clicks Save. From above, the image file has already been uploaded and its link has been saved. savepng.php above echoed back the complete file path of the file on the server, thus we use that to save the reference to the image file. To demonstrate how to save the base64 image string, we also save the preview image scr attribute to the json file, just for demonstration (that is not used anywhere within the app as the image file reference is used for referencing our thumbnails and the images shown on the report)
$('#pgAddBookSave').on('click', function (e) {
e.preventDefault();
e.stopImmediatePropagation();
var BookRec = pgAddBookGetRec();
app.addBook(BookRec);
});
As soon as a user clicks Save on the Add book screen, the book records are read from the controls and stored in an object when the code below runs.
var BookRec = pgAddBookGetRec();
This object is then passed to app.addBook to ensure the final process of adding this to the backend is done. Lets look at these.
function pgAddBookGetRec() {
var BookRec = {};
BookRec.Title = $('#pgAddBookTitle').val().trim();
BookRec.Author = $('#pgAddBookAuthor').val().trim();
BookRec.ISBN = $('#pgAddBookISBN').val().trim();
BookRec.Condition = $('input:radio[name=pgAddBookCondition]:checked').val();
BookRec.Price = $('#pgAddBookPrice').val().trim();
BookRec.BookImage = $('#pgAddBookBookImage').data('file');
BookRec.ImagePreview = $('#pgAddBookImagePreview').attr('src');
return BookRec;
}
All the input control contents are read. The src attribute that contains the base64 image string is also read and stored.
app.addBook = function (BookRec) {
$.mobile.loading("show", {
text : "Creating record...",
textVisible : true
});
var Title = BookRec.Title;
Title = Title.split(' ').join('-');
BookRec.Title = Title;
var recordJSON = JSON.stringify(BookRec);
var req = Ajax("jsonSaveBook.php", "POST", recordJSON);
if (req.status == 200) {
toastr.success('Book record saved.', 'Library');
var pgFrom = $('#pgAddBook').data('from');
switch (pgFrom) {
case "pgSignIn":
$.mobile.changePage('#pgSignIn', {
transition : pgtransition
});
break;
default:
pgAddBookClear();
}
} else {
toastr.error('Book record not saved. Please try again.', 'Library');
}
$.mobile.loading("hide");
};
From above, app.addBook receives the object that contains the book record. The primary key is cleaned for spaces and then the object converted into a JSON string. This is then posted to the server with jsonSaveBook.php
1.3. Creating Books - php
<?php
$record = file_get_contents('php://input');
$jsonrec = json_decode($record);
$Title = $jsonrec->Title;
if (!is_dir('./Book/')) {
mkdir('./Book/');
}
$jsonFile = "Book/" . $Title . ".json";
$f = fopen($jsonFile, 'w') or die("Error: Can't open file. Got write permission?");
fwrite($f, $record);
fclose($f);
?>
jsonSaveBook.php then receives the book json string, reads it, decodes it to get the book title, creates a Book directory on the server if it does not exist and then write the book contents into a json file, resulting in something like this...
Book JSON Record
{"Title":"Jellyfish",
    "Author":"Jelly Author",
    "ISBN":"ISBN3",
    "Condition":"good",
    "Price":"50.00",
    "BookImage":"Files/Jellyfish.jpg",
    "ImagePreview":"data:image/jpeg;base64,/9j/4AAQSkZJRgABAgEAYABgAAD/4QwtRXhpZgAATU0AKgAAAAgABwEyAAIAAAAUAAAAYkdGAAMAAAABAAUAAEdJAAMAAAABAFgAAIKYAAIAAAAWAAAAdpydAAEAAAAUAAAAAOocAAcAAAfSAAAAAIdpAAQAAAABAAAAjAAAAPYyMDA5OjAzOjEyIDEzOjQ4OjIzAE1pY3Jvc29mdCBDb3Jwb3JhdGlvbgAABZADAAIAAAAUAAAAzpAEAAIAAAAUAAAA4pKRAAIAAAADMDgAAJKSAAIAAAADMDgAAOocAAcAAAe0AAAAAAAAAAAyMDA4OjAyOjExIDExOjMyOjI0ADIwMDg6MDI6MTEgMTE6MzI6MjQAAAUBAwADAAAAAQAGAAABGgAFAAAAAQAAATgBGwAFAAAAAQAAAUACAQAEAAAAAQAAAUgCAgAEAAAAAQAACt0AAAAAAAAASAAAAAEAAABIAAAAAf/Y/+AAEEpGSUYAAQEAAAEAAQAA/9sAQwAQCwwODAoQDg0OEhEQExgoGhgWFhgxIyUdKDozPTw5Mzg3QEhcTkBEV0U3OFBtUVdfYmdoZz5NcXlwZHhcZWdj/9sAQwEREhIYFRgvGhovY0I4QmNjY2NjY2NjY2NjY2NjY2NjY2NjY2NjY2NjY2NjY2NjY2NjY2NjY2Nj...
Above is the Jellyfish book file record.
2. Adding Multiple Books
2.1 Adding Multiple Books - html definition
<div id="pgAddMultBook" data-role="page">
  <header id="pgAddMultBookHdr" data-role="header" data-position="fixed" data-tap-toggle="false">
    <h1>Library 1.00</h1>
  </header>
  <div id="pgAddMultBookCnt" data-role="content">
    <h3>Add Multiple Books (separate by ;)</h3>
    <div id="pgAddMultBookForm">
      <div data-role="fieldcontain">
      <label for="pgAddMultBookTitle">Titles
      <span class='red'>*</span></label>
      <textarea required="" name="pgAddMultBookTitle" id="pgAddMultBookTitle" placeholder="Enter Titles here."
      title="Enter Titles here."></textarea></div>
    </div>
  </div>
  <footer id="pgAddMultBookFtr" data-role="footer" data-position="fixed" data-tap-toggle="false">
    <div id="pgAddMultBookFtrNavBar" data-role="navbar">
      <ul>
        <li>
          <a id="pgAddMultBookBack" data-icon="carat-l">Cancel</a>
        </li>
        <li>
          <a type="submit" id="pgAddMultBookSave" data-icon="action">Save</a>
        </li>
      </ul>
    </div>
  </footer>
</div>
This screen is basically very easy. Its just a label and a text area control where one must type in multiple book titles separated by a semicolon and click Save. It has a cancel button at the bottom navigator too to take a user back to the previous screen.
2.1 Adding Multiple Books - javascript
As soon as a user clicks the Save button on this screen, the following happens...
$('#pgAddMultBookSave').on('click', function (e) {
e.preventDefault();
e.stopImmediatePropagation();
var multiTitle = $('#pgAddMultBookTitle').val().trim();
app.addMultBook(multiTitle);
});
The entered book titles separated by semicolon are read and stored in a variable called multiTitle. This variable is passed to app.addMultBook to process. Lets look at what that does.
app.addMultBook = function (multiTitle) {
$.mobile.loading("show", {
text : "Creating records...",
textVisible : true
});
var TitleCnt,
TitleTot,
TitleItems,
TitleItem,
Title,
BookRec;
TitleItems = Split(multiTitle, ";");
TitleTot = TitleItems.length - 1;
for (TitleCnt = 0; TitleCnt <= TitleTot; TitleCnt++) {
TitleItem = TitleItems[TitleCnt];
TitleItem = TitleItem.trim();
if (Len(TitleItem) > 0) {
TitleItem = TitleItem.split(' ').join('-');
Title = TitleItem;
BookRec = {};
BookRec.Title = TitleItem;
var recordJSON = JSON.stringify(BookRec);
var req = Ajax("jsonSaveBook.php", "POST", recordJSON);
}
}
$('#pgAddMultBookTitle').val('');
$.mobile.changePage('#pgBook', {
transition : pgtransition
});
$.mobile.loading("hide");
};
This method receives the delimited book titles. These are then split into an array. Using a loop method, each book title is cleaned, assigned to an object and then saved using jsonSaveBook.php as explained above. As you have noted, saving the book is the same however this is now inside a loop. When done, the book listing is shown. For each added book here though the other details like price, image etc still need to be updated. I have discovered that any book titles that dont have alphabetic characters at the beginning dont work favourably with the book listing.
3. Books Listing
This provides a list of all captured books in the Library app. For each book saved, it is read from the server and listed.
3.1 Books Listing - html definition
<div id="pgBook" data-role="page">
  <div data-position="left" data-display="overlay" data-position-fixed="true" id="pgBookLeftPnl" data-role="panel">
    <ul data-role="listview" id="pgBookLeftPnlLV">
      <li>
        <a data-transition="slide" href="#pgAddMultBook" class="ui-btn ui-icon-plus ui-btn-icon-left">New Multiple</a>
      </li>
      <li>
        <a data-transition="slide" href="#pgRptBook" class="ui-btn ui-icon-eye ui-btn-icon-left">Report</a>
      </li>
      <li>
        <a data-transition="slide" href="#pgMenu" class="ui-btn ui-icon-carat-l ui-btn-icon-left">Back</a>
      </li>
    </ul>
  </div>
  <header id="pgBookHdr" data-role="header" data-position="fixed" data-tap-toggle="false">
  <h1>Library 1.00</h1>
  <a data-role="button" id="pgBookMenu" data-icon="bars" data-transition="slide" href="#pgBookLeftPnl"
  class="ui-btn-left">Menu</a>
  <a data-role="button" id="pgBookNew" data-icon="plus" data-theme="b" class="ui-btn-right">New</a></header>
  <div id="pgBookCnt" data-role="content">
    <h3>Books</h3>
    <ul data-role="listview" data-inset="true" id="pgBookList" data-filter="true" data-filter-placeholder="Search Books">
      <li data-role="list-divider">Your Books</li>
      <li id="noBook">You have no books</li>
    </ul>
  </div>
</div>
This page by its nature its just a blank page and updated dynamically just before it is shown by the application. This page has a left panel thats similar to the Add Book one as discussed above, then a listview named pgBookList that will be updated in run time. A couple of js functions make this possible. These are app.checkForBookStorage, app.getBook and app.displayBook.
app.BookBindings = function () {
$(document).on('pagebeforechange', function (e, data) {
var toPage = data.toPage[0].id;
switch (toPage) {
case 'pgBook':
$('#pgRptBookBack').data('from', 'pgBook');
app.checkForBookStorage();
break;
The code above demonstrates what happens just before the book listing page is shown, this page is called pgBook. The app.checkForBookStorage function is called. These are explained below.
3.2 Books Listing - javascript
app.checkForBookStorage
app.checkForBookStorage = function () {
$.mobile.loading("show", {
text : "Checking storage...",
textVisible : true
});
var BookObj = app.getBook();
if (!$.isEmptyObject(BookObj)) {
app.displayBook(BookObj);
} else {
$('#pgBookList').html(BookHdr + noBook).listview('refresh');
}
$.mobile.loading("hide");
};
app.checkStorage executes just before the listing page is displayed. This calls app.getBook which goes to the server and reads all records of available books and stores this in an object. This is the object that contains each book that gets passed to app.displayBook to generate the final listview content.
app.getBook
app.getBook = function () {
$.mobile.loading("show", {
text : "Getting records...",
textVisible : true
});
var BookObj = {};
var icnt,
itot;
var req = Ajax("jsonGetBook.php");
if (req.status == 200) {
var recFiles = req.responseText;
recFiles = recFiles.split('\n');
itot = recFiles.length - 1;
for (icnt = 0; icnt <= itot; icnt++) {
var recFile = recFiles[icnt];
if (recFile.length > 0) {
var req = Ajax("jsonGetBook.php?file=" + encodeURIComponent(recFile));
if (req.status == 200) {
var record = JSON.parse(req.responseText);
var Title = record.Title;
record.Title = record.Title.split('-').join(' ');
BookObj[Title] = record;
}
}
}
var keys = Object.keys(BookObj);
keys.sort();
var sortedObject = Object();
var i;
for (i in keys) {
key = keys[i];
sortedObject[key] = BookObj[key];
}
BookObj = sortedObject;
return BookObj;
}
$.mobile.loading("hide");
};
app.getBook runs ajax and calls the jsonGetBook.php file. This returns a list of the file names within the Book folder of the server. For each book returned the same method is called now to return the actual book contents which will have the book title, author, isbn and image link. These are all saved into an object that contains all the books which is passed to app.displayBook. See jsonGetBook.php below.
app.displayBook
app.displayBook = function (BookObj) {
$.mobile.loading("show", {
text : "Displaying records...",
textVisible : true
});
var html = '';
var n;
for (n in BookObj) {
var BookRec = BookObj[n];
var pkey = BookRec.Title;
pkey = pkey.split('-').join(' ');
BookRec.Title = pkey;
var nItem = BookLi;
nItem = nItem.replace(/Z2/g, n);
var nTitle = '';
nTitle = n.split('-').join(' ');
nItem = nItem.replace(/Z1/g, nTitle);
var nCountBubble = '';
nCountBubble += BookRec.Price;
nItem = nItem.replace(/COUNTBUBBLE/g, nCountBubble);
var nDescription = '';
nDescription += BookRec.Author;
nDescription += ', ';
nDescription += BookRec.ISBN;
nItem = nItem.replace(/DESCRIPTION/g, nDescription);
var nSideContent = '';
nSideContent += BookRec.Condition;
nItem = nItem.replace(/SIDECONTENT/g, nSideContent);
var nThumbNail = '';
nThumbNail += BookRec.BookImage;
nItem = nItem.replace(/THUMBNAIL/g, nThumbNail);
html += nItem;
}
$('#pgBookList').html(BookHdr + html).listview('refresh');
$.mobile.loading("hide");
};
app.DisplayBook receives objects of all the read books, loops through each and update the listview accordingly. There are varibles that are initially defined to define each book listing.
var BookLi = '<li><a data-id="Z2"><img src="THUMBNAIL" alt=""></img><h2>Z1</h2><p>DESCRIPTION</p><p><span class="ui-li-aside">SIDECONTENT</span></p><p><span class="ui-li-count">COUNTBUBBLE</span></p></a></li>';
var BookHdr = '<li data-role="list-divider">Your Books</li>';
var noBook = '<li id="noBook">You have no books</li>';
And these get used to ensure a proper display of each book record within the app.displayBook loops above. From above, the countbubble receives the price of each book, the description/sub title gets the author and isbn and the sidecontent the condition of the book. The thumbnail gets the image path on the server.
3.3 Books Listing - php
jsonGetBook.php
<?php
If (isset($_REQUEST['file'])) {
$file = basename($_REQUEST['file']);
echo file_get_contents('./Book/'.$file);
} Else {
If (is_dir('./Book') && $handle = opendir('./Book/')) {
While (False !== ($entry = readdir($handle))) {
If (!is_dir($entry)) {
echo basename($entry)."\n";
}
}
closedir($handle);
} Else {
header("HTTP/1.0 404 Not Found");
}
}
?>
From the above script, when a file is passed as a part of the URL, this script returns the file contents. When no file is returned all the file names within that directory are returned.
3.4 Book Listing - on book click
$(document).on('click', '#pgBookList a', function (e) {
e.preventDefault();
e.stopImmediatePropagation();
var href = $(this).data('id');
href = href.split(' ').join('-');
$('#pgEditBook').data('id', href);
$.mobile.changePage('#pgEditBook', {
transition : pgtransition
});
});
When each book is selected from the book listing, its book title is read from the data-id attribute. This was set when each book was added to the listview with app.displayBook. Then the pgEditBook page is shown which displays the book details. This page is exactly the same as pgAddBook to add books but has just been separated for ease of code maintenance. However, it provides functionality to delete a book. For more details, please refer to the article mentioned in the introduction section of this article.
4. Right Side Panel
As indicated above, the right side panel is basically an empty listview that gets update dynamically whenever a book is added. The html definition of this panel was discussed above.
4.1 Right Side Panel - javascript
The same premise of updating the Book listing is followed here however only the book title is updated in this listview. This is initially defined as follows for each book record for this panel
var BookLiRi = '<li><a data-id="Z2">Z1</a></li>';
The applicable methods, just like the ones to update the book listing are the following:
app.pgAddBookcheckForBookStorageR and app.pgAddBookdisplayBookR.
Notice the R at the end of each.
NB: These follow the same methodology as discussed above and thus will be a rediscussion of the same thing. Please explorer the source code for more details.
You might have noted that the "Records" icon is a custom icon and not the normal icon from JQuery Mobile. This was achieved by defining it as follows:
.ui-icon-records:after {background-image: url("records.png");background-size: 14px 14px;}
A user defined png was used and a css style added to the html definition.
5. Books Report
The books report is initially a blank table that gets updated just before the report screen is shown.
5.1 Books Report - html definition
<div id="pgRptBook" data-role="page">
<header id="pgRptBookHdr" data-role="header" data-position="fixed" data-tap-toggle="false">
<h1>Library 1.00</h1>
<a data-role="button" id="pgRptBookBack" data-icon="carat-l" class="ui-btn-left">Back</a>
<div data-role="controlgroup" data-type="horizontal" class="ui-btn-right" style="margin-top:0;border-top:0;">
<a data-role="button" download="Book.xls" onclick="return ExcellentExport.excel(this, 'RptBook', 'Book');"
id="pgRptBookExport" data-icon="exportexcel" href="#">Export</a>
<a data-role="button" id="pgRptBookNew" data-icon="plus" data-theme="b" data-transition="slide"
href="#pgAddBook">New</a></div>
</header>
<div id="pgRptBookCnt" data-role="content">
<table id="RptBook" data-column-btn-text="Columns To Display" data-column-btn-theme="b" data-role="table"
data-mode="columntoggle" data-column-popup-theme="a" class="ui-responsive table-stroke table-stripe ui-shadow">
<caption>Books Report</caption>
<thead>
<tr class="ui-bar-a">
<th class="ui-bar-a ui-body-c">Title</th>
<th data-priority="2" class="ui-bar-a ui-body-c">Author</th>
<th data-priority="3" class="ui-bar-a ui-body-c">ISBN</th>
<th data-priority="4" class="ui-bar-a ui-body-c">Condition</th>
<th data-priority="5" class="ui-bar-a ui-body-c">Price</th>
<th data-priority="6" class="ui-bar-a ui-body-c">Image Preview</th>
</tr>
</thead>
<tfoot>
<tr>
<td></td>
</tr>
<tr>
<td class='ui-body-c' colspan="6">Powered by JQM.Show -
https://play.google.com/store/apps/details?id=com.b4a.JQMShow</td>
</tr>
</tfoot>
</table>
</div>
</div>
This screen has three buttons on its header to go back, export to excel and also add a new book. To be able to achieve the two buttons on the right, I used a controlgroup as depicted below.
<div data-role="controlgroup" data-type="horizontal" class="ui-btn-right" style="margin-top:0;border-top:0;">
    <a data-role="button" download="Book.xls" onclick="return ExcellentExport.excel(this, 'RptBook', 'Book');" id="pgRptBookExport" data-icon="exportexcel" href="#">Export</a>
    <a data-role="button" id="pgRptBookNew" data-icon="plus" data-theme="b" data-transition="slide" href="#pgAddBook">New</a>
</div>
From above you can note that within this div controlgroup there is an Export button and a New button. The data icon for the Export button is user defined also like this, using an own icon.
.ui-icon-exportexcel:after {background-image: url("exportexcel.png");background-size: 14px 14px;}
The table is defined with all the columns related to the books. On the image preview we want to show each book cover.
5.2 Books Report - javascript
As indicated, before the book report is show, the book report is generated. This is done by calling
app.BookRpt();
You can see this inside this function.
$(document).on('pagebeforechange', function (e, data) {
app.BookRpt
app.BookRpt = function () {
$.mobile.loading("show", {
text : "Loading report...",
textVisible : true
});
$('#RptBook tbody tr').remove();
var BookObj = app.getBook();
var newrows = '';
var n;
for (n in BookObj) {
var BookRec = BookObj[n];
n = n.split('-').join(' ');
var eachrow = '<tr>';
eachrow += '<td class="ui-body-c">' + n + '</td>';
eachrow += '<td class="ui-body-c">' + BookRec.Author + '</td>';
eachrow += '<td class="ui-body-c">' + BookRec.ISBN + '</td>';
eachrow += '<td class="ui-body-c">' + BookRec.Condition + '</td>';
eachrow += '<td class="ui-body-c">' + BookRec.Price + '</td>';
eachrow += '<td class="ui-body-c"><img src=' + BookRec.BookImage + ' alt="" height=100px width=100px></img>' + '</td>';
eachrow += '</tr>';
newrows += eachrow;
}
$('#RptBook').append(newrows);
$('#RptBook').table('refresh');
$.mobile.loading("hide");
};
This method first clears the table that displays the books, executes the app.getBook method discussed above, loops through each book record and extract the title, author, isbn, condition, price and link to the book cover.
The definition that does the magic to show each book cover is depicted below:
eachrow += '<td class="ui-body-c"><img src=' + BookRec.BookImage + ' alt="" height=100px width=100px></img>' + '</td>';
The height and width defined here are the same as per Add Book page.
Points of Interest
The enjoyable parts for me and things I learned from this were...
1. Left Side Panel listview button icons that are left aligned
2. Custom icons for the buttons
3. Right Side Panels
4. File input OnChange event and FileReader to upload images on server
5. Decoding base64 strings to save images to server.
6. Displaying images on a table and also listview thumbnails.
History
This is a continuation of my articles on JQuery Mobile CRUD functionality but with some added functionality for storing images on the server, multiple buttons on headers, custom icons, right side panel and php. As a reference point, Create a CRUD Web App using JQuery Mobile and PHP Ajax Calls. will he helpful for other things that are not mentioned in this article.
That's all folks, Enjoy!
I'm a Bachelor of Commerce graduate, fell inlove with ICT years back with VB5. Used Pick & System Builder to create a windows app. Very curious, developed my first web database app called Project.Show using ExtJS. Published on Google Play Store, learned JQuery Mobile, a project manager at best. My first intranet app eFas with MySQL.
Fear closes people to a lot of things and we hold ourselves back being held by it. Thus the sooner you believe you can't do something, the sooner everything will work towards that belief. Believe in yourself at all times because you can do anything you set your mind to it!
I have a very beautiful woman and four kids, the best joys in the world. East London, South Africa is currently home.
Awards:
Best Mobile Article of February 2015 (First Prize)
http://www.codeproject.com/Articles/880508/Create-a-CRUD-web-app-using-JQuery-Mobile-and-Loca
Best Mobile Article of May 2015 (Second Prize)
http://www.codeproject.com/Articles/991974/Creating-JQuery-Mobile-CRUD-Apps-using-JQM-Show-Ge
Apps
Bible.Show (Android Store App)
https://www.facebook.com/bibleshow
https://play.google.com/store/apps/details?id=com.b4a.BibleShow
JQM.Show (Android Store App)
https://www.facebook.com/jqmshow
https://play.google.com/store/apps/details?id=com.b4a.JQMShow
CodeProject.Show (An offline CodeProject Article writer)
http://www.codeproject.com/Articles/993453/CodeProject-Show-A-CodeProject-offline-article-wri


 General
  News
News  Suggestion
  Question
  Bug
Bug  Answer
  Joke
Joke  Praise
  Rant
Rant  Admin
Admin 


