Introduction
The packers are just tools that try to encrypt a program to make it hard to be reversed. These tools can be used by many as anti-crackers and more in worms and viruses. Reversing the packer is a waste of time and not a good strategy, so there's the solution.
You can create an unpacker for these types of packers with only 10 lines, and maybe create a tool that unpacks most of the known packers. You can create this unpacker easily with Pokas x86 Emulator.
Pokas x86 Emulator
Many generic unpackers appeared, but none of them were easily usable and hence customizable. However, this tool is maybe the best tool in the unpacking field right now as it is very easy to use, very easy to be customized and open source. Now you will ask me, what's the meaning of Emulator?
Emulator is a program that simulates the processor and memory. Do what they do... diassembles an instruction and runs it in virtual registers and memory. These programs don't run without stopping, but they stop by a breakpoint you added in the debugger that is included in the emulator. This breakpoint should stop the emulator at the OEP (the original entry point).
So What's Pokas x86 Emulator?
Pokas x86 Emulator is an Application-Only emulator created for generic unpacking and testing the antivirus detection algorithms.
This Emulator has many features. Some of them are:
- Has an assembler and a disassembler from and to mnemonics.
- Support adding new APIs and adding the emulation function to them.
- Support a very powerful debugger that has a parser that parses the condition you give and creates a very fast native code that performs the check on this condition.
- Supports
seh and supports tib, teb, peb and peb_ldr_data. - It monitors all the memory writes and log up to 10 previous Eips and saves the last accessed and the last modified place in memory.
- It support 6 APIs:
GetModuleHandleA, LoadLibrayA, GetProcAddress, VirtualAlloc, VirtualFree and VirtualProtect. - With all of these, it's FREE and open source. It successfully emulates:
- UPX
- FSG
- MEW
- Aspack
- PECompact
- Morphine
How can I get Pokas x86 Emulator?
You can get the emulator from here. You will find a good documentation of everything in the emulator.
Why Should I Program an Unpacker?
Some people who love challenges will ask why I should program an unpacker even if it's only near 10 lines code with this emulator?
I want to say that coding the unpacker is the last step you should do. First, you should begin with reversing and finding the all anti-unpackers tricks. Then you should find the suitable breakpoint that bypasses all the packer defences and then begin converting all these into code.
The Emulator Design
I don't want to dig into the emulator, but I think it is like this:
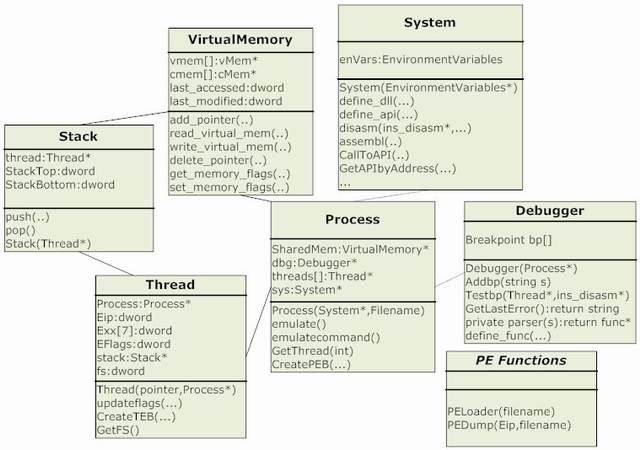
Now I will describe the emulator components and classes that are in the UML figure.
System: This is the Emulated Operating System and CPU. This class is used for disassembling and emulating assembly instructions and APIs. It also has the ability to assemble and disassemble any instruction from or to mnemonics for easy to debug or fix any error and also it could be used in any application as a separate component.
Process: This class is the emulated application. This class is the real emulator as it calls the system functions to emulate, calls the debugger for checking the breakpoints, manage the threads and handle the exceptions (if SEH is enabled).
It also manages the virtual memory and creates the PEB structure.
Thread: This class contains all variables that we need to emulate with. It contains the registers, Eip and EFlags and fs segment. It doesn't have the debug registers (because there is no need for it) and all segments except fs. It also creates the TEB structure and handles the SEH.
Virtual Memory: This class is used to emulate the memory. It doesn't support pages, but it simply adds a pointer and the equivalent virtual pointer and the size of that buffer.
It also monitors the memory writes and detects the invalid pointers and the writing on a read only page.
It also supports VirtualProtect API.
Stack: It's a small class used to push or pop a value from or to the stack and saves the top and bottom of stack in two variables, but it doesn't support resizing.
Debugger: This class is used for adding the stop condition for the emulator. It takes a condition in a string format (ex: "eip==0x4001000 && ecx>=100") and this condition is checked with every instruction emulated by emulate or emulatecommand functions.
The feature of this debugger that it doesn't decrease the performance as it parses the string and converts it into assembly and then converts it by the assembler into a native code to be run in every check on this breakpoint.
PE: This is not a class. It's a library that contains separate functions for working with the PE executables. It contains two functions:
PELoader: This function loads a PE file into memoryPEDump: This function dumps a PE file from memory to the disk with a given entrypoint and sets the import directory to zero.
Using the Emulator
Don't worry if you don't understand many of the descriptions above. You will see that the usage of this emulator is very simple:
- Initialize your Emulated OS and CPU
- Manage the DLLs and Apis
- Emulate the undefined Apis
- Adding the Stop Condition
- Emulate your Process
- Handle the Unhandled Exceptions
- Wait for your Breakpoints to be triggered
- Dump your Process to a File
Let's see an example:
#include <cstdlib>
#include <iostream>
#include "x86emu.h"
using namespace std;
int main() {
EnviromentVariables* vars= (EnviromentVariables*)malloc
(sizeof(EnviromentVariables));
memset( vars,0,sizeof(EnviromentVariables));
vars->dllspath="C:\\Windows\\System32\\";
vars->kernel32=(dword)GetModuleHandleA("kernel32.dll");
vars->user32=(dword)LoadLibraryA("user32.dll");
System* sys=new System(vars);
define_dll("gdi32.dll",vars->dllspath,0x75DE0000);
Process* c;
try{
c=new Process(sys,"upx.exe"); }catch(int x){
cout << "Error : File name not found\n";
};
c->debugger->AddBp("__isdirty(eip)");
int x=c->emulate(); if (x!=EXP_BREAKPOINT){ cout << "Error = " << x << "\n";
}else{
PEDump(c->GetThread(0)->Eip,c,"test.exe");
}
The Debugger Breakpoints
Int3 Breakpoint or Hardware on Execution
� "Eip ==0x00401000" �
Memory on Access or Write
� "__lastaccessed()==0x00401000" �
� "__lastmodified()==0x00401000"
Execution on Modified Data
� "__isdirty(eip)" �
In .text section only
� "__isdirty(eip) && eip>=0x401000 && eip <=0x405000"
Anti-unpackers trick : write "ret" on the real OEP and calls to it
�"__isdirty(eip) && ( __ read(eip) & 0xff ) !=0xC3)"
API Hooking
� "__isapi()" �
� "__isapiequal('Getprocaddress')" �
Executing the Code
For compiling the program, I usually use Dev-cpp and gcc, but I think VC++ will not create any problem I think.
What are the files I need ?
You will need x86emu.dll and x86emu.a (You must add them to the linker from project options->parameters->add library or object) and some header files included in x86emu-bin.zip.
After Execution
After execution, you will see a program named test.exe that should be the unpacked application. If it doesn't run, change the compatibility from right click->properties->compatibility-> and change the Windows version and it should run correctly.
Still have a problem?
You can get more information on solving the problem by reading the emulator documentations in x86emu-doc.zip and email me with any problem at amr.thabet[at]student.alx.edu.eg.
To be Continued...
In the next article, we will expose the features of this emulator and we will also cover the entire steps to write an unpacker including reversing, analysing and programming.
This is an a screenshot of an example we will talk about in the next article and is included in the examples (attached with the article).

Hope you like this emulator and the whole article. See you soon in the next article.
Points of Interest
I love programming very much. I always wanted to know about all technologies, how they were created and how I can create the same. From this, I began digging into the processor and Windows internals. Everyone learns high level languages and I learn the lowest level. I try to know how these high level programming languages work and how Windows works. I begin digging and digging, and still I haven't reached the bottom, but I'll always try...
History
- 9th August, 2010: Initial post
Amr Thabet (@Amr_Thabet) is a Malware Researcher with 5+ years experience in reversing malware, researching and programming. He is the Author of many open-source tools like Pokas Emulator and Security Research and Development Framework (SRDF).


 General
  News
News  Suggestion
  Question
  Bug
Bug  Answer
  Joke
Joke  Praise
  Rant
Rant  Admin
Admin 


