Contents
Developing a wizard for Visual Studio is not really difficult, yet there are a number of things that are tedious and require a bit of research. For each new wizard you wish to add to Visual Studio .NET, you will be faced with starting and stopping a new instance of Visual Studio each time you modify your code and need to test that; needless to say this is not very practical.
The add-item wizard attempts to solve all this and replace any future (simple) wizard you need with one universal wizard to which new inner-wizards can be added, and existing inner-wizards can be changed without stopping your currently running Visual Studio. You will only need to program new wizards when you need to do stuff that goes beyond simple template insertion.
If you open the solution and build the setup project, you can use the resulting MSI to actually install the wizard on your machine, or just right-click the AddItemWizardSetup project and select 'Install'. The installation wizard will popup:

Enter the path in which to install the wizard. This path is relative to the path where your Visual Studio is installed. Don't worry to find this out if you do not know it by heart; when you try to install it in a folder that's not the correct one, the installer will show you the correct path. Sadly enough, I haven't found a way to check this before this point and change the installation path accordingly. If anyone should know the answer, please let me know.
Follow all the necessary steps in the installer, and when installed, start a new instance of Visual Studio .NET and open any arbitrary solution you wish to work on, to proceed to the next topic.
Like for any other wizard, just right click a project and select 'Add -> Add New Item...'.
This brings up the familiar window that contains all the wizards with their icons. I've added mine in the first place, not to be pushy, just because I use it much more than any other wizard. If you don't like it in the first place, I'll show you later how to change its position.
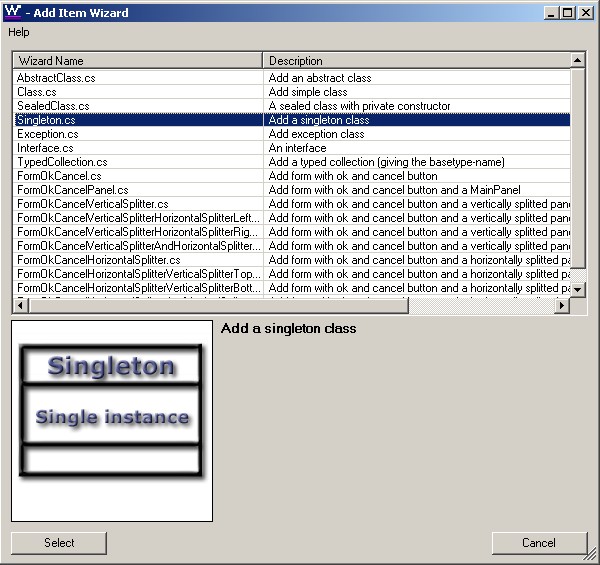
Double click the add item-wizard to bring up the Add-item wizard's own user interface:
Each inner-wizard can have its own image (200 x 200 pixels), since a picture says more than a thousand words. When no inner-wizard is selected, or when no image is specified for the selected inner-wizard, the default image is displayed (see above).
Double click the desired inner-wizard and an interface will show up that is dynamically constructed, depending on the number of placeholders that exist in the Wizards.xml for the specific inner-wizard you've selected.
I will explain in detail how everything is configured later on. An inner-wizard interface will look something like this:
For each file that the inner-wizard will add to your project, a tab page is made. On each tab page, you will have at least the filename and an extra textbox for any supplementary placeholder that's configured for the file in question.
When all mandatory data this inner-wizard needs is entered, the Add button will be enabled: press it and the files will be added to your project. The first file added will be made the activate one in your solution, so you can start typing some code straight away. When adding a form class, press the Form button (or normally SHIFT-F7) to go to the design mode of the form. Remember that, if this is the first form added to your project, it would be necessary to add a reference to the System.Windows.Forms.dll and the System.Drawing.dll, otherwise the designer can't show up.
Have a look in the folder where your Visual Studio .NET is installed, normally this is something like:
C:\Program Files\Microsoft Visual Studio .NET 2003\
In this folder, you will find a folder for C# called 'VC#', and in there, a folder for all the wizards 'VC#Wizards'. In the latter, you will find a folder that's created when you've installed the Add-Item wizard: 'AddItemWizard'. Have a look in this folder and you'll see three things:
- A 'WizardImages' folder, that holds all images, for each inner-wizard.
- A 'WizardItems' folder, that holds all templates, one template for each file of an inner-wizard.
- 'Wizards.xml': The main config file for the Add-Item wizard.
Let's have a look at (a part of) the Wizards.xml file:
="1.0"="utf-8"
<Wizards>
<AddItem name="AbstractClass.cs"
description="Add an abstract class"
image="WizardImages\...">
<File path="WizardItems\AbstractClass.cs">
<PlaceHolder id= "ClassName"
readOnly="false" mandatory="true" />
<PlaceHolder id= "FileName" readOnly="false"
mandatory="true"
dynamicValue="string.Concat([[Class Name]],".cs")"/>
</File>
</AddItem>
...
</Wizards>
Inner-wizards are defined between the <Wizards> and </Wizards> tags, and for each inner-wizard, there needs to be an item defined between the <AddItem> and </AddItem> tags. Each AddItem tag has a name and a description attribute and an optional image attribute. If no image is specified, the default image (see before) is displayed for that inner-wizard. Each inner-wizard needs at least one file defined between the <File> and </File> tags (hey, that is what wizards are for: to add files).
Each file gets its own tab page in the resulting wizard UI. The file has a path attribute that points to the actual template used when the item is added to your project.
What follows is a list of placeholders. Each placeholder has to have a unique ID and is used to replace the corresponding occurrences of that placeholder in question in the template to which this file points to. You will need at least one placeholder: the 'File Name', which is used to generate the actual file added to the project.
There are four more attributes that define the placeholder:
- A '
readOnly' attribute which defines whether or not the corresponding input textbox in readonly (true or false).
- A '
mandatory' attribute which defines whether this textbox needs to be filled out or not (true or false).
- An optional '
defaultValue' attribute which defines the starting value of the corresponding textbox.
- An optional '
dynamicValue' attribute that's used to construct the value of this textbox from other placeholder values of the same file or from placeholders from a different file of this inner-wizard.
So in the dynamicValue, you are actually putting C# code! The awkward thing is that you will have to use the special " symbols when working with strings or when you need other special characters.
For example:
<PlaceHolder id="File Name" ...
dynamicValue="string.Concat([[Class Name]],".cs")" />
This will determine the value of the 'File Name' textbox by concatenating the value of the 'Class Name' textbox with the literal value ".cs". As you can see, placeholders within a dynamic value are specified by the double [[ ]] signs. Dynamic values are always recalculated whenever a value of a textbox changes that is used to determine such a value. So in this example, when you type the name of the class in the 'Class Name' textbox, the value of 'File Name' will change with it, as if you were typing in two textboxes at the same time. When you wish to include a placeholder from another file of that inner-wizard, specify the 'path' of that file within the double {{ }} signs. Like this:
dynamicValue="string.Concat({{WizardItems\FileTemplate.cs}}
              [[Class Name]],".Designer.cs")"/>
Dynamic values are compiled each time you invoke an inner-wizard by selecting it, so that's why you could notice a small delay before the actual UI pops up. The advantage of this is that tuning an inner-wizard becomes easy, by modifying the config file and trying again. If the code can not be compiled, the add-item wizard will show you a window containing the problem(s):
As you can see, I wrap the code you've entered in the dynamicValue attribute into a class held within a unique namespace and with one method. Here, you get already a glimpse of the Add-item wizard's internal workings, but more about that later when we come to the code part. Let's focus on the configuration a little more.
Each file entry within one inner-wizard, points to a template that's specified by the path attribute, let's have a look at such a template:
using System;
namespace [!Namespace]
{
public class [!Class Name]
{
#region Constants
#endregion
#region Private fields
#endregion
#region Constructors
public [!Class Name]()
{
}
#endregion
#region Public Methods
#endregion
#region Public Properties
#endregion
#region Private Methods
#endregion
}
}
People familiar with the already present wizard templates will notice that I use exactly the same syntax for specifying a placeholder. For those not familiar, the syntax is: [!Placeholder Name].
The add item wizard has a few fixed placeholders:
[!Namespace]: the namespace placeholder.
[!AuthorName]: here the author name will be put, the name of the author is specified in the WizardAuthorDefinition.xml file (see below).
[!AuthorCode]: the author code, also specified in the WizardAuthorDefinition.xml file.
[!Today(dateFormat)]: will be replaced with DateTime.Today in the format specified by dateFormat which can be any legal formatting, don't specify any quotes.
All other placeholders used in the templates should be specified as a placeholder in the Wizards.xml config file. For a good example of this, take a look at the TypedCollection wizard's definition in Wizards.xml and its corresponding template.
The WizardAuthorDefinition.xml file can be found in the folder: ..\Microsoft Visual Studio .NET 2003\VC#\VC#Wizards. The reason it's a separate file, is that I have other wizards specific to my job which use the same file.
Since I promised before: here it is. When installing a wizard, a vsdir file is placed in the folder: ..\Microsoft Visual Studio .NET 2003\VC#\CSharpProjectItems.
So if you want to change the fact that the add-item wizard puts itself in the first position; edit its vsdir file 'AddItemWizard.vsz'; its contents look like this:
..\AddItemWizard.vsz| |Add-item Wizard|1|
                   Wizard containing other wizards| | | |New.unknown
Change the 1 you see here in bold to any higher value, to know what value to use. You'll need to check all other vsdir files in the same folder with all their wizard definitions.
It took me a while to figure out how to display a custom icon for the wizard in the add-item dialog box, as it turns out the solution is annoyingly simple (if you have searched that long):
In the folder '\Microsoft Visual Studio .NET 2003\VC#\CSharpProjectItems', each wizard has also a vsz file. Now, all you have to do is place an icon with the same name as your vsz file, but with the extension .ico, of course, in the same folder. In the vsdir file itself, leave all columns, that for all standard wizards specify a # sign followed by a number, blank; as you can see in the vsdir specification above.
To find out where Visual Studio .NET is installed, I've did some browsing through the registry, to try to find a key that would give me the path where the installation was done and use that to determine the path the wizard should be installed. I was actual mistaken the first time. Since I installed VS2005 Beta, I found out that the key I used then, didn't work anymore (sorry but can't remember what that was). The key I use now is:
VisualStudio.Solution.7.0\Shell\open\Command: for Visual Studio .NET 2001
VisualStudio.Solution.7.1\Shell\open\Command: for Visual Studio .NET 2003
VisualStudio.c.8.0\shell\Open\Command: for Visual Studio .NET 2005
When writing wizards or add-ins, there is another tricky part. You'll need to register your DLLs for COM-interop. Otherwise, you'll get some sort of unclear message when trying to invoke the code, like:
- Class not registered
- Unknown exception
When you try to register your class and you get the message "There are no registrable types", make sure the constructor of the classes to be registered for COM interop have no parameters.
Some types (like a class with only constants) may not be accessible: using the attribute [ComVisible( true )] above your class should solve this.
The assemblies are registered during installation (that's why you probably saw a command window flash by). To know how it is done, have a look at the RegisterDlls() method in the WizardInstall class.
When installing wizards or add-ins, sometimes (very rare, but it happens) some functionalities of Visual Studio, like creating a new solution or adding a new project to your solution, don't work anymore and throw a nice message like the ones stated above. This is probably due to the fact that we've registered some classes ourselves and other registrations of VS-DLL's get screwed up somehow.
Luckily enough, this problem can be patched, by re-registering those Visual Studio DLLs again. The DLLs to register are:
- extensibility.dll
- VSLangProj.dll
They can both be found in the folder '..\Program Files\Microsoft Visual Studio .NET 2003\Common7\IDE\PublicAssemblies'. You also need to perform a RegTlb command for the 'C:\Program Files\Common Files\Microsoft Shared\MSEnv\vslangproj.tlb' file. The RegTlb command can be found in the folder 'C:\WINDOWS\system32\Regtlb'.
The patch is done after the wizard DLLs are registered in the WizardInstaller class, by the method PatchVisualStudioProblem().
Run-Time generation, compilation and execution of code.
Since there are already so many articles about wizards, I'll will focus on the special part of this one: run time compilation and execution of code that points to structures within the code that generated the new code.
Whenever a wizard is selected from the add-item wizard main form, a new WizardForm is created like this:
public WizardForm( Wizard selectedWizard )
{
    InitializeComponent();

    SelectedWizard = selectedWizard;

    this.Text = " - " + selectedWizard.Name;
    labelDescription.Text = selectedWizard.Description;

    CreateDynamicCode();

    AddDynamicControls();

    CheckButtonAddEnabled();
}
As you can see, the selected inner-wizard is passed to the constructor and is stored in the SelectedWizard field which is defined as:
public static Wizard SelectedWizard;
I guess, the mental note I made there to myself says enough.
The next thing is creating the dynamic code that is needed for each placeholder:
private void CreateDynamicCode()
{
    int fileNr = 0;
    foreach( AddItemFile addFile in SelectedWizard.Files )
    {
        foreach( PlaceHolder placeHolder in addFile.PlaceHolders )
        {
            CreateDynamicCode( placeHolder, addFile, fileNr );
        }

        fileNr++;
    }
}
Let us hope for a foreach construct with an initializer and an iterator statement in a future version of C# :)
private void CreateDynamicCode
( PlaceHolder placeHolderToProcess
, AddItemFile addFile
, int fileToProcess
)
{
if( placeHolderToProcess.DynamicValue.Length > 0 )
{
string dynamicValue = placeHolderToProcess.DynamicValue;
int iOtherFile = 0;
foreach( AddItemFile fileToAdd in SelectedWizard.Files )
{
if( iOtherFile == fileToProcess )
{
int placeHolderNr = 0;
foreach( PlaceHolder placeHolder in addFile.PlaceHolders )
{
string replacer =
PlaceHolder.PlaceholderValueStart
+ placeHolder.Id
+ PlaceHolder.PlaceholderValueEnd;
dynamicValue = dynamicValue.Replace
( replacer
, "WizardForm.SelectedWizard.Files["
+ fileToProcess.ToString()
+ "].PlaceHolders["
+ placeHolderNr.ToString()
+ "].CurrentValue"
);
placeHolderNr++;
}
}
else
{
int placeHolderNr = 0;
foreach( PlaceHolder placeHolder in fileToAdd.PlaceHolders )
{
string replacer;
replacer = PlaceHolder.PlaceholderFileStart
+ fileToAdd.TemplatePath
+ PlaceHolder.PlaceholderFileEnd
+ PlaceHolder.PlaceholderValueStart
+ placeHolder.Id
+ PlaceHolder.PlaceholderValueEnd;
dynamicValue = dynamicValue.Replace
( replacer
, "WizardForm.SelectedWizard.Files["
+ iOtherFile.ToString()
+ "].PlaceHolders["
+ placeHolderNr.ToString()
+ "].CurrentValue"
);
placeHolderNr++;
}
}
iOtherFile++;
}
CodeBuilder codeBuilder = new CodeBuilder();
codeBuilder.AppendLine( "using System;" );
codeBuilder.AppendLine( "using System.IO;" );
codeBuilder.AppendEmtyLine();
codeBuilder.AppendLine( "using Erlend.String;");
codeBuilder.AppendEmtyLine();
codeBuilder.AppendLine( "using ", AddItemWizard.Namespace, ";" );
codeBuilder.AppendEmtyLine();
string nameSpace =
AddItemWizard.Namespace
+ "."
+ Path.GetFileNameWithoutExtension( addFile.TemplatePath )
+ "."
+ XString.RemoveAllSpaces( placeHolderToProcess.Id );
codeBuilder.OpenNamespace( nameSpace );
codeBuilder.AppendLine( "public class ", RunTimeClassName );
codeBuilder.OpenScope();
codeBuilder.AppendLine( "public object ", RunTimeMethodName, "()" );
codeBuilder.OpenScope();
codeBuilder.AppendLine( "return ", dynamicValue, ";" );
codeBuilder.CloseScope();
codeBuilder.CloseScope();
codeBuilder.CloseNamespace();
placeHolderToProcess.DynamicClass = CompileMethod
( "Placeholder '"
+ placeHolderToProcess.Id
+ @"' has invalid C# code in the 'dynamicValue'"
+ @" attribute of the 'WizardConfig\Wizards.xml' file"
, codeBuilder.ToString()
, RunTimeClassName, nameSpace
);
}
}
Here the dynamicValue attribute you specified in the Wizards.xml file is processed and all placeholders present there are replaced with the name of the variable that actually stores the value of that placeholder (which in the end is the value held in the corresponding textbox).
After this, the dynamicValue is inserted into a code snippet that I built using my own codeBuilder class, which is just a stringBuilder with some extra stuff. Perhaps, I could have used CodeDOM, but I don't know anything about it yet and that was not the focus of this project. Anyways, I guess the chosen solution is very readable.
Next, the code is compiled and the resulting class in instantiated and stored in the DynamicClass property of the placeholder, for execution later on:
private object CompileMethod
    ( string errorFormTitle
    , string code
    , string generateClass
    , string nameSpace
    )
{
    object runTimeClass = null;

    ICodeCompiler compiler =
      new CSharpCodeProvider().CreateCompiler();
    CompilerParameters compilerParameters =
                       new CompilerParameters();
    compilerParameters.ReferencedAssemblies.Add(
      "System.dll" );
    compilerParameters.ReferencedAssemblies.Add(
      "System.Windows.Forms.dll" );
    compilerParameters.ReferencedAssemblies.Add(
      Path.Combine( AddItemWizard.WizardFolder,
      "Erlend.String.dll") );
    compilerParameters.ReferencedAssemblies.Add(
      Path.Combine( AddItemWizard.WizardFolder,
      AddItemWizard.Namespace + ".dll" ) );
    CompilerResults compilerResults =
      compiler.CompileAssemblyFromSource( compilerParameters , code );

    if (compilerResults.Errors.HasErrors)
    {
        CompilationErrors.Show( errorFormTitle, code,
                            compilerResults.Errors );
    }
    else
    {
        Assembly compiledAssembly = compilerResults.CompiledAssembly;
        runTimeClass = compiledAssembly.CreateInstance( nameSpace +
                                             "." + generateClass );
    }

    return runTimeClass;
}
In the compiler parameters set up, references are added to system.dll but also to my own string library, which provides you with a big bag of supplementary static string manipulation methods found in the abstract class XString (luckily, C# 2.0 will have the possibility for a static class). Another DLL referenced is my own DLL, the DLL of the add-item wizard itself, so the code you generate can use properties and methods of the program which actually generates the code! Luckily so, otherwise this would never have worked. If you take a look at the code generated (in the method CreateDynamicCode, the part where the dynamicValue is processed), you will see that the code now points to something like WizardForm.SelectedWizard.Files[..], which is a structure that holds all the files and placeholders, their values, and the dynamically generated class itself. This way the generated code gets the values of the actual placeholders.
When the compilation is okay, the class is instantiated and returned to be stored in the DynamicClass property.
Now whenever a value of a textbox changes, the following method is executed to update the dependant placeholders and textboxes:
private void ProcessDependantPlaceHolderValues( PlaceHolder changedPlaceHolder )
{
foreach( Control control in addedInputControls )
{
if( control != null )
{
PlaceHolder placeHolder = (PlaceHolder)control.Tag;
if( placeHolder != changedPlaceHolder )
{
foreach( string placeHolderId in placeHolder.DependancyList )
{
if( placeHolderId == changedPlaceHolder.Id )
{
if ( placeHolder.DynamicClass != null )
{
try
{
string newValue = (string)
placeHolder.DynamicClass.GetType().InvokeMember(
RunTimeMethodName, BindingFlags.InvokeMethod,
null, placeHolder.DynamicClass, null);
control.Text = placeHolder.CurrentValue = newValue;
}
catch( Exception e )
{
MessageBox.Show
( "An exception has been thrown in dyanmic"
+ " generated code of placeHolder : "
+ placeHolderId
+ Environment.NewLine
+ e.Message
+ ( ( e.InnerException != null )? Environment.NewLine
+ "InnerException : " + e.InnerException.Message : "" )
);
}
}
}
}
}
}
}
}
When a user adds a new item, he can choose to do this on the project or any folder or subfolder within that project. I thought that finding out where the user chose to add the file would be much more straightforward than it turned out to be. It turns out there is no special method or property that gives you this information. What you need to do is walk through the solution tree in order to find out which item in the tree is the selected one. Everyone knows how the solution tree can be shaking like the San Andreas fault when you add a file or check-out a file, this is the reason: the tree is traversed, and when doing so, the tree is updated for each element you pass through (...). To avoid this and to speed up the process (every needless I/O you do to the screen slows things down, of course), it is best to hide the solution tree before the search and re-show it afterwards:
private string GetCorrectFolder()
{
UIHierarchy uiHSolutionExplorer ;
EnvDTE.Window explorerWindow =
wizardInfo.Dte.Windows.Item( Constants.vsext_wk_SProjectWindow );
explorerWindow.Visible = false;
uiHSolutionExplorer = (UIHierarchy)explorerWindow.Object;
UIHierarchyItem uiHSolutionRootNode ;
uiHSolutionRootNode = uiHSolutionExplorer.UIHierarchyItems.Item(1);
string folder = SearchTree( uiHSolutionRootNode );
if( folder.Length > 0 )
{
int pos = folder.IndexOf(@"\" );
folder = ( pos != -1 ) ? folder.Substring( pos+1 ) : "";
}
explorerWindow.Visible = true;
return folder;
}
private string SearchTree( UIHierarchyItem uiHItem )
{
if( uiHItem.UIHierarchyItems.Count > 0 )
{
foreach( UIHierarchyItem subItem in uiHItem.UIHierarchyItems )
{
if( subItem.IsSelected )
{
return subItem.Name;
}
else
{
string foundFolder = SearchTree( subItem );
if( foundFolder.Length > 0 )
return subItem.Name + @"\" + foundFolder;
}
}
}
return "";
}
Using the add-item wizard, you can gain an enormous amount of time when adding files to your solution. Since configuring the wizard is powerful and quiet easy once you are used to it, you will do so. I've been using the wizard for about half a year now, and it has become almost the only one I use when adding files to my solution.
If you find any bugs, please do report them, I will try to fix them as soon as possible. If you have any suggestions for improvement, I'll be happy to look in to them.
If I find enough time in the future, I will write another article about my pluggable add-in framework for Visual Studio .NET (2001 and 2003), which comes with about 50 add-ins. But since this project is so large I will have to find an enormous amount of time, so don't hope for it too soon.
History
- 02-Jan-2006: Removed bug (unable to install) when installing on a non-English version of Windows.


 General
  News
News  Suggestion
  Question
  Bug
Bug  Answer
  Joke
Joke  Praise
  Rant
Rant  Admin
Admin 


 , I will fix it this evening when I'm back home, keep you inform,