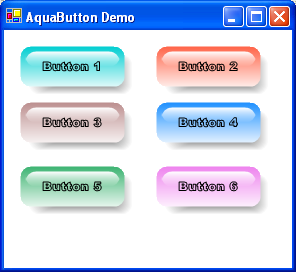
Introduction
The main purpose of this article is to show you how you can use some GDI+ methods to create aqua buttons. The reason I want to share this code is that for a while I Googled for articles that explained how to create aqua buttons and all of the articles I found depended on manipulation of pre-existing bitmaps rather than dynamic creation of the buttons.
About the Code
The code presented here is basically a class named AquaButton. This class is rather simple, and I am sure there is plenty that can be done to make it more robust. Keep in mind that the main purpose of this article has to do with the GDI+ methods I used to create the special effects needed for an aqua button.
The AquaButton Code
After staring for long periods of time at several aqua buttons, I observed that they are composed of three things: a linear color change from the main color of the button towards white, a shadow, and a bubble effect. All of these can be easily implemented with classes such as LinearGradientBrush to create the gradual change of the button color to a light white, PathGradientBrush to create a shadow effect, and then to create the bubble, it's a matter of playing with the transparency of a bubble on top of the button.
The Main Color of the Button
To create the main color of the button, we can use the LinearGradientBrush as shown in the following code:
Rectangle rc = new Rectangle(btnOffset,btnOffset,
          this.ClientSize.Width-8-btnOffset,
          this.ClientSize.Height-8-btnOffset);
GraphicsPath path1 = this.GetPath(rc, 20);
LinearGradientBrush br1 = new LinearGradientBrush(new Point(0, 0),
          new Point(0, rc.Height+2), clr, Color.White);
Let's look closer into the third line of code. This line creates a linear gradient, as specified by the background color, towards a white color. Notice that I specified the second point outside of this shape (rc.Height + 2). The reason for this is to prevent the color from going to a complete white color. Following is a sample of the image created:

The Shadow of the Button
The shadow can be created using a PathGradientBrush that has the same shape as the button but slightly offset towards an angle.
Rectangle rc2 = rc;
rc2.Offset(shadowOffset, shadowOffset);
GraphicsPath path2 = this.GetPath(rc2, 20);
PathGradientBrush br2 = new PathGradientBrush(path2);
br2.CenterColor = ControlPaint.DarkDark(Color.Silver);
br2.SurroundColors = new Color[]{Color.White};
PathGradientBrush is helpful in this case because it helps create a surrounding gradient from Dark Silver to White. Following is a sample of the image created:

Note that in this example the background of the form is White, so the gradient towards the white fits perfectly. If you use this sample code, it is probably best to find out the back color of the parent first and then create a gradient that starts at the DarkDark of the parent towards the same color of the parent.
The Bubble Effect
To create the bubble effect, you can also use the LinearGradientPath; however, this time instead of manipulating the color gradient, we manipulate the transparency gradient. What do I mean by transparency? Transparency is the Alpha parameter that can be specified when you create a color using the method Color.FromArgb(). One of the parameters of this method is the Alpha parameter. When this parameter is set to 255, it means the color is solid and not transparent at all. As you lower this parameter, the color created becomes more and more transparent. Let's take a look at the code to see how we can use this effect:
Rectangle rc3 = rc;
rc3.Inflate(-5, -5);
rc3.Height = 15;
GraphicsPath path3 = GetPath(rc3, 20);
LinearGradientBrush br3 =
  new LinearGradientBrush(rc3, Color.FromArgb(255, Color.White),
  Color.FromArgb(0, Color.White), LinearGradientMode.Vertical);
The fifth line creates a linear gradient from white: Color.FromArgb(255, Color.White) to transparent: Color.FromArgb(0, Color.White). Note that the Alpha parameter is set to go from 255 (solid) to 0 (completely transparent).
Text Outline
Lastly, the button shows a different type of font. In this case, I used the outline of the text to create a different text style for the button. The outline is created using GraphicsPath. This class automatically creates the array of points needed to show the outline of a string. This class is very helpful in cases where you want to create a better looking string. You can fill the inside of the path with any brush or you can give the same shadow effect as was described above for the button. Following are the most useful lines to create an outlined text:
GraphicsPath path4 = new GraphicsPath();
path4.AddString(this.Text, this.Font.FontFamily,
               (int)this.Font.Style, this.Font.Size,
               rcText, strformat);

Pen txtPen = new Pen(this.ForeColor, 1);
g.DrawPath(txtPen, path4);
Once you create the path (shown above as path4.AddString), you can either draw the outline of the path as shown above, using DrawPath, or you can fill the interior of the path with any type of brush to give some additional special effects to your text. For example, you could use a textured brush, a gradient brush with multiple colors, etc.
Pulsing Effect
One good point that ByteGhost reminded me was how to add the capability to give the pulsing effect to the aqua button. I also looked at Dave Peckham's article to get a good idea on how pulsing works. Basically, it's a smooth change of brightness up and down. The brightness can be controlled on a bitmap with the Gamma parameter of the image attribute. So to implement this feature, we just need to store the button in a Bitmap object as shown below:
buttonBitmapRectangle = new Rectangle(rc.Location, rc.Size);
buttonBitmap = new Bitmap(buttonBitmapRectangle.Width,
buttonBitmapRectangle.Height);
Graphics g_bmp = Graphics.FromImage(buttonBitmap);
g_bmp.SmoothingMode = SmoothingMode.AntiAlias;
g_bmp.FillPath(br1, path1);
g_bmp.FillPath(br3, path3);
g_bmp.DrawPath(txtPen, path4);
Something to note in the code above is that I did not store the shadow so that only the button has the pulsing effect.
Once the bitmap is stored, we can manipulate it anyway we like without having to call the Invalidate method to invoke OnPaint. Following is the code that takes care of adjusting the brightness of the image:
private void pulseTimer_Tick(object sender, EventArgs e)
{
 if (this.Focused && pulseOnFocus && buttonBitmap != null)
 {
  gamma += gammaStep;
  if (gamma > this.maxGamma) gammaStep = - gammaStep;
  if (gamma < this.minGamma) gammaStep = Math.Abs(gammaStep);

  imgAttr.SetGamma(gamma);
  this.CreateGraphics().DrawImage(buttonBitmap,
       buttonBitmapRectangle, 0, 0, buttonBitmap.Width,
       buttonBitmap.Height, GraphicsUnit.Pixel, imgAttr);
 }
}
Something I didn't mention before is that this class handles a color change when the mouse hovers over the button. When the color is changed, the bitmap also changes so the pulsing action continues even with the hover color!
To see the pulse in action, press the Tab button after you launch the demo. The tab will take you to the first button which has the pulse enabled. All the buttons on the first column have the pulse feature enabled.
Conclusion
In this article, I have shown you some very simple methods with some powerful visual effects. The AquaButton class I present here is not really that robust and needs lots of work. I just wanted to share my findings on how to create the aqua effects, and I hope that it can be of help to you when it comes to customizing your controls. Let me clarify that often I learn something new that I don't find in CP and I always say "that would be so cool to share"; however, by the time I create a fully robust library, I usually don't have the time to write the article. So here is the code "as is" and hope it gives you some new ideas.
History
- 28/11/2005 - Initial release.
- 29/11/2005 - Added capability to pulse button.
This member has not yet provided a Biography. Assume it's interesting and varied, and probably something to do with programming.


 General
  News
News  Suggestion
  Question
  Bug
Bug  Answer
  Joke
Joke  Praise
  Rant
Rant  Admin
Admin 


 if i modify the following lines to change from rounded corner rectangle button to two semicircle sides as rectangle button like (____).
![Rose | [Rose]](https://www.codeproject.com/script/Forums/Images/rose.gif) thank you
thank you