Introduction
This control is based on a MS Knowledge Base article titled "How To Create a Smooth ProgressBar in Visual Basic .NET". I have made several changes and additions to the sample code shown in the KB article, including adding two new features and correcting some program logic.
Background
As stated in the KB article, the ProgressBar control that is included with Visual Basic .NET supports only the standard setting, instead of standard and smooth settings from earlier versions. The article shows how to create a custom UserControl to provide a smooth continuous scrolling ProgressBar.
Using the code
The SmoothProgressBar.vb file compiles to a class library DLL which you can use to add the SmoothProgressBar control to your Toolbox in Visual Studio. There are many articles describing how to add a control to the Toolbox, so I won't repeat that info here. After adding the control to the Toolbox, select it and drop one on your form. Now you may change any of the properties to suit your liking. Most of the misc. properties are self-explanatory, such as ProgressBarColor, Minimum and Maximum. The Value property is what you will update in your code to change the "progress" of the ProgressBar. This is typically done by incrementing (or decrementing) the value in the Tick event handler of a Timer control which you've added to your form. For this purpose, I've created a StepValue property which can be set to a positive or negative integer, and a Stepit() method which adds the StepValue to the control's Value property when called. This mimics the behavior of the ProgressBar control provided in .NET. Refer to the code in Form1.vb in the SPB_test project included in the download if you're not sure how to do this.
Points of Interest
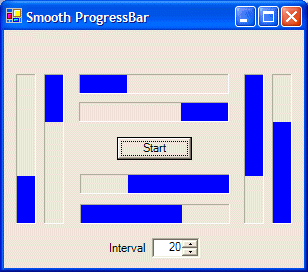
As I mentioned, I have added two new features to the original control presented in the KB article. The first uses the Horizontal property to control the direction of the scrolling in the ProgressBar. Setting this to True enables the normal horizontal scrolling. Setting it to False causes the scrolling to move vertically.
The second feature uses the Reverse property, which defaults to False. When set to True, the scrolling direction is reversed, that is, from right to left for horizontal mode and from top to bottom for vertical mode. Adding this ability required changing the code in the OnPaint method, as follows:
With Me.ClientRectangle
If isHorz Then
rect.Width = rect.Width * percent
If isRevs Then rect.X = .Width - rect.Width
Else
rect.Height = rect.Height * percent
If Not isRevs Then rect.Y = .Height - rect.Height
End If
End With
I have also changed the logic in the setter for the Value property, reducing its size and complexity quite a bit. Here I'm calculating four rectangles, one for each of the combinations of Horizontal and Reverse, in about the same number of lines of code as the original article used to get one rectangle...
Dim dm, dv, mm, mx As Integer
dm = max - min
dv = Math.Abs(val - oval)
mx = Math.Max(val, oval)
mm = Math.Min(val, oval)
Dim r As Rectangle
With Me.ClientRectangle
If isHorz Then
If isRevs Then
r =
New Rectangle(.Width - mx * .Width / dm, 0, dv * .Width / dm, .Height)
Else
r =
New Rectangle(mm * .Width / dm, 0, dv * .Width / dm, .Height)
End If
Else
If isRevs Then
r =
New Rectangle(0, mm * .Height / dm, .Width, dv * .Height / dm)
Else
r =
New Rectangle(0, .Height - mx * .Height / dm, .Width, dv * .Height / dm)
End If
End If
End With
It's interesting to note that in the original article the setter for the Minimum property actually sets the minimum value only when the value passed is less than zero or greater than the max value, while the setter for the Maximum property does nothing to prevent setting a value of less than zero, even setting min to the same value! I've changed this behavior to what (I hope) is the correct behavior. Also I'm preventing min and max from being set to the same value, because doing so causes an exception to be thrown due to the code using the difference between max and min (i.e. max-min) as the divisor in the expression to compute the size of the rectangle to update when the control is invalidated (can't divide by zero!).
I hope you enjoyed this control and I wish to thank MS for providing the inspiration (and much of the code) for it.
Portions of the code in the download for this article ©2005 Microsoft Corporation.
This member has not yet provided a Biography. Assume it's interesting and varied, and probably something to do with programming.
 General
  News
News  Suggestion
  Question
  Bug
Bug  Answer
  Joke
Joke  Praise
  Rant
Rant  Admin
Admin 


