Introduction
xhtml_gen offers a simple and intuitive solution for C++ developers to easily generate simple to complex XHTML documents. xhtml_gen produces XHTML documents which are well formed, according to XHTML rules. Also, the generated content will be nicely formatted, with all content being properly indented between the start and end tags, except for inline elements. Stylesheet support is also included, to help format the document for rich presentation. The library and all examples are compatible with VC6, VC7, and VC8 (Visual Studio 2005), as well as gcc.
xhtml_gen consists of a number of classes, of which only a few are used in the interface. These classes enable you to generate, virtually, any type of XHTML document and stylesheet which you could do by hand, or with an XHTML editor. With basic XHTML knowledge, you can design complex XHTML documents and reports suitable for your personal projects or commercial applications.
xhtml_gen provides four interface classes, which are used to generate XHTML and stylesheet documents:
xhtml_doc
xhtml_doc represents the XHTML document, and includes the root element <html>, <head> element, and <body> element (for frameset documents, xhtml_doc contains the <frameset> element). This class is responsible for creating the XHTML file. All XHTML content which is to be be written to the XHTML document file will end up here. xhtml_doc is a template class, which can accept three enumerations as template parameters, xhtml_transitional, xhtml_frameset, and xhtml_strict for transitional, frameset, and strict document types. The default type is strict, and this class header contains a typedef declaring the document as xhtml_doc<xhtml_strict>.
xhtml_element
xhtml_element is the main class in xhtml_gen, and encapsulates an XHTML element. xhtml_element inherits from basic_tree, and provides the tree-like structure for storing the document tree. xhtml_element objects can store #PCDATA (pc_data), or can store XHTML tag elements (tag) including the content associated with that tag. xhtml_element is a template class, which, like xhtml_doc, also accepts the three enumerations (xhtml_transitional, xhtml_frameset, xhtml_strict) as a template parameter. The default template parameter for element, like xhtml_doc, is xhtml_strict, and the class header contains a typedef declaring the element as xhtml_element<xhtml_strict>.
stylesheet
stylesheet provides a way to create stylesheets for one or more XHTML documents. The stylesheet object can be inserted directly into the XHTML document header, or can be written to a CSS file.
stylesheet_rule
stylesheet_rule represents a single rule in a stylesheet.
Example Code
The demo download example code contains a number of files. The files are part of two sample console programs. Both examples generate an XHTML resume (my own) to show the usage of generating a formatted XHTML document. The first example covers the basic operations of xhtml_gen for simple markup and stylesheet generation. The second example focuses on table/nested table generation with xhtml_gen. If you are using Visual C++ 6.0, you will need to uncheck the Enable minimal rebuild option in the project, for successful compilation. The following list details the two programs and their associated files:
- Simple markup example
Files:
- simple_markup_example.cpp: The CPP file to use in your console project.
- simple_markup_example_data.txt: A text data file to serve as input for the program.
- simple_markup_explanation.rtf: An RTF file which explains in detail the example code.
- resume.htm/resume.css: The resulting XHTML/CSS documents created by the program.
- Table markup example
Files:
- table_markup_example.cpp: The CPP file to use in your console project.
- table_markup_example_data.txt: A text data file to serve as input for the program.
- table_markup_explanation.rtf: An RTF file which explains in detail the example code.
- resume2.htm/resume2.css: The resulting XHTML/CSS documents created by the program.
General Usage
Generating XHTML documents couldn't be simpler using xhtml_gen. There are only two interface classes (and two more for stylesheet usage), and just a handful of operations to become familiar with. First, you will need an object to represent your XHTML document, which is provided by the class xhtml_doc. Then, you will need objects to represent every element within the document, provided by the class xhtml_element. Together, these two classes allow you to create XHTML documents from the very simple to the very complex.
As an example, we will concentrate on creating a very simple XHTML document, consisting of a title within the head element, and a heading, paragraph, horizontal rule, and a user list in the document's body. The layout of this document is shown here:
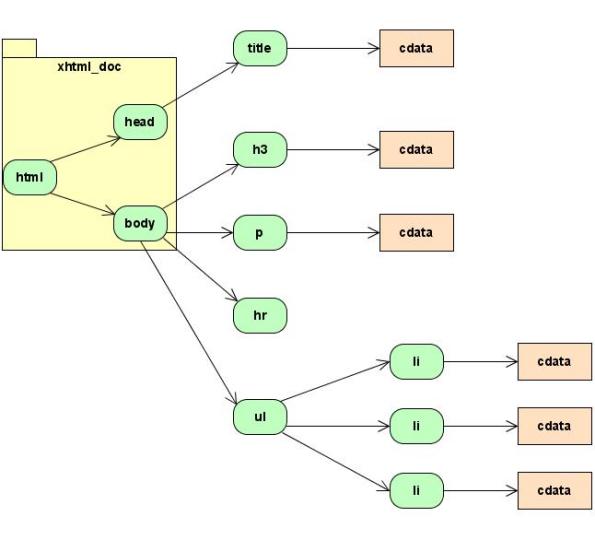
In this diagram, you can see that xhtml_doc contains the html, head, and body elements. You do not need to create these elements yourself, as they are created for you by the xhtml_doc object. There is no way to access the HTML element directly in xhtml_doc. There are only a few slightly used style properties allowed for this element, so there should be no reason to access it directly. The head and body elements in xhtml_doc can be accessed by the member operations head() and body(), respectively. To add content to the head element, you must use the head() accessor, but you can generally add content to the body element without using the body() accessor directly.
Both xhtml_doc and xhtml_element accept a single template argument, which determines the document type which is being generated. The document type can be one of three values, which specify a document type of transitional, frameset, or strict. To create an XHTML document of one of these three types, you need to use the appropriate template parameter for xhtml_doc and xhtml_element. A typedef is provided for the default document type, strict, which allows you to use the types, document and element. We will be using these types in the discussion and code below, to create strict document types. Below, we will summarize the three document types, and the declarations needed for the specific document types.
- Transitional document types
These XHTML documents follow less rigid XHTML guidelines, and are used mainly for backwards compatibility with HTML documents. Unless backwards compatibility is needed, it's recommended that the strict document type is used rather than this document type. The enumeration xhtml_transitional declares the enumeration tag values for transitional elements. These enumeration values are followed by a trailing _t, and must be used to define elements of this type. Examples are table_t, div_t, and body_t. To create documents and elements of this type, you would want to declare a couple typedefs for the document and element classes, like:
typedef xhtml_doc<xhtml_transitional> trans_doc;
typedef xhtml_element<xhtml_transitional> trans_elem;
- Frameset document types
Frameset documents are used for XHTML documents which use framesets. Framesets are not very popular on the web, since full support for them is lacking, and there are issues with their usage. They do, however, have their place in some situations, and may work well when used for documentation purposes. The enumeration xhtml_frameset declares the enumeration tag values for frameset elements. These enumeration values are followed by a trailing _f, and must be used to define elements of this type. Examples are table_f, div_f, and body_f. To create documents and elements of this type, you would want to declare a couple typedefs for the document and element classes, like:
typedef xhtml_doc<xhtml_frameset> frameset_doc;
typedef xhtml_element<xhtml_frameset> frameset_elem;
- Strict document types
Strict documents are the default document and element types in xhtml_gen. In the near future, most web site authors will be striving to create XHTML documents of this type, and is the document type which most experts recommend using. The enumeration xhtml_strict declares the enumeration tag values for strict elements. These enumeration values are declared just like the corresponding tag names, and must be used to define elements of this type. Examples are table, div, and body. To create documents and elements of this type, you can use the typedefs which are already declared in xhtml_gen:
typedef xhtml_doc<xhtml_strict> document;
typedef xhtml_element<xhtml_strict> element;
In this example, we will be creating a document and elements of the strict type, so we will be using the typedef for document and element.
Aside from the html, head, and body elements, you will be creating instances of all other elements which you will want to add to the document. To create an element, simply specify the appropriate tag enumeration in the xhtml_element's constructor. element para_elem(p); creates a paragraph element object. The p argument supplied in the element's constructor is one of enumerated values of the enumeration xhtml_strict. Only valid enumerated values can be used to create an element. There is a tag_type enumeration for every valid XHTML tag, which corresponds exactly to the XHTML tag name. The xhtml_element constructor can accept two more optional parameters, for the element's ID and the element's class name, which are discussed in the stylesheet usage.
There are two methods for adding nested contents to an element. The method you use will depend on the manner in which you are adding content to the specific element. If you are creating the sub (nested) element in its entirety before adding it to its parent element, you may want to use the << operator to add the nested element. The example below illustrates this method, adding an li element to a ul element.
element ul_elem(ul);
element li_elem(li);
li_elem.set_style(color, "red");
li_elem.set_attribute(type, "square");
li_elem << "Item number 1";
ul_elem << li_elem;
The second method for adding nested elements can be used when you would like to perform operations on the nested element after adding it to its parent element. This can be done by using the insert() operation on the parent element. This operation returns an iterator to the inserted element, allowing you to easily perform further operations on the inserted (nested) element after it has been inserted in its parent. The example below, which performs the same result as above, illustrates this usage.
element ul_elem(ul);
element::iterator it = ul_elem.insert(element(li));
*it << "Item number 1";
it->set_style(color, "red");
it->set_attribute(type, "square");
As you can see, the second method of adding nested elements not only saves you a line of code, but most html coders find this method more intuitive, as it corresponds more with the natural way XHTML is coded. The first method does have its advantages, however, as the << operation can be nested, as the example below illustrates by adding the cdata to an li element, and the resulting li element to a ul element.
ul_elem << (element(li) << "Item number 1");
Note that the parenthesis around the li element and cdata are needed above, as the input operator reads left to right. Also note that using this method does not allow you to work with the element which was inserted on the fly (the li element) after it's inserted, unless an iterator to that element is obtained later from the parent.
The insertion of nested elements have certain 'nesting' rules which must be followed. Certain elements can only allow certain nested elements, or elements of a certain nesting type. More generally, an element (or tag) can be classified into these nesting types. xhtml_gen uses a modified version of the standard nesting rules. If you try to insert an element into another which can not accept that element, the insertion does not succeed. A table of tags and their nesting and nested types is provided for reference at xhtml_gen's web site.
As mentioned above, xhtml_doc contains the html, head, and body elements for your document. You do not need to create any of these three elements. xhtml_doc also contains insert() and << operations similar to those of xhtml_element. xhtml_doc will insert a user created element into one of its three nested elements, depending on the type of the element being inserted. If the inserted element is a frameset element, and the document is a frameset document, the element is inserted into xhtml_doc's internal html element, as described in the frameset usage. If the inserted element is a head element, the contents of xhtml_doc's internal head element will replace the contents of the inserted head element. If the element being inserted is a body element, the contents of xhtml_doc's internal body element will replace the contents of the inserted body element. If the element is a flow type element, that element is inserted into xhtml_doc's internal body element. To insert elements into xhtml_doc's internal head element, a head() operation is provided which returns a pointer to the internal head element. A body() operation is also provided in xhtml_doc, to return a pointer to xhtml_doc's internal body element, if desired.
Saving an HTML document is very simple. Using the save() operation of xhtml_doc, pass the file path, and xhtml_doc will save its contents to the specified file.
With this basic knowledge, we are ready to create a simple XHTML document. The code is presented below:
#include "document";
using namespace xhtml_gen;
document doc;
*doc.head() << (element(title)
<< "Hello World Document");
element::iterator it = doc.insert(element(h3));
*it << "Hello World!";
it->set_style(color_property, "red");
it->set_style(text_align, "center");
it = doc.insert(element(p));
*it << "This is a basic example of creating"
" an xhtml document with xhtml_gen.\n";
*it << "As you can see, the << operator allows"
" you to keep adding content to an element"
<< element(br) << "\n";
*it << "Notice you can also mix " << (Element(b)
<< "markup") << " and " << (Element(b) << "cdata");
it = doc.insert(element(hr));
it = doc.insert(element(ul));
it->set_attribute(type, "disc");
it->set_style(color_property, "blue");
*it << (element(li) << "Item 1");
*it << (element(li) << "Item 2");
*it << (element(li) << "Item 3");
doc.save("c:\\HelloWorldTest.htm");
As you can see from the resulting XHTML code below, the document looks like what would be expected from the input, and the content is nicely formatted. Notice that the newline character (\n) at the end of the first and second lines in the paragraph did not create a new line in the displayed HTML, but did create a new line in the generated content. It will be very beneficial to include newlines in your text content, for the sake of reading the source of the XHTML document. To create a new line in the actual XHTML, you would embed an inline br element, as in the second line of the paragraph element.
<!DOCTYPE html PUBLIC "-//W3C//DTD XHTML 1.0 Strict//EN"
               "http://www.w3.org/TR/xhtml1/DTD/xhtml1-strict.dtd">
<html>
   <head>
      <title>
         Hello World Document
      </title>
   </head>
   <body>
      <h3 style = 'color:red; text-align:center;' >
         Hello World!
      </h3>
      <p>
         This is a basic example of creating an html document with xhtml_gen.
         As you can see, the << operator allows
         you to keep adding content to an element<br/>
         Notice you can also mix <b>markup</b> and <b>cdata</b>
      </p>
      <hr/>
      <ul units = 'disc'  style = 'color:blue;' >
         <li>
            Item 1
         </li>
         <li>
            Item 2
         </li>
         <li>
            Item 3
         </li>
      </ul>
   </body>
</html>
Notice when looking at the displayed XHTML source, that inline elements are not started on a new line, while block level elements are started on a new line. Also notice that all nested block elements are properly indented from their parent elements. Although this is a very simple XHTML document, the principles learned here will also enable you to create very complex HTML content. See the examples for more insight on using xhtml_gen to create more complex documents.
Interface
xhtml_doc operations
Let's first discuss xhtml_doc. xhtml_doc's interface is small, containing only necessary operations for its purpose. xhtml_doc, like xhtml_element, is a template class. There is a full typedef declaration, however, in xhtml_doc.h, typedef xhtml_doc<XHTML_STRICT> document; which enables you to use the type document for creating strict XHTML documents, which are the default document types in xhtml_gen. There are actually three template parameters you can supply to xhtml_doc.
xhtml_transitional for transitional XHTML documents.
xhtml_frameset for frameset XHTML documents.
xhtml_strict for strict XHTML documents.
These three template parameters are all enumerations. Each of the three enumerations declare enumeration values which correspond to the tags which define the document and elements.
xhtml_stict is the default doctype for xhtml_gen, so the typedef was created for this type. To create a transitional or frameset XHTML document, you can declare and use typedefs like the following:
typedef xhtml_doc<xhtml_transitional> trans_doc;
typedef xhtml_doc<xhtml_frameset> frameset_doc;
Some operations presented below return or accept as parameters, xhtml_elements or xhtml_element iterators. xhtml_element is another template class parameterized on the same template parameter as xhtml_doc. A typedef is provided for xhtml_element to be used for strict type elements.
typedef xhtml_element<xhtml_strict> element;
This typedef will allow you to use an element to create elements for strict type documents. Like xhtml_doc, xhtml_element can take the same three template parameters mentioned above to specify if the element is for a transitional, frameset, or strict type of XHTML document. Both xhtml_doc and xhtml_element objects must be instantiated from the same type, to work together. Since document and element are both typedefs using the template parameter xhtml_strict, these two types can be used together, which is the default case in xhtml_gen.
The interface presented below is assuming that the default document and element types are used. The operations are also valid for the other document types (transitional and frameset), unless noted.
Object construction
Adding content
element::iterator insert(const std::string& _pc_data)
Adds a character data element to xhtml_doc's internal body element. Returns an iterator to the added element if successful, or the end iterator, end(), if unsuccessful.
element::iterator insert(const element& elem)
Adds a nested element. Where the nested element is added depends on the element type. If the element is a head or body element, the element simply replaces xhtml_doc's internal head/body element in the document. Otherwise, the nested element is checked to see if it can be a nested element of body, and if so, is added to xhtml_doc's internal body element. Returns an iterator to the added element if successful, end() if unsuccessful.
void operator <<(const std::string& _pc_data)
This operation performs the same as the insert operation for strings above, but no iterator is returned. The << operators can be chained.
void operator <<(const element& elem)
This operation performs the same as the insert operation for elements above, but no iterator is returned. The << operators can be chained.
Saving and retrieving content
bool save(const std::string& path) const
Saves the document to a file specified by the passed path. The saved XHTML file will be well formed and nicely formatted.
std::string get_xhtml() const
Retrieves the full XHTML content as a string. The string content will also be well formed and nicely formatted.
Accessing internal top level elements
element* head()
Returns a pointer to the head element.
element* body()
Returns a pointer to the internal body element. This operation is not available to xhtml_doc<xhtml_frameset>.
element* frameset()
Returns a pointer to the internal frameset element. This operation is only available to xhtml_doc<xhtml_frameset>.
Stylesheet operations
void add_stylesheet(const stylesheet& ss)
Adds a stylesheet object to the header of the document. The style will be nicely formatted. All general CSS rules apply to the stylesheet and document.
void add_stylesheet_link(const std::string& path)
Adds a link to an external stylesheet. The specified path can be a file path or URL.
xhtml_element operations
xtml_element is the workhorse of xhtml_gen, and the class you will be using to create element objects for the document. Objects of this type represent an XHTML element, which include the start tag (including any attributes), end tag (if any), and any content nested within the element.
Like xhtml_doc, xhtml_element is a template class. A typedef is provided in xhtml_gen, declared as typedef basic_element<XHTML_STRICT> element;. This typedef will allow you to use the element to create your element objects.
In our list of operations below, I'll make the use of the element typdef to illustrate function signatures, but all operations are available for all three specifications of xhtml_element.
xhtml_transitional for transitional XHTML elements.
xhtml_frameset for frameset XHTML elements.
xhtml_strict for strict XHTML elements.
xhtml_stict is the default element type for xhtml_gen, which is why a typedef was created for this type. To create a transitional or frameset element, you can declare and use typedefs like the following:
typedef xhtml_element<xhtml_transitional> elem;
typedef xhtml_element<xhtml_frameset> elem;
Although the discussion and operations below refer to element, they apply to any three of the xhtml_element specifications.
xtml_element is derived from basic_tree, which is part of the tree container library, or TCL. This enables xtml_element to be used as a tree/tree node, which models the concept of an XHTML element well. The node itself stores information about the tag (tag object), and the node's children contain any possible nested content.
Notice that xtml_element can only be constructed by passing in a tag enumeration in its constructor. The default constructor is inaccessible, since an element of an unknown tag type is not allowed. An element may contain nested child elements or character data.
Since xhtml_element derives from basic_tree, most of the operations of basic_tree are available to xhtml_element, and are included below:
Element creation and assignment
explicit element(tag_type _tag, const std::string& _id = "", const std::string& _class = "")
Constructor for element. tag_type is an enumeration for the tag, and can be one of three enumeration values, xhtml_transitional, xhtml_frameset, or xhtml_strict. If the element is a strict XHTML element, the tag enumerations are simply named after the corresponding tag, e.g.: p, table, div. If the element is a transitional XHTML element, the tag enumerations are the same as the strict tag enumerations, but with a trailing _t, as in p_t, table_t, and div_t. If the element is a frameset XHTML element, the tag enumerations include a trailing _f, as in p_f, table_f, and div_f. The constructor creates a markup element of the specified tag. The optional second parameter sets the ID for the element, while the third optional parameter sets the element class name. These two parameters are handy when using stylesheets with the elements.
element(const element& src)
Copy constructor for element.
element& operator = (const element& rhs)
Assignment operator for element.
Adding nested content
element::iterator insert(const std::string& _pc_data)
Adds character data to the parent element. The parent element in which this operation is called must be capable of containing character data, for this operation to succeed. Returns an iterator to the added element if successful, or the end iterator, end(), if unsuccessful.
element::iterator insert(const element& elem)
Adds a nested element to the parent element. The parent element in which this operation is called must be capable of containing the nested element for this operation to succeed. Also, only elements of the same tag_type (xhtml_transitional, xhtml_frameset, or xhtml_strict) can be nested. Returns an iterator to the added element if successful, or the end iterator, end(), if unsuccessful.
element::iterator insert(element::const_iterator pos, const std::string& _pc_data)
Adds a character data element to the parent element at the specified position which is just ahead of pos. The parent element in which this operation is called must be capable of containing character data for this operation to succeed. Returns an iterator to the added element if successful, or the end iterator, end(), if unsuccessful.
element::iterator insert(element::const_iterator _pos, const element& _elem)
Adds a nested element to the parent element at the specified position which is just ahead of pos. The parent element in which this operation is called must be capable of containing the nested element for this operation to succeed. Also, only elements of the same tag_type (xhtml_transitional, xhtml_frameset, or xhtml_strict) can be nested. Returns an iterator to the added element if successful, or the end iterator, end(), if unsuccessful.
element& operator << (const std::string& _pc_data)
Adds character data to the element. The parent element in which this operation is called must be capable of containing character data for this operation to succeed. See tag reference for more details.
element& operator << (const element& elem)
Adds a nested element. The parent element in which this operation is called must be capable of containing the nested element for this operation to succeed. Also, only elements of the same tag_type (xhtml_transitional, xhtml_frameset, or xhtml_strict) can be nested. See tag reference for more details.
Saving and retrieving content
std::string get_xhtml(const int indent = 0) const
Retrieves the formatted content from the element. indent is used for formatting purposes, and sets the left indent for the formatted output. You may never need to use this operation explicitly, since you will normally use xhtml_doc's save() operation to save the complete XHTML document. This operation is provided for special cases where you may want to retrieve the content from a particular element in the document hierarchy.
Attribute and style operations
bool set_attribute( const attribute _attribute, const std::string& value )
Sets the specified attribute for the specified value. _attribute is an enumerated value. The enumeration names match valid XHTML attribute names, except where they conflict with element names or C++ keywords, in which case _attr is appended to the enumerated name. This operation will only allow attributes to be set for elements if the attributes are valid for that element. true is returned upon success.
bool set_style( const css_property _property, const std::string& value )
Sets the specified style to the specified value. _property is an enumerated value of possible CSS properties. The enumeration names match valid XHTML CSS property names, except where they conflict with element or attribute names, or C++ keywords, in which case _property will be appended to the enumerated name. This operation will currently allow any style property to be set for any of the elements, with no checking. Future implementations may check to insure that the style property being set is a valid property for that element.
std::string get_attribute( const attribute _attribute ) const
Returns the value of the specified attribute. If the attribute is not set, an empty string is returned.
std::string get_style( const css_property _property ) const
Returns the value of the specified style property. If the property is not set, an empty string is returned.
Querying element characteristics
Operations inherited from basic_tree
void clear()
Clears (erases) all descendant elements of the element. The element itself is not erased.
element* parent()
Returns a pointer to the parent element, or NULL if there is no current parent element.
bool empty()
Indicates if the element has or has no nested elements.
int size()
Returns the number of nested elements within the element. Only counts the immediate nested elements, not the descendants.
Iterator retrieval
It may be beneficial to traverse over nested elements. Iterators are provided by basic_tree for these operations.
element::iterator begin()
Returns an iterator pointing to the first nested element in the element. If the element is empty, returns the end iterator.
element::const_iterator begin() const
Same as above, but returns a const_iterator rather than iterator.
element::iterator end()
Returns an iterator pointing to past the last nested element. Iterators can be checked against the end iterator to see if an operation succeeded, or if they have traversed through all the nested elements.
element::const_iterator end() const
Same as above, but returns a const_iterator rather than iterator.
element::pre_order_iterator pre_order_begin()
Returns the beginning pre_order_iterator for the element. pre_order_begin() will, by nature, return an iterator pointing to the first immediate nested element, if any.
element::const_pre_order_iterator pre_order_begin() const
Same as above, but returns a const_pre_order_iterator.
element::pre_order_iterator pre_order_end()
Returns the ending pre_order_iterator for the element. While using the pre_order_iterator, it must be checked against pre_order_end() to know when all the descendants have been traversed.
element::const_pre_order_iterator pre_order_end() const
Same as above, but returns a const_pre_order_iterator.
element::post_order_iterator post_order_begin()
Returns the beginning post_order_iterator for the element. post_order_begin() will, by nature, return an iterator pointing to the deepest first descendant nested element, if any.
element::const_post_order_iterator post_order_begin() const
Same as above, but returns a const_post_order_iterator.
element::post_order_iterator post_order_end()
Returns the ending post_order_iterator for the node. While using the post_order_iterator, it must be checked against post_order_end() to know when all the descendants have been traversed.
element::const_post_order_iterator post_order_end() const
Same as above, but returns a const_post_order_iterator.
element::level_order_iterator level_order_begin()
Returns the beginning level_order_iterator for the element. level_order_begin() will, by nature, return an iterator pointing to the first immediate nested element, if any.
element::const_level_order_iterator level_order_begin() const
Same as above, but returns a const_level_order_iterator.
element::level_order_iterator level_order_end()
Returns the ending level_order_iterator for the node. While using the level_order_iterator, it must be checked against level_order_end() to know when all the descendants have been traversed.
element::const_level_order_iterator level_order_end() const
Same as above, but returns a const_level_order_iterator.
Stylesheet operations
A stylesheet object can contain multiple stylesheet rules. The stylesheet object can be linked to an XHTML document, or can be inserted directly into an xhtml_doc object header element. The stylesheet class has a very small interface, which is listed below:
Construction
stylesheet() stylesheet constructor.
Adding rules
Retreiving stylesheet rules
Saving Stylesheets
stylesheet_rule operations
This documentation does not attempt to explain the usage of stylesheets. There are many good books and web sites where you can learn about basic stylesheet usage.
In CSS terminology, a stylesheet rule consists of a selector and a declaration block. The declaration block can contain multiple declarations. Because a stylesheet rule needs a selector, the constructor for stylesheet_rule requires a selector string. The selector string can be any valid CSS selector.
Adding a declaration to the stylesheet rule involves passing two parameters, a CSS property enumeration, and a string value. The first parameter represents the style property, and the second string parameter represents the value for that property. Currently, xhtml_gen does not check the property value for validity. If the value is not valid for the specified property, that property will not be set for the stylesheet.
The stylesheet_rule class offers a small and simple interface, listed below.
Construction
Adding declarations
void add_declaration(const css_property _property, const std::string& value)
Adds a declaration to stylesheet_rule.
stylesheet_rule& operator <<(const declaration& decl)
Adds a declaration to the stylesheet. The declaration takes two parameters in its constructor, identical to the two parameters passed to add_declaration() above. This makes adding declarations to a stylesheet_rule much more convenient, since they can be chained together.
Stylesheet Rule Retreival
std::string get_rule(const int indent) const
Retrieves the full rule, with all declarations. The returned text is nicely formatted, and the rule and all declarations are indented by the specified indent parameter. This function is not usually called directly, but is supplied as an interface operation if desired.
Points of interest
Although this library is heavily template based, using the library requires no direct use of templates, unless the user wants to create transitional or frameset documents. In this case, the only use of templates required is the creation of a couple of typedefs. More library info and examples can be viewed at xhtml_gen's website.
History
The most current version of this library, as well as the version history and more information on the design and operations, can be found at xhtml_gen's website.


 General
  News
News  Suggestion
  Question
  Bug
Bug  Answer
  Joke
Joke  Praise
  Rant
Rant  Admin
Admin 


 Hi,
Hi,
