Introduction
This article describes how to create a ProgressBar control which, by having an appearance that can be customized, is a better looking and (to some extent) a more functional progress bar than what is provided as standard on the Windows Mobile 5 platform. There are already some good articles on creating good looking progress bars (such as this article), but this one will focus on making a progress bar that can take on virtually any appearance and run on a mobile device. I will also provide some tips on how to set up a Visual Studio project to reduce development time when implementing for Windows Mobile 5.
Updated: this update contains a performance fix. The fix is described in the Performance chapter.
Using the Code
The source code ZIP file that can be downloaded for this article contains one Visual Studio solution in a folder called Bornander UI. This solution contains the code for the progress bar and some code that tests it; all of it has Windows as the target platform. This project can be used when the .NET Compact Framework is not installed to try out the progress bar in a desktop environment. The downloadable ZIP also includes a ZIP file called Bornander UI (Cross platform).zip which contains the solution I used when building this progress bar. This also has projects that build the source code for a Device environment.
The code for the progress bar control is all in the file ProgressBar.cs. This file holds a class called ProgressBar that extends from System.Windows.Panel. Since it extends from a standard Windows Forms control, it is possible to lay it out on a form or panel using the visual designer.
Requirements
When creating this control, I decided on a set of requirements that the control should implement:
- The appearance of the progress bar should be configurable.
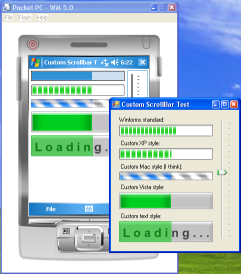
- The progress bar should be able to mimic already existing progress bars such as the ones found on XP, Vista and Mac.
- The progress bar must function as a normal Windows Forms control, meaning that it should be possible to use the form designer to add it to panels or forms.
- The source code for the progress bar must be fully portable between a Windows environment and a Windows Mobile environment, meaning that no changes to the source code should be required to compile it for either platform.
So, there are four rather straightforward requirements to implement. So, how did it go?
Catering for Custom Appearance
Rendering Using Primitives
One way to do custom rendering of a control is to override the paint methods and call methods such as DrawRect or FillRect to draw the desired graphics, for example:
...

protected override void OnPaint(PaintEventArgs e)
{
    e.Graphics.FillRectangle(new SolidBrush(backgroundColor), 0, 0,
                             this.Width, this.Height);
    e.Graphics.FillRectangle(new SolidBrush(foregroundColor), 0, 0,
                             scrollbarValue, this.Height);
}

...
This would first render a solid rectangle with a background in backgroundColor color and then render another, possibly shorter, rectangle over that in foregroundColor. This is basically how I think they've implemented the standard progress bar in the .NET Compact Framework.
However, it would be quite hard (or at least very time-consuming) to draw a progress bar such as the one in Windows Vista this way since that uses gradient transitions between colours. Luckily, System.Drawing.Drawing2D has brushes that do gradient fill (such as System.Drawing.Drawing2D.LinearGradientBrush). Excellent! We've got the tools we need to do the job. Or do we?
Everyone who has done a bit of .NET programming and then started doing .NET Compact Framework programming has realized just how compact the Compact Framework really is. Not only are some of the methods on some classes missing, but entire classes have also disappeared. For example, there is no System.Drawing.Drawing2D.LinearGradientBrush in the Compact Framework.
Rendering Using Images
After looking at the level of customization I was going for, I decided that even if there had been a System.Drawing.Drawing2D.LinearGradientBrush in the Compact Framework, it still wouldn't have met my requirements. I want my progress bar to allow for a greater level of customization. I would like to be able to have text or images in the background, kind of what you can sometimes see on progress bars found in games.

I decided to go with a solution where my progress bar, instead of rendering itself using primitives, uses a set of images that I can provide using the visual form designer in Visual Studio. This has three big benefits:
- It is a solution that is generic enough to allow for most appearances I can think of.
- It will allow me to "rip" other progress bars, as I can do a Print Screen and then cut and paste the parts I want. This is important to me because I've got no artistic skills whatsoever.
- The implementation time will only be a fraction of that of a primitive based rendering approach.
So images it is then.
Images
Types of Images
I started out trying to reproduce an XP kind of style and realized that I would need three images to do this:
- Background: this is, of course, the background image. This is drawn first.
- Foreground: this is stuff that "fills in" the progress bar as the value of it reaches its maximum. This is the second thing drawn.
- Overlay: this one is theoretically not necessary, but it is so much easier to use one than to skip it. This one is drawn last and this image should most often be more or less completely transparent. I use it to add nice looking borders.
Sizes of Images
How big should the images be? Do they all need to be the same size? What if I want my progress bar to be wider than the images used? Obviously, I want the progress bar to be able to take on more or less any dimension regardless of the images used, so how should the progress bar render, for example, the background if the background image isn't as wide as I want my progress bar to be? There are two ways to fix such a case:
- Draw the image more than once, one after the other until the width of the progress bar is filled, tiling the image
- Stretch the image whilst drawing it, making it as wide as the progress bar
I realized that both of these approaches have pros and cons. You can't stretch an image to create an XP-like look where the progress is indicated by green blocks. In this case, you have to tile the images. On the other hand, with a look such as Vista's it is more convenient to just stretch the image. In the end, I decided that I could get a cool effect from both of these approaches and that is why I left the choice up to the developer using the control instead. I did that by exposing a property called [imageType]DrawMethod. I wanted to have the option to tile or stretch the images differently for background, foreground and overlay:
public class ProgressBar : Panel
{
    public enum DrawMethod
    {
        Tile,
        Stretch
    }

    private DrawMethod foregroundDrawMethod = DrawMethod.Stretch;

    ...

    public DrawMethod ForegroundDrawMethod
    {
        get { return foregroundDrawMethod; }
        set { foregroundDrawMethod = value; }
    }

    ...
}
By exposing it as a public property, the visual form designer will allow me to change it using the property pages for the control. Perfect.
Image Segments
Ok, so we have the types of images we need and we have ways to make sure that any length of image will still cover the entire width of the progress bar. Great, that means that we can make small images and save memory and resources that way. The XP-style progress bar in my example above is made up of these three images:
- Background image
- Foreground image
- Overlay image (this is mostly transparent)
However, what if we wanted to draw, for example, the background image stretched to 200 pixels? That would mess up the proportions of the image in the corner, like this:
- Background image (stretched from 19 pixels to 200 pixels in width)
That does not look good, so I came up with the concept of image segments. I expose three segment related properties per image and then only stretch or tile the center segment. The three segments are defined by two properties of the ProgressBar class:
[imageType]LeadingSize: this defines the left-most area that will not be stretched. [imageType]TrailingSize: this defines the right-most area that will not be stretched.
The center segment is implicitly defined as the segment between the leading and trailing segments. Again, public properties expose the segment values to the form designer:
public class ProgressBar : Panel
{
    ...

    private int backgroundLeadingSize = 0;
    private int backgroundTrailingSize = 0;

    ...

    public int BackgroundLeadingSize
    {
        get { return backgroundLeadingSize; }
        set { backgroundLeadingSize = value; }
    }

    public int BackgroundTrailingSize
    {
        get { return backgroundTrailingSize; }
        set { backgroundTrailingSize = value; }
    }
}
Now, finally, all the properties we need are defined.
Rendering
It's now time to render the images. We do that by overloading OnPaint:
protected override void OnPaintBackground(PaintEventArgs e)
{
}
protected override void OnPaint(PaintEventArgs e)
{
if (offscreenImage == null)
CreateOffscreen();
Render(offscreen,
backgroundImage,
backgroundDrawMethod,
backgroundLeadingSize,
backgroundTrailingSize,
this.Width);
if (value > minimum)
{
int distance =
(int)(((float)this.Width) * ((float)(value - minimum)) /
((float)(maximum - minimum)));
Render(offscreen,
foregroundImage,
foregroundDrawMethod,
foregroundLeadingSize,
foregroundTrailingSize,
distance);
}
Render(offscreen,
overlayImage,
overlayDrawMethod,
overlayLeadingSize,
overlayTrailingSize,
this.Width);
e.Graphics.DrawImage(offscreenImage, 0, 0);
}
A few things to note here: first, we not only override OnPaint, but also OnPaintBackground to make sure the panel is not trying to render its default background. This is important because failing to do this can cause the progress bar to flicker.
Further, I do not render directly to the Graphics object that is passed to the OnPaint method, as that would also lead to flicker. Instead, I create an image in memory (this is done in the CreateOffscreen method) and render the progress bar to that. Then I render the off-screen image to e.Graphics at the end of the method. This way, the Graphics object that is visible on-screen only gets one update. No flicker!
A method called Render in the progress bar class is used to render an image up to a certain width. This is called three times, one for each type of image: background, foreground and overlay. For background and overlay, the width of the control is passed as a width parameter, making the background and overlay always being drawn to fill the entire progress bar. The foreground is drawn with a width parameter representing the amount of "progress" on the progress bar. The Render method looks like this:
protected void Render(Graphics graphics,
Image sourceImage,
DrawMethod drawMethod,
int leadingSize,
int trailingSize,
int distance)
{
if (sourceImage == null)
return;
ProgressBar.DrawImage(
graphics,
sourceImage,
new Rectangle(0, 0, leadingSize, this.Height),
new Rectangle(0, 0, leadingSize, sourceImage.Height));
int trailerLeftPosition = Math.Max(leadingSize, distance - trailingSize);
ProgressBar.DrawImage(
graphics,
sourceImage,
new Rectangle(trailerLeftPosition, 0, trailingSize, this.Height),
new Rectangle(sourceImage.Width - trailingSize,
0,
trailingSize,
sourceImage.Height));
if (distance > leadingSize + trailingSize)
{
RenderCenterSegment(graphics,
sourceImage,
drawMethod,
leadingSize,
trailingSize,
distance,
trailerLeftPosition);
}
}
By passing in a source rectangle (specifying which area of the image being drawn is going to be used) and the destination rectangle (the area on the graphics object the image is drawn onto), it is easy to draw the leading, trailing and center segments. At the end of the Render, and only if the width parameter is greater than the leading segment width plus the trailing segment width (this check is here to make sure that the "ends" for the progress bar are always drawn). the center segment is rendered. This is the part that takes into account the current DrawMode:
private void RenderCenterSegment(Graphics graphics,
Image sourceImage,
DrawMethod drawMethod,
int leadingSize,
int trailingSize,
int distance,
int trailerLeftPosition)
{
switch (drawMethod)
{
case DrawMethod.Stretch:
ProgressBar.DrawImage(
graphics,
sourceImage,
new Rectangle(leadingSize,
0,
distance - (leadingSize + trailingSize),
this.Height),
new Rectangle(leadingSize,
0,
sourceImage.Width -
(
leadingSize + trailingSize
),
sourceImage.Height));
break;
case DrawMethod.Tile:
{
Region clipRegion = graphics.Clip;
int tileLeft = leadingSize;
int tileWidth = sourceImage.Width -
(leadingSize + trailingSize);
graphics.Clip = new Region(
new Rectangle(tileLeft,
0,
trailerLeftPosition - tileLeft,
this.Height + 1));
while (tileLeft < trailerLeftPosition)
{
ProgressBar.DrawImage(
graphics,
sourceImage,
new Rectangle(tileLeft,
0,
tileWidth,
this.Height),
new Rectangle(leadingSize,
0,
tileWidth,
sourceImage.Height));
tileLeft += tileWidth;
}
graphics.Clip = clipRegion;
}
break;
}
}
The observant reader might have reacted to the use of ProgressBar.DrawImage rather than graphics.DrawImage. This is because of a portability issue between .NET and .NET Compact Framework. I want the same code base to run both platforms, desktop and device. This leads to the use of some pre-processor directives, since we must change the code slightly between platforms. The .NET Compact Framework ignores transparent pixels in PNG files and renders them as white. This won't do, so I fix that by using a "chroma key" defined in an ImageAttribute class to achieve transparency.
This would have worked for the desktop as well, but it is so much nicer being able to draw the images the way I want them to look, without the use of a "green screen" colour. This is why I decided to keep the original behaviour on the desktop.
protected static void DrawImage(Graphics graphics,
Image image,
Rectangle destinationRectangle,
Rectangle sourceRectangle)
{
#if PocketPC
if (imageAttributes == null)
{
imageAttributes = new ImageAttributes();
imageAttributes.SetColorKey(Color.Magenta, Color.Magenta);
}
graphics.DrawImage(image,
destinationRectangle,
sourceRectangle.X,
sourceRectangle.Y,
sourceRectangle.Width,
sourceRectangle.Height,
GraphicsUnit.Pixel,
imageAttributes);
#else
graphics.DrawImage(image,
destinationRectangle,
sourceRectangle,
GraphicsUnit.Pixel);
#endif
}
I went with magenta as a hard-coded chroma key, making it impossible to use that colour in the progress bar as it will not be rendered. This is a good thing because magenta is an ugly color. And that's it. Custom progress bars that can take on any appearance!
Rendering Marquee Bars
(This chapter was added in version 3 of this article.)
As was correctly pointed out to me in this article's discussion, my implementation lacks a marquee mode. I decided to add that and implement the same type of customization possibilities. For those of you who are unfamiliar with marquee progress bars, this is what it's called when a progress bar is used to indicate processing rather than progress. It is normally used to show the user that the application is doing something, but does not know how much work there is left to do. The first thing my progress bar needed was a way to indicate what type of bar it was, so I added an enumeration:
public class ProgressBar : Panel
{
    ...

    public enum BarType
    {
        Progress,
        Marquee
    }

    ...
}
Using a member of this enumeration that is exposed by a get/set property, it is then easy to set the type of bar using the property pages in the visual designer:
public class ProgressBar : Panel
{
    ...

    public enum BarType
    {
        Progress,
        Marquee
    }

    private BarType barType = BarType.Progress;

#if !PocketPC
    [Category("Progressbar")]
#endif
    public BarType Type
    {
        get { return barType; }
        set { barType = value; }
    }

    ...
}
You might wonder what the pre-processor directive around an attribute on the property is for:
#if !PocketPC
    [Category("Progressbar")]
#endif
    public BarType Type
By adding a Category attribute to the property, property pages in the visual designer can group related properties together. However, the .NET Compact Framework does not include the Category attribute, so the code would not compile without the pre-processor directive. This means that if we're using the progress bar in a desktop environment, the properties will be neatly grouped together. Unfortunately, this wont happen on the Device version. I also added another enumeration and member/property pair:
public class ProgressBar : Panel
{
    ...

    public enum MarqueeStyle
    {
        TileWrap,
        BlockWrap,
        Wave
    }

    ...
}
This gives the option to select a type of marquee rendering. There are three different rendering types to choose from in my implementation:
- TileWrap: this renders a single tile that travels over the bar and starts again at the beginning when reaching the end.
- BlockWrap: this is kind of like TileWrap, but the width of the block traveling over the bar is configurable.
- Wave: this renders a block like BlockWrap, but it moves back and forth over the bar in a sinuous wave pattern.
Since the background and overlay part of the progress bar do not change with BarType, most of the ProgressBar.OnPaint method remains the same as in the previous implementation. The only change is the addition of a switch statement that renders the foreground based on the BarType. The rendering of the marquee foreground is delegated to another method, as there are three options and I want to keep the ProgressBar.OnPaint method tidy:
protected override void OnPaint(PaintEventArgs e)
{
if (offscreenImage == null)
CreateOffscreen();
Render(offscreen, backgroundImage, backgroundDrawMethod,
backgroundLeadingSize, backgroundTrailingSize, this.Width);
switch (barType)
{
case BarType.Progress:
if (value > minimum)
{
int distance = (int)(((float)this.Width) * ((float)(
value - minimum)) / ((float)(maximum - minimum)));
Render(offscreen, foregroundImage, foregroundDrawMethod,
foregroundLeadingSize, foregroundTrailingSize, distance);
}
break;
case BarType.Marquee:
RenderMarqueeForeground();
break;
}
Render(offscreen, overlayImage, overlayDrawMethod, overlayLeadingSize,
overlayTrailingSize, this.Width);
e.Graphics.DrawImage(offscreenImage, 0, 0);
}
ProgressBar.RenderMarqueeForeground() is then responsible for rendering the foreground using the correct method:
private void RenderMarqueeForeground()
{
    switch (marqueeStyle)
    {
        case MarqueeStyle.TileWrap:
            RenderMarqueeTileWrap();
            break;
        case MarqueeStyle.Wave:
            RenderMaqueeWave();
            break;
        case MarqueeStyle.BlockWrap:
            RenderMarqueeBlockWrap();
            break;
    }
}
The three methods are then used to render the foreground. These methods are all basically the same: they all render the foreground leading part, a center part and, finally, the trailing part. The only difference between them is how they calculate where the drawing should begin.
Performance
As Windows Mobile Devices are a lot less powerful than desktop computers, I found that I needed to improve the rendering performance of the progress bar so that it would work smoother in cases where there are frequent updates to the progress value.
In this case, it was not very difficult to find an area where some time could be saved. I know that the progress bar is basically not doing anything but rendering itself. So, to optimize it, I needed to optimize the methods that render the background, foreground and overlay. When I say that it would not be very difficult, I mean that it would be easy to find a compromise where speed was gained at the cost of something else. This is usually the case when optimizing, unless the code is really poorly written to start with, in which case optimizations can be made by removing redundant things or just do thing correctly.
I decided to gain speed at the cost of memory used by storing the "calculated" graphics in cache images. By "calculated" I mean that the background, foreground and overlay as the way they appear on-screen is calculated using their leading, trailing properties. By rendering them to a cache image on Resize and then using the cache images when the progress bar needed repainting, no calculation would have to be done for a normal repaint.
This approach is all right for background and overlay, but for foreground, which changes as the progress value changes, it becomes more complicated. I could have created a complete set of cache images for the foreground, one for each amount of progress, and then rendered the correct one based on the progress value. This would have either made the progress bar appear as if it where snapping between values, if I had used too few cache images, or consumed too much memory if I had created one cache image for each possible state (equal to the width in pixels of the progress bar).
I decided to go for optimizing just the background and the overlay. The first thing needed then is a method that renders the images in their correct size, not to the off-screen, but to their cache images. This method is called from the method that handles resizes:
protected void RenderCacheImages()
{
ProgressBar.DisposeToNull(backgroundCacheImage);
ProgressBar.DisposeToNull(overlayCacheImage);
backgroundCacheImage = new Bitmap(Width, Height);
Graphics backgroundCacheGraphics = Graphics.FromImage(backgroundCacheImage);
Render(backgroundCacheGraphics, backgroundImage, backgroundDrawMethod,
backgroundLeadingSize, backgroundTrailingSize, this.Width);
overlayCacheImage = new Bitmap(Width, Height);
Graphics overlayCacheGraphics = Graphics.FromImage(overlayCacheImage);
overlayCacheGraphics.FillRectangle(new SolidBrush(Color.Magenta),
ClientRectangle);
Render(overlayCacheGraphics, overlayImage, overlayDrawMethod,
overlayLeadingSize, overlayTrailingSize, this.Width);
}
I can still re-use the existing ProgressBar.Render method, as that was created to render to an off-screen. However, instead of supplying the off-screen graphics as the first argument, the graphics for the cache images are provided. Note that in order to maintain any transparency, the overlay image is drawn onto a magenta area, as this will be left by the transparent (magenta) pixels on this pass and made transparent on the render to off-screen. The next step is then to replace the calls to ProgressBar.Render for background and overlay in the OnPaint method with calls to ProgressBar.DrawImage instead:
protected override void OnPaint(PaintEventArgs e)
{
if (offscreenImage == null)
CreateOffscreen();
ProgressBar.DrawImage(offscreen, backgroundCacheImage,
ClientRectangle, ClientRectangle);
switch (barType)
{
...
}
ProgressBar.DrawImage(offscreen, overlayCacheImage,
ClientRectangle, ClientRectangle);
e.Graphics.DrawImage(offscreenImage, 0, 0);
}
And that's it for the performance fix. When running the application, it is hard to see the difference on Windows Mobile 5 devices, but it's visible on PocketPC 2003 devices. Although this implementation is intended for use on Mobile 5 or later, I still try to make my code work on as wide a range of platforms as possible.
Final Result
All the requirements defined in the beginning of this article are implemented and the only thing that needs improvement is the performance when running on Mobile 5 devices. Overall, I'm pretty happy with the result.
Points of Interest
The ZIP file inside the downloadable shows how to set up a solution so that two projects can reference the same source files. This is good when developing for the .NET Compact Framework because it can take a little while to launch the test application on the emulator. It is therefore convenient to try it out in a desktop environment, but at the same time, I want instant feedback on API conformance. This is so that I do not spend days implementing something that then is useless because I've been using stuff that is unsupported by the Compact Framework.
All are comments welcome, both on the code and the article.
History
- 2007-11-14: First version
- 2007-11-15: Second version (fixed some spelling and grammar)
- 2007-11-26: Added support for Marquee progress bars
- 2007-12-14: Updated with a performance fix


 General
  News
News  Suggestion
  Question
  Bug
Bug  Answer
  Joke
Joke  Praise
  Rant
Rant  Admin
Admin 


