Introduction
I am going to explain the steps for creating a Windows service which monitors some folders or files and writes their changes in the event log. Creating services enables you to run an assembly in the background. Services are suitable for the times when you need to continuously listen to incoming network connections, or monitor something, or launch an assembly before the user logs in. Services can run automatically when the computer starts. When you compile the service project, you need to install it so it could run on the server. You have to create an installation component for that which installs and registers the service on the server. You need to call Run method from the main method, so the service would be loaded into the Service Control Manager. We want to create a Windows service which is able to monitor some files and report the changes, so we divide this post into 3 sections, which are Monitoring files, event log, and creating and installing Windows services.
Monitoring Directories and Files
FileSystemWatcher class provides methods for monitoring files. The most important FileSystemWatcher events which you can register are:
Changed: Occurs when a file or directory has changed in the watched directory Created: Occurs when a file or directory has been created in the watched directory Deleted: Occurs when a file or directory has been deleted in the watched directory Renamed: Occurs when a file or directory has been renamed in the watched directory
Let’s say you want to monitor all files in your Windows directory, in system32 (C:\Windows\System32). The code is pretty much simple.
using System;
using System.IO;
using System.Text;
namespace ConsoleApplication3
{
class Program
{
static void Main(string[] args)
{
FileSystemWatcher Watcher = new FileSystemWatcher();
Watcher.Path = Environment.SystemDirectory;
Watcher.IncludeSubdirectories = true;
Watcher.Created += new FileSystemEventHandler(Wathcer_Changed);
Watcher.Deleted += new FileSystemEventHandler(Wathcer_Changed);
Watcher.EnableRaisingEvents = true;
Console.ReadLine();
}
static void Wathcer_Changed(object sender, FileSystemEventArgs e)
{
Console.WriteLine("Change Type = {0}, Path = {1}", e.ChangeType, e.FullPath);
}
}
}
You can either pass the path as an argument to the constructor of FileSystemWatcher or assign it to path properties. There is a property called IncludeSubdirectories which you can set to true and as you realize from the name, it enables the watcher to watch sub directories too. There are two events Created and Deleted registered, which whenever they occur, the function Wathcer_Changed will be called and in that function, the event type and the full path of the changed object will be displayed on the screen.
Event Log
.NET Framework has a class called EventLog using which you can create an event log. You have to use System.Diagnostics namespace. You can view event log by opening control panel and then Administrative tools, click on Event Viewer.

Using the following code, you can create an event log TestLog and write an entry in that event log.
static void Main(string[] args)
{
if(!EventLog.SourceExists("TestLog","."))
EventLog.CreateEventSource("TestLog","Application");
EventLog Lg=new EventLog("Application",".","TestLog");
Lg.WriteEntry("The first test log",EventLogEntryType.Information);
Console.ReadLine();
}
You have two options for reading the event entry, either by opening the event viewer and then opening the application and click on the event you created and view the entry:

Or you can use this code to read the event entry:
static void Main(string[] args)
{
EventLog El = new EventLog("Application", ".", "TestLog");
foreach (EventLogEntry E in El.Entries)
{
if(E.Source=="TestLog")
Console.WriteLine(E.Source + " , " + E.Message);
}
Console.ReadLine();
}
Windows Services
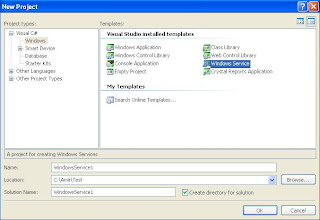
For creating a service project, click on file, new project and then select Windows Service.
Use the designer view, and from properties, change the name and the service name to whatever name you like. You can also set CanPauseAndContinue and CanShutDown properties to true, so you would be able to pause, restart and shut down the service. Within the service class, add the code to OnStart, OnStop, OnPause, OnContinue, and OnShutdown methods.
protected override void OnStart(string[] args)
{
FileSystemWatcher Watcher = new FileSystemWatcher();
Watcher.Path = Environment.SystemDirectory;
Watcher.IncludeSubdirectories = true;
Watcher.Created += new FileSystemEventHandler(Watcher_Changed);
Watcher.Deleted += new FileSystemEventHandler(Watcher_Changed);
Watcher.EnableRaisingEvents = true;
}
static void Watcher_Changed(object sender, FileSystemEventArgs e)
{
if (!EventLog.SourceExists("TestLog", "."))
EventLog.CreateEventSource("TestLog", "Application");
EventLog Lg = new EventLog("Application", ".", "TestLog");
string Message = "The Changed File" + e.Name + " , " + e.FullPath;
Lg.WriteEntry(Message, EventLogEntryType.Information);
}
Now we have to create an installer for the service. In order to add an installer to the project, you have to open the design view for the service, right click the designer and click Add Installer. Change the StartType property for the ServiceInstaller to Automatic. The StartType property can have one of the following values:
Automatic: The service starts automatically after the computer starts, whether or not a user logs in. Manual: A user must manually start the service. Disabled: The service does not start automatically and users cannot start the service.
Set the Description property to “Logs file changes in the system directory” and set the DisplayName property to “System File Watcher”.
Select ServiceProcessInstaller component from the designer view.

Set the Account property to LocalSystem. Account property gets one of the following values according to the security context you want to specify for your service:
LocalService: As a non - privileged user on the local computer. Use this to minimize security risk. NetworkService: Enables the service to authenticate to another computer on the network. LocalSystem: As unlimited privileged user. It can cause a severe security risk if vulnerabilities in your service could be exploited to harm the computer data. User: Causes the system to prompt for a valid user name and password.
Now you have to define your service startup object by right clicking the project in the solution explorer and choosing property. In the project designer, under application tab, select your service as the startup object.

You have to add a setup project to your service project in order to create a Windows installer (MSI) package. Click on File, Add, New project and add a setup project to your solution.

You have to add the output from your service project to the setup project. Right click the setup project in the solution explorer, click Add, and then Project Output.

From the Add output project dialog, select your service project from the list, and then select Primary Output.

Add a custom action to install the service executable file. Right click the setup project in the solution explorer, click view, and then Custom Actions, and then right click the Custom Actions in the designer view and Click Add Custom Action.


In the select Item Project dialog box, Select the Application Folder, and then select the Primary Output From the service.

The primary output will be added to the custom actions Install, Commit, Rollback and Uninstall.

Right click the setup project in the Solution Explorer and select Build. Go to your project’s folder, there will be a Setup.exe which is for installing the service. You can start, stop or change the Startup Type of your process, you can either go to control panel, Administrative Tools, Computer Management and then under Services and Application, click on Services and find your service or directly select Services in Administrative tools, and find your service.

You can start the service by restarting your computer or by right clicking the service and select Start. Go to Windows/System32 folder and create a text file after you have started the service. Then return to services page and right click the service and stop it. Under the administrative tools, select Event Viewer, under applications, you can see the event entry which your service has entered.

History
- 16th January, 2009: Initial post
This member has not yet provided a Biography. Assume it's interesting and varied, and probably something to do with programming.


 General
  News
News  Suggestion
  Question
  Bug
Bug  Answer
  Joke
Joke  Praise
  Rant
Rant  Admin
Admin 


