Introduction
Many programmers and students create small projects. These projects are often based on the same project template. In many cases, they need to modify the project settings, and every time they must do that, they lose time on repetitive configuration tasks. For these reasons, I have decided to create this article; it explains Visual Studio .NET template creation, and it can be a good example for creating more complex wizards.
Overview of the Visual C++ Custom Wizard
This information is not exhaustive, it explains the most common features of a custom wizard. A typical project wizard template contains the files listed below:
[name].vsz
Identifies the wizard engine and provides context and optional custom parameters.
[name].vsdir
This file provides a routing service between the Visual Studio shell and the items in the wizard project.
Templates.inf
Templates.inf is a text file that contains a list of templates to use for the project. Note that Template.inf is a template file itself (you can use directives to indicate which files to include in the project).
default.vcproj
The XML file that contains the project type information.
"Template file" folder
This folder contains files that will be included in the project. Note that the location on the hard drive is "$(ProjectDir)\Template Files\1033".
"HTML files" folder
Contains the HTML file (user interface) used by the wizard, one file per page wizard. The first file is "Default.htm". The location on the hard drive is "$(ProjectDir)\Html\1033".
"Script Files" folder
The Custom Wizard creates a JScript file called "Default.js" for each project. It also includes "Common.js". These files contain JScript functions that give you access to the Visual C++ object models to customize a wizard.
Define your project structure
Wait a moment, be patient. Before starting the template creation, you must create a default project. This project must contain your pre-requisites for a default project template. Write down on a text file everything that you do, this information will be useful when the wizard creates the new project.
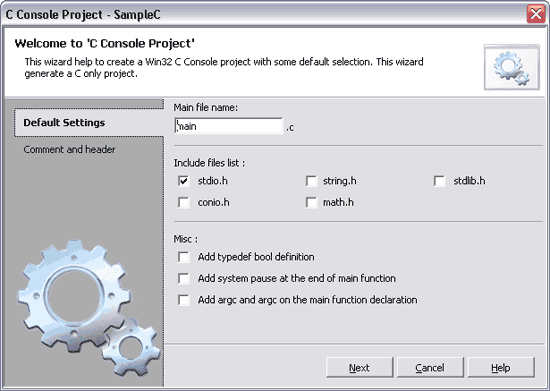
My project structure
For this article, I have chosen to create a Win32 Console project for creating a C project. My requisites are:
- A "main.c" file (it could be renamed).
- Include any other declaration (optional) like "stdio.h", "string.h", "conio.h", "stdlib.h", and "math.h".
- Add a
typedef to create a bool type (optional). - Add a system pause at the end of the main function (optional).
- Add author, date, and project description fields (optional).
- Finally, choose if the
argc and argv appear in the main function declaration.
First step - Create the default template structure
To create the template structure is pretty simple; Visual Studio does it for you. First, start Visual Studio .NET and select "New Project" from the "File" menu.

On the project dialog box, choose "Visual C++ Project" and "Custom Templates".
On the Application Setting page of the "Custom Wizard", change the wizard friendly name to "C Console Project", check the "User interface" checkbox, and set the number of wizard page to 2. The base is now created.
Second step - Define the project content
Add the C file
Now, we can add the project files. In my example, I only add one file called "main.c".
To add this file, create a file called "main.c" and save it to the "$(ProjectDir)\Templates\1033" folder. After that, right click on the "Template Files" directory on Visual Studio and select "Add existing item", then add the "main.c" file.
Erase useless files
Delete the "ReadMe.txt" and the "Sample.txt" files from the "Template Files" directory (from Visual Studio and from the hard drive).
Add the "main.c" entry on "template.inf"
Now, we modify the "template.inf" file to represent the last three modifications. For that, replace all the file content by "main.c".
Third step - Modify the HTML UI and the script
In this step, I only explain three modifications. All others are technically the same. These modifications are:
- Rename the "main.c" file, its new name comes from an input control on the HTML file.
- Add or not an included file depending on the checkbox selection.
- Set the configuration settings for the new project.
Rename "main.c"
On every project, you can find a "default.js" file. This file contains some functions that were called when the output project was created. On the default HTML file, there is a textbox "MAIN_FILE_NAME" that contains the file name; by default, it is "main". To allow Visual Studio to change the name of this file, you must modify the function "GetTargetName" as follows (the function is located on the default.js file).
function GetTargetName(strName, strProjectName)
{
    try
    {
        var strTarget = strName;

        if (strName == 'main.c')
            strTarget =  wizard.FindSymbol('MAIN_FILE_NAME') + '.c';

        return strTarget;
    }
    catch(e)
    {
        throw e;
    }
}
You can define the default value for the HTML controls by adding a "SYMBOL" tag on the HTML file. For example, to set the default value of the "MAIN_FILE_NAME" control to main, add the following line on the HEAD section.
<symbol name="MAIN_FILE_NAME" type="text" value="main"></symbol>
Add included file
For example, to add the "stdio.h" file into the "main.c" file, add a checkbox control on the "Default.htm" file:
<input id="INCLUDE_STDIO_H" type="checkbox" value="checkbox" name="checkbox">
After that, edit the "main.c" file and modify it according to the example below:
[!if INCLUDE_STDIO_H]
#include <stdio.h>

[!endif]
To view more possibilities, edit the file in the sample.
Project settings
To modify the project settings, it's a little more complicated. The function that does that is on the "default.js" file, its name is AddConfig().
When you create a project with the custom wizard, the generated AddConfig() function does not contain much information, but it contains the object declaration which we will use to change the project settings.
In my project, I need to change the following settings (config=debug). Below is a table with the settings to change and a sample code to make this change:
Character Set:Use Multi-Byte Character Set
Debug Information Format:Program Database for Edit & Continue (/ZI)
Warning Level:Level 3 (/W3)
Optimization:Disabled (/Od)
Preprocessor Definitions:WIN32;_DEBUG;_CONSOLE
Runtime Library:Single-threaded Debug (/MLd)
Create/Use Precompiled Headers:Not Using Precompiled Headers
Enable Incremental Linking:Yes (/INCREMENTAL)
Generate Debug Info:Yes (/DEBUG)
The code:
config.CharacterSet = charSetMBCS;
CLTool.DebugInformationFormat = debugOption.debugEditAndContinue;
CLTool.WarningLevel = warningLevelOption.warningLevel_3;
CLTool.Optimization = optimizeOption.optimizeDisabled;
CLTool.PreprocessorDefinitions = "WIN32;_DEBUG";_CONSOLE";
CLTool.RuntimeLibrary = rtSingleThreadedDebug;
CLTool.UsePrecompiledHeader = pchNone;
LinkTool.GenerateDebugInformation = true;
LinkTool.LinkIncremental = linkIncrementalYes;
The JavaScript:
var config = proj.Object.Configurations("Debug|Win32");
var CLTool = config.Tools("VCCLCompilerTool");
var LinkTool = config.Tools("VCLinkerTool");
For more information, see the AddConfig() function in the "Default.js" file.
Last step - Prepare a setup for installing the project custom wizard
In the setup file, you will find scripts allowing to install this example automatically. If you want to change these scripts for your personal use, you will find the parameters for the installation in the file "config.vbs".
Install this sample using setup
Extract the contents of "VCNetCustomWizard_demo.zip" and use the cmd files (install.cmd, uninstall.cmd, and settings.cmd).
Install this example manually
- Copy the "VCNetCustomWizard_demo.zip" file to your hard disk and extract to a folder.
- Copy the contents of the "Setup Files\Project" folder to the "Vc7\VCProjects\Customs Wizards" folder in the directory where Visual Studio is installed (for example, c:\Program Files\Microsoft Visual Studio .NET 2003\Vc7\VCProjects\Customs Wizards\).
- Copy the contents of the "Setup Files\Wizard" folder to the "Vc7\VCWizards\C Console v1" folder in the directory where Visual Studio is installed (for example, c:\Program Files\Microsoft Visual Studio .NET 2003\Vc7\VCWizards\C Console v1\).
- Edit the file "\Vc7\vcprojects\Customs Wizards\C Console Project.vsz" and replace "$$WIZARD_VERSION$$" with "7.1" and "$$ABSOLUTE_PATH$$" with the path that contains the wizard files (for example, c:\Program Files\Microsoft Visual Studio .NET 2003\Vc7\VCProjects\Customs Wizards\).
Note
For Visual C++ 2005 or 2005 Express, replace the string "$$WIZARD_VERSION$$" with "8.0", and go to the "config.vbs" file to view the installation paths.
Conclusion
Visual C++ .NET and Visual Studio .NET offer some features to customize your project templates; custom projects can help single developers or developer teams to accelerate their development by automating repetitive tasks. It can also provide a good foundation for creating personal or enterprise standards. Some other Visual Studio features like add-ins or macros can help developers to organize their work. I encourage developers to look at these different possibilities to eliminate the non- interesting things and concentrate on more significant tasks.
I am a C, C++ , C# and VB.NET software developer in Swiss. I actually work for SOPRA Group with C# and Oracle database.I have good experience in software development life cycle (analysis, requirements, design, coding, test and deploy). This experience spans many other experiences like embedded software, ATL, COM, Java application, complex Windows Installer Packages and more.
- 4+ years in .NET programming (especially C#);
- 3+ years in C/C++ programming;
- 3+ years in VB6, Java, Windows Installer


 General
  News
News  Suggestion
  Question
  Bug
Bug  Answer
  Joke
Joke  Praise
  Rant
Rant  Admin
Admin 


