Introduction
Hi there! Its time to do what? To play Columbus! Of course not all set to go rediscover
America but at least to discover the new enhanced User Interface capabilities of the .Net platform!
In this lab we'll be looking at various new UI features such as Transparent Windows, Control Anchoring and Control Docking. The jargon
getting to you? Fret not at the end of this lab exercise not only will you be able to understand what
these mean but also be able to create WinForm applications which use them.
So lets start the journey by starting the Visual Studio.net IDE (if its not already running)
Creating the full application
- Start Visual Studio.net
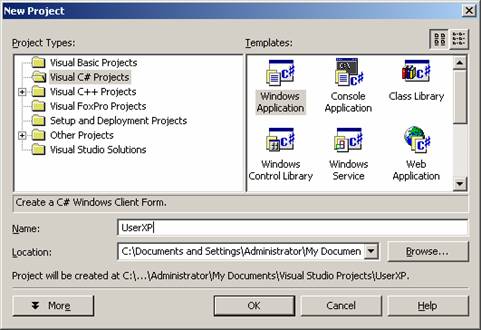
- Click File -> New -> Project
- Select Visual C# Projects on the left hand panel. And Windows Application on
the right-hand-side pane, and type in the name as “ UserXP ” and click OK . This
would fire-up the WinForm IDE.
- Drag and Drop one TrackBar control on the form. [ you
might have to scroll down a bit]

This is how a TrackBar control looks in the ToolBox
- Make sure that the TrackBar control is selected on
the form. Look for the Orientation property in the properties box. Click on
the drop down arrow and set it to Vertical.
- Make sure that the TrackBar control is selected on
the form. look for the Dock property in the properties box. Click on the drop
down arrow. A figure as shown below appears
Click on the Left side button on the grid.
Why did we do that?
What we've just done is that we've ‘docked' the TrackBar control to the left side of the screen. Now the TaskBar control is ‘tied' or rather ‘is glued' to the left side of the screen, if you notice in the designer the control is already stuck on to the left side of the screen. Even if you at runtime maximize the screen it doesn't budge! It stays right there! We'll see this in action soon.
- Make sure that the TrackBar control is still selected
and look for the properties listed below in the properties window and set them
to the ones specified.
Property
| Set To
|
Large Change
| 5
|
Maximum
| 100
|
Minimum
| 10
|
Small Change
| 5
|
Value
| 100
|
- Phew, almost done! Drag and Drop two label controls
from the toolbox onto the form.
This is how a Label control looks on the ToolBox
- Position the label controls as shown in the screen
shot below.
Your Form should now look like this
- Change the Text properties of the Label controls to
the ones seen in the screen shot.
- Drag and Drop a Button control onto the form
This is how a Button control looks on the ToolBox
- Set the Button's Text property to “ End Me Now ! ”
Change the Text property of the button control
- Make sure that the TrackBar control is selected on
the form. look for the Anchor property in the properties box. Click on the
drop down arrow. A figure as shown below appears
Anchor property of the Button
- Check all four side of the button.
Why did we do that?
The Anchor property of any control when set ‘anchors' the control to that position on the Form. That means even if the user resizes the form the control automatically resizes and repositions itself to fit onto the new form size. When a control is anchored to a form and the form is resized, the control maintains the distance between the control and the anchor positions. In our lab, you have a Button control that is anchored to the top, left, right, and bottom edges of the form, as the form is resized, the Textbox control resizes horizontally so that it matches the same distance from the right and left sides of the form. In addition, the control positions itself vertically so that its location is always the same distance from the top and bottom edge of the form. If a control is not anchored and the form is resized, the position of the control relative to the edges of the form is changed.
- Position the Button as shown below.
Your form should now look like this
- Now for the coding part! Double click on the TaskBar
control on the form to open the code window.
- Type in the following line of code
Form1.Opacity = (TrackBar1.Value) / 100
Type in the above line of code into the code window
Why did we do that?
To explore Transparent Windows! To make a window transparent we need to set its opacity property, 1 means its completely opaque( not transparent), the kind of windows we are used to see. And 0 meaning that the window is completely transparent ( infact invisible!). we will be able to adjust the transparency of our form using the TrackBar ! Push it up towards Full Visibility to make it completely opaque, push it right down to make it almost completely transparent! We will see this in action next.
- Switch back to the Designer view, by clicking on the
icon in the Solution Explorer.
Click on the view designer button
- Double click on the Button control. This should open
the code window again for you. Type in the following line of code.
MessageBox.Show ( "You cant get rid of me that easily!");
- Phew! We are finally done! Tough one huh? <st1:city><st1:place>Columbus
's life wasn't easy either! Now lets check out what
we've exactly made. Run the program by clicking on the Debug m enu -> and
then Start. ( or by pressing F5 )
Your very own ghostly window!
- Drag the TaskBar up and down to vary the degree of
transparency of your form. Amazing isn't it? Now try to maximize the window!
Notice any thing different? The button changes its size, maintaining a
proportionate distance between the edges!! That's Control Anchoring!! ;)
Hope you guyz had fun [I know you learnt nothing worthwhile!] but in any case if you think you have and there is anything more that you would like to know or would like to flog me about some dumb mistake I made please do so at mjeelani@yahoo.com
This member has not yet provided a Biography. Assume it's interesting and varied, and probably something to do with programming.


 General
  News
News  Suggestion
  Question
  Bug
Bug  Answer
  Joke
Joke  Praise
  Rant
Rant  Admin
Admin 


 Is there any way to make just the inside of the window transparent and not the frame or the text?


 as u've discovered 'cause of the min val of the track bar...