Introduction
Now, some of the digital controlling devices, which previously were hard to find or were expensive, have been produced on a mass scale and are cheaper than the European ones. One of the most important parts of the controlling system is precisely controlling a wide range of voltage.
In some projects, we used to implement Micro-Controller-based power supply RS232 controlling, which sometimes caused errors due to environment-inducing motors and something similar. Fortunately, we found some Chinese power supplies cheaper than we'd made available.
Code Description
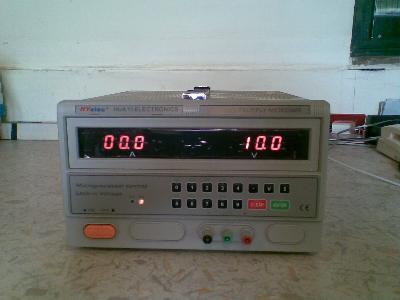
One of the most popular controllable power supplies which was offered with only an installable controlling program and no extra information about in use communication protocols or even its controlling program’s source code is HYElect Hua YI Electronics, Type HY3020M! We requested the main company to send us the protocol, but it seems they've sealed themselves, so nothing can be released! Despite their great help!! Using RS232 sniffing method, fortunately, the base protocol extracted!
The program consists of two parts. By choosing Virtual Power, it’s assumed to treat as a virtual power which you can remotely set its voltage and upper current limit and by choosing Real Power, it'll change to how you can contact with a real power supply unit.
The communication properties which shall be set are: 9600bps as Baud-Rate, 8 bit as default data length, with no parity bit and one stop bit and the wiring has to be done as what is shown below (pin 2 of computer connector must be connected to pin 3 of power supply connector, pin 3 of computer connector must be connected to pin 2 of power supply connector, pin 5 of computer connector must be connected to pin 5 of power supply connector and in each side, pin 7 and 8 have to be connected to each other)

The protocol which has been used there is terribly easy. The requesting sting which has to be sent is “8”.
MSCom.Write("8")
The reply will be in this form: “VVVAAA”. “VVV” indicates the power supply voltage which has to be divided by ten and “AAA” indicates the power supply current which has to be divided by 10 as the same.
RP_Vol_In = Mid(STR_InSerial, 1, 3)
RP_Cur_In = Mid(STR_InSerial, 4, 3)
NumUpDown_RP_Get_Voltage.Value = Val(RP_Vol_In) / 10.0
NumUpDown_RP_Get_Current.Value = Val(RP_Cur_In) / 10.0
The program also makes it possible to change the voltage set-point and current upper limit. For setting the voltage, the below piece of code is being used:
Dim Volt_Temp As Integer = NumUpDown_RP_Set_Voltage.Value * 10
Dim Volt_Check As Integer = 2
While Volt_Temp > 0
     Volt_Check = Volt_Check + (Volt_Temp Mod 10)
     Volt_Temp = Volt_Temp \ 10
End While
Volt_Check = Volt_Check Mod 10
RP_Vol_Out = "2" & (NumUpDown_RP_Set_Voltage.Value * 10).ToString("0000") & _
	Volt_Check.ToString("0")
As is obvious in the last line, the string length is 6 characters. The indicator character for voltage setting string is “2” which must be set at the first of string. The next four characters are made by NumUpDown_RP_Set_Voltage.Value * 10).ToString("0000") declaring the desired value. The last character is Volt_Check which is the remainder of summation of all digits Volt_temp divided by ten.
The process of the current setting is alike, by this difference that the indicator character is “1”. The piece of code brought below describes the process of creating a string going to be sent to change the current upper limit.
Dim Curr_Temp As Integer = NumUpDown_RP_Set_Current.Value * 10
Dim Curr_Check As Integer = 1
While Curr_Temp > 0
Curr_Check = Curr_Check + (Curr_Temp Mod 10)
Curr_Temp = Curr_Temp \ 10
End While
Curr_Check = Curr_Check Mod 10
RP_Cur_Out = "1" & (NumUpDown_RP_Set_Current.Value * 10).ToString("0000") _
		& Curr_Check.ToString("0")
Interesting Point
The most interesting thing that can be learned is that “Never lean on the information companies have sent to you”! I barely can say that I’d spent more than one week surfing the Internet finding whether any useful piece of information might have been left helping persons as me to advance the projects, but fortunately found nothing that forced me to stay on my feet. As a famous Chinese proverb goes, “Disappointment is the first step of failure”!
Special Thanks
Special thanks to Prof. Kamalaldin Farzaneh who has trusted in me and let me experience, fail and start again.
History
- 5th April 2010: Initial post


 General
  News
News  Suggestion
  Question
  Bug
Bug  Answer
  Joke
Joke  Praise
  Rant
Rant  Admin
Admin 


 , you've made me very glade
  .
.