Introduction
Don't have a car? Don't even have a driving license? You do not need them; all you need is to run a car simulation program to drive the most expensive and speedy cars. I will introduce you to a simple car simulation program using Irrlicht, the most popular Open Source game engine, and Newton, the great physics engine.
To make a car simulation program, you need a game engine to render the car body, the wheels, the track, and any other graphics items, but the idea behind the simulation is not to render the graphics items, but how to put these items in a physics environment to simulate reality. To do that, we will use a physics engine which will drop the car if it reaches the end of a cliff, or flip it if you try to pass a sharp turn ... etc. I used the Newton physics engine in this simulator, and to make our task easier, I also used the IPhysics Irrlicht Newton wrapper, which will make the link between Irrlicht and Newton so easy.
Background
The Irrlicht engine is an Open Source high performance real time 3D engine written and usable in C++. I used for this demo, the 1.4.2 version; the earlier versions couldn't render my .3ds models well. The IPhysics library (a set of classes for using Newton and Irrlicht together) was released only for the earlier versions, so I had to recompile this library to be compatible with the 1.4.2 version, and I have attached the new lib with the code sample.
Using the code
Open the solution file with Visual Studio 2005 and run the project. It will show a message telling you that it couldn't find the irrlicht.dll file. Just copy irrlicht.dll and newton.dll (you will find them in the attached sample executable) files to the release folder, and run again.
Preparing the code
Include these header files needed in the project:
#include <irrlicht.h>
#include <newton.h>
#include <IPhysics.h>
#include "EventReciever.h"
Use the #pragma comment statement to load the lib files (you can also add the lib files from the project setting).
#pragma comment (lib , "irrlicht.lib")
#pragma comment (lib , "newton.lib")
In the Irrlicht engine, everything can be found in a namespace. So if you want to use a class, you have to write its namespace before the name of the class, so we use the "using namespace" statement to avoid having to write the namespaces before every class.
using namespace irr;
using namespace core;
using namespace scene;
using namespace video;
using namespace io;
using namespace gui;
Irrlicht basics
To load a mesh, we only have to get the mesh from the Scene Manager with the getMesh() function, passing to it the path of the mesh, and add a SceneNode to display the mesh with addAnimatedMeshSceneNode().
We disable lighting because we do not have a dynamic light in here, and the mesh would be totally black otherwise:
IAnimatedMeshSceneNode* LoadCar(scene::ISceneManager* smgr )
{
char* carModel = "../media/Vehicle/impreza.3ds";
IAnimatedMesh* carMesh = smgr->getMesh(carModel);
IAnimatedMeshSceneNode* carSceneNode =
smgr->addAnimatedMeshSceneNode(carMesh);
carSceneNode->setMaterialFlag(video::EMF_LIGHTING, false);
return carSceneNode;
}
We do the same for the car wheels.
Get a pointer to the Video Driver, the Scene Manager, and the graphical user interface environment, so that we do not always have to write device->getVideoDriver() or device->getSceneManager().
Note: I used Direct3D 9 as my renderer; you can use other renderers like Direct3D 8 or even OpenGL:
IrrlichtDevice* device = createDevice( EDT_DIRECT3D9);
if (device == 0)
return ;
IVideoDriver* driver = device->getVideoDriver();
ISceneManager* smgr = device->getSceneManager();
The map of the game is a Quake 3 map which is packed into .pk3 files, which are nothing other than .zip files.
By calling the addZipFileArchive function, we are able to read from the files in that archive as if they are directly stored on the disk.
Now we can load the mesh by calling getMesh (Quake 3 maps are not really animated, they are only a huge chunk of static geometry with some materials attached; our game map exists in the Irrlicht SDK). The .bsp is the main model, and the other files are textures or XML files needed for this model, so we load the map as follows:
device->getFileSystem()->addZipFileArchive(pk3Map);
IAnimatedMesh* mapMesh = smgr->getMesh(mapName);
IAnimatedMeshSceneNode* gameMap = smgr->addAnimatedMeshSceneNode(mapMesh)
To look at the mesh, we place a camera into the 3D space at the position:
camera->setPosition(vector3df(0, 30.0f, -30.0f));
To show a window message, we use the device getGUIEnvironment function to add a message to the scene:
device->getGUIEnvironment()->addMessageBox(MessageText.c_str(),Caption.c_str());
The physics enhancements
The physics part is the most tricky part: how to make the loaded car behave as if it is real.
Newton is an advanced physics engine for real-time simulation of rigid bodies, created by Julio Jerez 2003. Linking between Newton and Irrlicht is not an easy task, so we use IPhysics (a set of interface classes for easily integrating Newton and Irrlicht).
To use IPhysics, make a CPhysics object, then call the init function that creates the physics world:
CPhysics physics;
physics.init(device->getTimer());
Creating a car follows the same approach as creating anything else. However, there are a lot of fields to fill out:
carBodyOffset: This is the offset position for the car body. For example, if you want the car body to be a box that is 5 units above the ground, this should be vector3df(0, 5.0f, 0).carBodySize: This is the size of the cube that will represent the car body. For example, if you want the car body to be a box that is 10x5x8, this should be vector3df(10.0f, 5.0f, 8.0f).carMass: The mass of the car body (not the wheels).frontAxleOffset: This is the distance (along the x axis) that the front axle is from the origin. For example, if your car is 10 units long, and you want the wheels to be at either end, this should be set to 5.0f, as should the field below.rearAxleOffset: Same as above, but for the rear axle. Note that this should be a positive number.axleWidth: The width of the axle determines how far apart the left and right wheels are. This should be about the width of the car body.tireMass: Mass of the tires.tireWidth: Width of the tires.tireRadius: Radius of the tires.carBodyNode: Pointer to the Irrlicht scene node representing the car body.wheelNode_FL: Front left wheel scene node.wheelNode_FR: Front right wheel scene node.wheelNode_RL: Rear left wheel scene node.wheelNode_RR: Rear right wheel scene node.tireSuspensionShock: This value is passed straight to Newton. From the Newton docs: "Parameterized damping constant for a spring, mass, damper system. A value of one corresponds to a critically damped system."tireSuspensionSpring: This value is passed straight to Newton. From the Newton docs: "Parameterized spring constant for a spring, mass, damper system. A value of one corresponds to a critically damped system."tireSuspensionLength: This value is passed straight to Newton. From the Newton docs: "Distance from the tire set position to the upper stop on the vehicle body frame. The total suspension length is twice that."maxSteerAngle: The maximum angle the wheels are allowed to turn for steering.maxTorque: The maximum torque for the wheels.maxBrakes: The maximum brakes for the wheels.
So, we make the SPhysicsCar object and fill these values:
SPhysicsCar carData ;
carData.carBodyOffset = vector3df(0, 0.0f, 0);
carData.carBodySize = vector3df(1.2f, 01.85f, 0.2f);
carData.carMass = 3000.0f;
carData.frontAxleOffset = 01.5f;
carData.rearAxleOffset = 01.1f;
carData.axleWidth = 01.7f;
carData.tireMass = 20.0f;
carData.tireRadius = 0.98f;
carData.tireWidth = 01.0f;
carData.maxSteerAngle = 0.6f;
carData.maxTorque = 2000.0f;
carData.maxBrakes = 50.0f;
carData.tireSuspensionLength = 0.20f;
carData.tireSuspensionSpring =
(carData.tireMass * 1.0f * 9.8f) / carData.tireSuspensionLength;
carData.tireSuspensionShock = sqrt(carData.tireSuspensionSpring) * 1.0f;
carData.carBodyNode = LoadCar(smgr);
carData.carBodyNode->setScale(vector3df(.943,.943,.943));
carData.tireNode_FL = LoadCarWheel(smgr ,driver);
carData.tireNode_FL->setScale(vector3df(carData.tireRadius,
carData.tireRadius, carData.tireWidth));
carData.tireNode_FR = LoadCarWheel(smgr ,driver);
carData.tireNode_FR->setScale(vector3df(carData.tireRadius,
carData.tireRadius, carData.tireWidth));
carData.tireNode_RL = LoadCarWheel(smgr ,driver);
carData.tireNode_RL->setScale(vector3df(carData.tireRadius,
carData.tireRadius, carData.tireWidth));
carData.tireNode_RR = LoadCarWheel(smgr ,driver);
carData.tireNode_RR->setScale(vector3df(carData.tireRadius,
carData.tireRadius, carData.tireWidth));
The main program body
After setting up, the scene lets us draw everything. We run the device in a while() loop, and everything is drawn between the beginScene() and endScene() call. The SetTarget camera member function is to make the camera follow the car body. Switch between the two camera modes using the staticCamera boolean. Draw all initialized graphics items by calling the drawAll() ISceneManager member function. Draw the GUI stuff (the message box) by calling the drawAll() GuiEnvironment member function. Update the physics environment and then drop the device object.
while(device->run())
{
driver->beginScene(true, true, SColor(255,100,101,140));
camera->setTarget(vector3df(carData.carBodyNode->getPosition().X,
carData.carBodyNode->getPosition().Y+3,
carData.carBodyNode->getPosition().Z ));
if(staticCamera)
camera->setPosition(vector3df(carData.carBodyNode->getPosition().X,
carData.carBodyNode->getPosition().Y+3,
carData.carBodyNode->getPosition().Z + 7));
smgr->drawAll();
device->getGUIEnvironment()->drawAll();
driver->endScene();
physics.update();
}
device->drop();
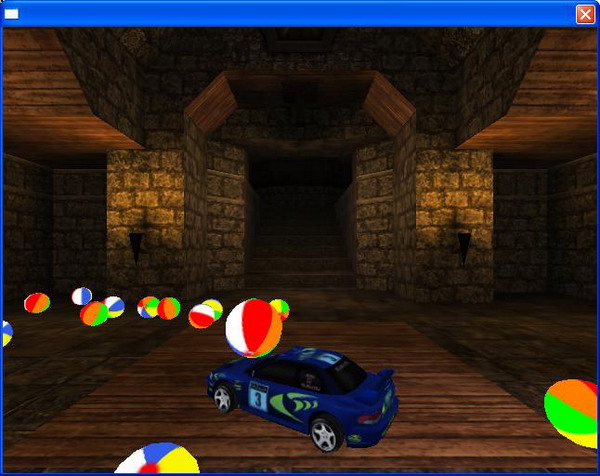
Adding balls
What about the balls I added? The balls in the demo is to feel the reality, as the motion of the balls make the scene so real. IPhysics enables you to add dynamic spheres in an easy manner as follows:
Make a sphere node and add the beach ball texture to it:
ISceneNode* dynamicShereNode = smgr->addSphereSceneNode(0.70f);
dynamicShereNode->setMaterialFlag(video::EMF_LIGHTING, false);
ITexture * ballTexture = driver->getTexture("../media/Balls/BeachBallColor.jpg");
dynamicShereNode->setMaterialTexture(0,ballTexture);
Make a SPhysicsSphere object and initialize its members like mass, x radius, y radius, z radius, then add the sphere node created before to the node member.
Note: EBT_DYNAMIC means that the ball is a dynamic entity or can move around.
SPhysicsSphere dynamicSphere;
dynamicSphere.bodyType = EBT_DYNAMIC;
dynamicSphere.mass = 1.1;
dynamicSphere.radius_x = .70f;
dynamicSphere.radius_y = .70f;
dynamicSphere.radius_z = .70f;
dynamicSphere.node = dynamicShereNode;
Add the SPhysicsSphere object to the physics world:
IPhysicsEntity* dynamicSphereEntity = physics.addEntity(&dynamicSphere);
Init the ball position just above the car:
dynamicSphereEntity->setPosition(vector3df(car->getPosition().X,
car->getPosition( ).Y+ 12, car->getPosition().Z));
Event handling
How do we move the car forward, backward, left, and right?
The CEventReciever class does the task for you. We have to overwrite the OnEvent virtual function to make our custom events. This function takes a const SEvent object as a parameter, which stores the key value pressed by the user, so we do our checking on this parameter to know what key user has pressed.
virtual bool OnEvent(const SEvent& event)
If the user pressed the up arrow key, we set the IPhysicsCar throttle percent by a positive value, and if he pressed the down arrow key, we set the IPhysicsCar throttle percent by a negative value. This value determines the speed of the car.
if(event.EventType == EET_KEY_INPUT_EVENT)
{
if(event.KeyInput.Key == KEY_UP)
{
if(!m_keys[KEY_UP])
{
m_keys[KEY_UP] = true;
m_car->setThrottlePercent(1.0f);
}
else if(event.KeyInput.PressedDown == false)
{
m_keys[KEY_UP] = false;
}
}
if(event.KeyInput.Key == KEY_DOWN)
{
if(!m_keys[KEY_DOWN])
{
m_keys[KEY_DOWN] = true;
m_car->setThrottlePercent(-100.0f);
}
else if(event.KeyInput.PressedDown == false)
{
m_keys[KEY_DOWN] = false;
}
}
For the right and arrow keys, we set the steering percent for the IPhysicsCar object instead of the throttle percent, in the same manner. If the user presses two opposite keys at once, it will stop the car.
if(!m_keys[KEY_LEFT] && !m_keys[KEY_RIGHT])
{
    m_car->setSteeringPercent(0.0f);
}

if(!m_keys[KEY_UP] && !m_keys[KEY_DOWN])
{
    m_car->setThrottlePercent(0.0f);

}
Also, I use the C key to drop a ball and the V key to flip the car, and F2, F3 keys to switch the camera mode.
if(event.KeyInput.Key == KEY_KEY_C)
{
dropDynSphere(m_smgr,m_driver,m_physics,m_car);
} else if(event.KeyInput.Key == KEY_KEY_V)
{
m_car->setPosition(vector3df(m_car->getPosition().X ,
m_car->getPosition().Y + 3 ,m_car->getPosition().Z));
m_car->setRotation(vector3df(m_car->getRotation().X +90,
m_car->getRotation().Y,m_car->getRotation().Z));
}
else if(event.KeyInput.Key == KEY_F3)
{
staticCamera= true;
}
else if(event.KeyInput.Key == KEY_F2)
{
staticCamera = false;
}
Points of interest
I wrote this article for those who share me love for game programming, so this article will be useful for developers who have a game programming background and some C++ skills.
Notes
You must install the VS2005 redistributable package if you have not installed Visual Studio 2005 on your PC; you can download the package from here.
History
- Sept. 27, 2009 - Initial release.
Senior C++ and Java developer graduated from faculty of computers and infomation cairo university.
I gift this article to do3aa
Just want to make a usful egyptian contripution on this great site


 General
  News
News  Suggestion
  Question
  Bug
Bug  Answer
  Joke
Joke  Praise
  Rant
Rant  Admin
Admin 


