Introduction
In my company I am into .NET 3.0 development. One of my work assignments included some R&D upon changing workflows at runtime. We were targeting at
loading workflow rules at runtime. At the time, we had the workflow information and rules combined in a separate .NET assembly. But it is referenced into the
application as a reference at design time itself. A workflow tool (from Microsoft I think) provides the facility for creation and modification of
workflows at runtime. We were expecting the workflow data will be provided as a .NET assembly and the assembly should load into the application just like opening a Word file.
I started thinking about loading and unloading an assembly without stopping the application. The first thing I looked, as everyone does, was the web for any
example applications. But alas! To my bad luck (or for my good sake!), there was no sample available in relation to this topic and wherever I searched, I found
references saying that it is a very difficult thing to implement and every one recommended not doing it. Fundamentally, it is a limitation with the
.NET Framework. But in our project, this feature was a critical component as without it, the complete task wouldl be left unusable. So I
directly jumped into MSDN and started with AppDomains. Because I had already got some hands on experience in Reflection and Application Domains, finding what to
do was not that difficult. After completing the requirement, I started thinking about sharing the work I had done, which ended up in creating this article.
Background
This article contains topics related to Assemblies, AppDomains, and some basics of Reflection. If you are
looking for some articles on any of these subjects, then this article may be appropriate for you.
- Basic usage of AppDomains.
- Unloading an assembly without unloading the application.
- Loading of assemblies at runtime.
- Runtime versioning of assemblies.
- Calling any member from an assembly with Reflection.
- Cross AppDomain communication.
- Loading and unloading of second AppDomain.
- Using a .NET assembly without locking its assembly file by Windows.
- A basic sample to structured coding flow.
Running the application
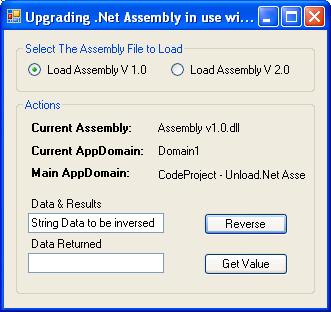
In order to ensure proper working of the application, compile the solution using the Rebuild Solution option. Then run the application.

By default, the assembly version one will be loaded. You should be able to see information like Current Assembly, Current AppDomain, Main AppDomain, etc.
in the main window. Upon clicking the button Reverse, the value in the text will be reversed. But because of the bug, each time the length will be
reduced. We can get the version of the assembly as 1 upon clicking the button GetValue.
Now click on the radio button Load Assembly V 2.0 to load the final version. You should be able to see the error provider's message in the respective radio buttons.
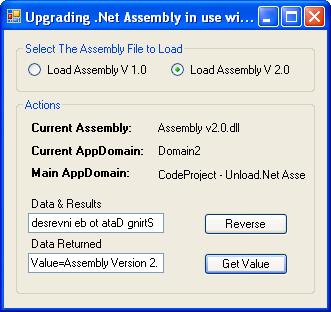
Now the application is loaded with the second version of the assembly which has the bug fixed. Now we will get the Reversed value properly,
and we can get the assembly version as 2.
Using the code
When I started thinking about sharing the code, I found that my code was too complex and bulky. It contained a lot of additional functionalities that was
related to .NET 3.0 which were out of the scope of this topic. I decided to create a new .NET 2.0 Windows Application and implement all the required features in it.
I created a new Windows Application project and designed the basic UI to decide upon the functionalities and workflow for the sample. I continued on
deciding the class structure and moved into the final coding. For your convenience, I am including the step by step process of my work.
Step 1: Creation of the basic UI
Create a new Windows Application project and name it "Code Project - Unload .NEt Assembly". Take the project properties and set the default namespace
to MySpace. Create a UI as per the picture above.
During design, take a note of the basic UI control names that are referenced in the application.
| Control | Type | Text | Additional Settings |
radioAssembly1 | RadioButton | Load Assembly V 1.0 | - |
radioAssembly2 | RadioButton | Load Assembly V 2.0 | - |
lblCurrentAssembly | Label | Current Assembly | - |
lblCurrentAppDomain | Label | Current Appdomain | - |
lblMainAppDomian | TextBox | Default Appdomain | ReadOnly=true, BorderStyle=None |
txtReverseData | TextBox | String Data to be inversed | - |
txtReturnedData | TextBox | (null) | - |
btnCalculate | Button | Reverse | - |
btnGetValue | Button | Get Value | - |
errorProvider1 | ErrorProvider | errorProvider1 | - |
Step 2: Deciding on the business flow - Deciding on the interface, classes, and the hierarchy
The sample presents three business scenarios for various levels of users.
For the end user
The program can be used to get the file version of the loaded assembly and it can reverse a string passed into the assembly. When the application starts,
it loads the beta version of the assembly and later on the user will be able to switch into the final release of the assembly without closing the application.
The program will continue to work regardless of which library file is loaded, but with changes in functionality according to the assembly file loaded.
For leaf level programmer
Upon startup, Form1_Load will create an instance of proxy with the default library ("version 1.0") and domain name. This proxy is equipped with
two methods which constitue the core business logic of the sample. One is to return the version information and the other to perform an operation from the
loaded assembly. Two properties are also exposed which return the default AppDomain and assembly name. To the end user / leaf programmer, these are the
only details that are exposed. The user is simply supposed to add a reference to the proxy and interface and then create an instance and utilize its exposed
methods. The user is not supposed to know the dynamic loading feature that is working behind.
For the component programmer
The next step is more complex and is meant for programmers who want to create an additional version of the assembly. You need to know these details if you are
planning to create the next version of the assembly, like version 3.0.
The basic business model is defined as an Interface in the project BaseInterface. This contains all the methods that are to be implemented in
the assembly. The main application, proxy, and all the assemblies are required to refer this assembly and implement its functionalities. If you want to add any
additional functionality, then you can change this Interface and recompile the solution. Then wherever an error message is shown, implement the method
accordingly to make it compatible.
With regard to dynamic loading of an assembly, two classes are used: AssemblyCore performs the file related functions like setting the default
assembly, and storing the assembly type and file related information; AppDomainCore performs operations like loading and unloading the
AppDomains, storing the default AppDomain name and instance, etc.
Step 3: Creation of additional projects, class structures, and control flows - Interface, proxy, beta assembly, final assembly
To proceed, we have to create four more projects, all of the Class Library type.
Project 1. Interface
BaseInterface: Contains the basic business model which is to be shared across the complete solution.
Name = BaseInterface- Set
RootNamespace = BaseInterface - Rename Class1.cs to IBaseInterface.cs
Class - IBaseInterface.cs
Paste this code to the code window:
using System;
using System.Collections.Generic;
using System.Text;

namespace BaseInterface
{
    public interface IBaseInterface
    {
        string ReturnBaseValue();
        string ReverseValue(string Value);
    }
}
Project 2. Proxy
The basic proxy that abstracts the leaf programmer from the dynamic assembly loading mechanism.
Name = Proxy- Set
RootNamespace = MySpace - References =
Solution.BaseInterface
Requires three class files in the project viz. Proxy.cs, AssemblyCore.cs, AppDomainCore.cs.
Class 1 - AssemblyCore.cs
Exposed Interfaces
public bool SetDefaultAssemblyFile(string AssemblyFileName) - Changes the default assembly file.public FileInfo DefaultAssemblyFile - Returns a FileInfo instance of the default assembly file.public string DefaultAssemblyFileName - Will always be the same. Used by the application as the assembly.public string CurrentType - Gets the currently used object type.public string ActiveAssemblyFile - Gets the original name of the active assembly file.public AssemblyCore(string AssemblyFileName,string TypeName) - Construtor.
To start with, paste the skeleton code into the code window.
using System;
using System.Collections.Generic;
using System.Text;
using System.IO;
using System.Reflection;
using System.Windows.Forms;

namespace MySpace
{
     internal class AssemblyCore
     {
        const string OriginalAssemblyFileName = "DefaultAssembly.dll";

        private string _activeAssemblyFile;
        public string ActiveAssemblyFile
        {
            get { return _activeAssemblyFile; }
        }

        private string _CurrentType;
        public string CurrentType
        {
            get { return _CurrentType; }
            set { _CurrentType = value; }
        }

        public string DefaultAssemblyFileName
        {
        }

        private FileInfo _DefaultAssemblyFile;
        public FileInfo DefaultAssemblyFile
        {
            get { return _DefaultAssemblyFile; }
        }

        public AssemblyCore(string AssemblyFileName,string TypeName)
        {
        }

        public bool SetDefaultAssemblyFile(string AssemblyFileName)
        {
        }
    }
}
Class 2 - AppDomainCore.cs
Exposed interfaces
public AppDomain DefaultAppDomain - Returns the Appdomain instance in use.public string DefaultAppdomainName - Returns the friendly name of Appdomain in use.public AppDomainCore(string AppDoaminName) - Contructor.
Paste the skeleton code into the code window:
using System;
using System.Collections.Generic;
using System.Text;

namespace MySpace
{
     internal class AppDomainCore
     {
          public AppDomainCore(string AppDoaminName)
          {
          }

          private AppDomain _DefaultAppDomain;
          public AppDomain DefaultAppDomain
          {
               get { return _DefaultAppDomain; }
          }

          private string _DefaultAppdomainName;
          public string DefaultAppdomainName
          {
               get { return _DefaultAppdomainName; }
          }
     }
}
Class 3 - Proxy.cs
Implements the basic Business Interface BaseInterface.IBaseInterface.
Exposed interfaces
public string ReverseValue(string Value) - Returns a reversed value of the string passed.public string ReturnBaseValue() - Returns a value from the assembly. Here it is the assembly version information.public Proxy(string AssemblyFileName, string AppDomainName,string CurrentType) - Constructor.public Proxy(string AssemblyFileName,string AppDomainName) - Constructor.public string DefaultAssemblyFileName - Default assembly file name.public string DefaultAppDomain - Second Appdomain name.
Paste the code into the code window:
using System;
using System.Collections.Generic;
using System.Text;
using System.Reflection;
using System.Windows.Forms;

namespace MySpace
{
    public class Proxy:BaseInterface.IBaseInterface
    {
        public string DefaultAppDomain
        {
        }

        public string DefaultAssemblyFileName
        {
        }
        public Proxy(string AssemblyFileName,string AppDomainName)
        {
        }

        public Proxy(string AssemblyFileName,
               string AppDomainName,string CurrentType)
        {
        }

        #region BaseInterface Members
        public string ReturnBaseValue()
        {
        }

        public string ReverseValue(string Value)
        {
        }
        #endregion
    }
}
Project 3. Beta assembly
The first version of the assembly.
Name = Assembly v1.0- Assembly Version = 1.0.0.0
- References =
Solution.BaseInterface - Debug compile path = "..\..\CodeProject - Unload.Net Assembly\CodeProject - Unload.Net Assembly\bin\Debug\" (this is for making the assemblies
come under the main executable path)
- Rename Class1.cs to ClassLibrary.cs
Class - ClassLibrary.cs
Exposes methods that are implemented from the referenced Interface BaseInterface.IBaseInterface.
Paste the code to the code window:
using System;
using System.Collections.Generic;
using System.Text;
namespace MyAssembly
{
    public class ClassLibrary : BaseInterface.IBaseInterface
       {
          #region BaseInterface Members
          public string ReturnBaseValue()
          {
          }

          public string ReverseValue(string Value)
          {
          }
          #endregion
     }
}
Project 4. Final assembly
The next version of the assembly.
Name = Assembly v2.0- Assembly Version = 2.0.0.0
- References =
Solution.BaseInterface - Debug compile path = "..\..\CodeProject - Unload.Net Assembly\CodeProject - Unload.Net Assembly\bin\Debug\" (this is for making the assemblies come
under the main executable path)
- Rename Class1.cs to ClassLibrary.cs
Class - ClassLibrary.cs
Exposes methods that are implemented from the referenced Interface BaseInterface.IBaseInterface.
Paste the code to the code window:
using System;
using System.Collections.Generic;
using System.Text;

namespace MyAssembly
{
    public class ClassLibrary : BaseInterface.IBaseInterface
    {
        #region BaseInterface Members
        public string ReturnBaseValue()
        {
        }

        public string ReverseValue(string Value)
        {
        }
        #endregion
    }
}
Step 4: Final construction
All the basic structures have been created and now we can proceed to the real coding. I am starting from the Basic Library into which the business logic is to be integrated.
Project 1. Beta assembly
The first thing we have to do is to make the class instance capable of crossing application boundaries. For this, the primary requirement is to inherit
the class from the MarshalByRefObject base class. Also, we have to mark the class as [Serializable]. To complete the implementation,
we have to write functionalities inside both methods. Insert the following code inside ReturnBaseValue():
return "Value=Assembly Version 1.0";
and insert this code into the method ReverseValue(string Value):
return ReverseString(Value);
Then add the following code under #endregion:
private string ReverseString(string Value)
{
StringBuilder tmp = new StringBuilder();
for (int i = Value.Length - 1; i > 1; i--)
{
tmp.Append(Value.Substring(i, 1));
}
return tmp.ToString();
}
Project 2. Final assembly
Just like the above project, inherit the class from the MarshalByRefObject base class and mark the class as [Serializable].
Then insert the following code inside ReturnBaseValue():
return "Value=Assembly Version 2.0";
and insert this code into the method ReverseValue(string Value):
return ReverseString(Value);
Then add the following code under #endregion:
private string ReverseString(string Value)
{
    StringBuilder tmp = new StringBuilder();

    for (int i = Value.Length - 1; i >= 0; i--)
    {
        tmp.Append(Value.Substring(i, 1));
    }
    return tmp.ToString();
}
Project 3. Proxy
After finishing the business logic required for functioning, we require that the associated code should be available in the proxy. So I think now we can
modify the proxy project. It contains three classes.
Class - AssemblyCore.cs
We have already given the value for the constant OriginalAssemblyFileName as "DefaultAssembly.dll". This file name
will be the only assembly file known to the application. Insert this code inside the property public string DefaultAssemblyFileName:
get { return OriginalAssemblyFileName; }
When the object instance is created, we require saving the current type and replacing the used assembly with the new assembly so that the application should
be able to refer it. For that, insert the following code into the constructor of public AssemblyCore(string AssemblyFileName,string TypeName):
CurrentType = TypeName;
SetDefaultAssemblyFile(AssemblyFileName);
The function SetDefaultAssemblyFile replaces the currently used assembly with the specified assembly file. It also saves an instance of the
newly created assembly file and the original assembly name.
Paste this code in the method public bool SetDefaultAssemblyFile(string AssemblyFileName):
try
{
    _activeAssemblyFile = AssemblyFileName;
    File.Copy(AssemblyFileName, OriginalAssemblyFileName, true);
    _DefaultAssemblyFile = new FileInfo(OriginalAssemblyFileName);
    return true;
}
catch(Exception Err)
{
    MessageBox.Show("An Error Occured. Versioning Failed. Details : " + Err.Message);
    return false;
}
Class – AppDomainCore.cs
Insert the following code inside the constructor of public AppDomainCore(string AppDoaminName):
_DefaultAppdomainName = AppDoaminName;
LoadAppDomain();
This will assign the active AppDomain name into the property DefaultAppDomain and call the LoadAppDomain
function to create a new Appdomain. Paste the code below into the bottom of the class:
private bool LoadAppDomain()
{
    AppDomainSetup ads = new AppDomainSetup();
    _DefaultAppDomain =
      AppDomain.CreateDomain(DefaultAppdomainName, null, ads);
    _DefaultAppDomain.SetShadowCopyFiles();
    return true;
}
Here we are using the AppdomainSetup class to create a new AppDomain. The SetShadowCopyFiles() function enables the
application to copy the assembly to another location and load it from there, thus releasing the original assembly from locking out.
The next step is an optional component. It is not actually required in this scenario as the unloading of the second AppDomain is handled automatically by
the GC upon creation of a new instance of the Proxy object. Paste the code below to the bottom of the class:
private bool ClearAppDomain()
{
    try
    {
        AppDomain.Unload(DefaultAppDomain);
        _DefaultAppDomain = null;
        return true;
    }
    catch
    {
        return false;
    }
}
~AppDomainCore()
{
    ClearAppDomain();
}
I have provided the ClearAppDomain function but it is not called anywhere because the GC is taking care of clearing the AppDomain upon assignment of the new
Proxy. This function is required if you want to unload an AppDomain explicitly. Even if the call to clear the AppDomain is not made, it is not going to make any difference.
If you set a breakpoint in the destructor of the AppDomain class, you can find a delayed call which is actually called by the GC that is called in an
unusual way. This is actually triggered by GC at some points of three generations of Garbage Collection. Also, the call inside the destructor is not
required as in normal cases the GC will be freeing the objects. This section I am leaving as an experiment for the readers.
Class – Proxy.cs
The Proxy class abstracts the above two classes. It utilizes the AppdomainCore and AssemblyCore classes. We also require an
instance of IBaseInterface to get the local proxy of the business entities. For these functionalities, paste the code below in the beginning of the class:
AppDomainCore _appDomainController;
AssemblyCore _assemblyController;
BaseInterface.IBaseInterface _proxy;
Proxy exposes two properties for enabling its functionality; paste the following code in the method public string DefaultAppDomain:
get { return _appDomainController.DefaultAppdomainName; }
and the following code in public string DefaultAssemblyFileName:
get { return _assemblyController.ActiveAssemblyFile; }
The next step is to define the constructor. Put the code below in public Proxy(string AssemblyFileName,string AppDomainName):
Init(AssemblyFileName, AppDomainName, "MyAssembly.ClassLibrary");
and the code below into the overloaded constructor public Proxy(string AssemblyFileName, string AppDomainName,string CurrentType):
public Proxy(string AssemblyFileName, string AppDomainName, string CurrentType)
These constructors call into a private method Init which we can find here:
private bool Init(string AssemblyFileName, string AppDomainName, string CurrentType)
{
    _assemblyController = new AssemblyCore(AssemblyFileName, CurrentType);
    _appDomainController = new AppDomainCore(AppDomainName);
    return true;
}
This method initializes the two objects created inside the class.
Now the main task is to complete the implementation of the interfaces. Paste the code below into the method public string ReturnBaseValue().
_proxy = (BaseInterface.IBaseInterface)_appDomainController.DefaultAppDomain.
CreateInstanceFromAndUnwrap(_assemblyController.DefaultAssemblyFileName,
_assemblyController.CurrentType);

if (_proxy != null)
{
    return _proxy.ReturnBaseValue();
}
return null;
This method CreateInstanceFromAndUnwrap creates and unwraps a remote proxy instance which is assigned into _proxy.
The method below can also be done in the same way, but I have adopted an alternative way to do this using Reflection. Paste the code into the method
public string ReverseValue(string Value):
return ((string)GetReversedString("ReverseString", new object[] { Value }));
and the below method GetReversedString(..) under the function.
private object GetReversedString(string MethodName,object[] Arguments)
{
    object proxy = (BaseInterface.IBaseInterface)
      _appDomainController.DefaultAppDomain.CreateInstanceFromAndUnwrap(
      _assemblyController.DefaultAssemblyFileName, _assemblyController.CurrentType);
    if (proxy != null)
    {
        MethodInfo mi = proxy.GetType().GetMethod(MethodName,
           BindingFlags.DeclaredOnly | BindingFlags.NonPublic |
           BindingFlags.Instance);
        if (mi != null)
        {
            object rv = mi.Invoke(proxy, Arguments);
            return rv;
        }
        else
        {
            MessageBox.Show("Oops. Such a method not found...!", ".Net Reflection",
            MessageBoxButtons.OK, MessageBoxIcon.Error);
        }
    }
    return null;
}
The above alternative will be useful if we don't have an Interface exposed, or in the worst case scenario that the method signature is not available at
design time. Instead of calling the method from the interface instance, here I am querying the object instance for the method signature and invoking it.
Project 4. Basic interface
Here nothing is left. Everything is completed in the first phase itself.
Project 5. Main application
Finally, after all these classes are defined and implemented, we have to integrate them into the main Windows Application to put it to work. For this,
the first thing we have to do is add a reference to both the Proxy and BaseInterface projects. Add this code to the top of the Form1 code window:
using MySpace;
Paste this code at the top of the class Form1:
Proxy DefaultProxy;
In Form1_Load, add the following code:
DefaultProxy = new Proxy("Assembly v1.0.dll", "Domain1");
lblCurrentAppDomain.Text = DefaultProxy.DefaultAppDomain;
lblCurrentAssembly.Text = DefaultProxy.DefaultAssemblyFileName;
lblMainAppDomian.Text = AppDomain.CurrentDomain.FriendlyName;
In the Click event of radioAssembly1, paste the following code:
DefaultProxy = new Proxy("Assembly v1.0.dll", "Domain1");
lblCurrentAppDomain.Text = DefaultProxy.DefaultAppDomain;
lblCurrentAssembly.Text = DefaultProxy.DefaultAssemblyFileName;
lblMainAppDomian.Text = AppDomain.CurrentDomain.FriendlyName;
errorProvider1.BlinkStyle = ErrorBlinkStyle.AlwaysBlink;
errorProvider1.SetError(radioAssembly2, "");
errorProvider1.SetError(radioAssembly1,
"This Dll is a Beta Version. It won't reverse the string properly");
Then in the Click event of radioAssembly2, paste the following code:
DefaultProxy = new Proxy("Assembly v2.0.dll", "Domain2");
lblCurrentAppDomain.Text = DefaultProxy.DefaultAppDomain;
lblCurrentAssembly.Text = DefaultProxy.DefaultAssemblyFileName;
lblMainAppDomian.Text = AppDomain.CurrentDomain.FriendlyName;
errorProvider1.BlinkStyle = ErrorBlinkStyle.AlwaysBlink;
errorProvider1.SetError(radioAssembly1, "");
errorProvider1.SetError(radioAssembly2,"This Dll is the Final Version");
The statement above creates a new instance of the proxy which internally destroys the existing AppDomain, replaces the assembly file with the new one,
and loads that into the application. For utilizing the business functionalities implemented in the proxy, we have to use click events in buttons.
In the Click event in btnCalculate, add the following code:
txtReverseData.Text = DefaultProxy.ReverseValue(txtReverseData.Text);
In the Click event in btnGetValue, add the following code:
txtReturnedData.Text = DefaultProxy.ReturnBaseValue();
Future plans
Because I am currently working on .NET 3.0 and Composite UI Application Block, I am trying to implement this feature in CAB applications. I have already created a sample which can load
a UI module upon a button click or any UI event. But the same problem with .NET 2.0 applications exist there. I am now proceeding with finding a way to unload a dynamically
loaded Module from a CAB application. This may take some time I think, as I am busy with a lot of things, but you can expect an article with this update.
Started Programming career with VB 6 and VC++ and now Into .Net Development. Working with .Net since its first release (Version 1.0 Beta). Lucky enough to continue always with most updated versions of .Net and as of now; May 2007, fighting with .Net 3.0 (WPF,WCF...etc) and it's next most anticipated version LINQ.
Got familiarity up on the .Net Technologies and Guidelines like CAB, and Patterns and Practices, Enterprise Library and now with it's WPF version etc.
Specialized in Windows and Distributed and Service oriented applications.


 General
  News
News  Suggestion
  Question
  Bug
Bug  Answer
  Joke
Joke  Praise
  Rant
Rant  Admin
Admin 


 I never checked for a memory leak for this app. What my intention was to release the assembly file and replace it wih another file which I was able to do the time I wrote this sample. I am not sure the sample work perfectly now because the framework itself changed a lot...and I am not sure all the dependecies target to the same version as I had it that time...Anyway thanks for this notification. I would be happy to help in my limits....

 !
!