Click here to Skip to main content
15,885,695 members
Articles / Desktop Programming / Win32

Code Snippet Manager

Rate me:
Please Sign up or sign in to vote.
4.90/5 (26 votes)
4 Jul 2011CPOL10 min read 77.6K   986   41   59
A little tool to keep a list of code or text snippets ready to put in the clipboard

Contents

Introduction

This article shows how to create a small application that sits on the task bar and provides the ability to copy preformatted text or code blocks to the clipboard, which may then be pasted into a program, document or web page as appropriate.

Snippets.png

Background

I first created this application when I found that I was repeatedly pasting the same comments or suggestions into CodeProject answers, in both Q&A and the Forums. I also used it as a learning (and I hope teaching) sample for a few features that can be used in many places when developing Win32 programs. For those who prefer to use MFC, a port of these ideas should be a fairly simple process; an exercise for the reader.

Using the Code

Note: This project has been developed under Windows 7 and Visual C++ Express 2010. For a version that works for Windows XP, see the section titled Windows XP version. The program is broken down into separate areas to try and show how each part may be used independently of the overall project. Some of the ideas have been taken from other CodeProject articles*, MSDN, and, of course, the wonderful Google.

*I have unfortunately not kept a record of all the articles I have referred to so apologies to those authors, but if you see anything here that may have originated in one of your articles, then let me know and I'll add an acknowledgement.

The program files used to build the project are:

  • Header files
    • Snippets.h: Local project and resource definitions
    • StdAfx.h: The include headers used throughout the project
  • Resource files
    • Snippets.ico: Icon for the notification area
    • Snippets.rc: Resource script - menu, dialogs, strings, version, etc.
  • Source files
    • DataReader.cpp: Code to read strings from various sources and save in a vector
    • NotifyIcon.cpp: Code to setup the notification icon and respond to commands
    • Snippets.cpp: Main portion of the Windows application, and message handler
    • StdAfx.cpp: Used to generate the precompiled headers

Creating a Task bar Notification Application

The basis of this application is the taskbar notification icon, which allows an application to be accessed from a small icon that is placed in the taskbar notification area of the Windows desktop. The application itself is a 'normal' Windows application whose main window is generally not displayed by default (or in some cases ever). However, the application needs to create a main window in order to receive messages from the Windows operating system to take whatever actions are requested by the user.

The application is a simple Win32 Windows application, which follows the standard pattern of:

  • Define and register a Windows class and its WndProc message handler
  • Create a main window of this class and (possibly) display it on the screen - but not in our case
  • Start the message pump to dispatch user messages to the application
  • Handle messages and commands as and when they are received

The extra code needed for the notification icon is invoked just before starting the message loop and comprises the section below which adds our icon to the notification area of the taskbar.

C++
// Use a globally unique id to identify our application icon (created by guidgen.exe)
static const GUID SnippetIconGUID =
{
    0xe87633eb, 0xaf17, 0x47e4, 0xa4, 0x3c, 0xaf, 0xbd, 0x86, 0xe1, 0x76, 0xd5
};

// the parameter block to register our notification icon
static NOTIFYICONDATA	notifyIconData;

/// <summary>
/// Initialize the taskbar icon for notification messages
/// </summary>
///
/// <param name="hWnd">handle to the parent window</param>
/// <param name="hInstance">instance handle to this module</param>
///
/// <returns>TRUE if successful initialisation</returns>
///
BOOL NotifyInit(HWND       hWnd,
                HINSTANCE  hInstance
                )
{
    // get source data into our vector
    pvContents = ReadData(MAKEINTRESOURCE(IDS_REGKEY), EX_REGVALUE);  // from the registry
    //  pvContents = ReadData(_T("..\\snippets.xml"), EX_XMLFILE);    // or an XML file
    if (pvContents != NULL &&
        pvContents->size() > 0)
    {
        SetLastError(-1);
        return FALSE;    // data read failure
    }
    
    // create the notification icon and
    // add it to the notification area of the Windows desktop.
    notifyIconData.cbSize           = sizeof notifyIconData;   	// size of the struct 
							// in bytes
    notifyIconData.hWnd             = hWnd;                    	// our main window
    notifyIconData.uID              = IDR_MAINFRAME;           	// the icon is identified 
							// by GUID (see guidItem) 
							// in Vista/7
    notifyIconData.uFlags           = NIF_MESSAGE |            	// uCallbackMessage member 
							// is valid
                                      NIF_ICON |               	// hIcon member is valid
                                      NIF_TIP |                	// Tooltip (szTip) member 
							// is valid
                                      NIF_INFO |               	// Balloon (szInfo) 
							// member is valid
                                      NIF_GUID |               	// GUID member is valid
                                      NIF_SHOWTIP;             	// use standard tooltip 
							// behaviour (see uVersion)
    notifyIconData.uCallbackMessage = WM_USER_SHELLICON;       	// notification message 
							// for user activations
    notifyIconData.hIcon            = LoadIcon(hInstance, 
		MAKEINTRESOURCE(IDR_MAINFRAME));           // 32x32 icon to be displayed
    LoadString(hInstance, IDS_TOOLTIP, notifyIconData.szTip, 
		_countof(notifyIconData.szTip));        // tip shown on mouse over
    notifyIconData.dwState          = 0;                       	// not used
    notifyIconData.dwStateMask      = 0;                       	// not used
    LoadString(hInstance, IDS_BALLOONINFO, notifyIconData.szInfo, 
	_countof(notifyIconData.szInfo));  		// balloon text shown on activation
    notifyIconData.uVersion         = NOTIFYICON_VERSION_4;   	// Vista and later
    LoadString(hInstance, IDS_BALLOONTITLE, notifyIconData.szInfoTitle, 
		_countof(notifyIconData.szInfoTitle));  	// balloon title
    notifyIconData.dwInfoFlags      = NIIF_USER;           	// use the hIcon icon 
							// in the balloon
#if (_WIN32_WINNT >= 0x0600)        // if Windows Vista or later
    notifyIconData.guidItem         = SnippetIconGUID;       	// icon GUID, used by 
							// windows for message 
							// tracking
    notifyIconData.hBalloonIcon     = NULL;
#endif

    return Shell_NotifyIcon(NIM_ADD, &notifyIconData);
} 

Items of note in the above:

  • The value stored in the uCallbackMessage field is used by Windows to notify the application that the icon has been activated by the user (either by mouse or keyboard). This value should be greater than the value of WM_USER and unique within the application.
  • The uVersion field should be adjusted for versions of Windows prior to Vista.
  • The GUID for the guidItem should be generated by guidgen or similar.
  • The size of the tooltip and balloon information fields are as defined for the NOTIFYICONDATA structure.
  • The Shell_NotifyIcon() function adds the icon to the notification area and displays the balloon information for a few seconds.
  • The ReadData() function returns a pointer to a vector which contains a number of pair objects, each containing a pair of strings: a title and a value, which are used to create the menu as described below.

The actual data used for snippet identifiers and their associated content is stored in a list that may be created from a number of different sources. The commonest method would be to have a table of strings within one of the source modules of the application or the resource script, but this means rebuilding the application whenever the list needs to be changed. Two possible alternatives are described in the following sections.

One of the common methods of storing configuration data for an application is to put it into the Registry under a key created for the application in question. Although this method is often frowned upon these days, it is still worth discussing as an exercise in learning how to make use of this Windows feature.

For the purposes of this program, I first created a Registry data file containing the information that I want, which will be saved under the key:

HKEY_CURRENT_USER\
    Software\
        CodeProject\
            Snippets

The actual data will be stored as values, whose names are the strings that will appear on the context menu of the application, and whose values will be copied to the clipboard when a menu item is selected. This data may be manually loaded into the Registry, but it is far simpler to create a .reg file which can be easily edited with Notepad or any other text editor. These keys are then added to the Registry by double-clicking the .reg file or using the reg IMPORT or regedit /s command.

The content of the .reg file will look something like this where each entry comprises two quoted strings, the first becomes the name of the item and the second its value:

Windows Registry Editor Version 5.00

[HKEY_CURRENT_USER\Software\CodeProject\Snippets]
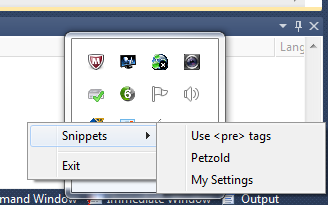
"Use <pre> tags"="Use the <span style=\"background-color:#FBEDBB;\">
code block</span> button, or add &lt;pre&gt;&lt;/pre&gt; tags"
"Petzold"="<a href=\"http://www.charlespetzold.com/dotnet/\">.NET Book Zero</a>
[<a href=\"http://www.charlespetzold.com/dotnet/\" target=\"_blank\"
title=\"New Window\">^</a>]"
"My Settings"="Select \"My Settings\" in the drop down below your name
    at the top right"

These values are extracted from the Registry into our vector by means of the RegEnumValue() function (see DataReader.cpp) as follows:

C++
    // repeat this until we run out of elements
    for (dwIndex = 0; lStatus == ERROR_SUCCESS; ++dwIndex)
    {
        // set the buffer size for the value name
        cchValueName = _countof(szKeyText);
        // set the buffer size for the value content to zero
        cbData = 0;
        // get the value name and size of the content
        lStatus = RegEnumValue(hkSnippets,      // the registry key obtained above
                               dwIndex,         // index to the next value [ 0 .. n ]
                               szKeyText,       // value name returned here
                               &cchValueName,   // size of value name buffer in characters
                               NULL,            // reserved
                               NULL,            // value type returned here if necessary
                               NULL,            // value content not returned this time
                               &cbData);        // size of value data in bytes 
                                                // returned here
        if (lStatus == ERROR_SUCCESS)
        {
            // allocate the data buffer and get the content
            pData = new BYTE[cbData];
#if (_WIN32_WINNT >= 0x0600)		// if Windows Vista or later
            lStatus = RegGetValue(hkSnippets, NULL, szKeyText, 
			RRF_RT_REG_SZ, NULL, pData, &cbData);
#else
            lStatus = RegQueryValueEx(hkSnippets, szKeyText, NULL, NULL, pData, &cbData);
#endif
        }
        if (lStatus == ERROR_SUCCESS)
        {
            // create the vector if required
            if (pvPairs == NULL)
            {
                pvPairs = new VECPAIR();
            }
            // create a pair of strings and push down into the vector
            PTSTR pszContent = reinterpret_cast<PTSTR>(pData);
			      STRPAIR itemPair(szKeyText, pszContent);
			      pvPairs->push_back(itemPair);
			      // delete the value buffer for next time round
			      delete[] pData;
        }
    }

The function extracts the name of each value entry within the key and, optionally, its content via a simple loop as shown above. As each entry is extracted, the data is used to create a new pair object which is then pushed into the vector that is used to hold all the items. The RegEnumValue() function returns a status of ERROR_NO_MORE_ITEMS when all values have been enumerated.

An alternative, and possibly better method, is to read the data from an XML file. This is not as difficult as it might be with the availability of the XMLLite library from Microsoft: see this article, and the Programmer's Guide.

The structure of the XML data may be in any form that the developer wishes, and the extraction code is then written to handle the element and attribute nodes in a forward direction reading through the XML as a stream. In order to implement the snippets that I commonly use, I have CDATA nodes when the value items contain special characters, including < and >, which would otherwise not be allowed. Thus, the XML data I have created contains items in the following form, corresponding to the items previously shown in the section on Registry values:

XML
<?xml version="1.0"?>
<snippets xmlns:dt="urn:schemas-microsoft-com:datatypes">
  <snippet title="Use pre tags">
    <![CDATA[
    Please use the <span style="background-color:#FBEDBB;">code block
    </span> button, or add &lt;pre&gt;&lt;/pre&gt; tags
    ]]>
  </snippet>
  <snippet title="Petzold">
    <![CDATA[
    <a href="http://www.charlespetzold.com/dotnet/">.NET Book Zero</a>
[<a href="http://www.charlespetzold.com/dotnet/" target="_blank"
title="New Window">^</a>]
    ]]>
  </snippet>
  <snippet title="My Settings">
    Select "My Settings" in the drop down below your name at the top right
  </snippet>
</snippets>

As you can see, this contains no schema information so we need to ensure its contents are properly formed to avoid the problem of lost elements.

The actual code to read and process the XML file is also in the DataReader.cpp source file, and a small extract is included below. As with the Registry values, the data is extracted by repeatedly reading through the nodes of the XML stream and saving the attribute string as the key name and the CDATA or text element as its corresponding value.

The first requirement when accessing a source with the XMLLite library is to connect the source file to the XmlReader class, which is done by using an IStream interface. The simplest way to do this is via the SHCreateStreamOnFile() function of the ShellAPI library as shown below. N.B. It is not too difficult to implement the IStream interface locally if you wish to store the XML data somewhere other than a simple text file.

The startup code for the reader creates a stream and a reader, sets the DtdProcessing_Prohibit property on the reader to prevent it from looking for an attached DTD and connects the stream to the reader ready to extract the individual elements of the stream.

C++
// Open a read-only input stream and connect it to the XMLReader
if (FAILED(hr = SHCreateStreamOnFile(pszSource, STGM_READ, &pFileStream)) ||
    FAILED(hr = CreateXmlReader(__uuidof(IXmlReader),
        reinterpret_cast<PVOID*>(&pReader), NULL)) ||
    FAILED(hr = pReader->SetProperty(XmlReaderProperty_DtdProcessing,
        DtdProcessing_Prohibit)) ||
    FAILED(hr = pReader->SetInput(pFileStream)))
{
    return NULL;
}

The actual code to read the XML is a simple loop which traverses the XML node by node and processes the content as required. Taking the above data, we check each element to see if it is a snippet tag and if so, save the title attribute and then proceed to the next node, which will be added to the pair object and thus to our vector as shown below. Some parts of the code block have been removed for the sake of brevity here; see the DataReader.cpp module for the complete routine. The overall routine walks the file node by node and processes it thus:

  • If it's a start element, get the title attribute and save in the first string
  • If it's an end element and both strings exist, then save the pair in the vector
  • If it's text or CDATA then store the text (trimmed) in the second string
C++
// read until there are no more nodes
while (S_OK == (hr = pReader->Read(&nodeType)))
{
    switch (nodeType)
    {
    case XmlNodeType_Element:
        // test for a start snippet element
        if (SUCCEEDED(hr = pReader->GetLocalName(&pszElementlName, NULL)) &&
            _tcscmp(pszElementlName, _T("snippet")) == 0)
        {
            // check for a 'title' attribute
            if (SUCCEEDED(hr = pReader->MoveToFirstAttribute()) &&
                SUCCEEDED(hr = pReader->GetLocalName(&pszAttributelName, NULL)) &&
                _tcscmp(pszAttributelName, _T("title")) == 0)
            {
                // add the title to the pair object
                if (SUCCEEDED(hr = pReader->GetValue(&pszValue, NULL)))
                {
                    strPair.first = pszValue;
                }
            }
        }
        break;
        
    case XmlNodeType_EndElement:
        if (SUCCEEDED(hr = pReader->GetLocalName(&pszElementlName, NULL)) &&
            _tcscmp(pszElementlName, _T("snippet")) == 0)
        {
            // end snippet element, so save the pair of strings
            if (strPair.first.size() > 0 && strPair.second.size() > 0)
            {
                if (pvPairs == NULL)
                    pvPairs = new VECPAIR();
                pvPairs->push_back(strPair);
            }
            // clear for next time
            strPair.first.clear();
            strPair.second.clear();
        }
        break;
        
    case XmlNodeType_Text:
    case XmlNodeType_CDATA:
        if (SUCCEEDED(hr = pReader->GetValue(&pszValue, NULL)))
        {
            // text or CDATA goes to the second string of the pair
            if (!strPair.first.empty())
            {
                strPair.second = pszValue;
            }
        }
        break;
    }
}  

Building a Dynamic Context Menu

This section deals with the action taken when the user selects the icon in the notification area and right clicks it to bring up the context menu. The message is sent to the main window via our WM_USER_SHELLICON message. This message is handled by the SnipNotify() function in the NotifyIcon.cpp module, and merely checks for right button click and hands off to the OnRButtonDown() function. This function creates a popup menu using the title values from the vector containing the string pairs. Each menu item is added to the popup menu at the beginning and given a command id based on its position in the menu. The menu is then tracked giving the user the opportunity of selecting a particular item, terminating the program, or just switching to another window. The code for creating the menu follows the normal rules for dynamic menus similar to:

C++
// create a new menu that will contain the item titles
hSnipMenu = CreateMenu();
int idm = IDM_SNIP;
for (VECPAIR::iterator it = pvContents->begin(); it < pvContents->end(); ++it, ++idm)
{
    // add the titles and command ids to the new menu
    AppendMenu(hSnipMenu, MF_STRING, idm, it->first.c_str());
}  

Having created this menu, we now need to add it to our predefined menu resource in our resource file which looks like:

IDR_POPUPMENU MENU
BEGIN
    POPUP "PopUp"
    BEGIN
        // Snippet menu items will be added above here dynamically
        MENUITEM SEPARATOR
        MENUITEM	"E&xit",		ID_APP_EXIT
    END
END  

The code to add and display the menu is:

C++
// get a handle to the popup menu resource
hPopup = LoadMenu(GetModuleHandle(NULL), MAKEINTRESOURCE(IDR_POPUPMENU));
// and then a handle to the menu itself
hSubMenu = GetSubMenu(hPopup, 0);
// insert the snippets menu into the popup, before menuitem[0].
InsertMenu(hSubMenu, 0, MF_BYPOSITION | MF_POPUP | MF_STRING, 
			(UINT_PTR)hSnipMenu, _T("Snippets"));

// this call is required so that the menu will be dismissed if the user clicks into
// a different window rather than selecting a menu item.
SetForegroundWindow(hWnd);
// track the popup and await a command
TrackPopupMenuEx(hSubMenu,                           // handle to our menu
    TPM_RIGHTALIGN | TPM_TOPALIGN | TPM_NONOTIFY,    // menu attributes
    pMousePoint->x,                                  // x and
    pMousePoint->y,                                  // y of mouse position
    hWnd,                                            // our main window handle
    NULL                                             // not used here
);  

Note that the program's main window must be set as the foreground window (even though it is not visible) at this point to allow the menu to be dismissed if the user clicks anywhere other than in the popup menu.

If the user selects a menu item, the item's command id is sent to the main window message handler and passed off to the OnSnipSelect() in NotifyIcon.cpp as described in the next section.

When a menu item is selected, the OnSnipSelect() routine receives a command id (plus a base value) which gives an index into the string vector used to create the popup menu. Using this index, the program extracts the content value from the relevant pair object in the vector and copies it to the ClipBoard. This text may then be pasted into any window for whatever purpose the user/developer needs.

Adding text to the ClipBoard is a fairly simple process and follows the general code path as shown below:

  • Open the ClipBoard and clear any previous contents
  • Allocate a global memory buffer to hold the text
  • Copy the text into the global buffer
  • Pass a pointer to the buffer and the content type to the ClipBoard handler
  • Free the global buffer and close the clipboard
C++
    PTSTR        pszContent;    // this points to the string to be put on the clipboard
    if (OpenClipboard(hWnd))
    {
        // clear any previous content
        EmptyClipboard();
        
        // get the buffer size required and allocate it on the global heap
        nSize = _tcslen(pszContent) + 1;
        hGlobal = GlobalAlloc(GMEM_MOVEABLE, nSize * sizeof(TCHAR));
        if (hGlobal != NULL)
        {
            // Lock the handle and copy the text to the buffer.
            PTSTR pstrCopy = reinterpret_cast<PTSTR>(GlobalLock(hGlobal));
            _tcscpy_s(pstrCopy, nSize, pszContent);
            GlobalUnlock(hGlobal);
            
            // Place the data on the clipboard.
#if defined(UNICODE)
            SetClipboardData(CF_UNICODETEXT, hGlobal);
#else
            SetClipboardData(CF_TEXT, hGlobal);
#endif
            GlobalFree(hGlobal);
        }
        // Close the clipboard.
        CloseClipboard();
    }

Windows XP Version

Although the original project was built under Windows 7, I have added a solution and project file SnippetsXP.sln and SnippetsXP.vcproj for building under Windows XP. The code changes are minimal and affect only the code in DataReader.cpp for the registry reader, and NotifyIcon.cpp for the notification setup.

  • Simple use of Registry values and how to enumerate them
  • The XMLLite library
  • Dynamic menus
  • The ClipBoard

Points of Interest

  • Using the Clipboard
  • Extracting Data from an XML File using the XMLLite Library
  • Reading Identifiers and Values from the Registry

History

  • Initial posting July 2011

License

This article, along with any associated source code and files, is licensed under The Code Project Open License (CPOL)


Written By
Retired
United Kingdom United Kingdom
I was a Software Engineer for 40+ years starting with mainframes, and moving down in scale through midi, UNIX and Windows PCs. I started as an operator in the 1960s, learning assembler programming, before switching to development and graduating to COBOL, Fortran and PLUS (a proprietary language for Univac systems). Later years were a mix of software support and development, using mainly C, C++ and Java on UNIX and Windows systems.

Since retiring I have been learning some of the newer (to me) technologies (C#, .NET, WPF, LINQ, SQL, Python ...) that I never used in my professional life, and am actually able to understand some of them.

I still hope one day to become a real programmer.

Comments and Discussions

 
GeneralRe: nice Pin
BillW339-Aug-11 13:42
professionalBillW339-Aug-11 13:42 
GeneralRe: nice Pin
Richard MacCutchan9-Aug-11 23:05
mveRichard MacCutchan9-Aug-11 23:05 
QuestionNice work Pin
Mike Hankey7-Aug-11 0:52
mveMike Hankey7-Aug-11 0:52 
AnswerRe: Nice work Pin
Richard MacCutchan7-Aug-11 9:09
mveRichard MacCutchan7-Aug-11 9:09 
GeneralMy vote of 5 Pin
Abhinav S6-Aug-11 6:04
Abhinav S6-Aug-11 6:04 
GeneralRe: My vote of 5 Pin
Richard MacCutchan7-Aug-11 9:09
mveRichard MacCutchan7-Aug-11 9:09 
GeneralMy vote of 5 Pin
ThatsAlok14-Jul-11 1:58
ThatsAlok14-Jul-11 1:58 
GeneralRe: My vote of 5 Pin
Richard MacCutchan16-Jul-11 7:05
mveRichard MacCutchan16-Jul-11 7:05 
Thanks Alok, I hope you find it useful. Sorry I did not reply sooner, but for some reason I don't get notifications when people leave comments on my articles. I think Chris is investigation.
The best things in life are not things.

GeneralMy vote of 4 Pin
Slacker0076-Jul-11 0:14
professionalSlacker0076-Jul-11 0:14 
GeneralRe: My vote of 4 Pin
Richard MacCutchan6-Jul-11 0:27
mveRichard MacCutchan6-Jul-11 0:27 
GeneralMy vote of 5 Pin
Rage4-Jul-11 21:54
professionalRage4-Jul-11 21:54 
GeneralRe: My vote of 5 Pin
Richard MacCutchan5-Jul-11 10:52
mveRichard MacCutchan5-Jul-11 10:52 
GeneralRe: My vote of 5 Pin
Rage6-Jul-11 0:15
professionalRage6-Jul-11 0:15 
GeneralRe: My vote of 5 Pin
Richard MacCutchan6-Jul-11 0:26
mveRichard MacCutchan6-Jul-11 0:26 
GeneralMy vote of 5 Pin
DaveAuld3-Jul-11 22:40
professionalDaveAuld3-Jul-11 22:40 
GeneralRe: My vote of 5 Pin
Richard MacCutchan3-Jul-11 23:30
mveRichard MacCutchan3-Jul-11 23:30 
GeneralRe: My vote of 5 Pin
Richard MacCutchan4-Jul-11 0:21
mveRichard MacCutchan4-Jul-11 0:21 
GeneralMy vote of 5 Pin
Hans Dietrich3-Jul-11 19:27
mentorHans Dietrich3-Jul-11 19:27 
GeneralRe: My vote of 5 Pin
Richard MacCutchan3-Jul-11 22:21
mveRichard MacCutchan3-Jul-11 22:21 

General General    News News    Suggestion Suggestion    Question Question    Bug Bug    Answer Answer    Joke Joke    Praise Praise    Rant Rant    Admin Admin   

Use Ctrl+Left/Right to switch messages, Ctrl+Up/Down to switch threads, Ctrl+Shift+Left/Right to switch pages.