Introduction
By following MVC, you can create beautiful skinned UIs and write the logic parts of your program in Python very easily.
Background
When I first thought up this program, I used tkinter in python. However it was difficult to make a beautiful window using tkinter. Using tkinter is more like using Swing in Java. And at that time, I was not very familiar with Python. So I decided to make an MFC skinned UI which communicates with python. This was almost 7 years ago. After making a small app, I left the code on my hard disk. Recently, I was using a dropbox and I realized that the dropbox was made in python. The dropbox reminded me of this code. So I am posting it here on CodeProject. I am not sure it might help others who think like me, but I hope so.
Using the code
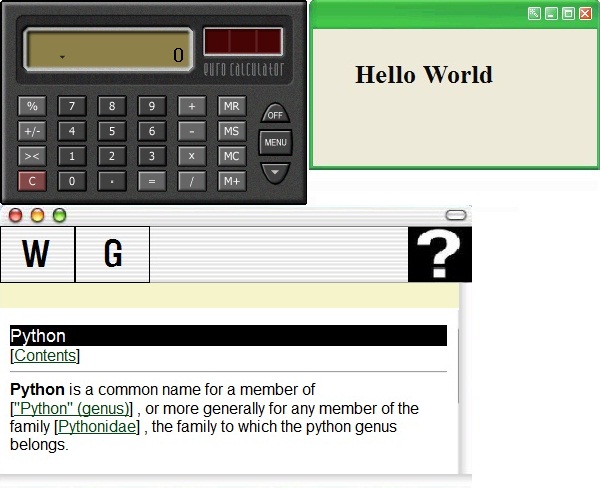
This program consists of three parts: XML script for the skin, the Python script for actually executing the program, and the MFC DLL for creating a skinned dialog and passing the user action to the Python script.
- The XML script for the skin:
="1.0"
<brandnewui>
<info>
information about this skin...
</info>
<resource>
<bitmap id="bmp" file="HelloWorld.bmp"/>
resources...
<icon id="icon" file="HelloWorld.ico"/>
</resource>
<window id="hello" type="cwnd">
<position x="150" y="150" width="292" height="171"/>
<bgcolor color="0x00000"/>
<icon id="icon"/>
<region/>
<alwaystop/>
<magnetic/>
<opacity value="80"/>
<move x="0" y="0" width="292" height="25"/>
actuall control's position and properties...
<emcontrol id="bg" type="pic">
<position x="0" y="0" width="292" height="171"/>
<background id="bmp"/>
<region/>
</emcontrol>
<emcontrol id="hello" type="static">
<position x="40" y="60" width="144" height="37"/>
<background id="bmp_bg"/>
<bgcolor value="ECE9D8"/>
<textcolor value="000000"/>
<font type="system" size="30" align="right" bold="true"/>
<text value="Hello World"/>
</emcontrol>
</window>
</brandnewui>
The XML skin is intuitive and does not need a description. The things you should remember are the window tag and the window ID. Because Python script will send a message to a window using the ID property as an identifier of the window.
- Python script:
import win32api, win32con, win32gui
import win32ui
import win32con
import string
from ctypes import *
from BrandNewUI import *
def SkinWndProc(str):
operator = string.split(str.value,"/")
if operator[0] == "btn_close":
HelloWorld.SendSkinMessage("wndmgr","cls","hello")
HelloWorld.FinalSkin()
EndPumpMessage()
pass
HelloWorld = CBrandNewUI(".\\BrandNewUI.dll",".\\HelloWorld\\HelloWorld.xml")
HelloWorld.LoadModule()
HelloWorld.InitSkin()
HelloWorld.SetAppHwnd()
HelloWorld.GetSkinMessage()
HelloWorld.SendSkinMessage("wndmgr","opn","hello")
HelloWorld.SetSkinProc(SkinWndProc)
StartPumpMessage()
LoadModule is for loading the MFC DLL. InitSkin is for reading the XML skin file and parsing the file. SetAppHwnd is for communicating between the Python window and the MFC window. They should know each other for sending messages. SendSkinMessage is for sending a message to the MFC DLL module. In this example, wndmgr is an abbreviation for "window manager". It is a command to open ("opn") a window ("hello") which should be the same in XML to window manager. The opposite of opn is cls ("close").
- MFC module's API description
This module communicates with a window created by python. It sends messages via the window SendMessage with a CString pointer. The Python script will receive the string message and parse the string. The functions in the API include:
_Initialize
_Finalize

_SendSkinMessage
_SetAppHWND
_GetSkinMessage
_GetLastRespond
_GetLastError
_GetSkinInfo

_UnzipSkinFile
These functions are APIs for the Python script. The Python script is able to call these APIs by using win32api, win32con, win32gui. Please see the BrandNewUI.py (it is a cliché name :-() file which shows how to load a window DLL and call it. I also use these external codes:
Points of iInterest
Make a package with py2exe
You can create an exe file with py2exe. First you have to prepare the script like below:
from distutils.core import setup
import py2exe
setup(windows=["Calculator.py"])
After creating the script, run "python setup.py py2exe" in the console. And then copy the DLLs and your skin folder to your "dist" folder which is created when you run "py2exe". These are needed for running as stand alone > libexpat.dll, mfc71.dll, msvcp71.dll, msvcr71.dll. Finally, you can launch a standalone exe file in the dist folder. Here is the py2exe site link: http://www.py2exe.org/index.cgi/Tutorial.
send c-string msg to python
The ctypes module helps me typecast the CSstring pointer to a Python string easily.
//MFC msg string is like this
m_strAppMessage.Format("%s/%s/%s/%d", lpszID , lpszAction , lpszValue , nUnitID );
//MFC
::SendMessage(python windows hwnd, wparam as a pointer of string message,
              lparam as a pointer of id string.);

//PYTHON
python_string  = c_char_p(string)
//PYTHON
msg = string.split(python_string,"/")
More details: http://docs.python.org/library/ctypes.html.
History
Worked and Working as Windows, Game Software, Mobile Developer.


 General
  News
News  Suggestion
  Question
  Bug
Bug  Answer
  Joke
Joke  Praise
  Rant
Rant  Admin
Admin 


