Introduction
This article explains how to create a Java swing application using the Netbeans IDE and how to use JNI to communicate with native C++ code. It also shows how to debug both the Java application as well as the native C++ DLL.
Background
Many times, we may be in a situation where the major part of an application including the GUI needs to be developed in Java and some legacy library already written in C or C++ needs to be used for some functionality of the application. In such a situation, Java Native Interface (JNI) is used to write wrappers around the C/C++ library calls and then interface those wrapper DLLs with Java code.
Let's Begin...
First let us start by creating a simple desktop application using the Netbeans IDE.
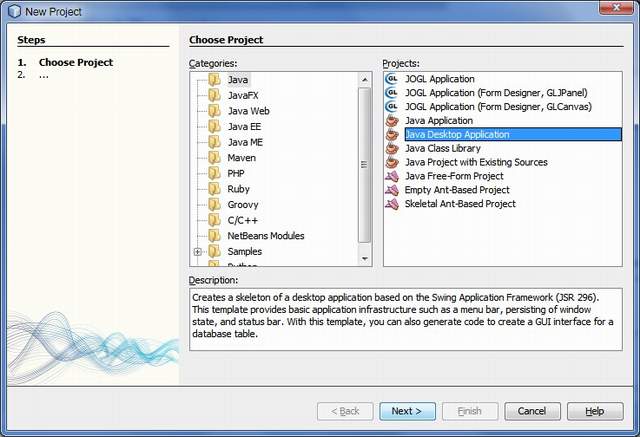
Start a new Java project in Netbeans and select "Java Desktop application" from the New Project wizard.
In the next page, set the name of the project as NativeGUI, you can choose the name you like.

The wizard will populate the project with the code for a basic Desktop Application and open up the interactive GUI editor.
Select and delete the menubar and the statusbar. Add components to the GUI as shown in the image below:
Delete lines 29 to 81 in the NativeGUIView.java file by switching into the Source view mode. This was the code autogenerated for the statusbar animation which needs to be removed. Also remove the unused member variables. Netbeans IDE will visually help you do all this. Optionally, you may choose to keep the menubar and statusbar to avoid hassles of deleting the code correctly.
Switch back to Design view mode and right click on the Add button and click Set Action from the context menu. You will get the Set Action dialog. Drop down the Action combo-box and select Create New Action.
Enter the action name as onAddClicked and press OK.
The wizard will add the code for the Listener and you will be taken to the code editor where you will enter the following code -- shown in bold.
@Action
public void onAddClicked() {
    double d = 0.0;
    try
    {
        d = NativeAdd.add(Double.parseDouble(jSpinner1.getValue().toString()),
        Double.parseDouble(jSpinner2.getValue().toString()));
    }
    catch(Exception e)
    {
        JOptionPane.showMessageDialog(mainPanel, e.getMessage());
    }
    jTextField1.setText(Double.toString(d));
}
Similarly create an Action and set it for the Quit button too. You can switch back to the UI editor by clicking the Design button on the panel just above the editor.
Add a Listener using the same procedure.
@Action
public void onQuitClicked() {
        System.exit(0);
}
Now right-click the nativegui package in the Projects view and click Add -> Java Class. In the Class dialog, enter the name NativeAdd and click Finish.
The code editor will open up with the newly added class code. Add the following static method lines to the class (shown in bold). This class is the wrapper class for loading and executing the native DLL and execute a method in it.
public class NativeAdd {
    native public static double add(double n1, double n2);
    static
    {
        System.loadLibrary( "NativeAdd" );
    }
}
Run the project once by clicking the green arrow in the toolbar above.
This will serve two purposes for us:
- We can see how the GUI looks like so that we can make necessary changes to the layout
- It will generate the class files for all the java files. We need the NativeAdd.class file for further processing for JNI.
Click the Add button and you will see lots of errors in the Netbeans output window. These are related to the missing DLL that we are supposed to provide so that the line System.loadLibrary( "NativeAdd" ); finds the DLL to load. This will be solved when we create the DLL with JNI code and place it in a locatable folder by the JVM.
Now open a command prompt window and navigate to the <Your Project Folder>\NativeGUI\build\classes\nativegui folder. All the built classes would be found here. chdir to one level up and issue the following command:
javah nativegui.NativeAdd
javah.exe is the JNI header generating tool found in the bin folder of your Java SDK installation. Ensure it to be in your path.
You will find a C header file in the name nativegui_NativeAdd.h generated in the folder. The file name is in the format packagename_classname.h. Open it to find a function in name Java_nativegui_NativeAdd_add. The name is in the format Java_packagename_classname_methodname. This function would actually be loaded from a DLL named NativeAdd.dll. Remember the argument we had given for the System.LoadLibrary method? This is the content of the nativegui_NativeAdd.h file.
#include <jni.h>
#ifndef _Included_nativegui_NativeAdd
#define _Included_nativegui_NativeAdd
#ifdef __cplusplus
extern "C" {
#endif
JNIEXPORT jdouble JNICALL Java_nativegui_NativeAdd_add
(JNIEnv *, jclass, jdouble, jdouble);
#ifdef __cplusplus
}
#endif
#endif
We will be using this code to create the JNI DLL that implements the function. Remember, only the header has been generated by javah.exe. We need to provide the function implementation. Remember, the code we implement in the NativeAdd.dll is only a wrapper around the native/legacy software API we wish to use with Java. Here, for demonstration purposes, we simply write code to add two numbers. In real life applications, the code for native APIs are called. The design of JNI classes and methods should be done after careful study of the native API functions or classes that you wish to call. You can also call COM APIs on Windows.
Now let us start implementing the code for the DLL.
Start Visual Studio and create a new Win32 Project with the name NativeAdd.
Select DLL in Application type and click Finish.
The project will be created and populated with code to create a DLL. The file NativeAdd.cpp is also created with only the inclusion of stdafx.h. Add a new header file to the project in the name NativeAdd.h. Now copy the contents of the file nativegui_NativeAdd.h (generated in the netbeans folder) and paste it into the Nativeadd.h file. Implement the function in the Nativeadd.cpp file as shown below:
#include "NativeAdd.h"

jdouble JNICALL Java_nativegui_NativeAdd_add
  (JNIEnv *env, jclass cls, jdouble n1, jdouble n2)
{
    return n1 + n2;
}
Add the java include folder path to Visual Studio either by the following steps ..
1) In the Solution Explorer, right click the project -> Properties.
2) In the property pages, expand C/C++ tree and select General node.
3) In the page add the "<path_to_jdk>\include" and "<path_to_jdk>\include\win32" folder path to "Additional Include Directories".
or by the steps below...
1) Click on Tools->Options in the menu bar.
2) In the Options dialog navigate to the Projects and Solutions->VC++ Directories node.
3) In the page, use the drop down box labelled "Show Directories For" to select "Include Files".
4) Create a new entry for "<path_to_jdk>\include" and "<path_to_jdk>\include\win32" folder path.
The second option is more prefered to the first one which is project specific only.
Now we are good to build the project.
Build the project. The file NativeAdd.dll is created in the Debug folder in the DLL Project path.
Note: You also have to add the library path and jvm.lib library entry to the linker if you would be accessing the JVM inside the C++ code.
Now we have the JNI code DLL and the Java GUI that uses it. But how will the DLL get loaded? For that, you have to copy the DLL in the <Your Java SDK Folder>\bin. But if we are running the GUI project from Netbeans, it is not required. We can simply set the working directory in the Run settings of the Project Properties dialog. You can right-click the project in the Netbeans Project View window and click on Properties to get the dialog.
Be sure to choose the path of your project... Not mine! :)
Now run the GUI project and test the addition of two numbers. Hurrah! You have just interfaced native C code to a Java application using JNI. Now let us get into the debugging of the application and see the native C code getting called. Start debugging the Java program by clicking the Debug button on the toolbar. Add a breakpoint in the onAddClicked method of the NativeGUIView class. Enter two values in the spinboxes of the application and click Add.
The debugger halts at the breakpoint.
Now we must set breakpoint in the native DLL code. In Visual Studio, click Debug -> Attach to Process.
From the Attach to Process dialog, select the java.exe that runs your application. Remember, there may be more than one instances of java.exe running on your system if some other Java application is running. Be careful to select the java.exe running your application. Click Attach.
Then add a breakpoint, in Visual Studio, in the native JNI function implementation.
Note: The breakpoint will not be hit since the DLL has not been loaded by the JVM. The breakpoint symbol is with a small warning icon and the tooltip states that it won't be hit.
Go back to Netbeans IDE and step over each block of code by pressing F8. After you step over the line calling the NativeADD.add method, the DLL will be dynamically loaded by the JVM and Visual Studio will automatically come on top with the breakpoint hit.
Step through the code in Visual Studio by pressing F10 and finally F5 when Visual Studio shows up the warning message box for showing disassembly. The Java application will be shown back on top. Then to further debug the application, go to Netbeans IDE and continue the debugging.
Hope you enjoyed this article!
Points of Interest
COM Server Applications can also be debugged in a similar fashion by attaching the Server EXE to the debugger.
Tip
This is an additional tip from CodeProject member wc2009 (follow the comments portion). If you want to compile the DLL project with MinGW compiler, you must add "-Wl,--add-stdcall-alias" to additional compiler options.
History
- 31st March, 2010: First release
- 12th April, 2010: Added tip for MinGW compiler
Sharjith is a Mechanical Engineer with strong passion for Automobiles, Aircrafts and Software development.


 General
  News
News  Suggestion
  Question
  Bug
Bug  Answer
  Joke
Joke  Praise
  Rant
Rant  Admin
Admin 


