Introduction
Ever been on a Web site that shows off the drag and drop operation? Maybe it allows you to drag and drop the product into a shopping cart. Most of us have been there and were really impressed with the feature. In this article, we will focus on how to create a similar drag and drop functionality to add users to a room.
Why JQuery?
Why indeed? There are several drag and drop libraries available for free. Take Microsoft ASP.NET Ajax, for example. Unfortunately, the Microsoft Ajax Library is not developer friendly, meaning it is darn complicated to use. So, if you are looking for some head-banging, be sure to dive into Microsoft Ajax. However, if you are interested in a simple and powerful approach, then JQuery is your friend.
Some of you might be thinking, "Why not simply write plain old vanilla JavaScript?" Well, off course you can, but that is also a very complicated and time-consuming approach. If you are interested in using only JavaScript, then check out the article, "Browser Compatible Drag and Drop Shopping Cart".
Downloading JQuery and UI API
Before we implement anything, we need to download the JQuery library and the JQuery drag and drop UI API. Check out the following links for download:
- JQuery Library
- JQuery Drag and Drop UI API
Scenario
The scenario is a little different from the shopping cart basket. In this application, we are going to drag and drop the users to a room. Once a user is inserted into the room, an entry is written to the database. We can also delete the user from the room. In that case, the entry is deleted from the database. Check out the GIF using the link, "Drag and Drop With Persistence Using JQuery".
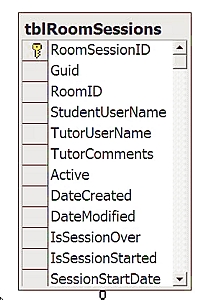
Database
There is one table, tblRoomSessions, that will hold the information about the user and the room. The diagram of the tblRoomSessions table is shown below:
The table script is included with the download.
Populating the Students List
There are multiple ways of populating the student DataList control. You can use a simple DataSet container, fill it up with the data from tblRoomSession and assign it to the DataList control. I have used a different approach, but it really does not matter how you populate the DataList.
Student DataList Control ASPX Code
The ASPX code for the DataList control is pretty straightforward. Check out the code below:
<asp:DataList ID="dlRooms" EnableViewState="false" runat="server" RepeatColumns="3"
            RepeatDirection="Horizontal">
    <ItemTemplate>

    <div id="div1" class="block">

    <div style="text-align:center; font-size:18px; border:solid 1px">

        <%# Container.ItemIndex + 1 %></div><li id="username" runat="server">
    <%# Eval("UserName") %></li><li id="roomId" runat="server" style="visibility:hidden">

    <%# Eval("RoomID") %></li><li>
    <%# Eval("Subject") %></li><li>
    <%# Eval("Description") %></li></div></ItemTemplate></asp:DataList>
When the DataList is populated, it will look something like the following screenshot:

The numbers indicate the order in which students requested the room. This means that the student with number 1 requested the room before the student with number 2. The numbers are generated using the following statement:
<%# Container.ItemIndex + 1 %>
You will also notice that the <LI> with an ID equal to roomId is marked as hidden. You don't need to embed the roomId with every <LI>, as you will know the roomId before you will reach this page. The <DIV> element, which contains all the <LI>, has a class called block. Let's take a look at all the styles in the next section.
CSS Styles
There are several CSS styles used in this application. Let’s take a look at a few of them.
.block {
   border<span class="code-none">: 2px solid #0090DF<span class="code-none">;
   background-color<span class="code-none">: #68BFEF<span class="code-none">;
   width<span class="code-none">: 200px<span class="code-none">;
   height<span class="code-none">: 200px<span class="code-none">;
   margin<span class="code-none">: 10px<span class="code-none">;
   overflow<span class="code-none">:auto<span class="code-none">;
   padding<span class="code-none">:1em 1em 1em 1em<span class="code-none">;
   z-index<span class="code-none">:9999<span class="code-none">;
   cursor<span class="code-none">:move<span class="code-none">;
<span class="code-none">}</span></span></span></span></span></span></span></span></span></span></span></span></span></span></span></span></span></span></span>
The block style is used for all of the draggable items.
.roomItem {
   border<span class="code-none">: 2px solid #0090DF<span class="code-none">;
   background-color<span class="code-none">: yellow<span class="code-none">;
<span class="code-none">}</span></span></span></span></span>
The roomItem style is used for the items that are inserted into the room.
.drop {
 background-color<span class="code-none">: #e9b96e<span class="code-none">;
 border<span class="code-none">: 3px double #c17d11<span class="code-none">;
   width<span class="code-none">: 300px<span class="code-none">;
   height<span class="code-none">: 300px<span class="code-none">;
   margin<span class="code-none">: 10px<span class="code-none">;
   overflow<span class="code-none">:auto<span class="code-none">;
   position<span class="code-none">:absolute<span class="code-none">;
  top<span class="code-none">: 5px<span class="code-none">;
  right<span class="code-none">: 10%<span class="code-none">;
  padding<span class="code-none">: 1em 0 0 0<span class="code-none">;
<span class="code-none">}</span></span></span></span></span></span></span></span></span></span></span></span></span></span></span></span></span></span></span></span></span>
The drop style is used for the drop zone <DIV> element which, in this case, is a room.
Making Items Draggable and Droppable using JQuery
Let me first post the complete code and then I will explain the code in segments.
$(document).ready(function(){
$(".block").draggable({helper:'clone'});
$(".drop").droppable({
accept: ".block",
activeClass: 'droppable-active',
hoverClass: 'droppable-hover',
drop: function(ev, ui) {
$(ui.draggable).addClass("roomItem");
var lid = ($(ui.draggable).children("li:first"));
var username = ($(ui.draggable).children("li:first").text()).replace(/[\n\r\t]/g,'');
var roomId = $(ui.draggable).children("li:eq(1)").text();
var removeLink = document.createElement("a");
removeLink.innerHTML = "remove";
removeLink.href = "#";
removeLink.onclick = function()
{
$("#drop1").children().remove("#"+lid[0].id);
$(this).remove();
$(ui.draggable).removeClass("roomItem");
$(ui.draggable).addClass("block");
VirtualTutoringRoomWebApps.VirtualRoomService.removeUserFromRoom(
username,Number(roomId));
}
$(this).append($(ui.draggable).clone().children("li:first").addClass("roomItem"));
$(this).append(removeLink);
VirtualTutoringRoomWebApps.VirtualRoomService.addUserToRoom(username,Number(roomId));
}
});
});
Seems complicated! Don't worry; it is not that hard to understand. Let's start with the document.ready function, which is fired when the DOM (Document Object Model) is ready and loaded.
To make the element draggable, all you need to do is use the draggable function provided in the JQuery UI API. The function can take different arguments, but we used the name of the class, which in this case is .block. This means, "Make all the elements draggable whose class is .block." The draggable function also takes in the helper. Helpers are used to perform actions on the draggable item. We are using the clone helper, which will create a clone for our draggable item.
$(".block").draggable({helper:'clone'});
The same technique is used for creating the drop zone. When the item is dropped inside the drop zone, a class called roomItem is attached to the item. This applies the yellow background to the item, which indicates that the item has been dropped into the drop zone. Then we use the following code to extract the username and the roomId from the <LI> items contained inside the draggable <DIV> element.
var username = ($(ui.draggable).children("li:first").text()).replace(/[\n\r\t]/g,'');
var roomId = $(ui.draggable).children("li:eq(1)").text();
A new hyperlink element is created that is used to remove the items from the drop zone. Basically, the remove link is used to remove the users from the room.
var removeLink = document.createElement("a");
removeLink.innerHTML = "remove";
removeLink.href = "#";
removeLink.onclick = function()
{
$("#drop1").children().remove("#"+lid[0].id);
$(this).remove();
$(ui.draggable).removeClass("roomItem");
$(ui.draggable).addClass("block");
VirtualTutoringRoomWebApps.VirtualRoomService.removeUserFromRoom(
username,Number(roomId));
}
When the item is removed from the drop zone, it is returned back to its original class, which is block. The server-side removeUserFromRoom method is fired, which removes the item from the database. We will take a look at this method later in this article. When we drag and drop the item into the drop zone, we append the first <LI> element into the drop zone. In this case, that is the username of the user.
$(this).append($(ui.draggable).clone().children("li:first").addClass("roomItem"));
$(this).append(removeLink);
VirtualTutoringRoomWebApps.VirtualRoomService.addUserToRoom(username,Number(roomId));
Check out the screenshot below, which shows the item added to the drop zone.
Finally, the addUserToRoom method is fired and adds the user to the room.
Ajax Methods
I have used Microsoft ASP.NET Ajax to create asynchronous calls to the Web service methods. Let's take a look at these methods:
[WebMethod]
        public bool removeUserFromRoom(string username, int roomId)
        {
            MethodInvoker.Invoke<SQLDataAccess>("RemoveUserFromRoom", new object[]
            {
                username.Trim(), roomId
            });

            return false;
        }

        [WebMethod]
        public bool addUserToRoom(string username, int roomId)
        {
            try
            {
                MethodInvoker.Invoke<SQLDataAccess>(
                    typeof(tblRoomSession), "AddAndPersistAll",
                    new object[]
                    {
                        new tblRoomSession()
                        {
                            Guid = Guid.NewGuid().ToString(), RoomID = roomId,
                            StudentUserName = username.Trim(),
                            TutorUserName = User.Identity.Name, IsSessionStarted = true,
                            SessionStartDate = DateTime.Now
                        }
                    });
            }
            catch (Exception ex)
            {
                string exception = ex.Message;
            }

            return false;
        }
Don't pay that much attention to the MethodInvoker class. This is a custom class that is used to create data access operations on objects. You can use DataSets, Entity classes, Managers, Repositorys and Mappers to perform the data access operations. If you are interested in the MethodInvoker class, then take a look at the blog post, "MethodInvoker".
Additional Features
There are several additional features that need to be implemented for this application. Some of them are listed below:
- A timer that will asynchronously fetch the users waiting for the room without refreshing the page.
- Not allowing duplicate users to be added to the same room.
Update
When this was published, we talked about few additional features that might be useful. Some of them are shown above under the "Additional Features" section. Here is the implementation of both the features.
First, let's see how we can update the interface when a new user enters the waiting list. This process should be done asynchronously which means that the screen should not refresh on the server side but on the client side. As it turns out, this can easily be accomplished by using the ASP.NET Timer control. The Timer control will fire an event which will fire a method on the server side. First you will need to add the Triggers section inside the UpdatePanel control.
<triggers>
    <asyncpostbacktrigger eventname="Tick" controlid="timer1">
    </triggers>
Now, let's see the Timer control which is also contained inside the UpdatePanel control.
<timer id="timer1" ontick="timer1_Tick" interval="5000" runat="server" />
The Timer control will fire the timer1_Tick event every 5 seconds. Now, let's take a look at the timer1_Tick event:
protected void timer1_Tick(object sender, EventArgs e)
      {
          BindData();
          up1.Update();        }
That was simple! The timer1_Tick event simply fetches the data from the database using the BindData method and then refreshes the UpdatePanel to update the user interface. Everything works great..... for 5 seconds. After 5 seconds, you won't be able to drag and drop your objects.
The reason is that when you updated the screen using the UpdatePanel, it reset all the controls inside it. Now, you can see the controls but they don't have any functionality. There is an easy way to fix this problem. All you need to do is to make the elements draggable once again. Check out the implementation below:
protected void timer1_Tick(object sender, EventArgs e)
{
BindData();
up1.Update();
RegisterDragAndDropScript();
}
private void RegisterDragAndDropScript()
{
string script = "makeElementsDraggableAndDroppable();";
ScriptManager.RegisterClientScriptBlock(this,this.GetType(),
"DragAndDropScript", script, true);
}
Now, when the UpdatePanel is refreshed, the controls are again made draggable.
Conclusion
In this article, we learned how to create a drag and drop UI using JQuery and the JQuery UI API. I hope you liked this article; happy coding!
History
- 5 March, 2008 -- Original version posted
- 7 March, 2008 -- Article updated


 General
  News
News  Suggestion
  Question
  Bug
Bug  Answer
  Joke
Joke  Praise
  Rant
Rant  Admin
Admin 


