Introduction
This article will go over a tool that gives you the ability to create and manage multiple timelines with freely editable items. You can add items to multiple timelines in a structure that is MVVM compatible. The control manages logic to provide some intelligent behaviors, etc. The presentation is completely open to use your own data templates to allow you to have full control of all aspects of your presentation. All start and end time values are managed through data binding, which allows you to use this control and have real time updates to your own entities.
This is my first foray into control development, so I hope it will be useful to many, but I also really look forward to any feedback and contributions. My project does utilize a very excellent project created by Steve Kirk for drag and drop functionality. His articles can be found here. The project as it appears in my solution has been modified in a few ways to suit some of my needs.
Background
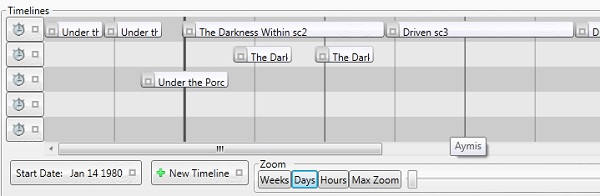
There are a lot of timeline tools out there for WPF, but none of them provide the kind of behavior I needed. I recently launched a project called BookWeaver to help fiction authors manage their writing. One of the big features I wanted to provide was a timeline tool that allows an author to track complex multi-threaded stories. I wanted something that allows a user to freely edit an events start and end times while intelligently preventing overlap on a given line. It needed to manage multiple timelines so that you can track concurrent storylines. The control needed to let users click on a given item and move it in time, effectively pushing other items when it bumps into them. I wanted to let the user edit start or end times by clicking on the left or right edges respectively. I also wanted to let users have a means to keep start and end times connected when editing one that has a contiguous neighbor.
Using the Code
The timeline control requires that all Items implement the ITimeLineDataItem interface that is defined in the TimeLineTool project. If you are using the MVVM pattern, then you should have a viewmodel that houses the observable collections for all of your timelines. So long as it also implements the ITimeLineManager interface, you can enable and disable a timeline.
public interface ITimeLineDataItem
{
	DateTime? StartTime { get; set; }
	DateTime? EndTime { get; set; }
    Boolean TimelineViewExpanded { get; set; }
}
Notice that the TimeLineControls in the sample project are housed inside an items control. In a more robust project, you would probably bind an ItemsControl with a collection of your own. When the Timeline controls are housed within an ItemsControl, then the control does a fairly good job of keeping all of the siblings properly synchronized. The following is a real world example of XAML for timelines that are generated using MVVM bindings:
<ItemsControl ItemsSource="{Binding Path=Threads}"
AlternationCount="2"
HorizontalAlignment="Stretch">
<ItemsControl.ItemContainerStyle>
<Style TargetType="ContentPresenter">
<Style.Triggers>
<Trigger Property="ItemsControl.AlternationIndex" Value="0">
<Setter Property="ContentTemplate"
Value="{StaticResource ThreadTemplate}"></Setter>
</Trigger>
<Trigger Property="ItemsControl.AlternationIndex" Value="1">
<Setter Property="ContentTemplate"
Value="{StaticResource ThreadAlternateTemplate}"></Setter>
</Trigger>
</Style.Triggers>
</Style>
</ItemsControl.ItemContainerStyle>
<ItemsControl.ItemsPanel>
<ItemsPanelTemplate>
<StackPanel Orientation="Vertical" />
</ItemsPanelTemplate>
</ItemsControl.ItemsPanel>
</ItemsControl>
<DataTemplate DataType="{x:Type ViewModels:ThreadViewModel}"
x:Key="ThreadTemplate">
<tt:TimeLineControl Items="{Binding Path=Scenes, Mode=TwoWay,
UpdateSourceTrigger=PropertyChanged}"
DrawTimeGrid="True"
Background="{StaticResource NormalBaseColorBrush}"
UnitSize="{Binding ElementName=ThreadCollection_Root,
Path=DataContext.TimeLineUnitSize, Mode=TwoWay,
UpdateSourceTrigger=PropertyChanged}"
StartDate="{Binding ElementName=ThreadCollection_Root,
Path=DataContext.ActualStartDate}"
FocusOnItem="{Binding ElementName=ThreadCollection_Root,
Path=DataContext.FocusScene}"
Height="30"
MinWidth="500"
MinimumUnitWidth="20"
ItemTemplate="{StaticResource TimeLineSceneTemplate}"
HorizontalAlignment="Left"
Manager="{Binding}"
Grid.Column="1"
ToolTip="{Binding Path=MyModel.ThreadName.Value}"/>
</DataTemplate>
The TimeLineSceneTemplate is pretty effectively demonstrated in a simple form in the demo project, so I am not including a real world example of it. You can see a few other properties that you can bind to. FocusScene lets you tell the control to scroll and zoom as needed to bring a given item into view. You can bind to DrawTimeGrid, which I would recommend. The grids can slow down performance, so it is actually best to only show them when the user requests them. You can set brushes for various time unit grid lines, or you can use defaults that will be various intensities of Gray/Black.
The DataTemplate for a Scene is pretty simple in the demo.
<DataTemplate  DataType="{x:Type tt:TempDataType}"
                x:Key="UsedTemplateProperty">
    <Border BorderThickness="1"

            BorderBrush="Green"
            CornerRadius="3"
            Margin="0,10,0,10"
            Height="60"
            Background="{StaticResource BgBrush}">

        <StackPanel Orientation="Vertical">
            <TextBlock Text="{Binding Path=Name}" />
            <TextBlock Text="{Binding Path=StartTime}" />
            <TextBlock Text="{Binding Path=EndTime}" />

            <TextBlock Text="{Binding Path=Duration}" />
        </StackPanel>
    </Border>
</DataTemplate>
The TimelineControl will take the Data bound to its Scenes property and will create a TimeLineItemControl for each one, then apply the Data Template you indicate for the contents of said TimeLineItemControl. If you want to influence your TimeLineItemControl's appearance, you do that via its style. The style for the control lets you apply a control template as well as set any other properties you want to set for the TimeLineItemControl.
<Style TargetType="{x:Type tt:TimeLineItemControl}">
<Setter Property="Template">
<Setter.Value>
<ControlTemplate TargetType="{x:Type tt:TimeLineItemControl}">
<Grid>
<Border Background="Blue"
HorizontalAlignment="Stretch"
VerticalAlignment="Stretch"
Opacity="0" />
<ContentPresenter HorizontalAlignment="Stretch"
VerticalAlignment="Stretch"
x:Name="PART_ContentHostPART_ContentHost" />
<ContentPresenter HorizontalAlignment="Left"
VerticalAlignment="Stretch"
x:Name="PART_LeftIndicator">
<ContentPresenter.Content>
<Button />
</ContentPresenter.Content>
</ContentPresenter>
<ContentPresenter HorizontalAlignment="Right"
VerticalAlignment="Stretch"
x:Name="PART_RightIndicator">
<ContentPresenter.Content>
<Button />
</ContentPresenter.Content>
</ContentPresenter>
</Grid>
</ControlTemplate>
</Setter.Value>
</Setter>
</Style>
You will want to take note of the PART_RightIndicator and PART_LeftIndicator. If you provide ContentPresenters with those respective names, the control will show whatever contents you place there when you mouse over the edges. If you use the style to set the property EditBorderThreshold then you can adjust the tolerances for those edges.
Points of Interest
It has been a long time since I actually did the implementation of the project, so a lot of the particulars aren't fresh in my memory. One thing I did find particularly challenging was dealing with interdependent dependency properties. Often times, I wanted similar actions to happen when multiple properties changed, but that action depends on all of the properties being initialized. So quite often, I would get exceptions depending on what order things happened. I am not entirely happy with how complicated everything seemed to get, and hope I can find some ways to simplify it and streamline it.
I also ran into something funky when I was tracking mouse move events for editing the scenes within the scene's code. The problem was that changes were relative to the scene itself. So when I moved the scene in response to the move event, that would cause the next move event to register a delta in the opposite direction. The result was that the scenes would flicker back and forth as I edited them. I felt pretty silly once I realized the reason for that behavior. Once I tracked movements relative to the parent canvas, that problem went away.
I had initially wanted to use left click for editing time values and right click for drag and drop to reorder. However, WPF doesn't provide any means to do drag operations with the right click. So I had to do all drag operation with the left click. That meant all time editing actions had to be relegated to the right click.
I ended up going for a simple canvas as the holding element for better and worse.
I added an IsExpanded dependency property for some of my specific needs. I had implemented a specialized expander that uses PopUp controls for the expander's contents. It caused some frustrating glitches under certain circumstances so I wired up the TimeLineItemControl so it will update that property and thus collapse the item under the different circumstances that were resulting in some unpleasant bugs. You likely can ignore that property for most of your uses. Binding to it will collapse expanders whenever your mouse rolls off the given TimeLineItemControl.
Intended Upgrades
I hope to do several things to upgrade it, but I am not sure when I will get to it. If anybody does provide updates, that would be awesome, but I don't expect it. I am using this in my commercial project BookWeaver, and upgrades to this tool will find their way into it.
I hope to improve several things about it in the future:
- Snapping to discrete time units (though that may be tricky for me)
- Give it the ability to collapse empty gaps and drag/drop across them as if they weren't present. The current version doesn't really work well for a timeline that has large breaks in time.
- I hope to clean up and simplify the code. I am still somewhat of a newbie at building controls like this.
- I hope to improve its start up draw behavior so stretch horizontal alignment would be meaningful.
Acknowledgements
Users here on CodeProject were extremely helpful as I was developing this tool. As mentioned in the introduction, Steve Kirk's drag drop solution was also very useful. I wanted to post this as a way of thanking those who helped me get the control together. I welcome and look forward to feedback. I am sure it can be improved and cleaned up. I also learned a lot from people at the MSDN forums.
I hope to write a follow up article that details the implementation of the control sometime soon.
History
- Version 1 - August 2011
- Version 1.01 - August 17 2011
- Added the ability to template out left and right edge indicators. I also made the threshold for when you are editing start and end time a dependency property so you can bind to it.
- Version 1.02 - August 20 2011
- Fixed a bug with the
DrawTimeGrid property. It wasn't properly updating the timeline control when it changed after initialization.
This member has not yet provided a Biography. Assume it's interesting and varied, and probably something to do with programming.


 General
  News
News  Suggestion
  Question
  Bug
Bug  Answer
  Joke
Joke  Praise
  Rant
Rant  Admin
Admin 


