Modular Design
Modular design is an approach that subdivides a system into smaller parts that can be independently created and then used in different systems to drive multiple functionalities.
Besides reduction in cost (due to lesser customization, and less learning time), and flexibility in design, modularity offers other benefits such as augmentation (adding new solution by merely plugging in a new module).
A downside to modularity is that modular systems are not optimized for performance. This is usually due to the cost of putting up interfaces between modules.
For more information on this, refer to Wikipedia Modular Design
Managed Extensibility Framework (MEF)
Managed Extensibility Framework (MEF) is a library which comes along with .NET
Framework 4.0 which simplifies the design of composable applications that can be extended after they have been deployed.
Below are some essential concepts in MEF:
- Composable part: A part provides services to other parts and consumes services provided by other parts. Parts in MEF can come from anywhere, from within the application or externally; from an MEF perspective.
- Export : An export is a service that a part provides. When a part provides an export, it is said that the part exports it. Parts can provide multiple exports, though most parts provide a single export.
- Import : An import is a service that a part consumes. When a part consumes an import, the part imports it. Parts can import single or multiple services.
- Contracts : A contract is an identifier for an export or an import. An exporter specifies a string contract that it provides, and an importer specifies the contract that it needs.
- Composition : Parts are composed by MEF, which instantiates them and then matches up exporters to importers.
To begin with a composite application or modular application or pluggable application, lets create a sample Calculator. Below shown image is what we are expecting as a final output of this example.

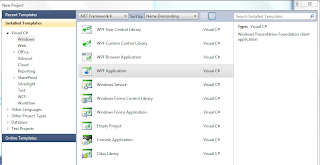
To start with, let’s create a new project. We are going to create the calculator application UI using WPF
So select WPF application from new project wizard.
Open visual studio instance and go to
File->New->Project and select WPF application.
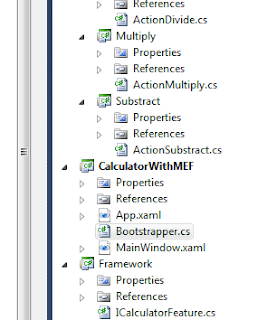
Now create a new class library project to the solution and name it as Framework. This will be a common dll which we will refer to most of the project that we will use. Common stuffs go here.
Now to the framework project, add one interface and name it as "ICalculatorFeature.cs"

In our calculator example, we are going to implement four basic features of a calculator, Addition, Subtraction, Division and Multiplication. We will create module or component for each feature. These features will then act as pluggable components or modules. i.e. when this module is available, then only the feature is available in the calculator.
For our example, the interface ICalculatorFeature should contain one property and a method as given below.
string Symbol { get; }
long PerformCalculation(int valueOne, int valueTwo);
Those entire pluggable components which we use in this example should be inherited from this interface. When they implement the interface property and methods, the property "Symbol" will give the unique symbol associated with the module and method "PerformCalculation" will perform the calculation associated with that module.
Now we need four class library projects. Create a solution folder with the name "CalculatorFeatures" and add these projects into it and name it as Add, Divide, Multiply, Subtract respectively.
Add one class each to all these projects.
Add "ActionAdd.cs" to Add project
Add "ActionDivide.cs" to Divide project
Add "ActionMultiply.cs" to Multiply project
Add "ActionSubtract.cs" to Subtract project

The classes must inherit from "ICalculatorFeature". Add a reference to Framework project and Inherit the class from "ICalculatorFeature" and implement the property and methods.
public class ActionAdd : ICalculatorFeature
{
#region ICalculatorFeature Members
public string Symbol
{
get { return "+"; }
}
public long PerformCalculation(int valueOne, int valueTwo)
{
return valueOne + valueTwo;
}
#endregion
}
Similar way you have to implement other modules.
Project Configurations
Now we need some configuration for the projects. We are going to change the output folder for the projects. First create a folder called "Executables" along with the main calculator project folder

Right click on the project and select properties. Go to Build tab. Now change output path.
For the modules Add, Divide, Multiply and subtract, point it to the "Features" folder inside Executables folder. This is important.

And for all other projects, make it point to executables folder
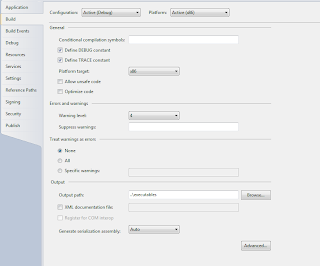
Now if you build the solution, the output dll for Add, Divide, Multiply and Subtract should go to Features folder inside executables folder and for projects Framework and Calculator, it should go to executables folder. In the main calculator application add one app.config file and in the appSettings section add the below settings
<appSettings>
    <add key="ModulesFolder" value="Features" />
</appSettings>
This setting is needed to find out the folder where the module dll’s will be. Remember we have set the output path of the projects to "Executables\Features" folder.
Now the basic setups for the example projects are over. Now let’s make it pluggable with the help of mef.
MEF
For making a module pluggable, we have to export it via mef. For this add a reference to System.ComponentModel.Composition

And add Export attribute to the classes that we created as shown below.
using System.ComponentModel.Composition;
using Framework;
namespace Substraction
{
[Export(typeof (ICalculatorFeature))]
public class ActionSubtract : ICalculatorFeature
{
#region ICalculatorFeature Members
public string Symbol
{
get { return "-"; }
}
public long PerformCalculation(int valueOne, int valueTwo)
{
return valueOne - valueTwo;
}
#endregion
}
}
Do exports for all the pluggable modules or features (Add, Divide, Multiply, Subtract). Once you are done with this, the modules are pluggable. We can now detect these modules from our main application. Let’s see how this is done.
In the main calculator project we have to configure MEF Container to export all those class objects which have Export attribute defined. For this we have to do some jugglery like
var catalog = new DirectoryCatalog(@".\");
var container = new CompositionContainer(catalog);
container.Composeparts(this);
and then expose the container using our own logic so that the class which require the object can get it either via querying the container or by defining Import attribute. We can simplify this jugglery by using Microsoft’s framework which is called Prism.
Prism is a superset of features which include MEF. Now prism will handle all the jugglery of creating container and make it available when in need. Let’s see how this is done.
For this we need prism, Prism is available as a download and you can get it from http://www.microsoft.com/en-us/download/details.aspx?id=28950
Download it and run it as administrator and it will unzip the library into a folder of your choice.
Now in that folder you can see a bin folder inside that you can see a desktop folder within that folder you can find all prism related dll’s.
Now add a reference to these dll’s to the main calculator project.
Microsoft.Practices.Prism
Microsoft.Practices.Prism.MefExtension
Microsoft.Practices.ServiceLocation

Now we need a class file. Add new class file and name it as "Bootstrapper.cs". This will be the entry point of the application. We will see later how to make this file as our entry point file.
Now the bootstrapper class has to inherit "MefBootstrapper"
MefBootstrapper comes along with Prism and is in the namespace Microsoft.Practices.Prism.MefExtension. Now we have to override some methods
from MefBootstrapper These methods are as below.
protected override DependencyObject CreateShell()
protected override void InitializeShell()
protected override void ConfigureAggregateCatalog()
protected override void ConfigureContainer()
Now your bootstrapper should look like this:
public class Bootstrapper : MefBootstrapper
{
    protected override DependencyObject CreateShell()
    {
        return new MainWindow();
    }

    protected override void InitializeShell()
    {
        base.InitializeShell();

        Application.Current.MainWindow = (Window) Shell;
        Application.Current.MainWindow.Show();
    }

    protected override void ConfigureAggregateCatalog()
    {
        base.ConfigureAggregateCatalog();

        string modulesFolder = ConfigurationManager.AppSettings["ModulesFolder"];

        AggregateCatalog.Catalogs.Add(
            new DirectoryCatalog(
                Path.Combine(Path.GetDirectoryName(Assembly.GetExecutingAssembly().Location), modulesFolder),
                "*.dll"));

        AggregateCatalog.Catalogs.Add(new AssemblyCatalog(typeof (MainWindowModel).Assembly));
    }

    protected override void ConfigureContainer()
    {
        base.ConfigureContainer();
        Container.ComposeExportedValue(AggregateCatalog);
    }
}
Here CreateShell() method will return the main window to be shown when application starts up.
InitializeShell() will do all initialization process for your main window.
ConfigureAggregateCatalog() will give us provision to configure the catalogue. This catalogue will then be used to configure container. Catalogue will tell from where to fetch objects of the classes which we have exported. Here we used two catalogues one is Module catalogue, to discover modules form the modules folder which is "Features" folder inside Executables folder. And Assembly catalogue to find the assembly which has the class "MainWindowModel".
ConfigureContainer() will help to configure container with the help of catalogue which we configured and will fetch all objects of the class which have export attribute on it and will the container will have those object. Later we can query container to give the object of our choice.
Now let’s see how to make this file as the entry file.
In the App.xaml file, there is an entry called StartupUri we have to remove it completely.

Now in the codebehind file for App.xaml, we have to tell it to run our bootstrapper.
public partial class App : Application
{
protected override void OnStartup(StartupEventArgs e)
{
base.OnStartup(e);
var bootstrapper = new Bootstrapper();
bootstrapper.Run();
}
}
Now if you run the application, you can see your main window.
Now let’s do some wpf coding to display the Symbols from the dll or component in the main window. Let’s do it in the MVVM way. MVVM is a very famous design pattern for creating wpf application. Here let’s not go into details of MVVM and lets simplify it by view and model.
For this let’s create a folder in the calculator project and name it as "Model" Now let’s create a class file in that folder and name it as "MainWindowModel.cs"
Content for the file should be as below.
namespace CalculatorWithMEF.Model
{
public struct ButtonProperty
{
public String Symbol { get; set; }
public ICommand Command { get; set; }
}
[Export]
public class MainWindowModel : Control
{
public static DependencyProperty CalculatorTextProperty =
DependencyProperty.Register("CalculatorText", typeof (int),
typeof (MainWindowModel), new FrameworkPropertyMetadata(0));
private ObservableCollection<ButtonProperty> _buttons;
public String PreviousButtonValue { get; set; }
public int BackupValue { get; set; }
public int CalculatorText
{
get { return (int) GetValue(CalculatorTextProperty); }
set { SetValue(CalculatorTextProperty, value); }
}
public ObservableCollection<ButtonProperty> ButtonsViewModelColl
{
get { return _buttons ?? (_buttons = new ObservableCollection<ButtonProperty>()); }
set { _buttons = value; }
}
[ImportMany(typeof (ICalculatorFeature))]
public IEnumerable<ICalculatorFeature> CalculatorFeature { get; set; }
public ICommand ButtonClick
{
get
{
return new RelayCommand(PerformClickAction);
}
}
public bool CanClickButtonandPerformAction(object parameter)
{
return true;
}
public void PerformClickAction(object parameter)
{
switch ((string) parameter)
{
case "On/Off":
if (0 == ButtonsViewModelColl.Count)
{
foreach (ICalculatorFeature feature in CalculatorFeature)
{
ButtonsViewModelColl.Add(new ButtonProperty {Symbol = feature.Symbol, Command = ButtonClick});
}
ButtonsViewModelColl.Add(new ButtonProperty {Symbol = "=", Command = ButtonClick});
}
else
{
ButtonsViewModelColl.Clear();
}
break;
case "=":
ICalculatorFeature calculatorFeature =
CalculatorFeature.FirstOrDefault(val => (string) parameter == val.Symbol);
if ((null == calculatorFeature) && string.Empty != PreviousButtonValue)
{
calculatorFeature = CalculatorFeature.FirstOrDefault(val => PreviousButtonValue == val.Symbol);
}
if (null != calculatorFeature)
{
CalculatorText = (int) calculatorFeature.PerformCalculation(BackupValue, CalculatorText);
}
BackupValue = CalculatorText;
break;
default:
BackupValue = CalculatorText;
PreviousButtonValue = (String) parameter;
break;
}
}
}
}
Note that here we are Exporting the class itself
[Export]
public class MainWindowModel : Control
    {}
Now pay attention to the line
[ImportMany(typeof (ICalculatorFeature))]
        public IEnumerable<ICalculatorFeature> CalculatorFeature { get; set; }
Here we say ImportMany(typeof (ICalculatorFeature)) now mef will load all objects of classes which is derived from ICalculatorFeature and will assign to the property CalculatorFeature.
Now we are going to make this file as the code behind file for the MainWindow.
Let’s see how this is done, go to the code behind file of MainWindow
public partial class MainWindow : Window
{
public MainWindow()
{
InitializeComponent();
this.DataContext = ServiceLocator.Current.GetInstance(typeof (MainWindowModel));
}
}
Here we are binding the data context of the xaml file. When we say ServiceLocator.Current.GetInstance, mef will return you an instance of the MainWindowModel now when mef try to resolve all dependency in the MainWindowModel class. Here when mef tries to resolve the dependence, it will fill the enumerator with exported values and the property will now contain 4 objects.
Now this is the content of xaml file within the window tag
<Window.Resources>
     <DataTemplate x:Key="DataEnumTemplate">
        <Button Height="37" Width="75" Command="{Binding Command}"
        CommandParameter="{Binding Path=Symbol}" Content="{Binding Path=Symbol}"></Button>
     </DataTemplate>
</Window.Resources>

<Controls:Grid>
     <Controls:TextBox Height="41" Margin="127,37,0,0" Width="212"
         HorizontalAlignment="Left" Name="textBox1"
         Text="{Binding Mode=TwoWay, Path=CalculatorText}"
         VerticalAlignment="Top" />
     <ListView Margin="59,84,106,12" Width="338"
         BorderThickness="0" HorizontalAlignment="Center"
         ItemsSource="{Binding Path=ButtonsViewModelColl}"
         ItemTemplate="{StaticResource DataEnumTemplate}">
     </ListView>
     <Button Height="37" Margin="416,98,0,0" Width="75"
       Command="{Binding ButtonClick}" CommandParameter="On/Off"
       Content="On/Off" HorizontalAlignment="Left" Name="button1" VerticalAlignment="Top" />
</Controls:Grid>
This will now bind to the miainwindowmodel.
Now run the application and you can see the application running.
Now try to unload one project say Addition module and clean the output folder and try to run the application and you can see the calculator does not have the addition button!


 General
  News
News  Suggestion
  Question
  Bug
Bug  Answer
  Joke
Joke  Praise
  Rant
Rant  Admin
Admin 


