Introduction
FREE for PERSONAL and COMMERCIAL use
The purpose of this article is to give a quick tutorial on how to use the SolidWidgets UI framework Layout manager.
SolidWidgets includes a very flexible and powerful layout manager that is native to their panel class. Components in a
window are always added to a panel instead of the window itself. Every native window (swFrame and swDialog) has a
root panel that is used to add components to the window. You can also add child panels to a panel as you will see in the sections below. One
of the most important aspects of this layout manager is that it works like a grid. You always dissect the panel into rows and columns.
Components or child panels are added to a panel, by specifying the starting row and column (location of the component within the grid), and
then you specify the number of rows and columns the component or child panel is to occupy within the panel.
Using the Code
Let's assume that we want to create a simple Login dialog that will capture a username and a password from the user, and the dialog will
have an OK and Cancel buttons. We want the username and password labels to appear to the left of the field, and we want to limit the space used
by the label to 180 pixels. We also want the username and password fields to occupy the remainder of the horizontal space on the dialog,
and we want the OK and cancel button to appear right user the password field, and be right-aligned to the username and password fields. This
layout can be easily achieved by creating the following layout:
void windowOpening()
{
setSize(400,160);
swPanel *rootPanel = getContentPane();
rootPanel->addRow(25); rootPanel->addRow(25); rootPanel->addRow(5); rootPanel->addRow(25); rootPanel->addColumn(180); rootPanel->addColumn(); rootPanel->addColumn(80); rootPanel->addColumn(80);
rootPanel->addChild(&userNameLabel,0,0,1,1); rootPanel->addChild(&userNameField,1,0,3,1); rootPanel->addChild(&passwordLabel,0,1,1,1);
rootPanel->addChild(&passwordField,1,1,3,1);
rootPanel->addChild(&okButton,2,3,1,1);
rootPanel->addChild(&cancelButton,3,3,1,1);
}
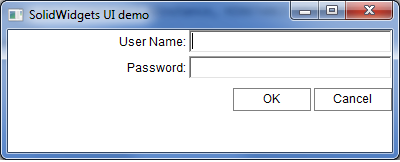
Here is the result:
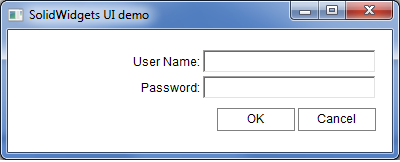
Adding extra formatting to make our dialog look better upon resizing.
We will add a margin of 10 pixels on all sides of the dialog. We will also add filler rows above and below the components, and filler columns to the left and right of the components. Here are the changes that we will make to our existing layout to add the changes above:
void windowOpening()
{
setSize(500,250);
swPanel *rootPanel = getContentPane();
rootPanel->setMargins(10,10,10,10);
rootPanel->addRow(); rootPanel->addRow(25); rootPanel->addRow(25); rootPanel->addRow(25); rootPanel->addRow(5); rootPanel->addRow(25); rootPanel->addRow();
rootPanel->addColumn(); rootPanel->addColumn(180); rootPanel->addColumn(); rootPanel->addColumn(80); rootPanel->addColumn(80); rootPanel->addColumn();
rootPanel->addChild(&userNameLabel,1,1,1,1); rootPanel->addChild(&userNameField,2,1,3,1); rootPanel->addChild(&passwordLabel,1,2,1,1);
rootPanel->addChild(&passwordField,2,2,3,1);
rootPanel->addChild(&okButton,3,5,1,1);
rootPanel->addChild(&cancelButton,4,5,1,1);
userNameLabel.setText(L"User Name:");
passwordLabel.setText(L"Password:");
passwordField.setPasswordStyle();
okButton.setText(L"OK");
okButton.setActionListener(this); cancelButton.setText(L"Cancel");
cancelButton.setActionListener(this);
}
Here is the enhanced version:
Here is the final code:
#include <swFrame.h>
#include <swLabel.h>
#include <swTextField.h>
#include <swButton.h>
class MainFrame: public swFrame
{
swLabel userNameLabel;
swLabel passwordLabel;
swTextField userNameField;
swTextField passwordField;
swButton okButton;
swButton cancelButton;
public:
MainFrame()
{
}
swString getApplicationTitle()
{
return L"SolidWidgets UI demo";
}
void windowOpening()
{
swPanel *rootPanel = getContentPane();
rootPanel->setMargins(10,10,10,10);
rootPanel->addRow(); rootPanel->addRow(25); rootPanel->addRow(25); rootPanel->addRow(25); rootPanel->addRow(5); rootPanel->addRow(25); rootPanel->addRow();
rootPanel->addColumn(); rootPanel->addColumn(180); rootPanel->addColumn(); rootPanel->addColumn(80); rootPanel->addColumn(80); rootPanel->addColumn();
rootPanel->addChild(&userNameLabel,1,1,1,1); rootPanel->addChild(&userNameField,2,1,3,1); rootPanel->addChild(&passwordLabel,1,2,1,1);
rootPanel->addChild(&passwordField,2,2,3,1);
rootPanel->addChild(&okButton,3,5,1,1);
rootPanel->addChild(&cancelButton,4,5,1,1);
userNameLabel.setText(L"User Name:");
passwordLabel.setText(L"Password:");
passwordField.setPasswordStyle();
okButton.setText(L"OK");
okButton.setActionListener(this); cancelButton.setText(L"Cancel");
cancelButton.setActionListener(this);
}
void windowOpened()
{
}
BOOL windowClosing()
{
if(showPromptMessage(L"Close Window?",L"Confirm Close",MB_YESNO) == IDYES)
return TRUE;
return FALSE;
}
void windowClosed()
{
}
void actionPerformed(long sourceId,long eventid, const swString& eventName)
{
if(sourceId == okButton.getID())
dispose(1);
else if(sourceId == cancelButton.getID())
dispose(0);
};
int APIENTRY wWinMain(HINSTANCE hInstance,
HINSTANCE hPrevInstance,LPWSTR lpCmdLine, int nCmdShow)
{
MainFrame f;
return f.show(hInstance,0,0,500,250,TRUE);
}
Points of Interest
You should always declare the components that you add to the panel in the header of the dialog or frame class. Since you are passing the
address of the variable to swPanel, you need to make sure that address stays valid for the life of the dialog or frame. If you
declare these component variables inside windowOpening, they will be destroyed as soon as the function terminates, and the addresses
to passed to swPanel will become invalid.
As easy and simplistic as this code looks, you will start realizing the power of this layout manager after you have developed a few screens.
I was a little skeptical before, but once I got used to developing using this framework, I don't think I could go back to developing with
MFC, Win32 APIs, or any other frameworks. You can find more help on http://www.solidwidgets.com.
The site includes a bunch of examples on how to use each component.
History
This is my first tutorial on SolidWidgets. I'm hoping to continue this series by adding few other tutorials to explain the other aspects of this framework.
This member has not yet provided a Biography. Assume it's interesting and varied, and probably something to do with programming.


 General
  News
News  Suggestion
  Question
  Bug
Bug  Answer
  Joke
Joke  Praise
  Rant
Rant  Admin
Admin 


