Introduction
With this software, you can capture the parts of screen and save them automatically or copy them to clipboard to use in another software. This is useful especially for me because I don't want to store every webpage as HTML and with lots of their images. Just one part of the whole page...
And we can make screenshots of our software too.
Background
In general, all of us are surfing online to know about the new technology or for some coding tricks or some projects. And sometimes, we feel that we want only some part of the screen as it is. We try to save the whole page, while we want only some part. Then we capture the whole screen and paste it to photo editing software, crop it and then save. It takes too much time. So then I think of searching for a software for this. I found one in Windows 7, but it also took much time, we have to open it, then capture and then save. So I made my own one, I just double click on tray icon, select the part I want and the software saves it automatically to the folder provided. And I can give a title, too.
Using the Code
It's very easy to use.
Just open the software and there will be a notify icon in tray. Just double click on it.

You are requested to select the area to capture... and it's done! The shot will be saved to the directory provided. The general directory for it is My Pictures.
Now let's talk about the code I have used.
First, let's see the code that I have used to capture the screen.
Sub CaptureScreen()
Dim hgt As Integer = My.Computer.Screen.WorkingArea.Height
Dim wdh As Integer = My.Computer.Screen.WorkingArea.Width
Dim scrn As New Bitmap(wdh, hgt, Imaging.PixelFormat.Format64bppArgb)
Dim gp As Graphics = Graphics.FromImage(scrn)
gp.CopyFromScreen(0, 0, 0, 0, New Size(wdh, hgt))
frmCapture.BackgroundImage = scrn
ScreenImg = scrn
frmCapture.lblFill.BackColor = Color.FromArgb(150, Color.Silver)
frmCapture.lblFill.Visible = False
frmCapture.Location = New Point(0, 0)
frmCapture.Size = New Size(wdh, hgt)
End Sub
When we double click the NotifyIcon, it calls the CaptureScreen function.
CaptureScreen function defines a graphics to do editing with the image and first, copies the image from screen using command gp.CopyFromScreen(0, 0, 0, 0, New Size(wdh,hgt).
Here, wdh and hgt are the width and height of the screen.
And then shows it as a background image in frmCapture. And finally, the frmCapture will be shown to us.
In which we have to select the area which we want to capture which uses the following command to en-light the selection area.
Private Sub frmCapture_MouseMove(ByVal sender As Object, ByVal e As _
                              System.Windows.Forms.MouseEventArgs) Handles Me.MouseMove
    Dim hgt As Integer = My.Computer.Screen.WorkingArea.Width
    Dim wdh As Integer = My.Computer.Screen.WorkingArea.Width
    If e.Button = Windows.Forms.MouseButtons.Left Then
        lblFill.Visible = True
        lblFill.Left = IIf(StPosX > e.X, e.X, StPosX)
        lblFill.Top = IIf(StPosY > e.Y, e.Y, StPosY)
        lblFill.Width = Math.Abs(StPosX - e.X)
        lblFill.Height = Math.Abs(StPosY - e.Y)
    End If
End Sub
For a selection area, I have used label which is transparent. When we drag a mouse, the label is shown to us for a reference to show a selection area.
And then, when we complete the selection, the following event is done:
Private Sub frmCapture_MouseUp(ByVal sender As Object, ByVal e As _
                  System.Windows.Forms.MouseEventArgs) Handles Me.MouseUp
    If StPosX <> e.X And StPosY <> e.Y Then
        EnPosX = e.X
        EnPosY = e.Y

        Dim CrpImg As Bitmap
        Dim gp As Graphics
        Me.Close()

        If My.Settings.Title = True Then
            CrpImg = New Bitmap(Math.Abs(StPosX - EnPosX), _
                  Math.Abs(StPosY - EnPosY) + 20, Imaging.PixelFormat.Format64bppArgb)
            gp = Graphics.FromImage(CrpImg)
            gp.DrawImage(ScreenImg, -IIf(StPosX > EnPosX, _
            EnPosX, StPosX), -IIf(StPosY > EnPosY, EnPosY, StPosY) + 20)
            Dim titl As String = InputBox("Enter Title to this Image...", _
                                 "Title", "My Image")
            gp.FillRectangle(Brushes.White, 0, 0, Math.Abs(StPosX - EnPosX), 20)
            gp.DrawString(titl, My.Settings.TitleFont, Brushes.Black, 10, 3)
        Else
            CrpImg = New Bitmap(Math.Abs(StPosX - EnPosX), Math.Abs(StPosY - EnPosY))
            gp = Graphics.FromImage(CrpImg)
            gp.DrawImage(ScreenImg, -IIf(StPosX > EnPosX, EnPosX, StPosX), _
                                    -IIf(StPosY > EnPosY, EnPosY, StPosY))
        End If

        Dim num As String = vbNull
        If My.Settings.SaveFile Then
            Dim FileList As Collections.ObjectModel.ReadOnlyCollection(Of String)
            FileList = My.Computer.FileSystem.GetFiles(My.Settings.FilePath & "\", _
        FileIO.SearchOption.SearchAllSubDirectories, My.Settings.FileName & "*.bmp")
            Dim MaxFile As Integer

            If FileList.Count <> 0 Then
                MaxFile = CInt(Microsoft.VisualBasic.Right( _
                   FileList.Item(FileList.Count - 1).ToString(), 7).Replace(".bmp", ""))
            Else
                MaxFile = 0
            End If
            num = MaxFile + 1
            For i As Integer = 1 To 3 - num.Length
                num = "0" & num
            Next
            CrpImg.Save(My.Settings.FilePath & "\" & My.Settings.FileName & " - " & _
                                         num & ".bmp", Imaging.ImageFormat.Bmp)
            frmDetails.NotifyIcon1.ShowBalloonTip(100, "Saved", _
            "Your Screen Capture has been saved.", ToolTipIcon.Info)
        Else
            Clipboard.SetImage(CrpImg)
            frmDetails.NotifyIcon1.ShowBalloonTip(100, "Saved", _
                     "Your Screen Capture has been copied to Clipboard.", ToolTipIcon.Info)
        End If
        Call frmDetails.ShowThumb(CrpImg, IIf(My.Settings.SaveFile, _
        My.Settings.FileName & " - " & num, "Clipboard"))
    End If
End Sub
Here, first, I have checked if the user selected area is greater than zero or not. Then new graphics is created which imports the image from frmCapture background image and directly saves or copies it to clipboard according to user's setting.
If the user setting is to give a title to image also, then it will ask to enter the title to the image.
The title is given to the image. See in the image given below "Code Project Home" is the title.
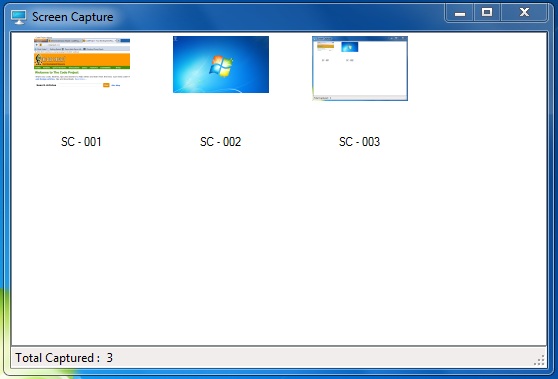
And then, the last thing is done. We have a facility to see the images we have captured and show the total images captured. For which we have used a command to create the thumbnail and show it in a listview.
Public Sub ShowThumb(ByVal Img As Image, ByVal FileName As String)
    Dim thumb As New Bitmap(thumbW, thumbW)
    Dim gp As Graphics = Graphics.FromImage(thumb)
    gp.DrawImage(Img, New Rectangle(0, 0, IIf(Img.Width > Img.Height, _
    thumbW, thumbW * Img.Width / Img.Height), IIf(Img.Width > Img.Height, _
    thumbW * Img.Height / Img.Width, thumbW)))
    ImageList1.Images.Add(thumb)
    ListView1.Items.Add(FileName, CInt(lblCount.Text))
    lblCount.Text = CInt(lblCount.Text) + 1
End Sub
And the thumb is shown with File Name.
As shown in the above image.
We can edit the filename to be given to the image and other settings from Options Dialogbox.
Change Default Title and its fonts, too.
Points of Interest
This code is specially useful for them who are mainly beginners and want to have some fun with images. They can understand how to create the bitmap using Bitmap function and save it in different formats like .bmp, .jpg, .png, etc. and create Thumbnail of images and to show it in a listview.
And anyone who is used to surfing the contents everyday and storing them as image with title will have a lot of fun...
History
- 4th August, 2012: Version 1.0.0.0 - First release
Hi! I am Tarun Mangukiya from Gujarat, India.
I like to make software and websites based on VB.NET, ASP.NET, php, Windows, Windows Phone, etc.
I believe in making user-friendly apps.
And I want to improve myself for the new upcoming world of Technology...
No need to be the best, just be good and everything around will be the best automatically.
My Apps :
Shabdkosh - The Gujarati Dictionary (http://www.windowsphone.com/en-in/store/app/shabdkosh-the-gujarati-dictionary/73c2fdd2-936c-4726-ae3b-e6e53ef182be)
Ahmedabad Tourism (http://apps.microsoft.com/windows/en-us/app/9c4f498f-c776-485e-8ee9-359d8cca65de)


 General
  News
News  Suggestion
  Question
  Bug
Bug  Answer
  Joke
Joke  Praise
  Rant
Rant  Admin
Admin 


