Screenshots
Default List view items
On ListView item selection

SampleActivity screen on item selection
Introduction
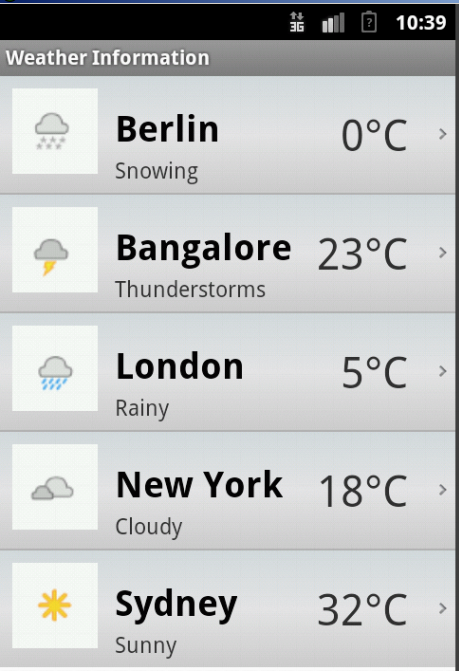
This article shall present a small tutorial to aid a curious wannabe Android developer to implement a customized Android ListView with image and some text, similar to the ones you see on a standard music player app or on a weather widget.
Background
The ListView control supplied by the Android SDK is by default simple, plain and definitely boring. For real-world commercial mobile applications, the first thing that strikes the user is the User Interface of the mobile application. The default look and feel of the Android ListView is not very appealing as it only renders a simple string in every ListView row using the internal TextView control. For most applications, you want to create an interface that is more graphically rich and visually pleasing to the user.
So what we are going to do is convert the plain and boring ListView something like this:
to a stunning customized list.
Now before we try to display something extraordinary flashy on the UI, we need a data source at the first place. For the sake of simplicity, let us take this simple XML data source which shall contain the weather information of few well known cities of the world.
The XML Data Source
="1.0"="utf-8"
<Weather>
<weatherdata>
<id>1</id>
<city>Berlin</city>
<tempc>0°C</tempc>
<tempf>32°F</tempf>
<condition>Snowing</condition>
<windspeed>5 kmph</windspeed>
<icon>snowing</icon>
</weatherdata>
<weatherdata>
<id>2</id>
<city>Bangalore</city>
<tempc>23°C</tempc>
<tempf>73.4°F</tempf>
<condition>Thunderstorms</condition>
<windspeed>10 kmph</windspeed>
<icon>thunder</icon>
</weatherdata>
<weatherdata>
<id>3</id>
<city>London</city>
<tempc>5°C</tempc>
<tempf>41°F</tempf>
<condition>Rainy</condition>
<windspeed>2 kmph</windspeed>
<icon>rainy</icon>
</weatherdata>
<weatherdata>
<id>4</id>
<city>New York</city>
<tempc>18°C</tempc>
<tempf>64.4°F</tempf>
<condition>Cloudy</condition>
<windspeed>7 kmph</windspeed>
<icon>cloudy</icon>
</weatherdata>
<weatherdata>
<id>5</id>
<city>Sydney</city>
<tempc>32°C</tempc>
<tempf>89.6°F</tempf>
<condition>Sunny</condition>
<windspeed>10 kmph</windspeed>
<icon>sunny</icon>
</weatherdata>
</Weather>
Let's assume we have created an empty Android project 'WeatherDisplay' with the default activity file as WeatherActivity.java.
To add an XML file into the Android project:
- Right click Project >New Android XML File.
- Name the file as weatherdata.xml.
- Place the XML file under the assets folder of the
WeatherDisplay android project.
Creating Customized List View Item Layout
Now that we have created an Android project and an empty UI, we are going to fill it with our customized list (each listview item having an image and a text) inside the layout. As explained earlier, we would want something like this:
Before we go ahead with creating the basic skeleton of the layout, let us also create a couple of files each defining a suitable gradient background (based on selection) to achieve that flashy highlighting effect.
Regular Gradient Background (Default State Styling)
Let us create a new XML file under res/drawable folder and name it as gradient_bg.xml.
="1.0"="utf-8"
<shape xmlns:android="http://schemas.android.com/apk/res/android"
android:shape="rectangle">
<gradient
android:startColor="#D5DDE0"
android:centerColor="#e7e7e8"
android:endColor="#CFCFCF"
android:angle="270" />
</shape>
Highlight Gradient background (On Hover State Styling)
To achieve this, let us create a new XML file under res/drawable folder and name it as gradient_bg_hover.xml.
="1.0"="utf-8"
<shape xmlns:android="http://schemas.android.com/apk/res/android"
android:shape="rectangle">
<gradient
android:startColor="#78DDFF"
android:centerColor="#16cedb"
android:endColor="#09adb9"
android:angle="270" />
</shape>
So now that we have defined different selection backgrounds, we shall use this style information and link this information on to the listview row item we have planned to create. So that a highlighting effect is achieved on the listview based on the user selection and de-selection.
Basically to have an effect similar to this:
To link the styling information defined in the gradient_bg.xml and gradient_bg_hover.xml files based on the user selection, let us create an XML file under drawable folder and name it as list_selector.xml. The configuration defined in this file shall serve as the background for the listview row item that we will define shortly.
="1.0"="utf-8"
<selector xmlns:android="http://schemas.android.com/apk/res/android">
<item
android:state_selected="false"
android:state_pressed="false"
android:drawable="@drawable/gradient_bg" />
<item android:state_pressed="true"
android:drawable="@drawable/gradient_bg_hover" />
<item android:state_selected="true"
android:state_pressed="false"
android:drawable="@drawable/gradient_bg_hover" />
</selector>
The list_selector.xml file shall define the styling information based on the present pressed state of the control (listview item) i.e. when the control is not pressed, it shall refer to the styling information defined in the gradient_bg.xml.
and
when the control is in pressed state, then it shall refer the styling information as defined in the gradient_bg_hover.xml. Now that we have defined the styling and background highlighting information in a file, we shall create the actual layout for our customized listview row item.
Creating the Custom List View Row Item
Let us custom design a listview which contains an image on the left side (weather icon), arrow at the right hand side and Information (City name and weather information) at the center. I have used RelativeLayout as parent node and placed all the remaining items using relative positioning properties.
- Right Click ? New ? Android XML File
- Name the file as list_row.xml and place it under res/layout location.
- Paste the following code inside the file:
="1.0"="utf-8"
<RelativeLayout xmlns:android="http://schemas.android.com/apk/res/android"
android:layout_width="fill_parent"
android:layout_height="wrap_content"
android:background="@drawable/list_selector"
android:orientation="horizontal"
android:padding="5dip" >
<LinearLayout
android:id="@+id/thumbnail"
android:layout_width="wrap_content"
android:layout_height="wrap_content"
android:layout_alignParentLeft="true"
android:layout_marginRight="5dip"
android:padding="3dip" >
<ImageView
android:id="@+id/list_image"
android:contentDescription="@string/app_name"
android:layout_width="60dip"
android:layout_height="60dip"
android:src="@drawable/sunny" />
</LinearLayout>
<ImageView
android:id="@+id/imageView1"
android:contentDescription="@string/app_name"
android:layout_width="wrap_content"
android:layout_height="wrap_content"
android:layout_alignParentRight="true"
android:layout_centerVertical="true"
android:src="@drawable/arrow" />
<TextView
android:id="@+id/tvCity"
android:layout_width="wrap_content"
android:layout_height="wrap_content"
android:layout_toRightOf="@+id/list_image"
android:layout_marginLeft="75dip"
android:layout_centerVertical="true"
android:paddingBottom ="10dip"
android:text="@string/strCity"
android:textColor="#040404"
android:textSize="25dip"
android:textStyle="bold"
android:typeface="sans" />
<TextView
android:id="@+id/tvCondition"
android:layout_width="wrap_content"
android:layout_height="wrap_content"
android:layout_below="@+id/tvCity"
android:layout_alignLeft="@+id/tvCity"
android:paddingTop="5dip"
android:layout_centerHorizontal="true"
android:text="@string/strWeather"
android:textColor="#343434"
android:textSize="15dip" />
</RelativeLayout>
As seen from the above file, we have defined the following UI controls in the layout file to achieve the desired customization.
ImageView (list_image) : holds the weather icon TextView (tvCity) : To display the name of the CityTextView (tvCondition) : To display the weather information (Cloudy, Rainy, etc.)ImageView (imageView1): To display the arrow icon on the right hand side.
This would yield as what we are trying to achieve, i.e., listview row item with images and some texts.
Now that we have the listview row item, it's time for us to show these items as a list, i.e., inside a ListView. To do this, we will define a ListView inside the res/layout folder (main screen) of our application.
Main Layout file (main.xml)
<LinearLayout xmlns:android="http://schemas.android.com/apk/res/android"
    xmlns:tools="http://schemas.android.com/tools"
    android:layout_width="match_parent"
    android:layout_height="match_parent"
    android:orientation="vertical">
    <ListView
      android:id="@+id/list"
      android:layout_width="fill_parent"
      android:layout_height="wrap_content"
      android:divider="#b5b5b5"
      android:dividerHeight="1dp"
      android:listSelector="@drawable/list_selector">
    </ListView>
</LinearLayout>
Note
In the above file, we define the appearance of each listview item by setting the property of the listSelector to refer to the styling information defined in the list_selector.xml.
Now that we have completed designing the custom ListView item, our next job is to parse the data source weatherdata.xml and update the data into listview. We shall make use of SAX Parsers to parse the weather data XML file. This is explained in the next section.
Using the Code
i. WeatherActivity class
This is the main activity that is invoked when the weather information application is started. The activity does mainly two things:
- Parsing of the XML data and filling in an appropriate list to be later bound to a
ListView:
DocumentBuilderFactory docBuilderFactory = DocumentBuilderFactory.newInstance();
DocumentBuilder docBuilder = docBuilderFactory.newDocumentBuilder();
Document doc = docBuilder.parse (getAssets().open("weatherdata.xml"));
List<HashMap<String,String>> weatherDataCollection =
new ArrayList<HashMap<String,String>>();
doc.getDocumentElement ().normalize ();
NodeList weatherList = doc.getElementsByTagName("weatherdata");
HashMap<String,String> map = null;
for (int i = 0; i < weatherList.getLength(); i++) {
map = new HashMap<String,String>();
Node firstWeatherNode = weatherList.item(i);
if(firstWeatherNode.getNodeType() == Node.ELEMENT_NODE){
Element firstWeatherElement = (Element)firstWeatherNode;
NodeList idList = firstWeatherElement.getElementsByTagName(KEY_ID);
Element firstIdElement = (Element)idList.item(0);
NodeList textIdList = firstIdElement.getChildNodes();
map.put(KEY_ID, ((Node)textIdList.item(0)).getNodeValue().trim());
NodeList cityList = firstWeatherElement.getElementsByTagName(KEY_CITY);
Element firstCityElement = (Element)cityList.item(0);
NodeList textCityList = firstCityElement.getChildNodes();
map.put(KEY_CITY, ((Node)textCityList.item(0)).getNodeValue().trim());
NodeList tempList = firstWeatherElement.getElementsByTagName(KEY_TEMP_C);
Element firstTempElement = (Element)tempList.item(0);
NodeList textTempList = firstTempElement.getChildNodes();
map.put(KEY_TEMP_C, ((Node)textTempList.item(0)).getNodeValue().trim());
NodeList condList = firstWeatherElement.getElementsByTagName(KEY_CONDN);
Element firstCondElement = (Element)condList.item(0);
NodeList textCondList = firstCondElement.getChildNodes();
map.put(KEY_CONDN, ((Node)textCondList.item(0)).getNodeValue().trim());
NodeList speedList = firstWeatherElement.getElementsByTagName(KEY_SPEED);
Element firstSpeedElement = (Element)speedList.item(0);
NodeList textSpeedList = firstSpeedElement.getChildNodes();
map.put(KEY_SPEED, ((Node)textSpeedList.item(0)).getNodeValue().trim());
NodeList iconList = firstWeatherElement.getElementsByTagName(KEY_ICON);
Element firstIconElement = (Element)iconList.item(0);
NodeList textIconList = firstIconElement.getChildNodes();
map.put(KEY_ICON, ((Node)textIconList.item(0)).getNodeValue().trim());
weatherDataCollection.add(map);
}
}
- Binds the data read by parser and updates the same to the corresponding UI elements (i.e.,
TextView and ImageView elements) with the help of BinderData class.
BinderData bindingData = new BinderData(this, weatherDataCollection);
- Sets this adapted list data as the data source to the
Listview.
list.setAdapter(bindingData);
- And lastly invokes a new sample activity upon selecting a particular item from the list by packaging the required parameters in an
Intent.
Intent i = new Intent();
i.setClass(WeatherActivity.this, SampleActivity.class);
i.putExtra("position", String.valueOf(position + 1));
i.putExtra("city", weatherDataCollection.get(position).get(KEY_CITY));
i.putExtra("weather", weatherDataCollection.get(position).get(KEY_CONDN));
i.putExtra("windspeed", weatherDataCollection.get(position).get(KEY_SPEED));
i.putExtra("temperature", weatherDataCollection.get(position).get(KEY_TEMP_C));
i.putExtra("icon", weatherDataCollection.get(position).get(KEY_ICON));
startActivity(i);
ii. SampleActivity class
This class gives the detailed overview of the Weather information for the selected city (as selected from the WeatherData activity). The parameters passed from the WeatherActivity class via an Intent is received and are set to the corresponding widgets (i.e., TextView and ImageButton).
Note: This activity shall be registered in the AndroidManifest.xml file.
Intent i = getIntent();
this.position = i.getStringExtra("position");
this.city = i.getStringExtra("city");
this.weather= i.getStringExtra("weather");
this.temperature = i.getStringExtra("temperature");
this.windSpeed = i.getStringExtra("windspeed");
this.iconfile = i.getStringExtra("icon");
iii. BinderData class
This class is responsible for binding the data content for each listview row item, i.e., it shall set the text and image for each control found in the list_row.xml. This class shall inculcate ViewHolder pattern to optimize ListViews.
View vi=convertView;
if(convertView==null){
vi = inflater.inflate(R.layout.list_row, null);
holder = new ViewHolder();
holder.tvCity = (TextView)vi.findViewById(R.id.tvCity);
holder.tvWeather = (TextView)vi.findViewById(R.id.tvCondition);
holder.tvTemperature = (TextView)vi.findViewById(R.id.tvTemp);
holder.tvWeatherImage =(ImageView)vi.findViewById(R.id.list_image);
vi.setTag(holder);
}
else{
holder = (ViewHolder)vi.getTag();
}
holder.tvCity.setText(weatherDataCollection.get(position).get(KEY_CITY));
holder.tvWeather.setText(weatherDataCollection.get(position).get(KEY_CONDN));
holder.tvTemperature.setText(weatherDataCollection.get(position).get(KEY_TEMP_C));
String uri = "drawable/"+ weatherDataCollection.get(position).get(KEY_ICON);
int imageResource = vi.getContext().getApplicationContext().getResources().getIdentifier(
uri, null, vi.getContext().getApplicationContext().getPackageName());
Drawable image = vi.getContext().getResources().getDrawable(imageResource);
holder.tvWeatherImage.setImageDrawable(image);
where the ViewHolder is a static class which shall serve as a placeholder for all the Android UI elements defined in the list_row.xml.
static class ViewHolder{
     TextView tvCity;
     TextView tvTemperature;
     TextView tvWeather;
     ImageView tvWeatherImage;
}
That's it!! We are good to go. Run the application on your Android emulator or best deploy it on your smartphone to see the desired listview customized according to your needs. You can play around by having different contents inside a list row item.
Points of Interest
History
Modified version:
ViewHolder pattern implemented for optimized listview- XML data parsing method modified
- Code snippet added for showing the weather details of the selected city
Software Developer, Cinephile, Dromomaniac, Animal lover, Self proclaimed Photographer not necessarily in the same order.


 General
  News
News  Suggestion
  Question
  Bug
Bug  Answer
  Joke
Joke  Praise
  Rant
Rant  Admin
Admin 


 . Jokes apart, Could you please tell me in detail why do you think the adapter is completely wrong.?