
Background
It's been a while since I have had a good reason to procrastinate so I can't be sure but I believe that HTML5 games are becoming more common on the internet and are replacing their flash counterparts. They are no longer just for developers or proofs of concept - they are fully fledged games. There are many examples of wonderfully visual puzzle games that dazzle as much as they entertain. I intend to show that it is equally easy to create a fast moving action based multiplayer game.
Being fascinated with flight since childhood, it has been on my to-do list for some time to create a game involving an aircraft. As my GL skills aren't up to scratch, I am stuck in a two dimension world. One thing that has always bothered me with 2D side scrolling games is the lack of physics. It is already a large leap to take away an entire dimension, but to set the game in a world without physics is really disappointing. The up arrow shouldn't make the plane move vertically up - it should pitch the aircraft. Before there were fast processors and hardware acceleration there was a good reason to ignore physics but those days have gone.
I decided my game should have the following features:
- Semi-realistic physics - it's 2D so it won't be too realistic
- Multiplayer - using web sockets
- Cross-platform - it's HTML5 based
- Smooth - the planes shouldn't jump and the rendering should be smooth
- Simple - I don't want too many bells and whistles, just the basics
I didn't add fun to the list as it is not guaranteed - there is no scoring or objectives but if you are like me, 'Semi-realistic physics' implies fun!
Code
The client has a single HTML page and 8 small javascript files. Each of the javascript files are responsible for a different part of the game
- utilities.js - adds a couple of functions to prototypes eg Array.indexOf
- polyfills.js - contains any functions required for cross browser compatibility
- user-controller.js - handles user input from the keyboard
- io.js - handles two way communication with a socket based server
- game-loop.js - instructs the model to step forward in time and render at appropriate intervals
- plane.js - handles physics of aircraft and tracks coordiantes, speed etc
- game.js - the main game model. It stores all planes, the game map and is responsible for rendering and stepping the simulation forward
- game-map.js - represents the map that the planes can move in
server.js is also included which is server side code that runs using Node.js. It simply passes on messages from one client to all other connected clients.
Game Loop
The classic way of performing a repeated task in javascript is to use 'setInterval' or 'setTimeout' which respectively call a function at a repeated interval or after a timeout. Modern browsers also come with a new method 'requestAnimationFrame'. There are many blog posts on the differences but for the sake of brevity I will highlight the important advantages of using requestAnimationFrame:
- You don't need to set an explicit interval, you are requesting a new frame at the next available time, not demanding one. The browser will aim to optimise the frequency that this is called to produce a nice smooth animation
- If you scroll away from the canvas or change tab there is no need to keep redrawing the game. Your browser will kindly stop firing your requestAnimationFrame callback (or at least throttle back the rate it is called) when your render area is invisible
- The browser will do what it can to optimise rendering, I'm not sure how much this helps but it can only be good
Does this mean it is time to retire the use of setInterval and do everything inside of requestAnimationFrame? Certainly not! This is a very bad idea and it is one that I have seen quite often. There is a small amount of calculation when working out how planes move at every timestep. If the game was being rendered at 60 fps the planes would update their positions 60 times a second; that is an excessive drain on the processor. I want to control how often the simulation should update. The simulation shouldn't stop or slow down when I am not viewing it, only rendering should stop. For these reasons, keep using setInterval or setTimeout for updating a game loop - only rendering code should go in requestAnimationFrame's callback. Note: you are still not guaranteed that setInterval will fire when you want, chrome for example throttles background tabs.
If the object's position is updated, for example, once a second, you might expect a very jumpy animation and therefore redundant requestAnimationFrame calls between updates. To ensure a smooth animation there is a very neat trick you can use in your render loop. Remember the previous position of your objects and interpolate. If your render loop is called 30% of the way between your game loop steps, draw your objects 30% of the way between their previous positions and their next positions. This ensures a smooth animation regardless of how infrequently an object's position updates. This increases the separation between the view and the model. You can see this feature in the gameLoop code. alpha is the fraction of how far through the current time step the game is when the rendering is being performed.
function gameLoop(game) {
var desiredDt = 50;
var previousGameTime = new Date();
setInterval(gameLoop, desiredDt);
requestAnimationFrame(renderLoop);
function renderLoop() {
alpha = (new Date() - previousGameTime) / desiredDt;
game.render(alpha);
requestAnimationFrame(renderLoop);
}
function gameLoop() {
var now = new Date();
game.step((now - previousGameTime) * 0.001);
previousGameTime = now;
}
} Physics
Physics in a game does not need to be difficult for it to look good. First, each plane object has all of the properties required to step it forward in time stored in a convenient object
this.planeDetails = {
    rotation : 0,
    x : 0,
    y : 0,
    vx : 0,
    vy : 0,
    thrust : false,
    rotateAntiClockwise : false,
    rotateClockwise : false
};
rotation is the angle the plane makes with the groundx and y are the x and y coordinates of the plane vx and vy are the horizontal and vertical components of velocitythrust is true if the plane is accelerating forward (user is holding the up key)rotateAntiClockwise and rotateClockwise are true if the user if holding down left or right to rotate the aircraft
The bottom three properties require input from the user and the rest are updated by the simulation. The first step to any physical simulation is to draw the tried and tested force diagram (or at least picture it in your head)
The forces in this picture are enough to get the aircraft moving and flying however one small addition still needs to be made. If the aircraft pitches up, as if it were starting a loop, the elevators should increase the lift and force the aircraft backwards.
Gravity and thrust can be set arbitrarily. The lift should be proportional to speed that the plane is moving 'forward' at. A stationary plane generates no lift and neither does a plane pointing vertically while moving horizontally. Drag/friction is also proportional to the speed of the plane, a stationary plane has no frictional forces.
The code to calculate the force on a plane is shown below. There are a lot of references to cosine and sine - if you want the horizontal component of something, multiply it by the cosine of its angle, and similarly multiply it be the sine of its angle for the vertical component. The code in the game will get no more complicated than this:
var friction = 0.2;
var thrust = this.planeDetails.thrust ? 300 : 0;
var gravity = 600;
var cos = Math.cos(this.planeDetails.rotation);
var sin = Math.sin(this.planeDetails.rotation);
var forwardSpeed = Math.abs(cos * this.planeDetails.vx + sin * this.planeDetails.vy);
var elevatorForce = Math.min(2000, 1.6*forwardSpeed);
var elevatorForceX = 0;
var elevatorForceY = 0;
var drotation = 0;
if (this.planeDetails.rotateAntiClockwise) {
drotation = 1.5
elevatorForceY = cos * elevatorForce;
elevatorForceX = -sin * elevatorForce;
} else if (this.planeDetails.rotateClockwise) {
drotation = -1.5
elevatorForceY = -cos * elevatorForce;
elevatorForceX = sin * elevatorForce;
}
if (elevatorForceY <= 0) {
elevatorForceY += 0.6*Math.abs(cos * forwardSpeed);
}
var forceX = cos * thrust + elevatorForceX - this.planeDetails.vx*friction;
var forceY = sin * thrust + elevatorForceY - this.planeDetails.vy*friction - gravity; I would be lying if I got the signs right for the elevator forces first time - trial and error worked like a charm. If the plane moves in the wrong direction just flip a sign.
Working out the forces is the only tricky part of a simple simulation like this. The thing that we are trying to update at each step is the position and velocity. There are many different 'integrators' that will take forces and update positions and velocities. For a game like this I use the semi-implicit Euler method for three reasons
- It's simple to implement
- It's fast
- It's stable and reasonably accurate
It is defined by two very simple rules
- The velocity at the next time step is the current velocity plus the current acceleration multiplied by the change in time.
- The position at the next time step is the current position plus the velocity that was just calculated multiplied by the change in time.
Acceleration is just force divided by mass - let's give the plane a mass of one for simplicity. Here is the code
this.planeDetails.rotation += drotation * dt;
this.planeDetails.vx += forceX * dt;
this.planeDetails.vy += forceY * dt;
this.planeDetails.x += this.planeDetails.vx * dt;
this.planeDetails.y += this.planeDetails.vy * dt;
The physics is done. Simple! The beautiful part of this is the emergent behaviour that manifests itself. Give the game a try. At no point is there a conditional block that says if the plane isn't moving fast enough, stall it and make it fall. There is no check to see that if the plane is on the ground and it moves at a certain speed, it should launch into the air. These emergent properties are the result of the simple rules defined above - elegant and simple. Obviously this game isn't completely realistic, the aircraft rotates at the touch of a button which airliners tend not to do. I was however pleasantly surprised myself about how real it felt.
Now the plane's position is known at every time. It just needs to be rendered.
Rendering
The HTML5 canvas is an obvious choice for drawing our game. I won't go into the details of using the HTML5 canvas as there are a lot of good tutorials already that can explain it much better than myself.
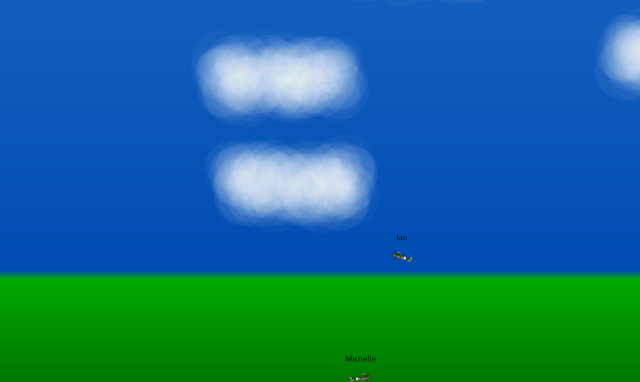
One of the features of the game is that there is a horizontally and vertically scrolling map that the plane is free to move in. One of the most powerful features of the canvas is the ability to draw one canvas onto another. This allows rendering a complex background to a separate 'map' canvas which can later be painted onto the main visible canvas with a single operation. The map is an arbitrarily chosen width and height of 5000x5000 (pixels and game units). The map is drawn by as a gradient from green -> light green -> dark blue -> light blue. 200 random points are chosen to draw clouds at. For each cloud point 400 small semi-transparent white circles are rendered around the chosen point to create a cloud affect. This is 80,000 circles which certainly shouldn't be drawn every frame.
(function drawMap() {
ctx.rect(0, 0, that.width, that.height);
var gradient = ctx.createLinearGradient(0, 0, 0, that.height);
gradient.addColorStop(0, '#8ED6FF');
gradient.addColorStop(0.95, '#004CB3');
gradient.addColorStop(0.95, '#00aa00');
gradient.addColorStop(1, '#007700');
ctx.fillStyle = gradient;
ctx.fill();
ctx.fillStyle = "#ffffff";
ctx.globalAlpha = 0.03;
for(var i=0;i<200;i++) {
var cloudYPosition = Math.random() * that.height - 500;
var cloudXPosition = Math.random() * that.width;
for(var j=0;j<400;j++) {
ctx.beginPath();
ctx.arc(cloudXPosition + 300*Math.random(), cloudYPosition + 100*Math.random(), Math.random() * 70, 0, 2 * Math.PI, false);
ctx.fill();
}
}
})(); The map canvas is very large and will not fit on the majority of monitors. At each render step, the correct portion of the map is drawn to the visible canvas. This allows devices of any size to play the game. The section that is drawn is a box with the plane at its centre. The code also ensures that the visible box is never rendering an area off of the map.
The code to render the correct section of the map is shown below. Note the use of the alpha parameter - this is the value that was described in the game loop section above which allows the previous and next position of the plane to be interpolated for a smooth animation.
this.render = function(alpha) {
var oneMinusAlpha = 1 - alpha;
var userX = alpha * userPlane.planeDetails.x + oneMinusAlpha * userPlane.previousDetails.x;
var userY = alpha * userPlane.planeDetails.y + oneMinusAlpha * userPlane.previousDetails.y;
var cameraX = userX - canvas.width*0.5;
var cameraY = map.height - userY - canvas.height*0.5;
cameraX = Math.max(100, cameraX);
cameraX = Math.min(cameraX, map.width - canvas.width - 100);
cameraY = Math.max(0, cameraY);
cameraY = Math.min(cameraY, map.height - canvas.height);
ctx.drawImage(map.canvas, cameraX, cameraY, canvas.width, canvas.height, 0, 0, canvas.width, canvas.height);The game is now side scrolling, the map does not need to fit inside the monitor. The last part of rendering, is drawing the planes. For ease, the coordinates of the canvas are translated to the camera coordinates.
ctx.save();
ctx.translate(-cameraX, -cameraY);
ctx.font = '20px Calibri';
ctx.textAlign = 'center';
for(var i=0;i<planes.length;i++) {
var plane = planes[i];
var x = plane.planeDetails.x * alpha + plane.previousDetails.x * oneMinusAlpha;
var y = plane.planeDetails.y * alpha + plane.previousDetails.y * oneMinusAlpha;
var rotation = plane.planeDetails.rotation * alpha + plane.previousDetails.rotation * oneMinusAlpha;
ctx.save();
ctx.translate(x, map.height - y);
ctx.fillText(plane.planeDetails.name, 0, -40);
ctx.rotate(-rotation);
ctx.drawImage(plane.canvas, - plane.halfWidth, - plane.halfHeight);
ctx.restore();
}
ctx.restore();
} The game is now drawn and perfectly playable. For very little extra effort, it is possible to make it multiplayer.
Multiplayer
The multiplayer functionality was implemented with web sockets. Web sockets allow modern browsers to have two-way communication with a server directly through sockets without the overhead of http headers. This isn't intended to be a tutorial in writing servers so for simplicity, the server merely accepts messages and passes them on to all the other connected clients. This has obvious security holes and it is very easy to cheat (or it would be if the game had an objective) but it's fine for demo. I was in a javascript mood at the time of writing so I used Node.js for the server, the code is completely uninteresting but can be found in server.js in the attached source. The communication process is:
- When the game first starts, a plane assigns itself a random id
- Every time step, the plane sends it's plane details along with its id to the server
- The server passes message to all clients
- If a client recognises an existing id, it updates the plane details otherwise it creates a new plane
function io(planeCallback) {
    var ready = false;
    window.WebSocket = window.WebSocket || window.MozWebSocket;

    var connection = new WebSocket('ws://192.168.0.6:1337');

    connection.onopen = function () {
        ready = true;
    };

    connection.onmessage = function (message) {
         try {
            planeCallback(JSON.parse(message.data));
        } catch (e) {
            console.log('Error processing message', message.data);
            return;
        }
    };

    connection.onerror = function (e) {
        console.log(e);
    };


    this.send = function(plane) {
        if (!ready) {
            return;
        }
        connection.send(JSON.stringify(plane.planeDetails));
    }
}
function planeDetailsRecieved(planeDetails) {
if (planeDetails.id === userPlane.planeDetails.id) {
return;
}
var existingPlane = null;
for(var i=0;i<planes.length;i++) {
if (planes[i].planeDetails.id === planeDetails.id) {
existingPlane = planes[i];
break;
}
}
if (existingPlane == null) {
existingPlane = new plane();
existingPlane.previousDetails = planeDetails;
planes.push(existingPlane);
}
existingPlane.planeDetails = planeDetails;
} Conclusion
Modern web technologies allow the creation of fully featured games with relative ease. The game presented here is not finialised but it shows that with minimal code and effort, a semi-realistic game can be created.
The full source code is attached should anyone wish to have a more in depth look at the code or indeed give the game a go. To run the game, simply open index.html. If you wish multiplayer to be enabled, run 'node server.js' before you open the game. Enjoy!
I'm a software developer from Scotland currently enjoying the wonders of modern web development.


 General
  News
News  Suggestion
  Question
  Bug
Bug  Answer
  Joke
Joke  Praise
  Rant
Rant  Admin
Admin 


