Introduction
This article explains creating a smart phone style password screen. The authentication is done based on user name and screen code drawn on the screen.
Background
The basic idea came from Android based smart phones which provide a screen lock/unlock feature based on a pattern drawn on the screen.
Using the code
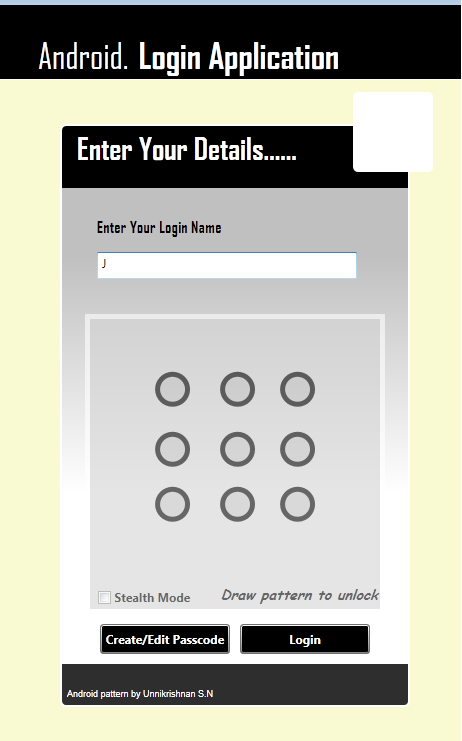
Login process
In the login screen, there will be two authentication processes. The user name will be authenticated and the pattern canvas will be displayed. Draw the pattern and on completion,
the user will be authenticated. The username authentication is done to retrieve the screen pattern information for the entered user.
Screen requirement
Display screen pattern canvas on username authentication. The pattern can be drawn in a visible / invisible mode by selecting the Stealth mode. On invalid entry, the screen code
will be displayed in red color for a second and will erase automatically. On success, the authenticated message will be displayed and screen code will be erased. Allow editing
of screen code after authentication success. The screen code can be saved and an internally drawn image will be sent to the user via mail and the drawn pattern will be available
in the image area for user reference.
How to achieve above requirements
Part 1:
- Create
a
LockView usercontrol. - Create
pattern
Canvas. - Create
3x3 matrix of ellipse with tag values set (1,2..9).
- Register
ellipse Mouse Down event.
- Register
ellipse Mouse Move event.
- Register
Canvas Mouse up event. - Create
stealth mode check box.
- Register
Save and Clear button events.
Part 2:
- Create
delegate for validation with screen data and validation flag as parameters.
- Create
delegate for save with screen data as parameter.
- Create
screen data with validation delegate object, save delegate object, screen code,
target screen code, drawn image source.
Part 3:
- Create lock base class with screen data and screen mode as dependency properties and methods to draw pattern, insert pattern data, validate pattern, save pattern,
capture screen pattern as image source.
- Encrypt the screen pattern using MD5Hash and set the screen code value.
How to draw a pattern

Create a polyline shape on ellipse mouse down and keep on adding points
as the mouse moves on valid ellipses. Add lines with arrow heads to show the
flow of the pattern. The arrow lines are created based on the current and previous
points from the polyline point collection. Apply theta for calculating the arrow
angle.
NewLine = new Polyline();
NewLine.Name = CodeLine;
NewLine.Stroke = color;
NewLine.StrokeThickness = 10.0;
protected static Shape DrawLinkArrow(Point p1, Point p2, string arrowName)
{
GeometryGroup lineGroup = new GeometryGroup();
double theta = Math.Atan2((p2.Y - p1.Y), (p2.X - p1.X)) * 180 / Math.PI;
PathGeometry pathGeometry = new PathGeometry();
PathFigure pathFigure = new PathFigure();
Point p = new Point(p1.X + ((p2.X - p1.X) / 1.35), p1.Y + ((p2.Y - p1.Y) / 1.35));
pathFigure.StartPoint = p;
Point lpoint = new Point(p.X + 6, p.Y + 15);
Point rpoint = new Point(p.X - 6, p.Y + 15);
LineSegment seg1 = new LineSegment();
seg1.Point = lpoint;
pathFigure.Segments.Add(seg1);
LineSegment seg2 = new LineSegment();
seg2.Point = rpoint;
pathFigure.Segments.Add(seg2);
LineSegment seg3 = new LineSegment();
seg3.Point = p;
pathFigure.Segments.Add(seg3);
pathGeometry.Figures.Add(pathFigure);
RotateTransform transform = new RotateTransform();
transform.Angle = theta + 90;
transform.CenterX = p.X;
transform.CenterY = p.Y;
pathGeometry.Transform = transform;
lineGroup.Children.Add(pathGeometry);
LineGeometry connectorGeometry = new LineGeometry();
connectorGeometry.StartPoint = p1;
connectorGeometry.EndPoint = p2;
lineGroup.Children.Add(connectorGeometry);
System.Windows.Shapes.Path path = new System.Windows.Shapes.Path();
path.Data = lineGroup;
path.StrokeThickness = 2;
path.Stroke = path.Fill = Brushes.Black;
path.Name = string.Format("ArrowLine{0}", arrowName);
return path;
}
Check for duplicate entries and insert each ellipse’s tag value in a stack. On mouse up, validate the pattern with the target screen code by encrypting
it into an MD5hash string. Invoke the onvalidate delegate with validation flag and screen data as parameters. Start a timer with an elapse time of 1 second to
clear all code and patterns on the screen. If the screen pattern is invalid, redraw the pattern with a red color and start the timer again to clear the screen.
Create a 3x3 matrix of ellipses with Tag values starting from (1,2,3...9) in a canvas
XAML code
<Canvas x:Name="LockCanvas" MouseUp="Canvas_MouseUp" Margin="110,20,80,10"
                    HorizontalAlignment="Center"  Height="180" Width="200"
                    Grid.Row="0" Grid.Column="0" Grid.ColumnSpan="2">
    <Ellipse   x:Name="Code1" Tag="1" Margin="5" Canvas.Left="0"
      Canvas.Top="0" Fill="Silver" Height="35"
      Width="35"
      StrokeThickness="5"
      Stroke="Black"  MouseMove="Canvas_MouseMove"
      MouseDown="Canvas_MouseDown"/>
        :
    :
</Canvas>
C# code:
CodeSequence = new Stack<int>();
ClearAll();
CreatePolyLine(Brushes.Green);
FillCodeSequence(sender as Ellipse);
if (!chkStealthMode.IsChecked.Value)
{
FillCodeColor(sender as Ellipse, Brushes.Green);
LockCanvas.Children.Add(NewLine);
}
private void Canvas_MouseMove(object sender, MouseEventArgs e)
{
if (e.LeftButton == MouseButtonState.Pressed)
{
Point currentPoint = e.GetPosition(LockCanvas);
var ellipse = sender as Ellipse;
bool firstEntry = IsItFirstEntry(ellipse);
Point point = GetPointFromCodeEllipse(ellipse);
if (!CheckSequenceExists(ellipse))
{
Shape arrow = null;
if (NewLine.Points.Count - 1 > 0)
{
arrow = DrawLinkArrow(NewLine.Points[NewLine.Points.Count - 1], point,
Convert.ToString(ellipse.Tag));
}
NewLine.Points.Add(point);
if (!chkStealthMode.IsChecked.Value)
{
FillCodeColor(sender as Ellipse, Brushes.Green);
if (arrow != null)
{
LockCanvas.Children.Add(arrow);
}
}
FillCodeSequence(ellipse);
}
if (firstEntry)
{
NewLine.Points.Add(point);
}
}
}
Create/Edit Screen pattern
On Save, the pattern is saved as an MD5Hash encrypted code which will be
saved in the database. After the pattern is
saved, the captured screen pattern will be emailed to the user for reference.
C#
private static BitmapSource CaptureScreen(Visual target, double dpiX, double dpiY)
{
if (target == null)
{
return null;
}
Rect bounds = VisualTreeHelper.GetDescendantBounds(target);
RenderTargetBitmap rtb = new RenderTargetBitmap((int)(bounds.Width * dpiX / 96.0),
(int)(bounds.Height * dpiY / 96.0),
dpiX,
dpiY,
PixelFormats.Pbgra32);
DrawingVisual dv = new DrawingVisual();
using (DrawingContext ctx = dv.RenderOpen())
{
VisualBrush vb = new VisualBrush(target);
ctx.DrawRectangle(vb, null, new Rect(new Point(), bounds.Size));
}
rtb.Render(dv);
return rtb;
}
protected virtual void SavePassCode()
{
if (ScreenLockData != null && ScreenLockData.OnSave != null)
{
var encryptedCode = Encryptor.MD5Hash(CodeSequence.ToStackString());
ScreenLockData.ScreenCode = encryptedCode;
ScreenLockData.TargetScreenCode = encryptedCode;
ScreenLockData.SreenCodeImage = CaptureScreen(LockCanvas, 100, 100);
ScreenLockData.OnSave(ScreenLockData);
timer.Start();
}
}
Login window
As we have the lock screen user control ready for use, let’s use it in a login page.
Bind ScreenLockdata with a viewmodel of type IScreenLockViewModel. Register the viewmodel delegates with the handler methods.
XAML:
<lock:LockView ScreenLockMode="{Binding ScreenLockMode,Mode=TwoWay,
    UpdateSourceTrigger=PropertyChanged}"
    HorizontalAlignment="Stretch"
    Visibility="{Binding ScreenVisibility,Mode=TwoWay,UpdateSourceTrigger=PropertyChanged}"
    ScreenLockData="{Binding ScreenLockViewModel, Mode=TwoWay,UpdateSourceTrigger=PropertyChanged}">
</lock:LockView>
public IScreenLockViewModel ScreenLockViewModel
{
get { return screenViewModel; }
set
{
screenViewModel = value;
RaisePropertyChanged("ScreenLockViewModel ");
}
}
ScreenLockViewModel = new ScreenLockViewModel();
ScreenLockViewModel.OnScreenCodeValidated = OnScreenCodeValidation;
ScreenLockViewModel.OnSave = OnSave;
ScreenLockViewModel.TargetScreenCode = GetUserCode(user);
ScreenLockMode = Extensions.ScreenLockMode.Login;
this.DataContext = this;
private void OnScreenCodeValidation(IScreenLockViewModel obj, bool isValidated)
{
if (isValidated)
MessageBox.Show(string.Format("Authenticated Password : {0}", obj.ScreenCode));
}
private void OnSave(IScreenLockViewModel obj)
{
MessageBox.Show("Saved Successfully!");
ScreenLockViewModel.TargetScreenCode = obj.ScreenCode;
ScreenLockMode = Extensions.ScreenLockMode.Login;
SavedImage = obj.SreenCodeImage;
}
Points of Interest
- Dependency property for binding the screen data.
- Drawing shapes such as polyline and line segment.
- Using geometry group for lines with arrow heads.
- Delegates.
- Encryption using MD5Hash.
- Pattern control can be used for locking the screen or for an initial authentication process.
This member has not yet provided a Biography. Assume it's interesting and varied, and probably something to do with programming.


 General
  News
News  Suggestion
  Question
  Bug
Bug  Answer
  Joke
Joke  Praise
  Rant
Rant  Admin
Admin 


 However you could probably make the background more android-like...