Introduction
You can download the Visual Studio solutions for this article at this location. With all the Nuget binaries, it's about 57 MB (too big to be hosted here at CodeProject.com).
The out-of-the-box authentication and authorization mechanisms for ASP.NET are old and haggard. I never really cared for the membership provider. Fortunately, Microsoft has developed an alternative for authentication and authorization, with claims-based security, which is now part of the System.IdentityModel namespace. And there are a few very smart people out there who have developed some open source projects which makes it easy to use claims-aware authentication and authorization.
In this article, I plan to walk you through a simple, bare-bones security implementation for an ASP.NET MVC 4 application. This implementation will use:
- MembershipReboot library for authentication; and
- Thinktecture.IdentityModel.45 for authorization
I intend to implement this sample application in stages, with a view to including each stage (or snapshot) of the code in the download code accompanying this article. The idea is that the reader follows the code in this article with the download code and watches it evolve. Each step of the way to demonstrate how the authentication/authorization works. My focus will be on the security configuration and code. Rather than trying to figure it all out from the finished product, you will be able to get your bearings with one of the snapshots.
Note that I will be paying no mind to look and feel. I will keep it low-fidelity, so as not to distract from the focus of the article.
Update: Since writing this article, I have become aware of a new membership system from Microsoft for ASP.NET called ASP.NET Identity. It appears that this system does not sit on top of the old Membership API. In addition, it is claims-aware. That being the case, it may be worth looking at as the authentication system for your ASP.NET applications.
Authentication – Preliminary
In the sample application, I will be using Forms authentication. Note that this does not mean I have to use the Membership provider. The membership API is available, but certainly not mandatory. It is merely an abstraction of a data store. I have chosen to use Brock Allen’s library, MembershipReboot which, despite its name, has nothing to do with the Membership provider. In fact, it is not a provider at all. It is a library which performs a large number of authentication-related functions, including:
- creating a new user, including encryption/hashing of the password
- verifying the identity of a user
- enabling the unlocking of a user
- resetting the password of the user
Getting Started with MembershipReboot
To get started, create a new project in Visual Studio 2012, using the project template for an ASP.NET MVC 4 Web Application. Choose the basic template. As MembershipReboot has a Nuget package, use Nuget to bring down the MembershipReboot DLL and have it referenced in your project. The next thing you need is the data store. I went for a SQL Server 2008 R2 (v.661) database. You can call this database anything you like and the great thing about it is, the tables we are about to create will just be normal tables which are part of your larger database (e.g. a database which persists data for a bespoke application).
On to those tables. The easiest way to create them is to run the SQL scripts which can be downloaded with the source code of the MembershipReboot project. You can download the source from here and you will find four SQL scripts in the folder Migrations.SqlServer\Sql. For your convenience, I have included those scripts in the download code for this article. You should run those scripts in the following order:
- 201301101956394_InitialMigration.sql
- 201302251410424_ExpandKeyAndAddAccountCloseFields.sql
- 201304152032598_NameId.sql
- 201304160322055_VerificationPurpose.sql
Now we have a database (I called mine MembershipReboot, but that was for a lack of imagination) with two tables:
UserAccountsUserClaims
This is our data store for all things authentication. That is, creating users, deleting users, resetting passwords, locking out users, unlocking users, logging in users, logging out users, etc.
Let's Quickly Skip Ahead and Create a User
At this point, we need to add a user to the database. We cannot just add one using simple SQL statements in the back-end. The users' password needs to be hashed properly. That being the case, we need to create a user using some kind of front-end, which will perform the proper hashing. The application in the download code includes a page to do just that.
So, we’ll take a quick detour. To add a user:
- In the download code, open the Visual Studio solution in the directory called ClaimsAspMvc;
- Run the solution, click the only hyperlink on the page to navigate to the Create a New User page;
- Complete the form to add a user.
- Check that the new user is in the database using SQL Server Management Studio.
With our new user added, we can now proceed. But first, close that solution, as that is the end-game.
Configuring Web.config for MembershipReboot
So far, we have created a SQL Server database (I am using SQL Server 2008 R2) and created an ASP.NET MVC 4 project with the MembershipReboot library added to the solution via Nuget. Now we need to configure the application to use Forms Authentication for authentication and we need to configure MembershipReboot.
1. Remove the Following Elements from the Web.config File
<profile defaultProvider="DefaultProfileProvider">
  <providers>
    <add name="DefaultProfileProvider"
      type="System.Web.Providers.DefaultProfileProvider, System.Web.Providers,
            Version=1.0.0.0, Culture=neutral, PublicKeyToken=31bf3856ad364e35"
      connectionStringName="DefaultConnection" applicationName="/" />
  </providers>
</profile>
<membership defaultProvider="DefaultMembershipProvider">
  <providers>
    <add name="DefaultMembershipProvider"
      type="System.Web.Providers.DefaultMembershipProvider, System.Web.Providers,
            Version=1.0.0.0, Culture=neutral, PublicKeyToken=31bf3856ad364e35"
      connectionStringName="DefaultConnection" enablePasswordRetrieval="false"
      enablePasswordReset="true" requiresQuestionAndAnswer="false"
      requiresUniqueEmail="false" maxInvalidPasswordAttempts="5"
      minRequiredPasswordLength="6" minRequiredNonalphanumericCharacters="0"
      passwordAttemptWindow="10" applicationName="/" />
  </providers>
</membership>
<roleManager defaultProvider="DefaultRoleProvider">
  <providers>
    <add name="DefaultRoleProvider"
      type="System.Web.Providers.DefaultRoleProvider, System.Web.Providers,
            Version=1.0.0.0, Culture=neutral, PublicKeyToken=31bf3856ad364e35"
      connectionStringName="DefaultConnection" applicationName="/" />
  </providers>
</roleManager>
As I won’t be using any providers in my sample application at all, I don’t want them cluttering up my config file.
2. Add the Following Sections to the Web.config File inside the Configsections Element
(Note, if any of them are already there, you do not need to add them twice.)
<section name="system.identityModel"
  type="System.IdentityModel.Configuration.SystemIdentityModelSection, System.IdentityModel,
        Version=4.0.0.0, Culture=neutral, PublicKeyToken=B77A5C561934E089" />
<section name="system.identityModel.services"
   type="System.IdentityModel.Services.Configuration.SystemIdentityModelServicesSection,
        System.IdentityModel.Services, Version=4.0.0.0, Culture=neutral, PublicKeyToken=B77A5C561934E089" />
<section name="membershipReboot"
   type="BrockAllen.MembershipReboot.SecuritySettings, BrockAllen.MembershipReboot"/>
<section name="entityFramework"
   type="System.Data.Entity.Internal.ConfigFile.EntityFrameworkSection, EntityFramework,
         Version=5.0.0.0, Culture=neutral, PublicKeyToken=b77a5c561934e089"
   requirePermission="false" />
By adding those sections, we are making configuration elements available for use in this Web.config file. Note the section with the name attribute membershipReboot. That config section comes from the MembershipReboot project (which is evident from the type attribute on that element).
3. Add the ConnectionString for the Database
This is to connect to the database which you created above, to store the authentication information.
<connectionStrings>
    <add name="MembershipReboot"
      connectionString="server=localhost;database=MembershipReboot;trusted_connection=yes;"
      providerName="System.Data.SqlClient" />
</connectionStrings>
4. Make Sure that the Following Section is in the Web.config File as a Child of the <system.web> Element
<authentication mode="Forms">
      <forms loginUrl="~/Admin/Login" timeout="2880" />
</authentication>
That element configures the application to use Forms Authentication and it causes a redirect to the route /Admin/Login in cases where the user is not yet authenticated. Note that I have added a controller called Admin with a view called Index. I deliberately chose the basic template when I created this solution because I did not want any authentication code to be freshly baked already, when I created the solution.
This is the state of the code at the end of Stage 1 in the download code. If you now make sure the ConnectionString is pointing to your instance of the database, and run up the application (using the Stage 1 code), you will find a page requesting you to enter a message. Enter a message in the text box and click the button. You should be immediately redirected to the Login page. We now have the absolute beginnings of the authentication code for our application.
Quickly take a look at the Login Action method of the AdminController. I pretty much copied that verbatim from the example application which comes with the MembershipReboot source code. Note that I have not used an IOC container to take care of dependency injection for the UserAuthenticationService or the ClaimsBasedAuthenticationService, as I did not want to distract from the key purpose of this article. In the real world, those services would be injected using an IOC container. I will clean this up and add proper dependency injection in the final version of the sample app.
Now we have to do some configuration of MembershipReboot and set up the Session Authentication Module (SAM) so that authentication information can persist across requests.
Finishing off the Authentication Part
We now need to add the MembershipReboot section. Note, this is not a provider and is not to be mistaken for one of the traditional ASP.NET providers. This is a custom config section which is part of the MembershipReboot library. This needs to be added as a child element to the configuration element:
<membershipReboot
    connectionStringName="MembershipReboot"
    requireAccountVerification="true"
    emailIsUsername="false"
    multiTenant="false"
    passwordHashingIterationCount="0"
    accountLockoutDuration="00:01:00"
    passwordResetFrequency="0"
/>
It is a means by which we can configure the behaviour of MembershipReboot. Other options include:
allowAccountDeletionemailIsUsernamerequireAccountVerificationallowLoginAfterAccountCreation
Obviously, the connectionStringName needs to be set so that the MembershipReboot library can access the database tables which we created earlier. That library uses EntityFramework 5 as its ORM. However, being open source, you are free to completely rewrite the data access code of the MembershipReboot library.
The next thing that we need to add to the Web.config is the SAM element, under the system.WebServer element:
<modules>
      <add name="SessionAuthenticationModule"
        type="System.IdentityModel.Services.SessionAuthenticationModule,
              System.IdentityModel.Services, Version=4.0.0.0, Culture=neutral,
              PublicKeyToken=b77a5c561934e089" />
</modules>
The SessionAuthenticationModule enables us to persist the authentication credentials across http requests. (As this is overriding an IIS setting, you will need to use IIS Express at the very least with your project. Cassini won’t cut it. The sample code uses IIS Express.)
The last thing I need to add to Web.config is the following section:
<system.identityModel.services>
    <federationConfiguration>
      <cookieHandler requireSsl="false" />
    </federationConfiguration>
</system.identityModel.services>
Ideally, if this was a public-facing application, we would be using a certificate for encryption of the cookie which we are using for authentication (as Google does for its search page – it encrypts searches). However, I won’t go to the trouble of a self-signed certificate here and will settle for no ssl and an unprotected cookie (for the purposes of this sample application).
I will now demonstrate the way SAM persists those credentials with the assistance of some screenshots of Fiddler:
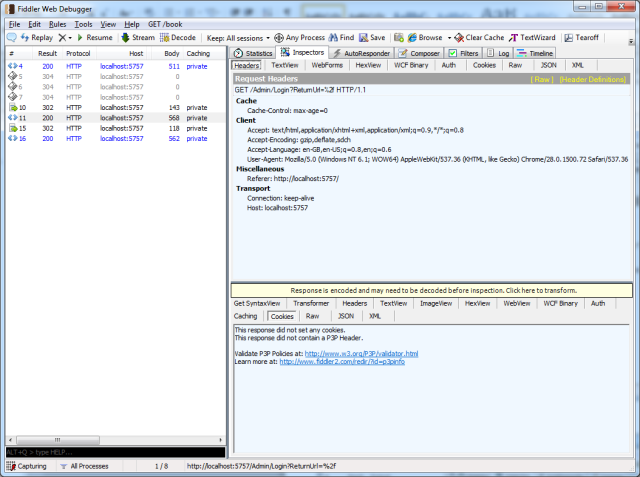
Figure 1 – shows the request after I had entered some text and clicked the Submit Message button. As I am not yet authenticated, I am redirected to the Login page (as normal with Forms authentication). You can see the 302 redirect at request 10 in the trace window on the left.

Figure 2 – I have selected the request numbered 15 in the trace window. You can see in the Response window the values of the cookies which have been issued by SAM when I successfully authenticated using the valid password with my username and clicking the Log In button.
Figure 3 - after having logged in, in subsequent requests you can see the cookies being sent with them. Those cookies also contain all the claims of the logged-in user. More on that later.
If you now open Stage 2 of the download code, we have implemented basic authentication using the MembershipReboot library. The usage is as follows:
- When you first load the application, you will be accessing it as an anonymous user. Then, enter a message in the text box and click the submit button.
- This will redirect you to the Login page at which you enter your login details. Enter the username and password for your user and you will be taken back to the original screen.
- You can click the Logout link to log out. Then log back in again, just to confirm all is working as it should be.
Note: There are some great extensions out there for the browsers which clear cookies. I use Click&Clean for Chrome. You'll find these handy when working through this article, at those times where you need to clear the browser's cookies when playing around with the code.
Authorization - Preliminary
Now we move on to authorization. That is, security measures which dictate whether an operation can be performed given the required combination of Claims held by the principal, the Action being executed and the Resource involved. The idea being, to evaluate whether a Principle with certain claims is permitted to perform an action on a particular resource/s. To couch that like an equation:
Evaluate if a principal with claims x is permitted to do action y on resource z
(taken from one of Dominick Baier’s comments on this blog post).
Getting Started with Thinktecture.IdentityModel
Thinktecture.IdentityModel is an excellent library which provides an abundance of helper methods which make authorization in a claims-aware environment quite straightforward (although, it did take a while for me to put all of the pieces together).
First, we need to bring down Thinktecture.IdentityModel using Nuget. You will have noticed that to get the redirect from the HomeController to the AdminController in the previous stages, I decorated the 2nd Index method of the HomeController with an Authorize attribute. That attribute only supports the old way of doing things. If you want to incorporate claims-aware authorization, you need to inherit from that class. And that is exactly what the ClaimsAuthorize attribute in Thinktecture.IdentityModel does.
In Stage 3 code, you will see I have decorated that action method as follows:
[ClaimsAuthorize("Write", "ImportantMessage")]
[HttpPost]
public ActionResult Index(string message)
{
    return View();
}
The next bit is really important and it demonstrates how you can externalise your authorization logic. We need to write a class which inherits from ClaimsAuthorizationManager (which lives in the System.Security.Claims namespace). There is a method called CheckAccess which we need to override. In this method, as far as authorization goes, the world is your oyster. That’s the beauty of this approach to authorization. You’re freed up to perform any kind of checks you want. You can hit a data store for data that determines the permission rights for a scenario.
The class which I have created to do this authorization is as follows:
public class AreWeAllowedToDoItManager : ClaimsAuthorizationManager
{
  public override bool CheckAccess(AuthorizationContext context)
  {
    var resource = context.Resource.First().Value;
    var claims = context.Principal.Claims.ToList();

    switch (resource)
    {
      case "ImportantMessage":
      {
        if (PrincipalCanPerformActionOnResource(context))
          return true;
        break;
      }
      default:
      {
        throw new NotSupportedException(string.Format("{0} is not a valid resource", resource));
      }
    }

    return false;
  }

  private bool PrincipalCanPerformActionOnResource(AuthorizationContext context)
  {
    var action = context.Action.First().Value;

    switch (action)
    {
      case "Write":
      {
        if (context.Principal.HasClaim("http://dave.com/ws/identity/claims/messenger",
                                       "ImportantMessenger"))
        {
          return true;
        }
        break;
      }
      default:
      {
        throw new NotSupportedException(string.Format("{0} is not a valid action", action));
      }
    }

    return false;
  }
}
And I wired it up in the Web.config file as follows (as a child element to the Configuration element):
<system.identityModel>
  <identityConfiguration>
    <claimsAuthorizationManager type="ClaimsAspMvc.AreWeAllowedToDoItManager, ClaimsAspMvc" />
  </identityConfiguration>
</system.identityModel>
In the project (the Stage 3 project), you will see that I have created a Messenger constant in a class called CustomClaimTypes which has the following value: "http://dave.com/ws/identity/claims/messenger". As I am making up the Claim, I can make up the URI! That's all the ClaimTypes constants resolve to - URI strings. The URIs which Microsoft has created for ClaimTypes can be viewed here.
Now, you can just add that claim to the UserClaims table in the database. Using the db backend, just add the user's Id in the UserAccountID column, the URI from that constant in the Type column and the value "ImportantMessenger" in the Value column.
| UserAccountID | Type | Value |
| 3 | http://dave.com/ws/identity/claims/messenger | ImportantMessenger |
We know from the CheckAccess method of the AreWeAllowedToDoItManager that the fact being verified is:
Evaluate if the current user with a Messenger claim of ImportantMessenger
         is permitted to do a Write action on the ImportantMessage resource
So, open Stage 3 of the download code, making sure the user you are using is logged out (either log them out or clear the browser's cookies). Then, follow these steps:
- Enter a message and click the Submit Message button and behold as it transfers you the Login page. As the anonymous user does not have the Claim
CustomClaimTypes.Messenger, it cannot access the Index action (the HttpPost version) on the HomeController. - Log in. You will then be re-directed back to the
Index page with a 302 request. - Type a message in the input box and click the Submit Message button. You should see the message appear below the input box.
Success! The authenticated user has passed the authorization check with flying colors.
Another way you can test this out is by attempting to "submit a message" with a logged-in user who does not have the CustomClaimTypes.Messenger claim. Proceed with that and verify that the user keeps getting re-directed back to the Login page for a failure to pass the ClaimsAuthorize check.
At some point, I'll add a page to the project where you can add claims for a user in the front-end. I have only scratched the surface with this library and will be very interested to explore its plethora of features.
A Few Final Comments/Observations
Roles-Based Checks – If you Really Must
If, for one reason or another, you need to use Roles-based authorization, the new System.IdentityModel API supports the traditional way of doing that with an object implementing the IPrincipal interface. To demonstrate, you could add the following code into the Index.cshtml:
if(User.Identity.IsAuthenticated)
{
  <text>Hello </text>@User.Identity.Name<text>,
    you are logged in!</text> @Html.ActionLink("Logout", "LogOut", "Home")

  System.Security.Claims.ClaimsPrincipal cp = new ClaimsPrincipal(User.Identity);

  if (cp.IsInRole("Maintainer"))
  {
    <div>If you can see this, you are logged in and in the Maintainer role.</div>
  }
}
The roles API will apply for any claim with the URI in that table (which is what the ClaimTypes.Role constant resolves to) and which has a value "Maintainers".
Then, you could add a user to that role by adding a row to the UserClaims table as follows:
The important take-away here is that the Roles API still works with the new ClaimsPrincipal class and such methods as IsInRole can still be used.
AntiForgeryTokens and the CreateUser Screen
If you add an AntiForgeryToken to your CreateUser screen (as you should), you'll find that the following InvalidOperationException will be thrown:
A claim of type 'http://schemas.xmlsoap.org/ws/2005/05/identity/claims/nameidentifier' or
'http://schemas.microsoft.com/accesscontrolservice/2010/07/claims/identityprovider' was not present
on the provided ClaimsIdentity. To enable anti-forgery token support with claims-based authentication,
please verify that the configured claims provider is providing both of these claims
on the ClaimsIdentity instances it generates. If the configured claims provider instead
uses a different claim type as a unique identifier, it can be configured by setting
the static property AntiForgeryConfig.UniqueClaimTypeIdentifier.
There are two ways to proceed with the successful validation of the AntiForgeryTokens and having no AntiForgeryTokens-related InvalidOperationException being thrown. And those two ways are explained really clearly in the error message itself:
- The 1st thing you could do would be to add either of the following claims to the principal's Claims collection:
- http://schemas.xmlsoap.org/ws/2005/05/identity/claims/nameidentifier
- http://schemas.microsoft.com/accesscontrolservice/2010/07/claims/identityprovider
This is the harder road to go down and there would have to be a pretty compelling reason NOT to go with the 2nd approach below. - The 2nd thing you can do is to add the following line of code to the
Application_Start method of the MvcApplication class (in Global.asax.cs):
AntiForgeryConfig.UniqueClaimTypeIdentifier = ClaimTypes.Name;
(As that is the ClaimType we are using here as the unique identifier of the User. If you were using the email address, you would assign ClaimTypes.Email).
Cookie Size - Does it Need Every Claim?
Looking back at Figure 2, we can see that the payload is pretty big, as it is carrying all of the Claims information for the authenticated user. Before Claims, the cookie only contained a name and password. If you do not need all of the claims information in the cookie, there is a way of turning that feature off (so to speak).
In the MvcApplication class, you need to override the Init() method and add the following code:
public override void Init()
{
    var sam = FederatedAuthentication.SessionAuthenticationModule;
    sam.IsReferenceMode = true;
}
This enables server-side caching of session tokens and is explained by Brock Allen in this blog post. That resulted in a reduction in cookie-size to 558 bytes (down from 2026 bytes).
Configuring SMTP for Emails
Part and parcel of authentication/authorization schemes is the ability to reset passwords, confirm the creation of new users and other such tasks. In the final code, I have used the NotificationService class that is part of the MembershipReboot library. That allowed me to simply configure the SMTP server in the Web.config as follows:
<system.net>
    <mailsettings>
      <smtp from="somesecureguy@gmail.com">
        <network host="smtp.gmail.com" username="somesecureguy@gmail.com"
                password="1C8(3*8b%$Et7y" port="587" enablessl="true">
      </network></smtp>
    </mailsettings>
</system.net>
Those details should work out-of-the box for you, or at least until Google cancels that account (which I only set up for this article).
Final Thoughts
I have only touched the surface with these two libraries and with this Claims stuff. Obviously, because these libraries are open source, it makes it very easy to tailor this stuff to your needs. I plan to evolve the final code of this example into a more interesting example. But for the time being, it provides a satisfactory vehicle for showcasing the basics of these libraries.
I hope you enjoy playing with them as much as I have!
History
Article
| Version | Date | Summary |
| 1.0 | 01 Sep. 2013 | Original published article |
| 1.1 | 13 Sep. 2013 | Added update about ASP.NET Identity |
| 1.2 | 13 Sep. 2014 | Fixed incorrect case of system.identityModel.services element |
Code
| Version | Date |
| 1.0 | 01 Sep. 2013 |
A mid-level developer writing .NET code to provide business solutions to a wide range of customer requirements.


 General
  News
News  Suggestion
  Question
  Bug
Bug  Answer
  Joke
Joke  Praise
  Rant
Rant  Admin
Admin 


