Note: You will need to rebuild the solution. CodeProject upload limits meant, I had to omit package DLLs, Visual Studio should auto-include these via NuGet when you do a rebuild
Table of Contents
Introduction
Step 1) Create an ASP.NET MVC Web Application in VS
Step 2) Move User Profile info into Northwind DB
Step 3) Add ADO.NET Entity Data Model
Step 4) Creating a CRUD form for Order entry
Step 5) Adding Data Annotations
Step 6) Applying custom styling
Step 7) Modify the layout of /Order/Index view
Step 8) Using a Partial View to show line items for each order
Step 9) Replace placeholders for order & line totals
Step 10) Using the jQuery UI Accordion control
Task Summary
Useful links referenced within this article
History
ASP.NET MVC - the not so new kid on the block, was released in 2009 and marked a radical departure from the ASP.NET Web Forms paradigm. Some of us "dyed-in-wool" Web Forms developers have been slow to adopt to the change. This article is primarily an attempt to help me make that transition, perhaps it will also be useful to some of you. The learning method that works best for me is to take a topic and to try explaining it to someone. I find that by the time I finish the explanation I have achieved a deeper understanding of that topic than if I had simply read up on the topic or tried out some practical exercises.
With that objective in mind, I would like to walk you the reader and ASP.NET Web Forms developer thru some RAD steps. The example focuses on database first development because that has been the more common scenario in my experience. We often join a development team working on an already existing database, so the focus of this walk-through is to assume an existing (the ubiquitous Northwind) database and build around that. I will try to frame the steps in a manner that will facilitate repetition with your own database after you have tried out our example. If you are interested in an example that does code-first development (the majority of example on the web seem to do this), refer to the link titled "Getting Started with Entity Framework Code First Development" at the end of this article.
I will avoid the pre-functionary theoretical lecture in interest of efficiency. However since this is targeted at Web Forms developers, let us sneak in a look at some of the similarities and differences between ASP.NET MVC and Web Forms.
Similarities
- Both built on top of the ASP.NET framework.
- They use the same languages (C#, VB.NET and J# - other languages can be used)
- Both use IIS and ASP.NET request pipeline including HTTP handlers and HTTP modules
- They also share the same configuration framework
- Finally, they both render a response to the user that is a mix of JavaScript code, CSS styles and HTML markup.
Differences
| Database schema (model) and business logic (controller) tightly coupled to UI components (view) | Based on separation of the database schema, business logic and UI components |
| Uses viewstate mechanism to enable awareness of state within a page | Encourages a stateless approach but allows some awareness of state via the ViewData/ViewBag and TempData objects |
| URLs are usually mostly file-based, they point to a physical file on the server. | URLs are route-based (combination of controller and action (method) that will handle the request) |
| Uses Master pages to offer consistent look-n-feel across multiple pages | Uses Layouts and shared views to offer consistent look-n-feel across application |
| User controls to encapsulate functionality within UI objects | Partial Views offer consistent functionality across multiple views |
| Server controls - server-side code that renders HTML | HTML Helpers offer similar but more basic functionality |
What lies ahead?
Though these frameworks are very different, Microsoft has taken pains to emphasize that they are not looking to replace Web Forms with MVC. Their repeated goal is to foster an environment where both flourish side-by-side.
Recent announcements about the future of ASP.NET lend support to this assertion. Refer to the link titled "ASP.NET vNext: the future of .NET on the Server" at the end of this article.
Requirements for getting started
You will need a Visual studio 2013 version that supports web development (vs), Sql Server 2008 or better and the Northwind database. I assume you have downloaded and installed these or equivalent components, so without further deliberation, let's get started.
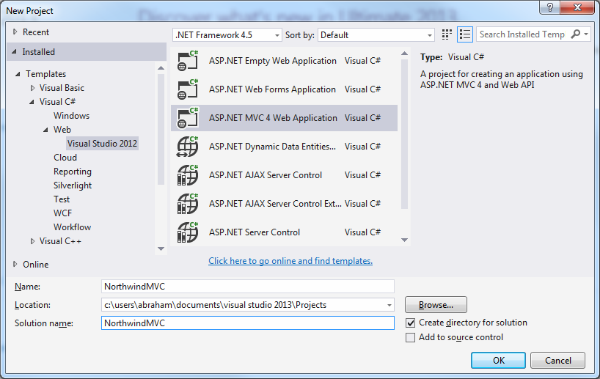
Open Visual Studio and click 'New Project' on the Start Page. In the New Project dialog, select ASP.NET MVC 4 Web Application, type 'NorthwindMVC' as the name of our application and click OK.
This will bring up the New ASP.NET MVC 4 Project dialog with Internet Application selected by default. Click OK to accept the default and proceed.

After a few seconds, your application template generation should be complete and you should see the default controller (HomeController.cs) with three actions (methods) defined.
Right-click on the App_Data folder in Solution Explorer and select the Open Folder in File Explorer option. The folder should open up and note that it should be empty.
Switch back to Visual Studio and press F5 to see what we get from this default application shell. Our default application includes a header with a placeholder for a logo and links to five internal pages right out-of-the-box.
The first of these is the Register link. Hover over it and you will notice that it is linked to the URL http://localhost:1240/Account/Register. In other words, this link will be handled by the Register action of the Account controller. Note, the port number for the URL may vary in your instance.
In the interest of brevity, I will eschew a discussion on routing (see URL Routing link at the end of this article) to proceed with application. Click on the Register link and register the user 'Steven Buchanan', type a password of your choice. The header changes to display,
...the Register button is no longer visible and the Log In button is replaced by the Log off button.
Now go back to the File Explorer window we had opened earlier and you should see an MDF and LDF file. This is the database file that stores your UserProfile information, i.e. the user you just registered is stored here.
The default project auto-generates a SQL database to support out-of-the-box user management, isn't that cool? Feel free to click on the About and Contact links to examine the other pages that are included in the default application.
Since we already have a database (Northwind) that we plan to use it makes sense to move the UserProfile and related tables to our Northwind DB. To achieve this, open web.config and modify the connection string 'DefaultConnection' as per the following template,
Original connection string:
Data Source=(LocalDb)\v11.0;Initial Catalog=aspnet-NorthwindMVC-20140518034312;Integrated Security=SSPI;AttachDBFilename=|DataDirectory|\aspnet-NorthwindMVC-20140518034312.mdf
Modified connecton string:
data source=[yourSQLServer];initial catalog=Northwind;integrated security=True;
Compile and run your application. Since we are no longer using the original database, we will have to register the user 'Steven Buchanan' once again. Then open the Northwind database and verify that a new UserProfile table has been added and contains the new user. You can now delete the MDF file within the App_Data folder.
Modifying the connection string caused the application to automatically add a set of five new tables to the Northwind DB. These tables store logins, user profiles and roles. In addition to Registration and Login mechanisms our application also includes a built-in option to allow users to sign-in using external security providers who support the OAuth standard for authorization (see OAuth Intro link at end of this article). These include Microsoft, Google, Facebook and Twitter. The AuthConfig class in the App_Start folder contains code to enable authentication using the above providers. You can begin by uncommenting code within the RegisterAuth method for each provider that you wish to use.
Note: Google is the easiest to implement and can be activated by simply uncommenting the following line in /App_Start/AuthConfig.cs,
OAuthWebSecurity.RegisterGoogleClient();
..and recompiling your application. There is a one-time process that involves linking a new user account (for eg., 'Steven Buchanan', 'Nancy Davolio' et. al. ) with your Google credentials.
Since our code is all written for us, take a moment to review /Model/AccountModels.cs (model), /Controllers/AccountController.cs (controller) and the views in the Views/Accounts folder. Clicking the 'Log in' button (View file =_LoginPartial.cshtml) invokes the Login(string) action of the Account controller. This is the default (HttpGet) action for Login. The action simply calls for the Login view to be rendered within the body of of the Layout / Master (View file = /Shared/_Layout.cshtml) page. We will come across another Login Action (HttpPost) in the next paragraph.
[AllowAnonymous]
public ActionResult Login(string returnUrl)
{
ViewBag.ReturnUrl = returnUrl;
return View();
}
[HttpPost]
[AllowAnonymous]
[ValidateAntiForgeryToken]
public ActionResult Login(LoginModel model, string returnUrl)
{
if (ModelState.IsValid && WebSecurity.Login(model.UserName, model.Password, persistCookie: model.RememberMe))
{
return RedirectToLocal(returnUrl);
}
ModelState.AddModelError("", "The user name or password provided is incorrect.");
return View(model);
}
Once the user enters a username and password, the Login(LoginModel, string) action is invoked. This action is connected to the post verb by means of the [HttpPost] attribute applied to the method. This method uses the WebSecurity (out-of-the-box) class to validate user credentials. Assuming success, the user is redirected to the Home/Index view. The _LoginPartial view mentioned in the previous paragraph is updated to reflect the authenticated status of the user.
Right-click the 'Models' folder and select Add - ADO.NET Entity Data Model.
In the Specify Name for Item dialog, enter 'Northwind'.
Select the Generate from database option in the Entity Data Model Wizard and click Next.
Select the New Connection button from the Choose Your Data Connection dialog. Enter the name of your SQL Server and select Northwind as the database in the Connection Properties dialog, then click OK to return to the Choose Your Data Connection dialog.
Finally, change default value in the Save entity connection settings in Web.config as to NorthwindDB (see blue arrow in the diagram above) and click the Next button.
From the Choose Your Version dialog, select the Entity Framework 5.0 and click the Next button. You can select 6.0 if available without affecting this example in any manner. See link Upgrading from EF 5 to EF 6 at end of this article if you wish to examine requirements for EF 6.0.
From the Choose Your Database Object and Settings dialog, select the Tables as shown below. You do not need to include any Views, Stored Procedures or Functions at this point. Type in 'Northwind' as the Model Namespace and click the Finish button to generate the model class files. Note, In addition to the table objects selected below, this process auto includes a DbContext generator NorthwindDB which you will need for operations involving the database starting with the one in Step 4 below.
You may be prompted to reload web.config file, click Yes if this happens. This is usually a sign that earlier changes to web.config may not have been saved and you may have to re-enter your DefaultConnection (refer Step 2 above).
You should see a database diagram (Northwind.edmx) representing the tables selected and the relationships between those tables. The diagram also includes Navigation Properties for each table object. This allows you to transparently access related objects from any given object. For example, once you have an Order object, you also have Customer, Employee, Shipper and Order_Details objects for that Order.
Expand the EDMX node within the Models folder for the ADO.NET Entity Data Model we just added, then expand the Northwind.tt node to confirm all classes have been created. You can double-click on any class to see its generated code. Do not edit this code! Editing may cause problems and any edits will be lost if the EDMX file is refreshed.
Press F5 to compile and run your solution. This helps make Intellisense aware of the new classes that were added as part of our Model.
Right-click on the Controller node in Solutions Explorer and select Add - Controller.
In the Add Controller dialog, enter OrderController as the Controller Name, select template MVC Controller with read-write actions and views using Entity Framework (default selection). Select Order as our Model class and NorthwindDB as our Data context class.
Click the Add button, this will generate all the code needed to Create, Retrieve, Update and Delete Order data. You can confirm this by pressing Ctrl+F5 to execute the code. Add '/Order' to the URL to invoke the default action (Index() - list all order details) of the OrderController.
Note: since there are thousands of rows in the output, this may take a while to render within the browser especially if you choose to run within Debug mode. Feel free to check out the Edit, Details and Delete options highlighted in the screen snippet below. It may not be pretty but it is functional. Notice the date formats unnecessarily include a time component. We will take care of this and other formatting blemishes in Step 5 below.
The same process can be repeated for the Employee, Customer and other tables of your choosing. If this were your own database instead of Northwind, these steps could easily be utilized to repeat the above actions and come up with the same results. We have come a long way and have yet to write a single line of C# code, HTML markup or CSS styling.
It is time we added some code to help us continue with our discovery of the ASP.NET MVC ecosystem. Let us start with a couple of trivial changes to help us avoid some typing as we repeatedly modify and test our sample application. Open /Views/Shared/_Layout.cshtml and modify the HTML ActionLink items within the <ul>...</ul> tags inside the <header> as shown below. This should hide the About and Contact options and add an Order link to the menu.
@Html.ActionLink("Home", "Index", "Home")
@*@Html.ActionLink("About", "About", "Home")
@Html.ActionLink("Contact", "Contact", "Home")*@
@Html.ActionLink("Orders", "Index", "Order")
Since the DB contains thousands of Orders, it would make sense to constrain the Orders by Employee. We can do this by modifying the Index() action of the OrderController to filter Orders such that the username matches the name of the employee attached to the order. This was the reason we registered as Steven Buchanan while registering in Step 1. Naturally, this will require that each employee register with a username matching their employee name. In a real scenario, we would have attached employees to user profile records and derived employee name or ID from the profile and used that instead. For now we favor convenience! Open the OrderController and replace the Index action code with the snippet below.
    public ActionResult Index()
    {
        var orders = db.Orders.Include(o => o.Customer)
                                .Include(o => o.Employee).Include(o => o.Shipper);
        List<Order> orderRows = new List<Order>();
        foreach (Order order in orders)
        {
            string employeeName = String.Format("{0} {1}", order.Employee.FirstName.Trim()
                                                        , order.Employee.LastName.Trim());
            if (employeeName == User.Identity.Name)
                orderRows.Add(order);
        }

        return View(orderRows);
    }
Press Ctrl+F5 to compile and launch the application. When /Home/Index view is rendered, login as Steven Buchanan (if not already logged in) and then click the new Orders link on the menu. Our /Order/Index view should render showing only the subset of Orders attributed to the currently logged in Employee. Feel free to register another Employee account and confirm that their Orders show up correctly as expected.
Take a few minutes to review the code generated for the remaining actions within OrderController. Note that all actions that modify the database are overloaded with separate variants for the HttpGet and HttpPost calls. See HttpGet versus HttpPost in the links at the end of this article for an explanation.
Having completed basic CRUD operations, let us now look to improve the default look-n-feel that we inherited from the Visual Studio application template. Navigate back to the /Order/Index view, notice the column headers are derived from the respective column names within Northwind DB tables. As a first step, we would like to customize these headers. This is usually done with the help of Data Annotations in our model classes. Data Annotations are tags placed above field definitions in our model. These tags set display and validation characteristics for the fields to which they are applied. The following example shows data annotations applied to the ShipName member within the Order object. The first tag specifies a label to be applied wherever the ShipName field is displayed, the second specifies a validation constraint that is automatically applied prior to executing Submit actions on any input form that contains that member.
[Display(Name = "Ship To")]
[MaxLength(256, ErrorMessage = "Name cannot exceed 256 characters")]
public string ShipName { get; set; }
By utilizing data annotations we are able to get a consistent treatment of data members across the entire application and it also saves us from having to write the most common validation routines. For more details see the MVC Data Annotations link at the end of this article. Unfortunately for us we are unable to add these annotations to our model classes. Since these classes are auto-generated from the database, we may at somepoint in future need to regenerate them following some future change to the database. Such an action would effectively overwrite any changes made to these classes. We can work around this inconvenience by creating a metadata class for our Model. We can do this by right-clicking the Models folder and adding a new class.
Give this class the name ModelMetadata.cs. Delete the default code in the class file and insert the following code in its place. Notice, the second line inserts a reference to a class that enables support for Data Annotations.
using System;
using System.ComponentModel.DataAnnotations;
namespace NorthwindMVC.Models
{
#region Connect Base model classes to metadata
[MetadataType(typeof(OrderMetaData))]
public partial class Order { }
#endregion
public class OrderMetaData
{
public int OrderID;
public string CustomerID;
public Nullable<int> EmployeeID;
[Display(Name="Order date")]
[Required(AllowEmptyStrings=false,ErrorMessage="Order date is required")]
[DataType(DataType.Date,ErrorMessage="Order data must be a valid date")
, DisplayFormat(DataFormatString="{0:MM/dd/yyyy}"
, ApplyFormatInEditMode=true)]
public Nullable<System.DateTime> OrderDate;
[Display(Name="Required Date")]
[DataType(DataType.Date,ErrorMessage="Required date must be a valid date")
, DisplayFormat(DataFormatString="{0:MM/dd/yyyy}"
, ApplyFormatInEditMode=true)]
public Nullable<System.DateTime> RequiredDate;
[Display(Name="Ship Date")]
[DataType(DataType.Date,ErrorMessage="Ship date must be a valid date")
, DisplayFormat(DataFormatString="{0:MM/dd/yyyy}"
, ApplyFormatInEditMode=true)]
public Nullable<System.DateTime> ShippedDate;
public Nullable<int> ShipVia;
public Nullable<decimal> Freight;
[Display(Name="Ship To")]
[MaxLength(256,ErrorMessage="Name cannot exceed 256 characters")]
public string ShipName;
[Display(Name="Mailing Address")]
[MaxLength(256,ErrorMessage="Name cannot exceed 256 characters")]
public string ShipAddress;
[Display(Name="City")]
[MaxLength(10,ErrorMessage="Name cannot exceed 100 characters")]
public string ShipCity;
[Display(Name="Region")]
public string ShipRegion;
[Display(Name="Zip")]
public string ShipPostalCode;
[Display(Name="Country")]
[MaxLength(100,ErrorMessage="Name cannot exceed 100 characters")]
public string ShipCountry;
}
}
The section of code enclosed within the Connect base model classes to metadata region declares a new class OrderMetaData and annotates it as a metadata class for the Order class. The rest of the code contains the definition for the OrderMetaData class. By moving data annotations into a separate file we ensure they do not get overwritten when the base class is regenerated following changes to our database. Press Ctrl+F5 to recompile and execute the application. Navigate to the /Order/Index view and the column headers should reflect the values specified in the data tags within the metadata class above. The date values for the date columns are also formatted as defined.
Note, the sample code above only supplies data annotations for the Order class. We excluded the data annotations for the Customer, Employee and other tables to reduce the length of code shown here. Feel free to addin the missing data annotations as a learning exercise. The completed solution attached to this article contains data annotations for all base classes.
|
The /Order/Details view does not have any styling and is not very readable due to the default presentation that alternates header and value items. Let us apply a custom style to improve the readability of this view. We do this by right-clicking the Content folder in Solution Explorer and selecting Add - Style Sheet as shown in the screen snippet below. Enter 'SiteCustom.css' as the Item name and click OK.
|
|
| Replace the default content with the following style,
.display-label {
    font-weight: bold;
}
We then modify App_Start/BundleConfig.cs as shown in the line below. Note, only insert the code snippet in bold. The rest of the code is only included to help determine the location where the code is to be inserted
bundles.Add(new StyleBundle("~/Content/css").Include("~/Content/site.css"
            , "~/Content/sitecustom.css"));
Press Ctrl+F5 and navigate to /Order/Details view of any Order to see the styling changes reflected.
|
|
Now that we have walked through the basics of style creation, let's take on a more ambitious task. The default (/Order/Index) view generated in Step 4 is a bit unwieldy. The flat tabular layout requires a lot of horizontal and vertical scrolling which may not be optimal in terms of UI design.
We can modify the HTML markup and add some CSS styling to achieve an alternate layout. We start by commenting out the entire table in the Index view by wrapping it within @*...*@ tags. Note, I prefer to enclose the commented table within tags. This is optional, it allows me to collapse the commented code within the VS editor. We can delete it later once we have completed our alternate layout.
a) Adding new HTML markup
Copy the markup below and paste it below the <p>...</p> tags containing the Create ActionLink and above the original (commented) table markup. Save the Index view and navigate to the /Order/Index view. Assuming you are still logged on as Steven Buchanon, you should see the changes reflected in your view.
<h3>
    <div class="tablecontainer">
        <div class="row">
            <div class="order customer cell left3">
                <text>@Html.DisplayNameFor(model => model.Customer.CompanyName)</text>
            </div>
            <div class="order date cell middle3">
                <text>@Html.DisplayNameFor(model => model.OrderDate)</text>
            </div>
            <div class="order amount cell right3">
                <text>Order Total</text>
            </div>
        </div>
    </div>
</h3>
@foreach (var item in Model)
{
<h3>
    <div class="tablecontainer margin10">
        <div class="row">
            <div class="order customer cell left3">
                @Html.DisplayFor(modelItem => item.Customer.CompanyName)
            </div>
            <div class="order date cell middle3">
                @Html.DisplayFor(modelItem => item.OrderDate)
            </div>
            <div class="order amount cell right3">
                **999**
            </div>
        </div>
    </div>
</h3>
<div>
    <p>
        <div class="tablecontainer">
            <div class="row">
                <div class="cell left">
                    <div>
                        <span class="bold">@Html.DisplayNameFor(model => model.RequiredDate): </span>@Html.DisplayFor(modelItem => item.RequiredDate)
                    </div>
                    <div>
                        <span class="bold">@Html.DisplayNameFor(model => model.ShippedDate): </span>@Html.DisplayFor(modelItem => item.ShippedDate)
                    </div>
                    <div>
                        <span class="bold">@Html.DisplayNameFor(model => model.Shipper.CompanyName): </span>@Html.DisplayFor(modelItem => item.Shipper.CompanyName)
                    </div>
                    <div>
                        <span class="bold">@Html.DisplayNameFor(model => model.Freight): </span>@Html.DisplayFor(modelItem => item.Freight)
                    </div>
                    <div>
                        <span class="bold">@Html.DisplayNameFor(model => model.ShipName): </span>@Html.DisplayFor(modelItem => item.ShipName)
                    </div>
                </div>
                <div class="spacer"> </div>
                <div class="cell right">
                    <div>
                        <span class="bold">@Html.DisplayNameFor(model => model.ShipAddress): </span>@Html.DisplayFor(modelItem => item.ShipAddress)
                    </div>
                    <div>
                        <span class="bold">@Html.DisplayNameFor(model => model.ShipCity): </span>@Html.DisplayFor(modelItem => item.ShipCity)
                    </div>
                    <div>
                        <span class="bold">@Html.DisplayNameFor(model => model.ShipRegion): </span>@Html.DisplayFor(modelItem => item.ShipRegion)
                    </div>
                    <div>
                        <span class="bold">@Html.DisplayNameFor(model => model.ShipPostalCode): </span>@Html.DisplayFor(modelItem => item.ShipPostalCode)
                    </div>
                    <div>
                        <span class="bold">@Html.DisplayNameFor(model => model.ShipCountry): </span>@Html.DisplayFor(modelItem => item.ShipCountry)
                    </div>
                </div>
            </div>
        </div>
    </p>
</div>
}
b) Adding CSS styles to complement the markup
The markup itself does not do the job, we need to style the classes associated with the markup to advance our makeover. Copy the CSS below and paste it at the end of the existing styles in /Content/SiteCustom.css. Save the CSS file and refresh the /Order/Index view. This should result in a cleaner, more responsive look and feel.
#accordion {
width: 98%;
}
.tablecontainer {
display: table;
width: 100%;
}
.row {
display: table-row;
}
.cell {
display: table-cell;
font-size: .75em;
}
.left3, .right3, .middle3 {
width: 33%;
}
.left, .right {
width: 49%;
background-color: #EFEEEF;
border-radius: 4px;
border: 1px solid #556b2f;
padding-left: 1em;
}
.single {
width: 100%;
background-color: #EFEEEF;
border-radius: 4px;
border: 1px solid #556b2f;
padding-left: 1em;
}
.single th {
padding-left: 1em;
}
.single td {
padding-left: 2em;
}
.spacer {
width: 2%;
}
.bold {
font-weight: bold;
}
.margin10 {
margin-left: 20px;
}
.alignright {
text-align: right;
}
.tableinner {
display: table;
width: 100%;
border: 1px;
margin-top: 2px;
}
.rowinner {
display: table-row;
}
.cellinner {
display: table-cell;
font-size: .75em;
}
"A Partial View is a reusable fragment of content and code that can be embedded in another view and improves the usability of a site, while reducing duplicate code." (from a post titled, Partial Views in ASP.NET MVC 3. See link at the end of this article). It seeks to reduce duplication and promote consistency by using the same view snippet across multiple views within an application. As mentioned in the introduction, it is the counterpart of an user control in the Web Forms domain.
The partial view that we will create displays all items for a given Order.
a) Generate the Order Details Partial View
Right-click the /Views/Order folder and select 'Add - View'.
In the Add View dialog, type 'OrderDetailsPartial' as the View name.
Check the Create a strongly-typed view checkbox and select 'Order_Detail' as your Model Class.
Leave the Scaffold template value as is (Empty)
Check the Create as a partial view checkbox, then click the Add button to complete adding this view.
The new view should be empty save for one line as shown below.
@model NorthwindMVC.Models.Order_Detail
There is one change that we need to make to the line above. We will be passing not just one Order_Detail item (this is the default assumed by the Add View template) but a collection of the type Order_Detail, since one Order typically contains multiple items. To accommodate this we modify the line above by wrapping it within an ICollection interface as shown below.
@model ICollection<NorthwindMVC.Models.Order_Detail>
b) Insert markup into the partial view
Copy and paste the following markup below the @model declaration. This markup renders the header and each line item present in the Order_Detail collection that it receives.
<div class="tableinner">
    <div class="rowinner">
        <div class="cellinner single">
            <table>
                <tr>
                    <th class="bold">@Html.DisplayNameFor(model => Model.FirstOrDefault().Product)</th>
                    <th class="bold">@Html.DisplayNameFor(model => Model.FirstOrDefault().Quantity)</th>
                    <th class="bold">@Html.DisplayNameFor(model => Model.FirstOrDefault().UnitPrice)</th>
                    <th class="bold">@Html.DisplayNameFor(model => Model.FirstOrDefault().Discount)</th>
                    <th class="bold">Subtotal</th>
                </tr>
                @foreach (NorthwindMVC.Models.Order_Detail line in Model)
                {
                    <tr>
                        <td>@line.Product.ProductName</td>
                        <td class="alignright">@line.Quantity</td>
                        <td class="alignright">@line.UnitPrice</td>
                        <td class="alignright">@line.Discount</td>
                        <td class="alignright">**999**</td>
                    </tr>
                }
            </table>
        </div>
    </div>
</div>
c) Call partial view within the main view page
Insert a call to the newly created partial layout (OrderDetailsPartial) in /Order/Index as shown below. Notice the optional second parameter passed to the partial layout, it represents the collection of items within an Order. This overrides the Order object which would have been the default value passed.
@Html.Partial("OrderDetailsPartial", item.Order_Details)
Place it after the closing tag of the last tablecontainer div and before the closing paragraph (</p>) as shown below.
Save all files and refresh the /Order/Index view within the browser to view the line items for each Order.
You may have noticed a couple of placeholders (**999**) within the markup you just edited. One of these was present in the /Order/Index view while the other was included in the OrderDetailsPartial view. The values to be displayed at these locations need to be computed. While this computation is possible within the view, it would be better to delegate this processing to the controller.
a) Insert helper methods into OrderController
To get started copy the two methods below and add them to the OrderController class. These are two static methods to be called by code that will replace the two placeholders mentioned in the previous paragraph.
    static public string getOrderTotal(ICollection<Order_Detail> orderDetails)
    {
        decimal orderTotal = 0;
        foreach (Order_Detail item in orderDetails)
        {
            orderTotal += item.UnitPrice * item.Quantity * ((decimal)(1 - item.Discount));
        }
        string returnVal = string.Format("{0:C2}", orderTotal);
        return returnVal;
    }
    static public string getOrderDetailTotal(Order_Detail item)
    {
        decimal itemTotal = 0;
        itemTotal = item.UnitPrice * item.Quantity * ((decimal)(1 - item.Discount));
        string returnVal = string.Format("{0:C2}", itemTotal);
        return returnVal;
    }
b) Replace placeholder in /Order/Index view
Now, replace the placeholder in /Order/Index with a call to one of the methods we just added to the OrderController class. Note, I have included the relevant <div>..</div> tags to help identify the location of the call to the getOrderTotal method. You should only copy the line between the tags and replace the placeholder **999**. This is the call to the method that will compute the Order Total.
<div class="order amount cell right3">
@NorthwindMVC.Controllers.OrderController.getOrderTotal(item.Order_Details)
</div>
c) Replace placeholder in partial view
Next, replace the placeholder (**999**) in OrderDetailsPartial with a call to the getOrderDetailTotal() method. Once again, I have included the accompanying <td>...</td> tags to help identify the location of the call to getOrderDetailTotal(). Do not include the <td> tags as they are already present in the existing markup. This call will compute the item total for each line item.
<td class="alignright">@NorthwindMVC.Controllers.OrderController.getOrderDetailTotal(line)</td>
Save all files and launch the application by pressing 'F5'. After you login as an employee, navigate to the /Order/Index view. You should now see the computed Order Total and Subtotal for each line item as shown in the screen snippet below.
Our UI has made significant improvements over the initial auto-generated layout. We have for example, eliminated the horizontal scrolling that the earlier layout required. Unfortunately we do have a large amount of data and the view could use some further tweaking. The following controls are popular options to manage larger datasets.
- the jQuery UI Accordion (http://jqueryui.com/accordion/),
- Trirand's jqGrid (http://trirand.com/blog/jqgrid/jqgrid.html)
For our example we will be using the accordion to wrap our Order objects and simplify user interaction with the UI. The task is quite simple because we have already done the bulk of the work necessary to enable the accordion. The markup that we copied into the /Order/Index view is already primed and ready for wrapping inside an accordion.
a) Insert accordion div tag and JavaScript call into view
Let us start by inserting the required markup into the /Order/Index view. Note, do not insert the @foreach code block shown below. The @foreach code block is included as a guide to where the
tags for the accordion should begin and end.
We also need to add a bit (technically one line :)) of JavaScript as shown below. This is the bit that activates the accordion.
<div id="accordion">
    @foreach (var item in Model)
    {
        <h3>...</h3>
        <div>...</div>
    }
</div>
<script type="text/javascript">
    window.onload = function () {
        $("#accordion").accordion({
            autoHeight: 'false',
            heightStyle: 'content',
            collapsible: true,
            active: false
        });
    }
</script>
b) Activating the jQuery UI component within our application
We now need to ensure that we have the jQuery UI included in our project. While Visual Studio includes jQuery automatically for ASP.NET MVC applications, it does not fully activate the jQuery UI component - the code is available but not linked in to our application. We need to complete the last steps to make the jQuery UI available. We do this by editing the /Shared/_Layout view file. This is the equivalent of the ASP.NET Webforms Master file. Let us begin by opening this file and inserting two lines. The first line attaches the jQuery UI CSS files to our application. Note, the first and third lines shown below already exist in our markup and are only shown here as a guide to the location where we must insert the line for jQuery UI CSS. This is done by inserting the second line shown below inside the <head> tag of the /Shared/_Layout file.
@Styles.Render("~/Content/css")
@Styles.Render("~/Content/themes/base/css")
@Scripts.Render("~/bundles/modernizr")
Similarly, the jQuery UI JavaScript file must be inserted before the closing
</body> tag in /Shared/_Layout file. Again, do not insert the first & third lines shown below, they already exist. Copy the second line below and paste it between the first & third lines.
@Scripts.Render("~/bundles/jquery")
@Scripts.Render("~/bundles/jqueryui")
@RenderSection("scripts", required: false)
The screen snippet below shows the final result. Some markup sections have been folded (denoted by the + sign in the margin) to focus attention on the additions in this part of the exercise.
c) Using NuGet to update the jQueryUI library (if needed)
Finally, we need to ensure our jQuery UI version is not too old. Check the /Scripts folder for the version number of jquery-ui-<version#>.js. If the version number is 1.10 or better, we should be good to go. If not, we will need to use
Tools - Library Package Manager - Manage NuGet Packages for Solution
...from the VS menu to call up the Manage NuGet Packages dialog. Locate the jQuery UI (Combined Library), select it and click the Update button to update the jQuery UI files within your application. See screen snippet below for reference.
Save all files and refresh the /Order/Index view in the browser. We should get a collapsed view showing an accordion with only the Customer, Order date and totals displayed. Clicking on any Order should display relevant Order and Line item details.
We could go on, but this is a reasonable stopping point in what is already a long article. If there are enhancements that are of particular interest, feel free to mention them in the comments and I'll try to do a followup that addresses common requests. Thank you for your time and attention.
Step 1) Create an ASP.NET MVC Web Application in VS
Create an ASP.NET MVC Web Application (Internet Application) in VS called NorthwindMVC.
Step 2) Move User Profile info into Northwind DB
Change connection string 'DefaultConnection' in web.config to,
data source=[yourSQLServer];initial catalog=Northwind;integrated security=True;
Run the application, register new user 'Steven Buchanan'
Step 3) Add ADO.NET Entity Data Model
Add an ADO.NET Entity Data Model, named 'Northwind'.
Select Generate from database and enter values to connect to your Northwind database
When prompted, include Categories, Customers, Employees, Order Details, Orders, Products, Shippers and Suppliers.
Step 4) Creating a CRUD form for Order entry
Add a new controller named 'OrderController', select 'MVC controller with read/write actions and views, using Entity Framework' as the template.
Select 'Order' as the Model class and enter your data context class, NorthwindDB in our example.
Modify /Order/Index action to limit orders by logged-in user (employee = Steven Buchanan)
Step 5) Adding Data Annotations
Add ModelMetadata class, enter code to connect base classes to metadata classes.
Declare metadata classes and insert data annotations for base class.
Step 6) Applying custom styling
Add custom stylesheet 'SiteCustom.css', to project.
Step 7) Modify the layout of /Order/Index view
Replace table markup in /Order/View with provided markup.
Append provided CSS styles to SiteCustom.css
Step 8) Using a Partial View to show line items for each order
Add partial view 'OrderDetailsPartial', select Order_Detail for Model class.
Leave Scaffold template as empty and check partial view option.
Change view model declaration to ICollection<northwindmvc.models.order_detail />
Replace default markup with provided markup
Use Html.Partial helper to insert partial view into /Order/Index
Step 9) Replace placeholders for order & line totals
Insert provided helper methods into OrderController.
Replace placeholder in /Order/Index with call to helper method getOrderTotal()
Replace placeholder in /Order/OrderDetailsPartial with call to helper method getOrderDetailTotal()
Step 10) Using the jQuery UI Accordion control
Wrap markup in /Order/Index with div (id='accordion')
Insert provided JavaScript code initializing accordion to /Order/Index view.
Modify /Shared/_Layout view, insert lines provided to activate jQuery UI component.
Use NuGet Package Manager to update jQuery UI version to 1.10 if necessary.
Press Ctrl+F5 to execute application.
A brief history of Asp.Net MVC framework (Shailendra Chauhan)
A version history of the ASP.NET MVC Framework including feature lists for each version.
Entity Framework Development Approaches (MSDN)
An examination of database-first versus model-first versus code-first approaches to development.
Getting Started with Entity Framework Code First Development (Tom Dykstra)
Uses the Contoso University sample web application to demonstrate how to create ASP.NET MVC 5 applications using the Entity Framework 6 and Visual Studio 2013. This tutorial uses the Code First workflow.
ASP.NET vNext: the future of .NET on the Server (Xinyang Qiu)
Microsoft announcement from the .NET Web Development and Tools group on the future of ASP.NET
URL Routing (Scott Guthrie)
A drill down into the routing architecture of the ASP.NET MVC Framework.
OAuth Intro (Wikipedia)
OAuth is an open standard for authorization. The above link details the history and specifications covered by this standard.
Upgrading from EF 5 to EF 6 (StackOverflow.com)
A brief Q&A session on StackOverflow including steps on converting an application from EF5 to EF6.
HttpGet versus HttpPost (Ganesh S Divekar)
A blog post detailing the differences and applicability of (when to use) each within a given scenario.
MVC Data Annotations (Shailendra Chauhan)
A short but near-complete explanation of various Data Annotations.
Partial Views in ASP.NET MVC 3 (Suprotim Agarwal)
Brief explanation of Partial Views with an example.
- 19 May 2014 - Initial draft
- 21 May 2014 - Added Task Summary section


 General
  News
News  Suggestion
  Question
  Bug
Bug  Answer
  Joke
Joke  Praise
  Rant
Rant  Admin
Admin 


