Introduction
It might seem such a simple thing, setting the version of your project, but it is so often missed during deployments to testing environments - making the task of identifying what it is that is exactly running a troublesome one.
With the ever constant movement towards a fully Agile approach, with Continuous Deployment becoming the holy grail that teams are trying to achieve, automating the process of stamping your assemblies will become a critical need during your build and deployment pipeline - without this, the task of identifying what is where becomes exceptionally error prone!
This article quickly covers how you can use the Open Source TFS Build Extensions to modify the Azure Continuous Deployment Build Process Template to version stamp the triggering changeset onto the AssemblyVersion for a project. One significant thing with this workflow is nothing gets checked back in; one of my biggest pet hates about many of the processes that are out there already is that they create additional checkins for pushing the version back into source control; this is ignored here, as we are simply stamping the changeset number onto the revision of the assembly and not changing anything else.
Background
In order to use this article, you really need to have an account with Visual Studio Online, an account with Azure, and a project linked up for Continuous Deployment.
This article assumes you are using Visual Studio 2013 (however, you should be able to use Visual Studio 2012, but your mileage might vary).
Getting set up
Before we do much we need to actually get your TFS instance setup so we can customise things. While it is possible to load customised
Build Process Templates into individual projects, it is best practice to centralise these in their own TFS Project - simply because you can only have one Custom Build Assembly path set (for managing them in source control as part of the build) for each controller.
So first of all, create a project on your TFS instance called TFSCustomisations.
In here create a folder called CustomAssemblies (I tend to place mine under the BuildProcessTemplates folder, but it doesn't really matter).
Download the TFS Build Extensions (http://tfsbuildextensions.codeplex.com/), and pull the assemblies out of the Code Activities\VS2013 folder. Please these into your CustomAssemblies folder, and add them to source control. Check them in.
Now to setup the build controller. Go into Visual Studio, in the Team Explorer panel, go to Builds. Click Actions and select Manage Build Controllers. Pull up the properties window on the build controller, and set the "Version control path to custom assemblies" to your new custom assemblies source control folder.

Now that we have the configuration done, we need to start putting together our custom activity.
Setting up the solution
There are, as ever, a few house keeping tasks when it comes to building a custom activity, or modifying Build Process Templates - especially if you want to use the GUI Workflow Designer in Visual Studio (trust me, if this is your first time, you properly do!).
Create an empty Solution.
Create two projects based on the Workflow Activity Library template - call one BuildProcessTemplates, and the other anything you like (I called mine TFSActions - which is what I'll refer
to this project as in this article) - both projects need to target .NET 4.5.1 if you are using Visual Studio 2013.
Now, to the TFSActions add references to all of the Community TFS Build Extension assemblies (you don't really have to, but it makes life easier later). You will also need to add various TFS related assemblies - these can be found in C:\Program Files (x86)\Microsoft Visual Studio 12.0\Common7\IDE\ReferenceAssemblies under on of three folders there. You will need to add:
Microsoft.TeamFoundation.Build.Client
Microsoft.TeamFoundation.Build.Common
Microsoft.TeamFoundation.Build.Workflow
Microsoft.TeamFoundation.Client
Microsoft.TeamFoundation.Common
Microsoft.TeamFoundation.VersionControl.Client
To your BuildProcessTemplates project add a reference to the TFSActions project.
Also add:
Microsoft.TeamFoundation.Build.Client
Microsoft.TeamFoundation.Build.Common
Microsoft.TeamFoundation.Build.Workflow
Microsoft.TeamFoundation.Client
Microsoft.TeamFoundation.Common
Microsoft.TeamFoundation.VersionControl.Client
Microsoft.TeamFoundation.VersionControl.Common
Microsoft.TeamFoundation.Deployment.Workflow
Microsoft.TeamFoundation.WorkItemTracking.Client
PresentationFramework (in the Assemblies list)
WindowsBase (in the Assemblies list)
System.Activities.Presentaiton (in the Assemblies list)
You may find you have to add more, but this will essentially keep the designer happy enough to be usable. We don't need to worry about this project compiling - the only one that needs to compile is TFSActions.
Add you existing build template (as an Add Existing Item from the BuildProcessTemplates folder) to your solution - hopefully you can now open it without any significant errors!
Create a copy of this template in your BuildProcessTemplates folder (i.e. call it something like AzureContinuousDeployment.WithVersion.11.xaml), and add this again using Add Existing Item.
You should end up with:
Now, lets actually create our activity!
Building the activity
The activity is going to be very simple - it's going to take a few parameters, and simply recursively update the AssemblyInfo files in your solution during the build process.
To do that we are going to need to pass in some things:
WorkspaceName
BuildDetail
BuildAgent
SourcesDirectory
The good news is all of these items are defined in the base build templates - however, watch out as sometimes they are not (if you have a customised one for example, or are using the new streamlined 2013 templates, and you might have to do some fancy footwork to get the values you need).
Add a new C# Workflow Activity item to the project.
Make sure you call it something sensible, like UpdateVersion.
Open up this workflow, and start off by dragging a Sequence from your toolbox onto the designer; if you don't put a sequence down first, you can only specify a single action to be performed. A sequence, as the name says, means the actions will occur sequentially in order. Set the name on the sequence to "Apply Version Information"; it's always good practice to set the names on activities properly as these will be exported to diagnostics logs (and so it helps you later!!).
Lets add in the parameters to this workflow - click on the Arguments "option" at the bottom of the workflow, and add the parameters:
WorkspaceName string
BuildDetail IBuildDetail (use the search!)
BuildAgent IBuildAgent (use the search!)
SourcesDirectory string
We are going to need some local variables too; however, when you setup variables, note that they have scope - click on your sequence, and then click on the Variables "option".
You'll note in my screenshot I create one for the WorkspaceName within scope; this is because in my copy of the activity I do some additional processing for oddball workspaces :)
Drag a GetWorkspace activity from the toolbox and drop it onto your sequence.
Drag a FindMatchingFiles activity from the toolbox and drop it onto your sequence.
Drag an AssemblyInfo activity from the toolbox and drop it onto your sequence.
If you want, add some logging by adding some WriteBuildMessage activities - you should have something like this:
Now to do configuration of the activities!
Click on the GetWorkspace activity and have a look in the Properties window.
Set:
Name => to either the WorkspaceName argument you defined, or the local variable if you are like me
Result => to the workspace variable
Click on the FindMatchingFiles activity and set the properties to:
MatchPattern => string.Format("{0}\\**\\assemblyinfo.cs", SourcesDirectory)
Result => to the assemblyInfoFiles array variable
Click on the AssemblyInfo activity and set the properties to:
AssemblyFileVersion => "$(current).$(current).$(current)." + BuildDetail.SourceGetVersion.Replace("C", "")
AssemblyVersion => "$(current).$(current).$(current)." + BuildDetail.SourceGetVersion.Replace("C", "")
Files => the assemblyInfoFiles array variable
There are a lot more properties you can set here, but if you are interested I'd suggest you have a look at the wiki page for that particular activity: http://tfsbuildextensions.codeplex.com/wikipage?title=How%20to%20integrate%20the%20AssemblyInfo%20build%20activity&referringTitle=Documentation
Compile your TFSActions project - you shouldn't get any errors.
Using the activity
So we now have an activity that updates the AssemblyInfo files correctly, but this will not do any good so far as we have not changed the Build Process Template.
Open up your copy of the template (the one you created with .WithVersion. in the name); this article assumes you are looking at the Azure Continuous Deployment template, but the others are fairly close.
Scroll down through the template, and look for the block titled "Try Compile, Test, and Associate Changesets and Work Items". We want our activity to run just before this (so just after the workspace has been initialised, and the code has been pulled).
Drop your UpdateVersion activity from the toolbox onto the designer, just above the "Try Compile .." sequence.
Set the properties for your activity:
BuildAgent => BuildAgent
BuildDetail => BuildDetail
SourcesDirectory => SourcesDirectory
WorkspaceName => WorkspaceName
You'll notice that these are all being assigned to variables that are already defined in the workflow.
Save your template.
The last thing you need to do is place a copy of the assembly for the TFSActions project into your CustomAssemblies folder (i.e. copy the TFSActions.dll from bin\Debug or bin\Release into CustomAssemblies). Be sure to add this to source control! This is the copy the build server will pickup and use.
Check everything into TFS.
Now all we need to do is point a build at this new definition!
Configuring a build
I'm not going to walk you through the entirety of configuring a new build, as I'll assume you know how do this in TFS, but I will show you how you can specify this new (common) workflow.
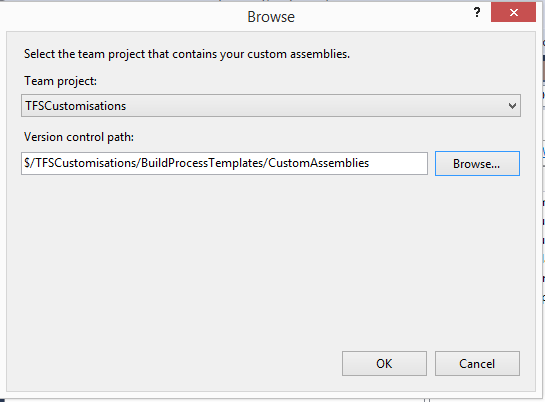
When you create your build, and go to the process section, you'll probably go "Where's my workflow?!".
Do not panic. Click New on the right hand side of the drop down list, then select your TFSCustomisations project and hit browse to go and find your workflow file.
And that's it! Your workflow will now appear and you can have versioned builds automatically!
See, aren't TFS Build workflow's easy?
History
- Jan 2014: Happy New Year, my first article, first version!
A long term software developer and technical architect with a strong interest in Agile, Continuous Integration, Continuous Deployment and just "getting-stuff-done" in general!


 General
  News
News  Suggestion
  Question
  Bug
Bug  Answer
  Joke
Joke  Praise
  Rant
Rant  Admin
Admin 


 If you change it for one rc files and you'll be good to go.