Introduction
Linux is a great open-source operating system that is widely used in many applications from desktops to embedded ARM boards. While most of Linux-related code runs in the user-mode, adding support for new devices often calls for creating kernel modules involving special techniques for coding and debugging. This article demonstrates Linux kernel-mode techniques using a simple virtual character device as an example.
We will employ Microsoft Visual Studio as our IDE to make our development easier through its various coding and debugging features.
Before you begin ensure that you have the following installed:
Creating a basic project
Ensure that you can access your Linux machine from your Windows machine over a serial port. It is recommended to use a VM with a virtual COM port as it's fast and convenient. Start Visual Studio and create a new VisualKernel module project:

Follow the wizard to have your project created. On the last page specify the debugging method you want to use. If you are not using VMWare, specify the COM port that can be used to connect to the virtual machine:

You have now created a basic "Hello, World" project. Build it with Ctrl-Shift-B and start debugging with F5: 
Once we have verified that the kernel module can be built and debugged, we will create the actual character device.
Creating the device object
In order to create our device object and make it visible to the user-mode applications, we will need to perform 4 steps:
- Dynamically allocate a "major number" for the device
- Register a character device with the allocated major number
- Create a sysfs device class for our device
- Create a sysfs device so that the system can create a node inside /dev
To make the code in this example more compact we will omit the full error handling and use the BUG_ON() statements to check whether our device registration succeeded.
First of all we need to include the header files containing necessary kernel structures:
#include <linux/device.h>
#include <linux/cdev.h>
#include <linux/fs.h>
Next we need to declare static variables that will hold our device number, class object and device object:
struct file_operations demo_operations = {
.owner = THIS_MODULE,
};

static dev_t device_major_number;
static struct cdev character_device;
static struct class *class_object;
static struct device *device_object;
Finally we need to implement device creation in the kernel module initialization function:
static int __init LinuxKernelModule1_init(void)
{
    int status;
    const char *device_name = "MyCharacterDevice";

    cdev_init(&character_device, &demo_operations);

    printk("Allocating a major number...\n");
    status = alloc_chrdev_region(&device_major_number, 0, 1, device_name);
    BUG_ON(status < 0);

    printk("Adding a character device with number %d...\n", device_major_number);
    status = cdev_add(&character_device, device_major_number, 1);
    BUG_ON(status < 0);

    printk("Creating a device class \"%s\"...\n", device_name);
    class_object = class_create(THIS_MODULE, device_name);
    BUG_ON(IS_ERR(class_object));

    printk("Creating a device object \"%s\"...\n", device_name);
    device_object = device_create(class_object, NULL, device_major_number, NULL, device_name);
    BUG_ON(IS_ERR(device_object));

    printk("Device object created!");
    return 0;
}
When our module is unloaded we should reverse every operation performed in the initialization function:
static void __exit LinuxKernelModule1_exit(void)
{
    device_destroy(class_object, device_major_number);
    class_destroy(class_object);
    cdev_del(&character_device);
    unregister_chrdev_region(device_major_number, 1);
}
Testing it out
Build the project. Note that as we are now using some GPL-only API, we need to change the module license to GPL. Set a breakpoint inside the initialization function and start debugging your project with F5. Step through the initialization process observing variable values to see what's going on:
Open the SSH session window and try reading some data from the device using the 'cat' tool:
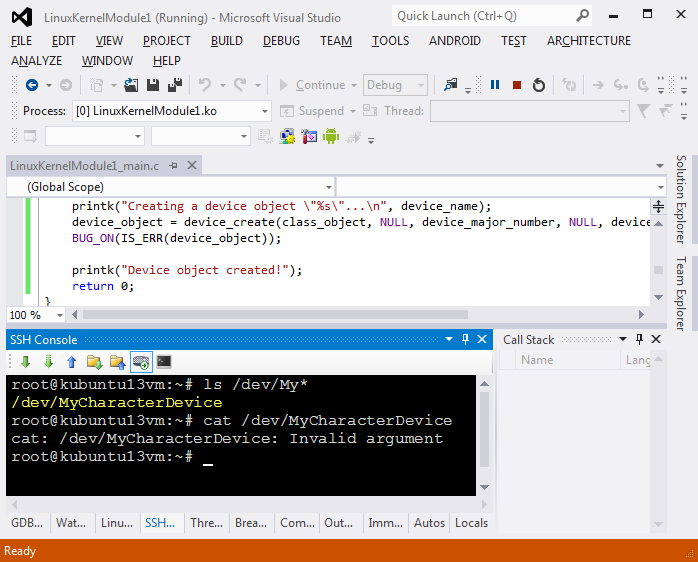
Linux will report an 'Invalid Argument' error. This happens because we did not provide a read() function that will be invoked each time someone tries to read data from our device. We will do it in the next step.
Providing data to user mode
We can control the data that is provided to a user-mode application when it reads from our device by implementing a read handler - special function that will be invoked by the kernel each time someone reads from our device. We'll implement a very basic function returning one fixed message:
static ssize_t demo_read_function(struct file *pFile, char __user *pBuffer, size_t size, loff_t *pOffset)
{
    static const char message[] = "Hello, User-mode\n";

    int todo = sizeof(message) - 1 - *pOffset;
    if (todo < 0)
        todo = 0;

    todo = min(todo, size);
    if (todo > 0)
        copy_to_user(pBuffer, message + *pOffset, todo);

    *pOffset += todo;
    return todo;
}
All we need to do now is to register this function in our file_operations structure:
 struct file_operations demo_operations = {
    .owner = THIS_MODULE,
    .read = demo_read_function
};
Build your module and start debugging it. Run 'cat /dev/MyCharacterDevice' to see the 'Hello, User-mode' message. Set a breakpoint in demo_read_function() and re-run cat to step through it:

Use the call stack window to navigate through the Linux kernel source and see the Linux code responsible for calling our code. Enjoy debugging!


 General
  News
News  Suggestion
  Question
  Bug
Bug  Answer
  Joke
Joke  Praise
  Rant
Rant  Admin
Admin 


