Introduction
This post does not talk about OWIN and its benefits, there are many articles out there to explain what OWIN is and what Claims based authentication is.
This tip is just to show beginners how to use OWIN in easy steps, it is simply a demonstration that uses OWIN to protect your site, be it an MVC or ASPX in the simplest form.
I found a nice and very useful introductory article Understanding OWIN and Katana on CodeProject by ashish__shukla.
I would like to skip all theoretical explanations that you can find online and move directly to the practical part, but before you move on, please make sure you understand claims, authentication and authorization concepts.
To make that demo, let's list these four steps and explain them later as we go. They are:
- Create an empty Project and Create Folders to organize your files.
- Add needed packages.
- Add OWIN Startup file.
- Few lines of code and few configurations and you are all done.
ASP.NET Web Forms
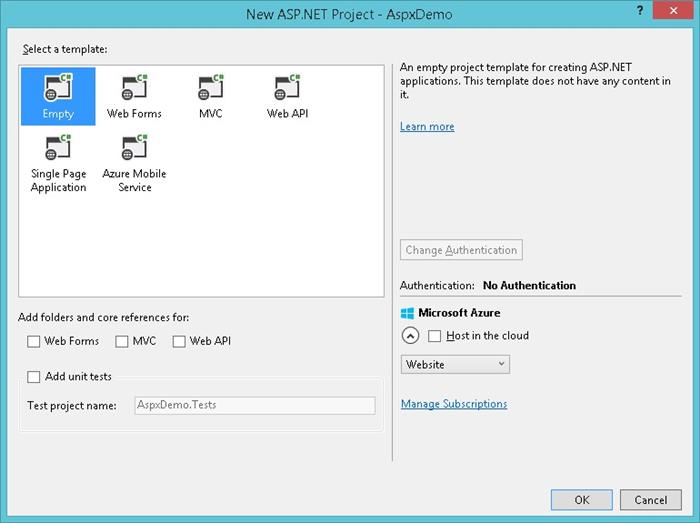
Step One - Create a Project
Create an empty project to avoid all un-needed packages and files.
Add new folder (Accounts) and another folder called (Home) for instance.
You may choose to have a master page file.
So, this step is the easiest and the most straightforward, obviously you need a project to have your files within.
Step Two - Add Needed Packages
You need the following packages, in fact, the first one is sufficient, but I am using the other three.
- Install-Package
Microsoft.Owin.Security - Install-Package
Microsoft.Owin.Host.SystemWeb - Install-Package
Microsoft.AspNet.Identity.Core - Install-Package
Microsoft.Owin.Security.Cookies
So as you can see, three of them are related directly to Microsoft implementation of OWIN and the fourth is related to security and identity.
This step is also straigtforward and simple.
Step Three - Add OWIN Startup File
Add a new item to the project and select (OWIN Start up class).
This class is the OWIN set up class that should run first to set OWIN up.

It will add this file to your application.
[assembly: OwinStartup(typeof(Demo.Security.Startup1))]
namespace Demo.xxxxxxxxxxx
{
public class Startup1
{
public void Configuration(IAppBuilder app)
{
}
}
}
What we notice here is that assembly attribute, this is needed to mark that file as the owin start up file.
OWIN startup is the file that sets OWIN up and hooks it up with the application, it should be executed first when Application starts.
The other thing we notice is that if you keep the file's name as Startup, you don't really need that assembly attribute that's why I commented it out in ASPX project while I needed it in MVC project because I change the name of the file... (a third option is to use configurations to mark that startup file as a startup.)
This is also a very simple and straightforward step. All the three steps can be merged in one because they are nothing but adding files and packages.
Finally, Do Some Coding and Configurations
This is the only step where you get your hands just a little wet.
Few lines of code and configurations are shown below:
public class Startup
    {
        public void Configuration(IAppBuilder app)
        {
            app.UseCookieAuthentication(new CookieAuthenticationOptions
            {
                AuthenticationType = DefaultAuthenticationTypes.ApplicationCookie,
                LoginPath = new PathString("/Account/Login.aspx"),
                CookieSecure = CookieSecureOption.SameAsRequest
            });
        }
    }
We added one line of code in the startup file or class just to add a cookie-based authentication middleware to your web application pipeline.
We are indicating to use cookies and also indicating the login page.
In this demo, I created two folders Account and Home, I added few pages.
Let's call all these pages as resources, now using the configuration files, I can indicate which of these resources is protected (needs authenticated user to access it and which don't), I can set that on all resources in one folder or subfolder or just specific pages.
Now all the code you need to add is in the login page, and it is just few lines of code.
In short, after user enters credentials, you validate them, against your database if user is authenticated, you load all his claims (if you don't know the meaning of claims or how to use them, that is a different topic), once you got or composed the claims, you can use OWIN to authenticate the user (in our case, to create an authentication ticket and a cookie for that user ).
The claims help creating the identity for that user.
protected void LogIn(object sender, EventArgs e)
{
if (ModelState.IsValid)
{
if (true)
{
List<Claim> claims = GetClaims();
if (null != claims)
{
SignIn(claims);
LoggingHelper. RedirectToReturnUrl(Request.QueryString["ReturnUrl"], Response);
}
ModelState.AddModelError("", "Invalid username or password.");
}
else
{
ModelState.AddModelError("", "No User of that email address.");
}
}
}
This is just a dummy function to create claims, you need to add claims per user from data in your database or user's profile, I just made these claims up:
private List<Claim> GetClaims()
{
    var claims = new List<Claim>();
    claims.Add(new Claim(ClaimTypes.Email, "assilabdulrahim@gmail.com"));
    claims.Add(new Claim(DemoIdentity.IPClaimType, "128.236.333.2"));
    claims.Add(new Claim(DemoIdentity.IdClaimType, "12345"));
    claims.Add(new Claim(ClaimTypes.Name, "Assil"));
    claims.Add(new Claim(ClaimTypes.Name, "Abdulrahim"));

    var roles = new[] { "Admin", "Citizin", "Worker" };
    var groups = new[] { "Admin", "Citizin", "Worker" };

    foreach (var item in roles)
    {
        claims.Add(new Claim(DemoIdentity.RolesClaimType, item));
    }
    foreach (var item in groups)
    {
        claims.Add(new Claim(DemoIdentity.GroupClaimType, item));
    }
    return claims;
}
This is the actual authentication and there is only one line that matters which is:
AuthenticationManager.SignIn
I created an Identity, a custom identity and the signed in with those claims and then created a custom principle and assigned it to the user of my application.
That way, my application knows the user, knows its claims and privileges and also OWIN has taken care of maintaining that through all the requests.
private void SignIn(List<Claim> claims)
{
var claimsIdentity = new DemoIdentity(claims,
DefaultAuthenticationTypes.ApplicationCookie);
LoggingHelper.AuthenticationManager.SignOut(DefaultAuthenticationTypes.ApplicationCookie);
LoggingHelper.AuthenticationManager.SignIn
(new AuthenticationProperties() { IsPersistent = false }, claimsIdentity);
HttpContext.Current.User = new DemoPrincipal
(LoggingHelper.AuthenticationManager.AuthenticationResponseGrant.Principal);
}
As we said earlier, we need to inform the web application which resources are protected, and this is done using the configuration files, of the website or in any sub folders.
We can also protect selected resources within the same subfolder using location, like this example:
="1.0"
<configuration>
<location path="About.aspx">
<system.web>
<authorization>
<deny users="?"/>
</authorization>
</system.web>
</location>
</configuration>
If you remove this , you will apply that authorization on all resources in that sub folder.
<location path="About.aspx">
</location>
ASP.NET MVC
No big change here in MVC, the first three steps are almost the same.
And a very minor difference in the fourth step.
Step One - Create a Project
Just like in ASPX, create an empty project to avoid all un-needed packages and files.
Add new folder (Models, Controllers, Views).
You may choose to have a layout file.
Step Two - Add Needed Packages
You need the following packages, in fact, the first one is sufficient, but I am using the other three.
Because it is an MVC application, you need MVC framework for sure:
- Install-Package
Microsoft.AspNet.Mvc (this is addition to MVC) - Install-Package
Microsoft.Owin.Security - Install-Package
Microsoft.Owin.Host.SystemWeb - Install-Package
Microsoft.AspNet.Identity.Core - Install-Package
Microsoft.Owin.Security.Cookies
Step Three - Add OWIN Startup file
Add a new item to the project and select (OWIN Start up class)
This class is the OWIN set up class that should run first to set OWIN up.
Finally
Few lines of code and configurations shown below:
public class AuthConfig
   {
       public void Configuration(IAppBuilder app)
       {
           System.Web.Helpers.AntiForgeryConfig.UniqueClaimTypeIdentifier = ClaimTypes.Email;
           app.UseCookieAuthentication(new CookieAuthenticationOptions
           {
               AuthenticationType = DefaultAuthenticationTypes.ApplicationCookie,
               LoginPath = new PathString("/Account/Login"),
               CookieSecure = CookieSecureOption.SameAsRequest
           });
       }
   }
So far, everything is almost exactly like ASPX.
private void SignIn(List<Claim> claims)
{
var claimsIdentity = new DemoIdentity(claims,
DefaultAuthenticationTypes.ApplicationCookie);
AuthenticationManager.SignOut(DefaultAuthenticationTypes.ExternalCookie);
AuthenticationManager.SignIn(new AuthenticationProperties()
{ IsPersistent = true }, claimsIdentity);
HttpContext.User = new DemoPrincipal
(AuthenticationManager.AuthenticationResponseGrant.Principal);
}
The code is also the exact same, the differences are:
You don't inform the application about protected resources by configuration file, you don't have files in MVC you have actions and views.
To mark an action or controller as needs authorization/authentication' you add this attribute:
[Authorize]
That's all in regards to OWIN, yet in order to make your sample work, and since you started with an empty project not MVC project, you need to set the routes of the application and also some razor configurations (look at the demo).
I graduated as an electronic engineer at 2000, and I have been working in software development ever since.
Interested mainly in .NET technologies.


 General
  News
News  Suggestion
  Question
  Bug
Bug  Answer
  Joke
Joke  Praise
  Rant
Rant  Admin
Admin 


