Introduction
The Model-View-Controller pattern have been used widely with good results in software developement, mainly related with web development in frameworks like Django, Symphony ASP.NET MVC amoung others. On the other hand some variant of this patterns have emerged, like the Model-View-ViewModel (MVVM) or Model-View-Presenter (MVP) patterns that have been adopted effectively for desktop applications.
About to Android, some people says it is a MVC framework in some way, due to the Activity or Fragment acts as a Controller and the View are defined in layout xml files. The problem is that generally the Activity or Fragment class’s file are too big and contains lots of code for managing the UI and events handling. Thus making it difficult to maintain and scale with new requirements.
The framework I introduce here with two successfully products for Android is called Enterlib and it was developed based on the MVVM pattern. Enterlib helps you to decouple your application components in to separated layers and the communications between they is through well-defined interfaces or contracts. The architecture will help you to write reusable, robust and testable components that can scale with new functionalities with little changes in the code. Also the framework provides utilities for:
- Performing data binding
- Invoking Asynchronous operations
- Performing data validations and conversion
- Serializing components into JSON
- Invoking of RESTful HTTP Services
- Performing data filtering
- Communicating between loose couple components
- implementing the Repository pattern with common Interfaces
- Implementing Views
- Implementing ViewModels
- Additional set of Widgets
Background
Some of the base components of Enterlib came from concepts found in WPF (Windows Presentation Foundation) like Dependency Properties, Data Context, Resources and Bindings. And also from known patterns such as the Observer, Commanding, Delegates, and Factory among others.
Using the code
Using Enterlib the View can implements IDataView. This interface defines common functionalities for displaying a progress dialog when doing background operations in the ViewModel , updating the UI once the background operation finished, indicates the View is ready for displaying data, and reports exceptions or validations messages in a friendly. There is also a class FragmentView that implements IDataView and is used as the base of BindableFragment, the later implements the IFormView interface and allows easily data-binding and validation of input data.
Usually the ViewModel is defined as a descendant of DataViewModel.Then the View is resposable for creating his ViewModel, for that the FragmentView define the following method that is called during the invocation of onActivityCreated.
protected abstract DataViewModel createViewModel(Bundle savedInstanceState);
The DataViewModel is the root DataContext for the binding operations, it implements the Observable pattern and notifies the View when a property changed. Besides it defines common workflows for loading data in background threads and navigating to others Views in the app. In the ViewModel you can defined commands that represents operations to be invoked when the user performs an action on the UI, for example pressing a button or selecting an item in a ListView as we will see later.
Let’s see an example of a simple app with Eclipse+ADT in which we are going to define a LogIn Activity, validates the user inputs, invoke the LogIn command and go to an Activity that displays a list of product if the user provides the right credentials. First we have to import enterlib_lib as an android project library. The codes for the MainActivity and the LogInFragment are shown below
package mvvm.sample;

import android.app.Activity;
import android.os.Bundle;

public class MainActivity extends Activity {

	@Override
	protected void onCreate(Bundle savedInstanceState) {
		super.onCreate(savedInstanceState);
		setContentView(R.layout.activity_main);

		if (savedInstanceState == null) {
			getFragmentManager().beginTransaction()
					.add(R.id.container, new LogInFragment()).commit();
		}
	}
}
package mvvm.sample;

import com.enterlib.databinding.BindingResources;
import com.enterlib.mvvm.BindableFragment;
import com.enterlib.mvvm.DataViewModel;

import android.content.Intent;
import android.os.Bundle;
import android.view.LayoutInflater;
import android.view.View;
import android.view.ViewGroup;

public class LogInFragment extends BindableFragment {

	public LogInFragment() {
	}

	@Override
	public View onCreateView(LayoutInflater inflater, ViewGroup container,
			Bundle savedInstanceState) {
		View rootView = inflater.inflate(R.layout.fragment_main, container,
				false);
		return rootView;
	}

	@Override
	protected BindingResources getBindingResources() {
		return new BindingResources()
		.put("R.string", R.string.class);
	}

	@Override
	protected DataViewModel createViewModel(Bundle savedInstanceState) {
		return new LogInViewModel(this);
	}

	@Override
	public void navigateTo(int requestCode, Bundle extras, Object data) {
		switch (requestCode) {
		case LogInViewModel.GO_HOME:
			startActivity(new Intent(getActivity(), HomeActivity.class));
			break;

		default:
			break;
		}
	}
}
The LogInFragment creates a LogInViewModel instance and provides a BindingResources, preconfigures with the application's resources classes such as R.string and R.layout. Thouse resources are used during the setup of the bindings for locating an item template layout or the display's name of an input field when showing a validation message. The code for the LogInViewModel is display below
package mvvm.sample;
import com.enterlib.exceptions.ValidationException;
import com.enterlib.fields.Field;
import com.enterlib.fields.Form;
import com.enterlib.mvvm.Command;
import com.enterlib.mvvm.DataViewModel;
import com.enterlib.mvvm.IDataView;
import com.enterlib.threading.IWorkPost;
import com.enterlib.validations.ErrorInfo;
public class LogInViewModel extends DataViewModel {
public static final int GO_HOME = 0;
public static class LoginModel{
public String Username;
public String Password;
}
LoginModel login;
public LoginModel getLogin() {
return login;
}
public LogInViewModel(IDataView view) {
super(view);
}
@Override
protected boolean loadAsync() throws Exception {
login =new LoginModel();
return true;
}
public Command LoginCommand = new Command() {
public void invoke(Object invocator, Object args) {
Field field = (Field) invocator;
Form form = field.getForm();
if(form.validate()){
form.updateSource();
doAsyncWork("Verifing user's credentials...", new IWorkPost() {
@Override
public boolean runWork() throws Exception {
Thread.sleep(2000);
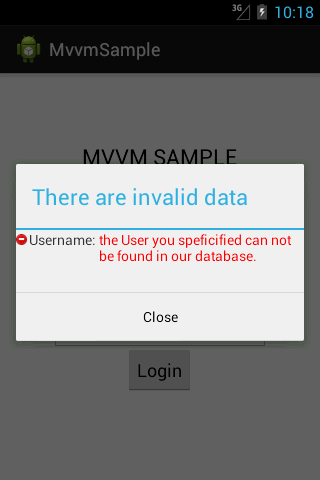
if(!login.Username.equalsIgnoreCase("admin")){
throw new ValidationException(new ErrorInfo()
.addError("Username", "the User you speficified can not be found in our database."));
}
return true;
}
@Override
public void onWorkFinish(Exception workException) {
if(workException!=null)
return;
getNavigator().navigateTo(GO_HOME, null, null);
}
});
}
}
};
}
When a command is invoked the invocator is an instance of Field. The Field acts as a controller for the UI element. It defines the bindable properties and commands the element suport. Also it is in charge for seting the bindings, controls the validation workflow, notifies the user then its value is not valid and invoke the value converter when setting or getting the field’s value. The fields are contained in a Form object. The Form is responsible for creating the Fields from the Fragment's root ViewGroup calling the Form's method.
public static Form build(BindingResources bindingResources, ViewGroup rootView, Object viewModel);
The layout for the LogInFragment is shown below. The bindings are defines with expressions using the android:tag attribute. For example the relativeLayout1 defines a binding to the readonly Login (getLogin) property of the LogInViewModel with the expression android:tag="{Value:Login}". This sets the DataContext for the relativeLayout1's childrens to be the value of the Login property
<RelativeLayout xmlns:android="http://schemas.android.com/apk/res/android"
    xmlns:tools="http://schemas.android.com/tools"
    android:layout_width="match_parent"
    android:layout_height="match_parent"
    android:paddingBottom="@dimen/activity_vertical_margin"
    android:paddingLeft="@dimen/activity_horizontal_margin"
    android:paddingRight="@dimen/activity_horizontal_margin"
    android:paddingTop="@dimen/activity_vertical_margin"
    tools:context="mvvm.sample.MainActivity$PlaceholderFragment" />

    <RelativeLayout
        android:id="@+id/relativeLayout1"
        android:layout_width="match_parent"
        android:layout_height="wrap_content"
        android:layout_centerInParent="true"
        android:tag="{Value:Login}" >

        <TextView
            android:id="@+id/textView1"
            android:layout_width="wrap_content"
            android:layout_height="wrap_content"
            android:layout_alignLeft="@+id/editText1"
            android:layout_alignParentTop="true"
            android:text="@string/username"
            android:textAppearance="?android:attr/textAppearanceMedium" />

        <TextView
            android:id="@+id/textView2"
            android:layout_width="wrap_content"
            android:layout_height="wrap_content"
            android:layout_alignLeft="@+id/editText1"
            android:layout_below="@+id/editText1"
            android:text="@string/password"
            android:textAppearance="?android:attr/textAppearanceMedium" />

        <EditText
            android:id="@+id/editText1"
            android:layout_width="wrap_content"
            android:layout_height="wrap_content"
            android:layout_below="@+id/textView1"
            android:layout_centerHorizontal="true"
            android:background="@drawable/custom_edit_text"
            android:ems="10"
            android:tag="{Value:Username, Required:true, DisplayRes:username}" />

        <EditText
            android:id="@+id/editText2"
            android:layout_width="wrap_content"
            android:layout_height="wrap_content"
            android:layout_alignLeft="@+id/textView2"
            android:layout_below="@+id/textView2"
            android:background="@drawable/custom_edit_text"
            android:ems="10"
            android:inputType="textPassword"
            android:tag="{Value:Password, Required:true, DisplayRes:password}" />
    </RelativeLayout >

    <TextView
        android:id="@+id/textView3"
        android:layout_width="wrap_content"
        android:layout_height="wrap_content"
        android:layout_alignParentTop="true"
        android:layout_centerHorizontal="true"
        android:layout_marginTop="52dp"
        android:text="MVVM SAMPLE"
        android:textAppearance="?android:attr/textAppearanceLarge" />

    <Button
        android:id="@+id/button1"
        android:layout_width="wrap_content"
        android:layout_height="wrap_content"
        android:layout_below="@+id/relativeLayout1"
        android:layout_centerHorizontal="true"
        android:tag="{ClickCommand:LoginCommand}"
        android:text="Login" />

</RelativeLayout>
In the code listing above the EditText containing the input for the usernamet declares the following binding android:tag="{Value:Username, Required:true, DisplayRes:username}". This means that the field’s value controlling the EditText is binded to the "username" property of the field’s DataContext, which is the object binded to the field’s value controlling the parent layout. This creates a chain of binding until it reach the root DataContext the LogInViewModel. Also the expression, DisplayRes:username indicates that when a validation message is shown the name for the field is the string located in the resource file res/value/string.xml with name=”username”. In addition the LoginCommand of the ViewModel is binded to the bindable property ClickCommandProperty of the Button's Field through the expression android:tag="{ClickCommand:LoginCommand}".
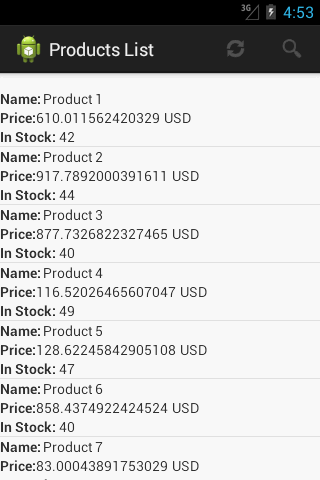
The code listing for the products list Activity is shown below
package mvvm.sample;

import android.app.Activity;
import android.os.Bundle;

public class HomeActivity extends Activity {
	@Override
	protected void onCreate(Bundle savedInstanceState) {
		super.onCreate(savedInstanceState);
		setContentView(R.layout.activity_main);

		if (savedInstanceState == null) {
			getFragmentManager().beginTransaction()
					.add(R.id.container, new ProductListFragment()).commit();
		}
	}
}
The View
package mvvm.sample;
import java.util.Random;
import android.os.Bundle;
import android.view.LayoutInflater;
import android.view.View;
import android.view.ViewGroup;
import com.enterlib.data.ICollectionRepository;
import com.enterlib.databinding.BindingResources;
import com.enterlib.exceptions.InvalidOperationException;
import com.enterlib.mvvm.DataViewModel;
import com.enterlib.mvvm.GenericListFragment;
public class ProductListFragment extends GenericListFragment<ProductListItem> {
@Override
public void onCreate(Bundle savedInstanceState) {
super.onCreate(savedInstanceState);
setHasOptionsMenu(true);
}
@Override
public View onCreateView(LayoutInflater inflater, ViewGroup container,
Bundle savedInstanceState) {
return inflater.inflate(R.layout.fragment_products_list, null);
}
@Override
protected ICollectionRepository<ProductListItem> createRepository() {
return new ICollectionRepository<ProductListItem>() {
@Override
public ProductListItem[] getItems() throws InvalidOperationException {
ProductListItem[]products = new ProductListItem[20];
Random ran = new Random();
for (int i = 0; i < products.length; i++) {
ProductListItem p = new ProductListItem();
p.id = i +1;
p.name ="Product "+ String.valueOf(p.id);
p.price = ran.nextDouble() * 1000;
p.currency = "USD";
p.stock = ran.nextInt(50);
products[i] = p;
}
try {
Thread.sleep(3000);
} catch (InterruptedException e) {
e.printStackTrace();
}
return products;
}
};
}
@Override
protected DataViewModel createViewModel(Bundle savedStateInstance) {
ProductListViewModel vm = new ProductListViewModel(this, createRepository());
setSelectionCommand(vm.SelectCommand);
return vm;
}
@Override
protected BindingResources getBindingResources() {
return new BindingResources()
.put("R.string", R.string.class)
.put("R.layout", R.layout.class);
}
@Override
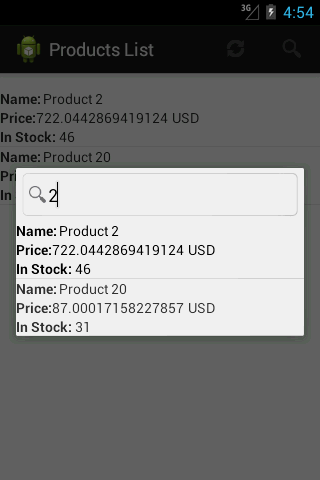
protected String getFilterHint() {
return "Name";
}
}
The Model
package mvvm.sample;

public class ProductListItem {
	public int id;
	public String name;
	public double price;
	public String currency;
	public int stock;

	@Override
	public String toString() {
		return name;
	}
}
The ViewModel in this case extends from CollectionViewModel<t> which defines a readonly property getItems that returns and array of T. This property is binded to the Value property of the ListField controlling the ListView as it can seen in the XML layout for the fragment_products_list.
package mvvm.sample;

import android.view.View;
import android.widget.AdapterView;

import com.enterlib.data.ICollectionRepository;
import com.enterlib.fields.Field;
import com.enterlib.mvvm.CollectionViewModel;
import com.enterlib.mvvm.IMessageReporter;
import com.enterlib.mvvm.IReporterDataView;
import com.enterlib.mvvm.SelectionCommand;

public class ProductListViewModel extends CollectionViewModel<ProductListItem> {

	public ProductListViewModel(IReporterDataView view,
			ICollectionRepository<ProductListItem>  repository) {
		super(view, repository);

	}

	public SelectionCommand SelectCommand = new SelectionCommand() {

		@Override
		public void invoke(Field field, AdapterView<?> adapterView, View itemView,
				int position, long id) {
			ProductListItem item = (ProductListItem) adapterView.getItemAtPosition(position);
			((IMessageReporter) getView()).showMessage("Item Selected "+item.name);

		}
	};

}
The ProductListFragment's layout (fragment_products_list)
="1.0"="utf-8"
<RelativeLayout xmlns:android="http://schemas.android.com/apk/res/android"
xmlns:tools="http://schemas.android.com/tools"
android:layout_width="match_parent"
android:layout_height="match_parent"
android:paddingTop="@dimen/activity_vertical_margin">
<ListView
android:id="@+id/listView"
android:layout_width="match_parent"
android:layout_height="match_parent"
android:fastScrollEnabled="true"
android:tag="{
Value:Items,
ItemTemplate:product_item_template,
ItemClickCommand:SelectCommand}" />
</RelativeLayout>
The Item Template Layout (product_item_template)
="1.0"="utf-8"
<LinearLayout xmlns:android="http://schemas.android.com/apk/res/android"
android:layout_width="match_parent"
android:layout_height="match_parent"
android:orientation="vertical" >
<LinearLayout
android:layout_width="match_parent"
android:layout_height="wrap_content" >
<TextView
android:textStyle="bold"
android:layout_width="wrap_content"
android:layout_height="wrap_content"
android:text="Name:"
/>
<Space
android:layout_width="wrap_content"
android:layout_height="wrap_content"
android:layout_marginLeft="1dp"
android:layout_marginRight="1dp" />
<TextView
android:layout_width="wrap_content"
android:layout_height="wrap_content"
android:tag="{Value:name}"
/>
</LinearLayout>
<LinearLayout
android:layout_width="match_parent"
android:layout_height="wrap_content" >
<TextView
android:textStyle="bold"
android:layout_width="wrap_content"
android:layout_height="wrap_content"
android:text="Price:"
/>
<TextView
android:layout_width="wrap_content"
android:layout_height="wrap_content"
android:tag="{Value:price}"
/>
<Space
android:layout_width="wrap_content"
android:layout_height="wrap_content"
android:layout_marginLeft="2dp"
android:layout_marginRight="2dp" />
<TextView
android:layout_width="wrap_content"
android:layout_height="wrap_content"
android:tag="{Value:currency}"
/>
</LinearLayout>
<LinearLayout
android:layout_width="match_parent"
android:layout_height="wrap_content" >
<TextView
android:textStyle="bold"
android:layout_width="wrap_content"
android:layout_height="wrap_content"
android:text="In Stock: " />
<TextView
android:layout_width="wrap_content"
android:layout_height="wrap_content"
android:tag="{Value:stock}"
/>
</LinearLayout>
</LinearLayout>
Login Screen


Product List Screen

Points of Interest
There are a lots of features in Enterlib not covered in this article and it's still growing with new utilities. It was very useful for me during the development of enterprises applications for Android that retrieve its data from RESTfull Services implemented with WCF. I hope it will be useful in your projects and I appreciate any ideas for improving the framework.
About the Author
Senior Software Engineer with more than 8 years of experience in the industry. Graduated from Computer Science ,focused on .NET and Java technologies with special interest on Computer Graphics, Compilers , Languages and Machine Learning.


 General
  News
News  Suggestion
  Question
  Bug
Bug  Answer
  Joke
Joke  Praise
  Rant
Rant  Admin
Admin 


