In this post, we will see some information about IndexedDB. As the name implies, IndexedDB is a database in which we can do all kinds of operations which we do in a normal database. This IndexedDB has been introduced with the HTML5. This allows a user to store large amount of data in user’s browser. It has been proved that IndexedDB is more powerful and efficient than other storage mechanisms like local storage and session storage. Basically IndexedDB is an API which helps the developers to do some database operations in client side, like creating database, open the transaction, creating tables, inserting values to tables, deleting values, reading the data. If you need any other way to save some data in client side, you can use storage mechanisms introduced in HTML5. Now we will look some of the operations a developer can do with IndexedDB. I hope you will like this.
Background
Before introducing IndexedDB, developers were familiar with Web SQL. If you need to know more about Web SQL, you can see Web SQL Introduction.
Why to Use IndexedDB Instead of Web SQL?
W3C has been announced that use of Web SQL is obsolete and deprecated, hence it is not recommended using Web SQL in your applications. Most of the modern web browsers like Mozilla do not support the use of Web SQL, this is also a great limitation of Web SQL.
Now we have an alternative of Web SQL, IndexedDB which is more efficient and faster than Web SQL. Below are some of the main advantages of IndexedDB.
- It stores the data as Key-Pair values
- It is Asynchronous
- It is non relational
- Can access the data from the same domain
Using the Code
As you all know, the first step to work with a database is just creating it.
Create/Open IndexedDB Database
It is always better to check whether your browser is supporting IndexedDB or not. To check that, you can use the following syntax.
<script type="text/javascript">
window.indexedDB = window.indexedDB || window.mozIndexedDB ||
window.webkitIndexedDB || window.msIndexedDB;
if (!window.indexedDB) {
alert("Oops, Does not support IndexedDB");
}
</script>
So if your browser is supporting IndexedDB, you are ready to go!. Cool!. Now we can create a database.
if (!window.indexedDB) {
alert("Oops, Does not support IndexedDB");
} else {
var dbName = 'myDB';
var dbVersion = 2;
var crDB = window.indexedDB.open(dbName, dbVersion);
}
Here the first parameter is the database name and the second one is the version of your database. A version represents your database’s current schema. If everything goes well, you can see your database in your browser’s resources as follows:
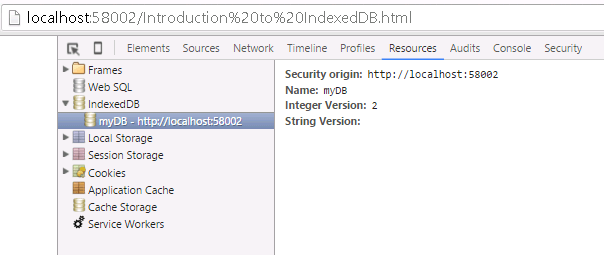
IndexedDB Creation
When you create a database, there some certain events that are getting fired. They are:
onupgradeneeded
crDB.onupgradeneeded = function (event) {
                alert("That's cool, we are upgrading");
                db = event.target.result;
                var objectStore = db.createObjectStore("UserName", { keyPath: "UserID" });
            };
This event gets fired when you try upgrading your database. Here, we are creating an object store with name ‘UserName’ and index key ‘UserID’. Below is the output you get when the onupgradeneeded is fired.

IndexedDB onupgradeneeded Alert
IndexedDB onupgradeneeded Output
onsuccess
crDB.onsuccess = function (event) {
                alert("Awesome, You have successfully Opened a Databse!");
                db = event.target.result;
            }
If there are no errors, you will get an alert as follows:
IndexedDB OnSuccess Alert
onerror
crDB.onerror = function (event) {
               alert("Oops, There is error!", event);
           }
Here crDB is our database instance. Once this is done, we can start using the transaction as we use in SQL.
Creating Transaction
To create a transaction, we can use the following syntax. We can use transaction method from our database instance.
var myTran = db.transaction(["UserName"], "readwrite");
myTran.oncomplete = function (e) {
alert("Awesome, Transaction is successfully created!");
};
myTran.onerror = function (e) {
alert("Oops, There is error!", e.message);
};
Here db is our database instance. And myTran is our transaction object which we are going to use for our upcoming operations. We are creating a transaction with read write permission, that is why we have given a property as ‘readwrite’ while creating transaction. Why we use transaction is, as you all know transaction can be rolled back. For example, if any of the operation throws any error, the transaction will be rolled back so there won’t be any kind of mismatching data happening. And of course, we can easily manage error logs with the help of transaction. Shall we write queries needed for our operations?
Adding the Data
Once our transaction is ready, we can insert some data to our object in the transaction onsuccess event, which we have called inside of database onsuccess event. Please check the below code.
crDB.onsuccess = function (event) {
alert("Awesome, You have successfully Opened a Databse!");
db = event.target.result;
var myTran = db.transaction(["UserName"], "readwrite");
myTran.oncomplete = function (e) {
alert("Awesome, Transaction is successfully created!");
};
myTran.onsuccess = function (e) {
alert("Awesome, Transaction is successfully created!");
var myObj = myTran.objectStore("UserName");
var myNames = ["Sibi", "Aji",
"Ansu", "Shantu", "Aghil"];
for (var i = 0; i < 5; i++) {
myObj.add({ UserID: 'SBKL0' + i, Name: myNames[i] });
}
};
myTran.onerror = function (e) {
alert("Oops, There is error!", e.message);
};
}
Here myNames is the array in which we have few names and we are using a loop to insert few data to the object. Now, you can see that your data has been added to the object in your browser’s resources.
IndexedDB Adding Data To Objects
We have successfully added data. Right? Now we will see how we can remove the data we just added.
Removing the Data
If there is adding, there should be deleting :). You can delete an object from object store as follows:
setTimeout(function () {
                        db.transaction(["UserName"],
                        "readwrite").objectStore("UserName").delete('SBKL00');
                    }, 10000);
So you can re write the onsuccess event of transaction as follows:
myTran.onsuccess = function (e) {
alert("Awesome, Transaction is successfully created!");
var myObj = myTran.objectStore("UserName");
var myNames = ["Sibi", "Aji",
"Ansu", "Shantu", "Aghil"];
for (var i = 0; i < 5; i++) {
myObj.add({ UserID: 'SBKL0' + i, Name: myNames[i] });
}
setTimeout(function () {
db.transaction(["UserName"],
"readwrite").objectStore("UserName").delete('SBKL00');
}, 10000);
};
It can give you an output as follows:
<>
IndexedDB Deleting Data From Objects
Now, we will see how we can access a particular data from object store.
Access the Data with Key
To access a particular data, we will add a button and in the button click event, we will fetch the details needed as a request.
<input id="btnGet" type="button" value="Get Name" />
Click event is as follows:
$(function () {
            $('#btnGet').click(function () {
                var get = db.transaction(["UserName"],
                "readwrite").objectStore("UserName").get('SBKL01');
                get.onsuccess = function (event) {
                    alert("The name you have requested is : " + get.result.Name);
                };
            });
        });
You can get the alert as follows, if you run your code.
IndexedDB Get The Data With Key
Now we will see how we can update data with the Get method.
Updating the Data
To update the data, we will have a button and in the button click, we will fire the needed code.
<input id="btnUpdate" type="button" value="Update Name" />
And click event is as follows:
$('#btnUpdate').click(function () {
                var updObject = db.transaction(["UserName"],
                "readwrite").objectStore("UserName");
                var upd=updObject.get('SBKL03');
                upd.onsuccess = function (event) {
                    upd.result.Name = 'New Name';
                    updObject.put(upd.result);
                };
            });
Here, we are getting an element using the get method, and we are updating the value in the result, once it is done, we will assign that new result to the object store using put method.
It will give you an output as follows:
IndexedDB Update The Data With Key
An another interesting thing is, we can use cursors also as we use in SQL, if we need to loop through some data. Here, I will show you how we can do that.
Using Cursor
Create a button and write a little code as follows:
<input id="btnShow" type="button" value="Show the data" />
Then we will create an HTML table.
<div id="myTab">
        <table id="show">
            <thead>
                <th>User ID </th>
                <th>Name</th>
            </thead>
            <tbody></tbody>
        </table>
    </div>
Now we can write the cursor as follows:
$('#btnShow').click(function () {
var curObject = db.transaction(["UserName"],
"readwrite").objectStore("UserName");
curObject.openCursor().onsuccess = function (event) {
var cur = event.target.result;
if (cur) {
$('#show').append('<tr><td>' +
cur.key + '</td><td>' + cur.value.Name + '</td></tr>');
cur.continue();
}
};
$('#myTab').show();
});
Here, we are creating a cursor using the function openCursor() and in the onsuccess event, we are looping through the cursor. You can always give some styles to your table.
<style>
        table, tr, td, th {
            border: 1px solid #ccc;
            border-radius: 5px;
            padding: 10px;
            margin: 10px;
        }
    </style>
That is all. Now when you click the show button, you can see the data in a table format as follows:
IndexedDB Using Cursor
Complete Code
<!DOCTYPE html>
<html>
<head>
<title>Introduction to IndexedDB</title>
<script src="Scripts/jquery-1.11.1.min.js"></script>
<script type="text/javascript">
var dbName = 'myDB';
var dbVersion = 2;
var crDB;
var db;
window.indexedDB = window.indexedDB ||
window.mozIndexedDB || window.webkitIndexedDB || window.msIndexedDB;
if (!window.indexedDB) {
alert("Oops, Does not support IndexedDB");
} else {
crDB = window.indexedDB.open(dbName, dbVersion);
var db;
crDB.onerror = function (event) {
alert("Oops, There is error!", event);
}
crDB.onupgradeneeded = function (event) {
alert("That's cool, we are upgrading");
db = event.target.result;
var objectStore = db.createObjectStore("UserName", { keyPath: "UserID" });
};
crDB.onsuccess = function (event) {
alert("Awesome, You have successfully Opened a Databse!");
db = event.target.result;
var myTran = db.transaction(["UserName"], "readwrite");
myTran.oncomplete = function (e) {
alert("Awesome, Transaction is successfully created!");
};
myTran.onsuccess = function (e) {
alert("Awesome, Transaction is successfully created!");
var myObj = myTran.objectStore("UserName");
var myNames = ["Sibi", "Aji",
"Ansu", "Shantu", "Aghil"];
for (var i = 0; i < 5; i++) {
myObj.add({ UserID: 'SBKL0' + i, Name: myNames[i] });
}
setTimeout(function () {
db.transaction(["UserName"],
"readwrite").objectStore("UserName").delete('SBKL00');
}, 10000);
};
myTran.onerror = function (e) {
alert("Oops, There is error!", e.message);
};
}
}
$(function () {
$('#myTab').hide();
$('#btnGet').click(function () {
var get = db.transaction(["UserName"],
"readwrite").objectStore("UserName").get('SBKL01');
get.onsuccess = function (event) {
alert("The name you have requested is : " + get.result.Name);
};
});
$('#btnUpdate').click(function () {
var updObject = db.transaction(["UserName"],
"readwrite").objectStore("UserName");
var upd = updObject.get('SBKL03');
upd.onsuccess = function (event) {
upd.result.Name = 'New Name';
updObject.put(upd.result);
};
});
$('#btnShow').click(function () {
var curObject = db.transaction(["UserName"],
"readwrite").objectStore("UserName");
curObject.openCursor().onsuccess = function (event) {
var cur = event.target.result;
if (cur) {
$('#show').append('<tr><td>' +
cur.key + '</td><td>' +
cur.value.Name + '</td></tr>');
cur.continue();
}
};
$('#myTab').show();
});
});
</script>
<style>
table, tr, td, th {
border: 1px solid #ccc;
border-radius: 5px;
padding: 10px;
margin: 10px;
}
</style>
</head>
<body>
<input id="btnGet" type="button" value="Get Name" />
<input id="btnUpdate" type="button" value="Update Name" />
<input id="btnShow" type="button" value="Show the data" />
<div id="myTab">
<table id="show">
<thead>
<th>User ID </th>
<th>Name</th>
</thead>
<tbody></tbody>
</table>
</div>
</body>
</html>
That is all. We did it. Have a happy coding.
Conclusion
Did I miss anything that you may think is needed? Did you try Web SQL yet? Have you ever had this requirement? Could you find this post useful? I hope you liked this article. Please share me your valuable suggestions and feedback.
Your Turn. What Do You Think?
A blog isn’t a blog without comments, but do try to stay on topic. If you have a question unrelated to this post, you’re better off posting it on C# Corner, Code Project, Stack Overflow, ASP.NET Forum instead of commenting here. Tweet or email me a link to your question there and I’ll definitely try to help if I can.


 General
  News
News  Suggestion
  Question
  Bug
Bug  Answer
  Joke
Joke  Praise
  Rant
Rant  Admin
Admin 


