Introduction
This article describes automated web deployment using Team Foundation Server. It provides step-by-step guide from installation thru configuration to deployment.
I want to notice, I used the simplest configuration wizard to configure TFS and accepted the defaults what is ok for this demo purpose. In general, the TFS setup is simple and straight-forward, but I wanted to keep it as simple as possible.
Accepting the defaults also means, the Team Foundation Application Server runs under NT AUTHORITY/LOCAL SERVICE account and the Build Service runs under NT AUTHORITY/System account. The best practice in a production (domain) enviroment is to create separate service accounts for both with least possible privileges (e.g. tfs_app for application server and tfs_build for build service).
Another important information here is that I installed, for this demo purpose, everything on one machine – SQL Server, Team Foundation Server, Build Service. Also, we will deploy/publish a web application and it’s database to the same machine – so we’ll use SQL Server and IIS running on the same machine where TFS is installed.
Products used: Windows Server 2008 R2, SQL Server 2008 R2, Team Foundation Server 2010, Visual Studio 2012.
Content
- Team Foundation Server – installation and configuration
- Build/Deployment prerequisites installation
- Connect to Team Foundation Server from Visual Studio 2012
- Create a New Team Project
- Add Source Code to TFS Source Control
- How to make sure our solution is in source control
- Check-in the solution
- Create a New Build Definition
- Deploy Web Application – Trigger the manual build
- Issue 1
- Issue 2
- Check published web application
- Deploy a new version of already published web application
Team Foundation Server - installation and configuration
Let’s run TFS installation. On the feature selection page in installation wizard, select all components as you can see below.
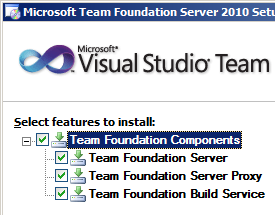
Team Foundation Server – source code control (work items tracking, version history maintaining)
Team Foundation Server Proxy – cache files locally = less bandwith, improve performance (typically installed in a remote location)
Team Foundation Build Service – automated builds. The best practise is to install this feature on a different server, but for simplicity we’ll install it on the same machine as Team Foundation Application Server.
Once the product installation is successfully completed, click on Configure to start TFS configuration wizard.

A TFS configuration wizard appears, where we’re going to configure Team Foundation Application Server and Team Foundation Build Service. You can choose from multiple configuration wizards – select the wizard which best fits your needs.
For our needs Basic wizard is sufficient (it is the simples setup option), so select Basic and click Start Wizard. The Basic Configuration Wizard appears – here you can set up only SQL Server Instance. Either you select Install SQL Server Express or if you have already installed some edition of SQL Server (Standard and Enterprise are supported) you can choose Use an existing SQL Server Instance.
I have already SQL Server installed (on the same machine where the Team Foundation Server is) so I chose the second option.
On the next wizard page specify the SQL Server Instance name. Finish the wizard by clicking Next and if you pass all validation checks (on Readiness Checks page), click Configure.
When configuration progress is completed, click Next
The configuration results page appears – here you can see configuration result, Team Foundation Server url and Web Access url as you can see below. Click Close to finish the wizard.
Now, you should see the Configuration Center again. Start the wizard to configure build service by clicking Configure Team Foundation Build Service and then Start Wizard.
The Build Service Configuration Wizard appears – click Next on each wizard page and accept selected defaults. It sets up this computer as a build machine, configures build controller and build agent.
What is important to know is that each build controller is dedicated to a single team project collection. For more information see this MSDN article.
Now let’s see the configuration we made in TFS Administration Console:
Click Start – All Programs – Microsoft Team Foundation Server 201x – Team Foundation Administration Console
The Team Foundation Server Administration Console comes up, where you can manage all configuration settings.
Under Application Tier, in the Team Project Collections is DefaultCollection, which was created by configuration wizard while configuring TFS application server. As you can see below, there is no Team Project in this collection. We will create a team project later in this tutorial using Visual Studio.
Build/Deployment prerequisites installation
In order to be able to build your web application with Team Build Service, it has to have all .targets files your web project needs. The installation of TFS doesn’t include all necessary files, so you have 2 options:
- Install Visual Studio on the same machine as TFS
OR
- Copy folder %Program Files (x86)%\MSBuild\Microsoft\VisualStudio\v10.0 (or v11.0 if you use Visual Studio 2012) from your development machine to the same location on Team Build Server
We want our web application not only to be build by the TFS Build Service, but also we want it to be deployed/published – so we have to install Web Deploy 3.5. The web application will use .NET Framework 4.5 so we have to install it as well (both on the machine where TFS is installed):
- Download and launch Web Platform Installer: http://go.microsoft.com/?linkid=9805118
- At the top of the Web Platform Installer 5.0, click Products
- In the navigation pane (on the left side), click Frameworks
- In the Microsoft .NET Framework 4.5 row, click Add (if the .NET Framework 4.0 is not already installed, click Add in this row as well)
- In the navigation pane, click Server
- In the Web Deploy 3.5, click Add
- Click Install
Connect to Team Foundation Server from Visual Studio 2012
- Open Visual Studio 2012 and click Connect to Team Foundation Server on the start page (or first click Team in the top menu)
Connect to Team Foudation Server dialog opens. - If your TFS is not listed in the servers drop down list, click Servers... and then click Add
- Write the name or IP address of the machine where TFS is installed and click OK.
Then you are prompted for credentials.
Note: I used Administrator’s account to connect to TFS. I have installed and configured TFS under this account, so it is set up as TFS administrator as well. For a real environment it is absolutely not good. So please, make sure to set appropriate privileges for a proper users.
So we have made connection to the TFS. In the middle are the project collections (we have only one DefaultCollection) and in the left bottom corner is the user account name you used to connect to TFS with. - Click on Connect button
Create a New Team Project
After we created connection to Team Foundation Server, on the right side of the Visual Studio (in Team Explorer tab) you should see you’re connected to DefaultCollection of specified TFS.
If you didn’t have Team Explorer open or you accidentally closed it, you can get it back by clicking View and Team Explorer in the top menu.
Now we’ll create a team project inside the DefaultCollection:
- In the Team Explorer tab click DefaultCollection, select Projects and click New Team Project...
- Write a project name (and a description if you want) on the first page of the New Team Project wizard that came up and click Next
- Select a process template you want to use to create this team project and click Next (templates‘ explanation is beyond the scope of this tutorial – just accept selected default)
- On the Specify Source Control Settings accept the default, click Next
- Review the setting you made and click Finish to create the team project
- When the project is successfully created, you should see the message on the last page of the wizard. Then click Close
- Check the Team Explorer tab – you should be connected to just created team project (in my case FirstProj)
Add Source Code to TFS Source Control
Now it’s time to open source code of your web application (or create a new one – my case) you want to add to source control and later build and deploy automatically.
So please, open your web application project/solution or create a new one. I created ASP.NET MVC 4 Web Application (Internet Application template without unit test project) named TFSTest.
To add your source code to source control you have to:
- Right click on the name of your solution (in the Solution Explorer tab) and select Add Solution to Source Control...
- Add Solution <solution name> to Source Control dialog opens – accept the defaults, click OK
The solution is added to source control.
How to make sure our solution is in source control
- You can see small plus sign next to each item in the solution (in the Solution Explorer tab)
OR
- Go to Team Explorer tab and click Source Control Explorer
- Source Control Explorer opens in the middle of the Visual Studio – here you can browse your solution added to source control
Here you can see the plus sign next to each item as well. It means, items were added to source control, but haven’t been checked-in yet.
Check-in the solution
- Right click on the name of your solution (in the Solution Explorer tab) and select Check In...
- Pending Changes appears (in the Team Explorer) – here you can enter a check-in comment and then click Check In button
- Check-in Confirmation dialog opens – click Yes to confirm check-in
Now your solution is added and checked-in to source control. In the Solution Explorer you can see small lock next to each item.
Create a New Build Definition
A build definition instructs TFS
- what actions triggers a build
- which projects to compile
- what is the drop folder location (where should build copies and packages reside)
- what tests should run
- In the Team Explorer tab (in Visual Studio) click Builds – if you are on Home tab of the Team Explorer
If you are not on the Home tab, just click project name (in my case FirstProj) and click Builds
- Build tab in the Team Explorer opens, click New Build Definition
- Build definition dialog opens – write a name for this build definition (or leave it as is) and a description if you want
- Click Trigger and select the trigger that best fits your needs – it instructs TFS which action should be build fired on. For our demo, I’m going to use manual trigger, so later we’ll see how to do it.
- Click Source Settings – here you specify what you want to build = which working folder in source control
- Click Build Defaults – here you can specify what controller you want to use for this build definition and an UNC path to folder where your build outputs should be copied to
If you want the build output to be copied to a folder, create it and make sure it has correct permissions so that TFS build can write in it. In our case the build runs undes SYSTEM account as we can see in Team Foundation Server Administration Console – Build Configuration – Build Service Properties:
-
Click Process – I would say, this is the most important configuration part of the build definition. We want the deployment to be a part of the build, so we have to pass appropriate arguments to MSBuild Arguments. Unfortunately, there is no fancy interface for configuring TFS web publishing – we have to know the arguments and their possible values in order to achieve deployment of a web application according to our liking.
So, to achieve our goals - build the solution/project, create a package of it (zip file), deploy/publish web application to localhost we need to use these arguments:
/p:DeployOnBuild=True;DeployTarget=MSDeployPublish;CreatePackageOnPublish=True;MSDeployPublishMethod=InProc;MsDeployServiceUrl=localhost;DeployIisAppPath="Default Web Site/TFSTest";VisualStudioVersion=11.0;UserName=
it doesn’t matter if you write arguments like above or like this:
/p:DeployOnBuild=True /p:DeployTarget=MSDeployPublish /p:CreatePackageOnPublish=True /p:MSDeployPublishMethod=InProc /p:MsDeployServiceUrl=localhost /p:DeployIisAppPath="Default Web Site/TFSTest" /p:VisualStudioVersion=11.0 /p:UserName=
Let’s explain the arguments a little bit:
DeployOnBuild – True = deploy after successful build
DeployTarget – MSDeployPublish = publishing with Web Deploy (we installed it as prerequisite)
CreatePackageOnPublish – True = create a package before publishing (zip file that contains all files necessary for correct web application running). Packages can serve as deployment history (archive of what you published). You can find them in your drop folder we specified in step 6 while creating build definition.
MSDeployPublishMethod – tells what method to use for deployment, InProc = deploy localy – to an IIS running on the same machine as build service
MsDeployServiceUrl – tells which server the application should be deployed to, localhost = same machine as build service is running
DeployIisAppPath – tells where to publish in IIS (IIS Site Name/Application Name), Default Web Site/TFSTest = will be published in Default Web Site (it is IIS Site Name) and Application Name will be TFSTest
VisualStudioVersion – tells the version of Visual Studio I use, 11.0 = tells I’m using Visual Studio 2012, so the MSBuild will look for .targets files in %Program Files (x86)%\MSBuild\Microsoft\VisualStudio\v11.0, instead of ...\v10.0 (Visual Studio 2010) what is the default as I use Team Foundation Server 2010.
UserName – is the domain\user that has access to web server where we are going to publish the application. If you don’t provide user name (our case) you will use Windows authentification.
Password – is the password of the user above. In our case we used windows authentification, so we don’t have to provide this argument at all.
Deploying on a remote server
If you want to deploy your application to a remote IIS (running on other machine than build service is running), your MSBuild arguments should look like this:
/p:DeployOnBuild=True /p:DeployTarget=MSDeployPublish /p:CreatePackageOnPublish=True /p:MSDeployPublishMethod=RemoteAgent /p:MsDeployServiceUrl=ServerName /p:DeployIisAppPath="Default Web Site/TFSTest" /p:VisualStudioVersion=11.0 /p:UserName=
OR
/p:DeployOnBuild=True /p:DeployTarget=MSDeployPublish /p:CreatePackageOnPublish=True /p:MSDeployPublishMethod=WMSVC /p:MsDeployServiceUrl=https://ServerName:8172/MsDeploy.axd /p:DeployIisAppPath="Default Web Site/TFSTest" /p:VisualStudioVersion=11.0 /p:UserName=
Please note, in this scenarios you have to install Web Deploy tool on the remote server as well.
- Click the save icon in the toolbar (in Visual Studio) to save just created build definition
- The created build definition (TFSTest in our case) appears in the Team Explorer tab under Builds
Deploy Web Application - Trigger the manual build
While creating the build definition, we set trigger to manual, so to invoke build manualy is our only option.
- Right click build definition name and select Queue New Build...
- The Queue Build dialog opens – accept the defaults and click Queue
- In the Team Explorer you can see a new build was queued – by double clicking it, you open a dialog to see the progress and the result of the build
Issue 1
Our first build failed because of following error
Reason:
Our web application (if you had created it as me) uses .NET Framework 4.5. It means the application pool the application is running under, requires .NET Framework 4.0. As we used Default Web Site, which application pool (DefaultAppPool) uses by default .NET Framework 2.0, we encountered this error.
Resolution:
Change the .NET Framework of the DefaultAppPool to 4.0
Now you may ask yourself – why we should change application pool to 4.0 and not to 4.5 as our web application uses? The reason is that there is no 4.5 application pool. You can run any 4.5 application in 4.0 application pool. The .NET Framework 4.5 is an in-place-update not a new major version.
- Go to Start – Administrative Tools – Internet Information Services (IIS) Manager on the server where you want to deploy the application
- The IIS Manager Console opens – click Application Pools, double click DefaultAppPool, select .NET Framework v4.0.30319, click OK
If you don’t have .NET Framework v4.0.30319 in the drop-down list available, run following command to install/register the version of .NET Framework:
"%windir%\Microsoft.NET\Framework\v4.0.30319\aspnet_regiis.exe -i" – Start – Run and paste this command without quotes.
Now repeat steps 1, 2 and 3 to invoke new build again.
Issue 2
If you had created the web application as me with the same name (TFSTest) you probably encounter another error.
Reason:
The build partially succeeded – the application was built and published, but the build process encountered above error while trying to test the app – MSTest loads all assemblies trying to find any unit tests. The reason is that we accepted default settings for Automated Tests while creating build definition (Process tab) and also our web application name contains word „test“.
This means the MSTest will search recursively for all assemblies and will find our TFSTest.dll twice.
Resolution:
Change the property of Automated Tests to *\*test*.dll to disable recursive search.
- Right click build definition name (Team Explorer tab – Builds) and select Edit Build Definition...
- The Build Definition opens, click Process and open Automated Tests property by clicking ...
- Automated Tests property opens, click Edit and change **\*test*.dll to *\*test*.dll and then click OK and OK
- Click the save icon in the toolbar (in Visual Studio) to save modified build definition
Now again, invoke new build by repeating step 1, 2 and 3.
As we can see in the build progress dialog, the build now succeeded.
Check published web application
- Go to the server where you have just published your web application (in our case it is the same server where TFS is installed)
- Open Internet Information Services (IIS) Manager as we did in Issue 1
- Expand Sites and Default Web Site in the Connections pane – as you can see, our web application was published with the name TFSTest as we specified in MSBuild Arguments
- To check if the application works, click TFSTest and then Browse *:80 (http) on the right side of IIS Manager in the Actions pane
- Internet Explorer opens and we see our web application
- You can find application package generated by build service in the drop folder we specified while creating build definition:
Open Windows Explorer on the server where the specified shared drop folder is located (in our case it is still the same machine) and find Drops folder – inside it you can find not only the package (zip file), but also 2 XML files which contains parameters for app settings and deployment and a Windows Command Script (.cmd) used for deployment.
Deploy a new version of already published web application
Now we are going to change e.g. some text in our web application, so we can see the change, check-in the new solution to source control, invoke manual build and check if it is successfully updated in IIS.
For example we can change this text on the home page:
- In Solution Explorer expand the project TFSTest – Views – Shared and double click _Layout.cshtml – it is what we call master page in Web Form applications
- Change the text „your logo here“ e.g. to „This is my logo“ – when you start writing the item is automatically checked-out for you to edit it
- Check-in the item _Layout.cshtml to source control by right clicking it and selecting Check-In...
- Write a comment, if you want, click Check In and confirm Check-In dialog by clicking Yes - _Layout.cshtml has been checked-in to source control
- Invoke the manual build (exactly as we did before)
- After successful build, check the web application – eighter same way as we did before, or if you haven’t closed Internet Explorer yet, just click Refresh button (or press F5)
- As we can see, the new version of our web application has been published
Conclusion
Automated web deployment is great feature of Team Foundation Server. To set it up is not so simple as it could be if there is some nice user interface for build definition creation. I hope someone will find this article useful. I tried to describe the whole process in detail as much as possible. If you have any questions or find any important information missing, please feel free to write back.
In the next part, we’ll discuss how to set up DB deployment.
History
07/08/14 - Initial Version
This member has not yet provided a Biography. Assume it's interesting and varied, and probably something to do with programming.


 General
  News
News  Suggestion
  Question
  Bug
Bug  Answer
  Joke
Joke  Praise
  Rant
Rant  Admin
Admin 


