Just download the project demo from here and enjoy. :)
Introduction
I was working in MVC application project and I wanted to upload file or multiple files with a progress bar info without using flash player or any upload file plugins. So in this post, we will explain a simple way to:
- Upload single or multiple files with a progress bar info
- Upload multiple files via Selecting files or Drag and Drop files
Background
HTML5 provides a standard way to interact with local files using File API specification, it gives us an opportunity to access files data or use client side validation to verify the size / type of uploaded files.
This specification includes several interfaces to access files:
- A
File interface which includes a read only info about file such as name, type and size in bytes. - A
FileList interface which represents a list of individually selected files (list of file object) the user interface for selection can be invoked via <input type="file"> or drag & drop.
XMLHTTPRequest2 is one of the heroes of HTML5 universe, XHR2 are the same XMLHttpRequest but with many changes. It includes the following new features:
- Uploading/downloading binary data.
- Progress events during uploading. This event includes the following information:
Total: integer value that specifies total bytes being transferred.Loaded: integer value that specifies bytes uploaded.lengthComputable: Boolean value that checks if total Size of uploaded data is known.
- Cross-origin requests
These features allow AJAX to work confidently with new technologies of HTML5 like the File API so by putting all these together, uploading file will be very easy and not a big deal without using flash player, external plugins or use normal html <form> and depend on server side to enable showing upload progress.
In this post, we’ll write a small application that is able to:
- Upload single file and provide upload progress info?
- Create a thumbnail preview of images before sending to server?
- Upload multiple files via selecting multiple files or drag & drop files?
And we will check Browsers support for XHR2, File API, FormData and drag & drop.
Using the Code
How to Upload Single File and Providing Upload Progress Info?
All we have to do is create a simple View like below:
- Form consists of input file element and button to submit the form.
- Section for file info and a progress bar I used bootstrap progress bar:
<div id="FormContent">
           <form id="FormUpload"
           enctype="multipart/form-data" method="post">
               <span class="btn btn-success fileinput-button">
                   <i class="glyphicon glyphicon-plus"></i>
                   <span>Add files...</span>
                   <input type="file"
                   name="UploadedFile" id="UploadedFile" />
               </span>
               <button class="btn btn-primary start"
               type="button" id="Submit_btn">
                   <i class="glyphicon glyphicon-upload"></i>
                   <span>Start upload</span>
               </button>
                <button class="btn btn-warning cancel"
                type="button" id="Cancel_btn">
                   <i class="glyphicon glyphicon-ban-circle"></i>
                   <span>close</span>
               </button>
           </form>
           <div class="progress CustomProgress">
               <div id="FileProgress"
               class="progress-bar" role="progressbar"
       aria-valuenow="0" aria-valuemin="0"
       aria-valuemax="100" style="width: 0%;">
                   <span></span>
               </div>
           </div>
           <div class="InfoContainer">
               <div id="Imagecontainer"></div>
               <div id="FileName" class="info">
               </div>
               <div id="FileType" class="info">
               </div>
               <div id="FileSize" class="info">
               </div>
           </div>
       </div>
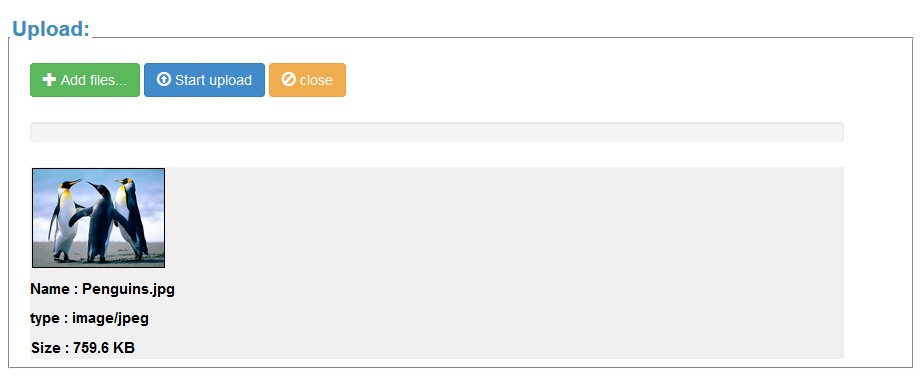
Then, we will add input file element’s onchange event and assign it to JS method called SingleFileSelected like in the below code snippet, so this method will be called every time user chooses/changes a file. In this method, we will select the input file element and access its files object of type FileList and select the first file (files[0]), this file of type file object gives us some read only information about file like file name, file type (mime type). We can use it to restrict some files and File size in bytes. This size we will convert it into MB and KB in our method so we can display them on the browser.
function singleFileSelected(evt) {
var selectedFile = ($("#UploadedFile"))[0].files[0];
if (selectedFile) {
var FileSize = 0;
var imageType = /image.*/;
if (selectedFile.size > 1048576) {
FileSize = Math.round(selectedFile.size * 100 / 1048576) / 100 + " MB";
}
else if (selectedFile.size > 1024) {
FileSize = Math.round(selectedFile.size * 100 / 1024) / 100 + " KB";
}
else {
FileSize = selectedFile.size + " Bytes";
}
$("#FileName").text("Name : " + selectedFile.name);
$("#FileType").text("type : " + selectedFile.type);
$("#FileSize").text("Size : " + FileSize);
}
}
We can also use File reader object to read the uploaded file content into memory, the reader object has some events like onload, onError, four functions for reading data readAsBinaryString(), readAsText(), readAsArrayBuffer() and readAsDataURL() and the result property which represent file's contents. This property is only valid after the read operation is complete, and the format of the data depends on which of the methods was used to initiate the read operation.
We will not explain the File reader in detail, but we will use it in our SingleFileSelected method to preview images as thumbnail. See the below code snippet.
This code filters out images from uploaded files, then creates an object of Filereader and uses the onload event callback to create the image preview. This callback will get called after file reading operation is completed and the result is assigned to reader.result property, then we will call reader.readAsDataURL() that returns data as encoded DataURL.
if (selectedFile.type.match(imageType)) {
           var reader = new FileReader();
           reader.onload = function (e) {

               $("#Imagecontainer").empty();
               var dataURL = reader.result;
               var img = new Image()
               img.src = dataURL;
               img.className = "thumb";
               $("#Imagecontainer").append(img);
           };
           reader.readAsDataURL(selectedFile);
       }
So now, we will be able to load file name, type, size and Image preview like the figure below:
Now, we need to send the uploaded file to the server, so we will add onclick event and assign it to the JS method called uploadFile(). See the below code snippet:
function UploadFile() {
var form = $('#FormUpload')[0];
var dataString = new FormData(form);
$.ajax({
url: '/Uploader/Upload',
type: 'POST',
xhr: function () {
var myXhr = $.ajaxSettings.xhr();
if (myXhr.upload) {
myXhr.upload.addEventListener('progress', progressHandlingFunction,
false);
}
return myXhr;
},
success: successHandler,
error: errorHandler,
complete:completeHandler,
data: dataString,
cache: false,
contentType: false,
processData: false
});
}
In this method, we will send form using Form data object to serialize such file values we can create formdata manually by instantiating it, then appending fields to it by calling its append() method or retrieving a FormData object from an HTML form like we did in the above function by passing Form element to formdata constructor when creating it and also we can append more information to it. Then, we create JQuery AJAX with the right options:
XHR: Create custom XMLHTTPRequest check if upload Property Exists, then add a Progress event and assign it to JS method progressHandlingFunction that will handle progress of upload property .processData: Set to false to tell jQuery not to process the data.contentType: Set to false to tell jQuery not to set contentType.Data: Set it to the formdata object.
Other options are regular Ajax options and are pretty self-explanatory .
Let’s take a look at progressHandlingFunction. In this method, we check if total Size of uploaded data is known via e.lengthComputable, then we use e.loaded(value of uploaded bytes) and e.total(value of total bytes being transferred) to compute the percentage of uploaded data.
function progressHandlingFunction(e) {
    if (e.lengthComputable) {
        var percentComplete = Math.round(e.loaded * 100 / e.total);
        $("#FileProgress").css("width",
        percentComplete + '%').attr('aria-valuenow', percentComplete);
        $('#FileProgress span').text(percentComplete + "%");
    }
    else {
        $('#FileProgress span').text('unable to compute');
    }
}
So now, we are able to send data to server and provide a progress. Let's take a look at the server side code in the below snippet which is a very simple action called upload in controller called uploader.
In this action, we received the file in HttpPostedfileBase object. This object contains information about the uploaded file like Filename property, Contenttype property and inputStream property that contains file content with this information we can validate file on server save file.
[HttpPost]

        public JsonResult Upload(HttpPostedFileBase uploadedFile)
        {
            if (uploadedFile != null && uploadedFile.ContentLength > 0)
            {
                byte[] FileByteArray = new byte[uploadedFile.ContentLength];
                uploadedFile.InputStream.Read(FileByteArray, 0, uploadedFile.ContentLength);
                Attachment newAttchment = new Attachment();
                newAttchment.FileName = uploadedFile.FileName;
                newAttchment.FileType = uploadedFile.ContentType;
                newAttchment.FileContent = FileByteArray;
                OperationResult operationResult = attachmentManager.SaveAttachment(newAttchment);
                if (operationResult.Success)
                {
                    string HTMLString = CaptureHelper.RenderViewToString
                    ("_AttachmentItem", newAttchment, this.ControllerContext);
                    return Json(new
                    {
                        statusCode = 200,
                        status = operationResult.Message,
                        NewRow = HTMLString
                    }, JsonRequestBehavior.AllowGet);

                }
                else
                {
                    return Json(new
                    {
                        statusCode = 400,
                        status = operationResult.Message,
                        file = uploadedFile.FileName
                    }, JsonRequestBehavior.AllowGet);

                }
            }
            return Json(new
            {
                statusCode = 400,
                status = "Bad Request! Upload Failed",
                file = string.Empty
            }, JsonRequestBehavior.AllowGet);
        }
Upload Multiple Files Via Selecting Files or Drag & Drop Files?
In this section, we will implement the same uploader, but with some new features:
- Allow selecting multiple files
- Drag and drop files
We will create the same view like the one in single uploader section, but we need to add a few things:
- Adding multiple attribute to the input file element that allow selecting multiple files
- Adding section for drag and drop files like in the below code snippet
<div id="drop_zone">Drop images Here</div>
Then, we will add onchange event and assign it to JS method called MultiplefileSelected like we did before with SingleFileSelected method, but here we will play with all the files in the files list object and allow Drag and Drop files. See the code snippet.
In this method, we assigned the selected/dragged files to a global variable called selectedFiles, then for each file in selectedfiles, we will read the file using Read method in our DataURLreader object. I made this object for making the code a little bit clearer and readable instead of creating file reader for each file in the same method. After reading file, we can render the image information or any error. Let’s take a look at DataURLreader object.
function MultiplefileSelected(evt) {
    evt.stopPropagation();
    evt.preventDefault();
    $('#drop_zone').removeClass('hover');
    selectedFiles = evt.target.files || evt.dataTransfer.files;
    if (selectedFiles) {
        $('#Files').empty();
        for (var i = 0; i < selectedFiles.length; i++) {
            DataURLFileReader.read(selectedFiles[i], function (err, fileInfo) {
                if (err != null) {
                    var RowInfo = '<div id="File_' + i + '"
                    class="info"><div class="InfoContainer">' +
                                   '<div class="Error">' + err + '</div>' +
                                  '<div data-name="FileName"
                                  class="info">' + fileInfo.name + '</div>' +
                                  '<div data-type="FileType"
                                  class="info">' + fileInfo.type + '</div>' +
                                  '<div data-size="FileSize"
                                  class="info">' + fileInfo.size() +
                                  '</div></div><hr/></div>';
                    $('#Files').append(RowInfo);
                }
                else {
                    var image = '<img src="' + fileInfo.fileContent +
                    '" class="thumb" title="' +
                    fileInfo.name + '" />';
                    var RowInfo = '<div id="File_' + i + '"
                    class="info"><div class="InfoContainer">' +
                                  '<div data_img="Imagecontainer">' +
                                  image + '</div>' +
                                  '<div data-name="FileName"
                                  class="info">' + fileInfo.name + '</div>' +
                                  '<div data-type="FileType"
                                  class="info">' + fileInfo.type + '</div>' +
                                  '<div data-size="FileSize"
                                  class="info">' + fileInfo.size() +
                                  '</div></div><hr/></div>';
                    $('#Files').append(RowInfo);
                }
            });
        }
    }
}
The DataURLFileReader object contains read method that takes a file and callback method as parameters, at the first of the method, we create a new fileReader and handle its onload and onerror callback methods and at the end of function, we call readAsDataURL method to read the file, we create an object called fileInfo that will contain all file information and file content after it is loaded.
var DataURLFileReader = {
    read: function (file, callback) {
        var reader = new FileReader();
        var fileInfo = {
            name: file.name,
            type: file.type,
            fileContent: null,
            size: function () {
                var FileSize = 0;
                if (file.size > 1048576) {
                    FileSize = Math.round(file.size * 100 / 1048576) / 100 + " MB";
                }
                else if (file.size > 1024) {
                    FileSize = Math.round(file.size * 100 / 1024) / 100 + " KB";
                }
                else {
                    FileSize = file.size + " bytes";
                }
                return FileSize;
            }
        };
        if (!file.type.match('image.*')) {
            callback("file type not allowed", fileInfo);
            return;
        }
        reader.onload = function () {
            fileInfo.fileContent = reader.result;
            callback(null, fileInfo);
        };
        reader.onerror = function () {
            callback(reader.error, fileInfo);
        };
        reader.readAsDataURL(file);
    }
};
Using Drag and Drop for Selecting
Another technique for loading files is native drag and drop from local machine to browser and we will not use another plugin. Now all of the major browsers actually have a native support for Drag & Drop.
To start working with Drag and Drop, we need to add dragover and drop events on drop_zone element.
var dropZone = document.getElementById('drop_zone');
    dropZone.addEventListener('dragover', handleDragOver, false);
    dropZone.addEventListener('drop', MultiplefileSelected, false);
    dropZone.addEventListener('dragenter', dragenterHandler, false);
    dropZone.addEventListener('dragleave', dragleaveHandler, false);
The dragover event will fire when the file dragged over the drop target, in the handler of this method, we just prevent defaults of the browser and change the dropEffect property of the datatransfer object to copy, see code below:
function handleDragOver(evt) {
    evt.preventDefault();
    evt.dataTransfer.effectAllowed = 'copy';
    evt.dataTransfer.dropEffect = 'copy';
}
Then we will add the drop event and assign it with our MultiplefileSelected method to handle dropped files. It is good practice to add dragenter and dragLeave events. With these events, you can change the styles of Drop zone by adding CSS class to Dropzone element when Dragenter event fired and remove this class when dragleave event fired.
Now, we are ready to hit the start upload button to send files to the server. We just add onclick event that will call UploadMultipleFiles method when button is clicked.
This method is similar to our previous method Uploadfile except one thing we create the formdata object manually to validate/prevent sending non image files.
function UploadMultipleFiles() {
var dataString = new FormData();
for (var i = 0; i < selectedFiles.length; i++) {
if (!selectedFiles[i].type.match('image.*')) {
continue;
}
}
}
Now the last thing we have to do is the server side code and it also similar to our previous single upload server side code. The only thing is we will receive a list of files, so our action signature should be like that:
public JsonResult UplodMultiple(HttpPostedFileBase[] uploadedFiles)
And make sure that HttpPostedFileBase array name is the same as the object name in the append method of formdata object. By this way, the MVC can map the files array.
public JsonResult UplodMultiple(HttpPostedFileBase[] uploadedFiles)
dataString.append("uploadedFiles", selectedFiles[i]);
Upload Big Size Files
To allow uploading big size files. if you use IIS 7 or greater. you should modify the web.config file and add the two sections below:
<system.webServer>
       <security>
                <requestFiltering>
                           <requestLimits maxAllowedContentLength="2147483648" />
                </requestFiltering>
       </security>
</system.webServer>

<httpRuntime targetFramework="4.5"  maxRequestLength="2097152"/>
This will allow you to upload file up to 2 giga.
Note: maxAllowedContentLength is measured in bytes while maxRequestLength is measured in kilobytes which is why the values are different (both are equivalent to 2 GB).
Browsers Support
Senior software engineer with experience in Microsoft .net development stack. Having a good knowledge of team- management, solution architecture, and agile environment. I have a great passion for learning new frameworks, tools, and technologies And I do blogging sharing technical articles.


 General
  News
News  Suggestion
  Question
  Bug
Bug  Answer
  Joke
Joke  Praise
  Rant
Rant  Admin
Admin 


 "..
"..