Introduction
Like many other features provided by the Visual Studio .NET, add-ins are also very useful, but unfortunately, only a few users use this feature. Through add-ins, you can integrate extra functionalities directly into the Visual Studio IDE. In this article, we will create an add-in that will help to implement standard modification history at the top of your C# files. Please, please do vote for my article whether you like it or not ;)
Using the Code
In this article, initially, we will use the wizard provided by the IDE, then we will modify the generated code as per our requirements. Our target is to provide an option in the Tools menu to add standard modification history at the top of C# files (see figs. 1a and 1b).
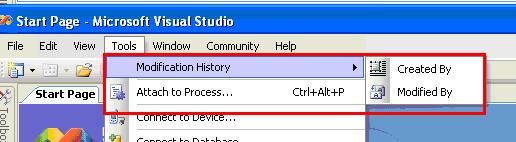
Fig. 1a

Fig. 1b
Create a new Visual Studio Add-in project as displayed in the figure 2a. Click OK, and select Next in the second step of the wizard. Select the language you need to use for your add-in in the third step of the wizard; I am using C# for this article.
Fig. 2a
Make sure that you have selected both options in the next step (fig. 3a).
Fig. 3a
Give your add-in a decent name in the next step. Since I will be using this add-in to enforce modification history standards, I am using “Modification History” as a name and also as a description. I would suggest you give a more meaningful description (fig. 4a).
Fig. 4a
In the very next step, I would recommend you at-least select the first option. By selecting this option, Visual Studio .NET would generate code to add a command with a default icon in the Tools menu, which we will be modifying later on (fig. 5a).
Fig. 5a
In the next screen, if you select the given options, then programmer will have the option of adding an About box and other technical support information. For now, I am not using this feature (fig. 6a). And in the next screen, click Finish.
Fig. 6a
Once you complete the wizard. you would have auto-generated code, and if you run this auto-generated project, you would notice that you have a new menu item in the Tools menu. Now, let's talk about the code. All we need to focus on is the Connect class. The Connect class provides the IDTExtensibility2 interface that allows the programmer to take control of the IDE’s user interface functionality. The main object we will be using is already generated by Visual Studio. NET.
private DTE2 _applicationObject;
In this article, we will modify the auto-generated code of three functions of the Connect class:
public void Exec(…)
public void QueryStatus(…)
public void OnConnection(…)
In the auto-generated code of OnConnecion(…), you would see that in the try block, only one command option is created and that command button is added into the Tools menu, but as per our needs, we need to create two commands (one for Created By modification history, and the other for Modified By modification history) in the submenu (see fig. 1a). For this purpose, we have modified the generated code within the try block on the OnConnection(…) method.
public void OnConnection(object application, ext_ConnectMode connectMode,
object addInInst, ref Array custom)
{
_applicationObject = (DTE2)application;
_addInInstance = (AddIn)addInInst;
if(connectMode == ext_ConnectMode.ext_cm_UISetup)
{
object []contextGUIDS = new object[] { };
Commands2 commands = (Commands2)_applicationObject.Commands;
string toolsMenuName;
try
{
ResourceManager resourceManager =
new ResourceManager(
"ModificationHistory.CommandBar",
Assembly.GetExecutingAssembly());
CultureInfo cultureInfo = new System.Globalization.CultureInfo(
_applicationObject.LocaleID);
string resourceName = String.Concat(cultureInfo.TwoLetterISOLanguageName,
"Tools");
toolsMenuName = resourceManager.GetString(resourceName);
}
catch
{
toolsMenuName = "Tools";
}
Microsoft.VisualStudio.CommandBars.CommandBar menuBarCommandBar =
((Microsoft.VisualStudio.CommandBars.CommandBars)
_applicationObject.CommandBars)["MenuBar"];
CommandBarControl toolsControl = menuBarCommandBar.Controls[toolsMenuName];
CommandBarPopup toolsPopup = (CommandBarPopup)toolsControl;
try
{
for (int iloop = 1; iloop <= toolsPopup.CommandBar.Controls.Count; iloop++)
{
if (toolsPopup.CommandBar.Controls[iloop].Caption ==
"Modification History")
{
CommandBarPopup op =
(CommandBarPopup)toolsPopup.CommandBar.Controls[iloop];
oBar = op.CommandBar;
break;
}
}
Command cmdCreatedBy = commands.AddNamedCommand2(_addInInstance, "CreatedBy",
"Created By", "Executes the command for Created By", true, 10,
ref contextGUIDS, (int)vsCommandStatus.vsCommandStatusSupported +
(int)vsCommandStatus.vsCommandStatusEnabled,
(int)vsCommandStyle.vsCommandStylePictAndText,
vsCommandControlType.vsCommandControlTypeButton);
Command cmdModifiedBy = commands.AddNamedCommand2(_addInInstance, "ModifiedBy",
"Modified By",
"Executes the command for ModificationHistory", true, 13,
ref contextGUIDS, (int)vsCommandStatus.vsCommandStatusSupported +
(int)vsCommandStatus.vsCommandStatusEnabled,
(int)vsCommandStyle.vsCommandStylePictAndText,
vsCommandControlType.vsCommandControlTypeButton);
if (oBar == null)
oBar = (CommandBar)commands.AddCommandBar("Modification History",
vsCommandBarType.vsCommandBarTypeMenu, toolsPopup.CommandBar, 1);
if ((cmdModifiedBy != null) && (toolsPopup != null))
cmdModifiedBy.AddControl(oBar, 1);
if ((cmdCreatedBy != null) && (toolsPopup != null))
cmdCreatedBy.AddControl(oBar, 1);
}
catch(System.ArgumentException )
{
}
}
}
At the beginning of the try block, we are checking if a submenu with the name of “Modification History” already exists or not. If yes, then we will use the same Command Bar (submenu) to add our two new commands.
After that, we create two Command objects instead of one. Just keep in mind that you should not have any spaces in the second parameter, i.e., the name of the Command button menu. You can also change the icon by changing the value of the sixth parameter. In this case, we are using 10 and 13 which are reserved icons provided by the Visual Studio .NET. You can use your own icons from the resource file instead.
Immediately after that, we create a CommandBar (submenu), if not already exists. And finally, we add both our newly created Commands to the CommandBar.
Since we have now two Commands, it is necessary to change the code of the QueryStatus(…) method. See the modified if condition in the code below:
public void QueryStatus(string commandName, vsCommandStatusTextWanted neededText,
                        ref vsCommandStatus status, ref object commandText)
{
    if(neededText == vsCommandStatusTextWanted.vsCommandStatusTextWantedNone)
    {
        if (commandName == "ModificationHistory.Connect.CreatedBy" ||
             commandName == "ModificationHistory.Connect.ModifiedBy")
        {
            status = (vsCommandStatus)vsCommandStatus.vsCommandStatusSupported|
                                      vsCommandStatus.vsCommandStatusEnabled;
            return;
        }
    }
}
The UI is completed now. We now need to add functionality to the newly added commands. For that, we will modify the Exec(…) method of the Connect class. Every time you click the newly added commands, the Exec(…) function would be called, and that is why we need to identify the invoker through the parameter “commandName”. In this tutorial, we are generating modification history for C# files only. After that, we are simply placing standard text for modification history (Created By/Modified By) at the appropriate position in the C# files. In this article, we are using a member variable to store the text (template) of the modification history; you can also store these texts in a separate text file.
string sCSCreatedByText =
            "/*************************************************************" +
            "************************\n" +
            "\n" +
            "Author                        :  [USERNAME]\n" +
            "Development Environment    :  [ENVIROMENT]\n" +
            "Name of the File           :  [FILENAME]\n" +
            " \n" +
            "Overview:\n" +
            "Write description of file here \n" +
            " \n" +
            "\n" +
            "Creation/Modification History      :\n" +
            "--------------------------------------------------------------" +
            "------------------------\n" +
            "Date            user                    Description\n" +
            "------------      ------------------    ----------------------" +
            "--------------------------\n" +
            "[DATE]     [USERNAME]\n" +
            "***************************************************************" +
            "***********************/\n";

string sCSModifiedByText =
    "[DATE]     [USERNAME]\n" +
    "***************************************************************" +
    "***********************/\n";

string sCSModifiedReplacedText =
    "***************************************************************" +
    "***********************/\n";


public void Exec(string commandName, vsCommandExecOption executeOption, ref object varIn,
                 ref object varOut, ref bool handled)
{
    handled = false;
    if(executeOption == vsCommandExecOption.vsCommandExecOptionDoDefault)
    {
        if (commandName == "ModificationHistory.Connect.CreatedBy")
        {
            if (_applicationObject.ActiveDocument.Language.ToString() == "CSharp")
            {
                TextDocument objTextDoc =
            (TextDocument)_applicationObject.ActiveDocument.Object("TextDocument");
                sCSCreatedByText = sCSCreatedByText.Replace("[USERNAME]",
                                                            Environment.UserName);
                sCSCreatedByText = sCSCreatedByText.Replace("[ENVIROMENT]",
                                     _applicationObject.Application.Name +
                                     " " + _applicationObject.Application.Version );
                sCSCreatedByText = sCSCreatedByText.Replace("[FILENAME]",
                                     _applicationObject.ActiveDocument.Name);
                sCSCreatedByText = sCSCreatedByText.Replace("[DATE]",
                                     DateTime.Now.ToShortDateString());

                objTextDoc.StartPoint.CreateEditPoint().Insert(sCSCreatedByText);
            }

            handled = true;
            return;
        }

        if (commandName == "ModificationHistory.Connect.ModifiedBy")
        {
            if (_applicationObject.ActiveDocument.Language.ToString() == "CSharp")
            {
                TextDocument objTextDoc =
            (TextDocument)_applicationObject.ActiveDocument.Object("TextDocument");
                sCSModifiedByText = sCSModifiedByText.Replace("[USERNAME]",
                    Environment.UserName);
                sCSModifiedByText = sCSModifiedByText.Replace("[DATE]",
                    DateTime.Now.ToShortDateString());

                objTextDoc.ReplaceText(sCSModifiedReplacedText, sCSModifiedByText,
                                        (int)vsFindOptions.vsFindOptionsFromStart  );
            }

            handled = true;
            return;
        }
    }

    handled = true;
    return;
}
Conclusion
This is just a single use of add-ins, you can use this functionality of Visual Studio .NET for many other purposes like to add a personal checklist, or the contact info of your client you are developing software for. You can also implement a spell checker for your code.
This member has not yet provided a Biography. Assume it's interesting and varied, and probably something to do with programming.


 General
  News
News  Suggestion
  Question
  Bug
Bug  Answer
  Joke
Joke  Praise
  Rant
Rant  Admin
Admin 


