Its happy day. Finally we are at the last stage of “Learn MVC Project in 7 days” series. I believe you have enjoyed all the previous days and learned something from it.
Please don’t forget to drop your comments/suggests/feedbacks at the end of the article.
Complete Series
We are pleased to announce that this article is now available as hard copy book you can get the same from www.amazon.com and www.flipkart.com
This is not actually a lab related to any new functionality. This lab is just to make project more structured and systematic.
Step 1 - Create solution folders
Right click the solution select Add>>New Solution Folder.
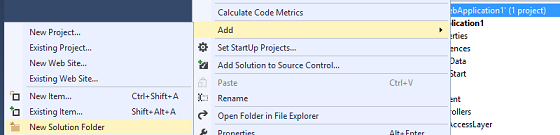
Name the folder as “View And Controller”.
Now repeat the step and create three more similar folders called “Model”, “ViewModel” and “Data Access Layer”

Step 2 – Create Data Access Layer Project
Right click the Data Access Layer folder and create a new class library project called “DataAccessLayer”.
Step 3 – Create Business Layer and Business Entities Project
Create two new class library projects inside Model folder and call it “BusinessLayer” and “BusinessEntities” respectively.
Step 4 – Create ViewModel project
Create a new project class library project inside ViewModel folder and call it ViewModel.
Step 5 – Add references
First right click each project one by one. Select Add>>Reference and select references as below.
-
For DataAccessLayer select BusinessEntities
-
For BusinessLayer select DataAccessLayer and BusinessEntities
-
For MVC WebApplication select BusinessLayer,BusinessEntities, ViewModel
-
For BusinessEntities System.ComponentModel.DataAnnotations
Step 6 – Set project
-
Copy SalesERPDAL.cs from DataAccessLayer folder in the MVC project to newly created DataAccessLayer class library project.
-
Remove DataAccessLayer folder from MVC (WebApplication1) project.
-
Copy Employee.cs, UserDetails.cs and UserStatus.cs from Model folder inthe MVC project to newly created BusinessEntities class library project.
-
Copy EmployeeBusinessLayer.cs from Model folder in theMVC project to newly created BusinessLayer class library project.
-
Remove Model folderfrom MVC project.
-
Copy all the classes from ViewModels folder in the MVC project to newly created ViewModel class library project.
-
Remove ViewModels folder from MVC project
-
Move MVC project (WebApplication1) to “View And Controller” solution folder.
Step 7 – Build the project
Select Build>>Build Solution from menu bar.
You will get following error messages.
Step 8 – Solve errors
-
Add System.Web reference to ViewModel project
-
Use Nuget manager and Install Entity Framework in the DataAccessLayer and BusinessLayer project. (If you are getting confused on how to use Nuget Manager then I recommend you to look into Day 3)
Note: Entity Framework reference is required inside Business Layer because Business Layer is directly connected to DataAccessLayer. As a proper architecture Business layer should not be connected to DataAccessLayer directly. We can accomplish this with the help of Repository pattern. Repository pattern will be completely out of the scope this series.
-
Remove EntityFramework from MVC project.
-
Right click the MVC project and select “Manage Nuget packages” option.
-
Select “Installed Packages” in the left section of “Manage Nuget Packages” dialogue box.
-
Right side section will display all the packages installed prior. Select EntityFramework and click uninstall.
Step 9 – Build the solution
You will get following error.
Step 10 – Solve the error
Now we neither have SalesERPDAL reference nor have Entity Framework reference inside MVC project. Adding those references in not a good practice. As a best practice Controller should not be connected to Data Access Layer directly.
1. Create a new class called DatabaseSettings with a static method called SetDatabase inside DataAccessLayer project as follows.
using System.Data.Entity;
using WebApplication1.DataAccessLayer;
namespace DataAccessLayer
{
    public class DatabaseSettings
    {
        public static void SetDatabase()
        {
            Database.SetInitializer(new DropCreateDatabaseIfModelChanges<SalesERPDAL>());<saleserpdal>
        }
    }
}
</saleserpdal>
2. Create a new class called BusinessSettings with a static method called SetBusiness inside BusinessLayer project as follows.
using DataAccessLayer;

namespace BusinessLayer
{
    public class BusinessSettings
    {
        public static void SetBusiness()
        {
            DatabaseSettings.SetDatabase();
        }
    }
}
3. Remove both the erroneous using statements from global.asax and also remove the Database.SetInitializer statement. Invoke BusinessSettings.SetBusiness function as follows.
using BusinessLayer;
.
.
.
BundleConfig.RegisterBundles(BundleTable.Bundles);
BusinessSettings.SetBusiness();
Build the application. Build will succeed.
Make sure to execute the application once.☻
What are solution folders?
Solution folders are just logical folders. They won’t actually get created in physical hard drive. There only purpose will be making solution more systematic.
Now we will not make any changes to our existing controllers and views. We will create fresh controllers and views for this lab. Reason for taking such step are,
-
Make existing options intact, so that later in the stage you can compare earlier version and single page version and learn it better.
-
Implement and understand one more concept in Asp.Net MVC called Areas.
As I said for this lab we will create new controllers, views and ViewModels all together from the scratch.
Only following things will be reused
-
Existing Business Layer
-
Existing Data Access Layer
-
Existing Business entities
-
Authentication and Exception filters
-
FooterViewModel
-
Footer.cshtml
Step 1 – Create a new Area
Right click the project and Select Add>>Area. A dialogue box will popup. Put it as SPA and select ok.
It will create a new folder structure inside our project as follows.
Obviously Model folder related to the area is not required. Delete it.
Areas are simply a way to implement modules in Asp.Net MVC project.
Every project is made up of more than one module. Example - Account Module, Customer Relationship module, Payment gateway module etc.
In traditional application development style we usually use “Folders” to achieve this. We create more than one folder inside single project. Each folder represents one module. We will keep all the respective files of respective module in respective folders.
Now custom folders will be a big issue when it comes to Asp.Net MVC.
Let’s say in Asp.Net MVC we will use simple folders for implementing module.
-
Now DataAccessLayer, BusinessLayer, BusinessEntities and ViewModels won’t create any issue. They are simple classes so can be kept anywhere.
-
Controllers - We can’t keep it anywhere. It must be kept inside Controller folder. But it is not going to be big issue because from MVC 4 restriction over controller location was removed. Now we can keep it wherever we want.
-
Views -unfortunately for views it’s not possible. All the views must be placed inside “~/Views/ControllerName” or “~/Views/Shared” folder.
This is where Areas comes to picture.
Step 2 – Create required ViewModels
Create a new folder called SPA in ViewModel class library project and create a ViewModel called MainViewModel as follows.
using WebApplication1.ViewModels;
namespace WebApplication1.ViewModels.SPA
{
public class MainViewModel
{
public string UserName { get; set; }
public FooterViewModel FooterData { get; set; }
}
}
Step 3–Create Index action method
Put following using statement in MainController.
using WebApplication1.ViewModels.SPA;
using OldViewModel=WebApplication1.ViewModels;
Now create a new action method called Index inside MainController as follows.
public ActionResult Index()
{
MainViewModel v = new MainViewModel();
v.UserName = User.Identity.Name;
v.FooterData = new OldViewModel.FooterViewModel();
v.FooterData.CompanyName = "StepByStepSchools";
v.FooterData.Year = DateTime.Now.Year.ToString();
return View("Index", v);
}
As you can see an alias called OldViewModelis added for WebApplication1.ViewModels namespace. Now instead of writing WebApplication1.ViewModels.ClassName we can simply write OldViewModel.ClassName.
Not specifying alias name will leads to ambiguity error. Both namesapces WebApplication1.ViewModels.SPA and WebApplication1.ViewModels have some similar classes.
Step 4 – Create Index View
Create a view associated with above index method as follows.
@using WebApplication1.ViewModels.SPA
@model MainViewModel
<!DOCTYPE html>

<html>
<head>
    <meta name="viewport" content="width=device-width" />
    <title>Employee Single Page Application</title>
</head>
<body>
    <div style="text-align:right">
        Hello, @Model.UserName
        <a href="/Authentication/Logout">Logout</a>
    </div>
    <hr />
    <div id="DivOption">

    </div>
    @Html.Partial("Footer", Model.FooterData)
</body>
</html>
Step 5 – Execute and Test the application
Press F5 and execute the application. Complete the Login process and navigate to index action in Main Controller.
Why SPA keyword is required before controller name?
When we add an area to an ASP.NET MVC application, Visual Studio creates a file named [AreaName]AreaRegistration.cs containing a class that derives from AreaRegistration. This class defines the AreaName property and the RegisterArea method, which registers the route information for the new area.
In our case you can find that file with nameSpaArealRegistration.cs and will be located inside “~/Areas/Spa” folder. RegisterArea method of SpaArealRegistration class contain following code.
context.MapRoute(
                "SPA_default",
                "SPA/{controller}/{action}/{id}",
                new { action = "Index", id = UrlParameter.Optional }
            );
This is why, when it comes to controllers in the area we put SPA keyword before controller name
How come RegisterArea in SPAAreaRegistration class get invoked?
Open global.asax file. Very first line in Application_Start will be something like below.
AreaRegistration.RegisterAllAreas();
The RegisterAllAreas method finds all types in the application domain that derive from AreaRegistration and calls each of their RegisterArea methods.
Can we invoke MainController actions without using SPA?
Let’s make this question easy.
Question is will this URL works? “localhost:8870/Main/Index”
Answer is – Yes.
AreaRegistration class creates new route but it won’t remove other routes. Route defined in RouteConfig class still work correctly. As I said before there is no restriction for controller location. Hence it will work but output won’t be displayed properly because it won’t be able to find the view. I suggest you to execute your application once and try it.
Step 1 – Create ViewModel for displaying existing employees.
Create new ViewModel classes called EmployeeViewModel and EmployeeListViewModel in SPA folder of ViewModel class library as follows.
namespace WebApplication1.ViewModels.SPA
{
    public class EmployeeViewModel
    {
        public string EmployeeName { get; set; }
        public string Salary { get; set; }
        public string SalaryColor { get; set; }
    }
}
namespace WebApplication1.ViewModels.SPA
{
    public class EmployeeListViewModel
    {
        public List<employeeviewmodel> Employees { get; set; }
    }
}
</employeeviewmodel>
Note: Both the ViewModels are exact replica of ViewModel created for Non-Spa application. Only difference is this time BaseViewModel is not required.
Step 2 – Create EmployeeList Index
Create new action method called EmployeeList inside MainController as follows.
public ActionResult EmployeeList()
{
    EmployeeListViewModel employeeListViewModel = new EmployeeListViewModel();
    EmployeeBusinessLayer empBal = new EmployeeBusinessLayer();
    List<employee> employees = empBal.GetEmployees();

    List<employeeviewmodel> empViewModels = new List<employeeviewmodel>();

    foreach (Employee emp in employees)
    {
        EmployeeViewModel empViewModel = new EmployeeViewModel();
        empViewModel.EmployeeName = emp.FirstName + " " + emp.LastName;
        empViewModel.Salary = emp.Salary.Value.ToString("C");
        if (emp.Salary > 15000)
        {
            empViewModel.SalaryColor = "yellow";
        }
        else
        {
            empViewModel.SalaryColor = "green";
        }
        empViewModels.Add(empViewModel);
    }
    employeeListViewModel.Employees = empViewModels;
    return View("EmployeeList", employeeListViewModel);
}
</employeeviewmodel></employeeviewmodel></employee>
Note: HeaderFooterFilter is not required.
Step 3 – Create AddNewLink PartialView
Now we cannot use earlier AddNewLink partial view because anchor tags we had over there will leads to full refresh. Our target is to create a “Single Page Application” hence there shouldn’t be any full refresh.
Create a new partial view called AddNewLink.cshtml in the “~/Areas/Spa/Views/Main” folder.
<a href="#" onclick="OpenAddNew();">Add New</a>
<a href="#" onclick="OpenBulkUpload();">BulkUpload</a>
Step 4 – Create AddNewLink action method
Create a new action method called GetAddNewLink inside MainController as follows.
public ActionResult GetAddNewLink()
{
if (Convert.ToBoolean(Session["IsAdmin"]))
{
return PartialView("AddNewLink");
}
else
{
return new EmptyResult();
}
}
Step 5 - Create EmployeeList View
Create a new partial view called EmployeeList in “~/Areas/Spa/Views/Main” folder.
@using WebApplication1.ViewModels.SPA
@model EmployeeListViewModel
<div>
    @{
        Html.RenderAction("GetAddNewLink");
    }

    <table border="1" id="EmployeeTable">
        <tr>
            <th>Employee Name</th>
            <th>Salary</th>
        </tr>
        @foreach (EmployeeViewModel item in Model.Employees)
        {
            <tr>

                <td>@item.EmployeeName</td>
                <td style="background-color:@item.SalaryColor">@item.Salary</td>
            </tr>
        }
    </table>
</div>
Step 6 – Set EmployeeList as initial screen
For this open Index.cshtml located in “~/Areas/Spa/Views/Main” folder and include EmployeeList action result inside DivOptions div as follows.
...
</div>
<hr />
<div id="DivOption">
   @Html.Action("EmployeeList","Main")
</div>
@Html.Partial("Footer"...
Step 7 - Execute and Test
Press F5 and execute the application.
Step 1–Create AddNew ViewModels
Create a new ViewModel called CreateEmployeeViewModel in SPA folder of ViewModel class library project as follows.
namespace WebApplication1.ViewModels.SPA
{
    public class CreateEmployeeViewModel
    {
        public string FirstName { get; set; }
        public string LastName { get; set; }
        public string Salary { get; set; }
    }
}
Step 2 – Create AddNew action method
Put following using statement in MainController
using WebApplication1.Filters;
Now create AddNew action method inside MainController as follows.
[AdminFilter]
public ActionResult AddNew()
{
    CreateEmployeeViewModel v = new CreateEmployeeViewModel();
    return PartialView("CreateEmployee", v);
}
Step 3 – Create CreateEmployee Partial View
Create a new partial view called CreateEmployee in the “~/Areas/Spa/Views/Main” folder as follows.
@using WebApplication1.ViewModels.SPA
@model CreateEmployeeViewModel
<div>
    <table>
        <tr>
            <td>
                First Name:
            </td>
            <td>
                <input type="text" id="TxtFName" name="FirstName" value="@Model.FirstName" />
            </td>
        </tr>
        <tr>
            <td colspan="2" align="right">
                @Html.ValidationMessage("FirstName")
            </td>
        </tr>
        <tr>
            <td>
                Last Name:
            </td>
            <td>
                <input type="text" id="TxtLName" name="LastName" value="@Model.LastName" />
            </td>
        </tr>
        <tr>
            <td colspan="2" align="right">
                @Html.ValidationMessage("LastName")
            </td>
        </tr>
        <tr>
            <td>
                Salary:
            </td>
            <td>
                <input type="text" id="TxtSalary" name="Salary" value="@Model.Salary" />
            </td>
        </tr>
        <tr>
            <td colspan="2" align="right">
                @Html.ValidationMessage("Salary")
            </td>
        </tr>
        <tr>
            <td colspan="2">

                <input type="submit" name="BtnSubmit" value="Save Employee" onclick="SaveEmployee();" />
                <input type="submit" name="BtnSubmit" value="Cancel" onclick="CancelSave()"  />
                <input type="button" name="BtnReset" value="Reset" onclick="ResetForm();" />
            </td>
        </tr>
    </table>
</div>
Step 4– Include jQuery UI
Right click Project and select “Manage Nuget Manager”.
Search for “jQuery UI”.
Install jQuery UI.
It will add couple of JavaScript (.js) and Stylesheet (.css) files to the project.
Step 5- Include jQuery UI
Open “~/Areas/Spa/Views/Main/Index.cshtml” and Include jQuery.js,jQueryUI.js and all.cssas follows. All these files are added as a part of jQuery UI package by Nuget manager.
<head>
<meta name="viewport" content="width=device-width" />
<script src="~/Scripts/jquery-1.8.0.js"></script>
<script src="~/Scripts/jquery-ui-1.11.4.js"></script>
<title>Employee Single Page Application</title>
<link href="~/Content/themes/base/all.css" rel="stylesheet" />
...
Step 6 – Implement OpenAddNew function.
Create a new JavaScript function called OpenAddNew in “~/Areas/Spa/Views/Main/Index.cshtml” as follows.
<script>
    function OpenAddNew() {
        $.get("/SPA/Main/AddNew").then
            (
                function (r) {
                    $("<div id='DivCreateEmployee'></div>").html(r).
                        dialog({
                            width: 'auto', height: 'auto', modal: true, title: "Create New Employee",
                            close: function () {
                                $('#DivCreateEmployee').remove();
                            }
                        });
                }
            );
    }
</script>
Step 7– Execute and Test
Press F5 and execute the application.
Complete the login process and navigate to Index action in MainController. Finally click on Add New hyperlink.
Step 8 –Create ResetForm function
Open CreateEmployee.cshtml view. Create ResetForm function in the top as following.
@model CreateEmployeeViewModel
<script>
    function ResetForm() {
        document.getElementById('TxtFName').value = "";
        document.getElementById('TxtLName').value = "";
        document.getElementById('TxtSalary').value = "";
    }
</script>
<div>
    <table>
......
......
<input type="submit" name="BtnSubmit" value="Save Employee" onclick="SaveEmployee();" />
                <input type="submit" name="BtnSubmit" value="Cancel" onclick="CancelSave()" />
                <input type="button" name="BtnReset" value="Reset" onclick="ResetForm();" />
            </td>
        </tr>
......
……
Step 9 –Create CancelSave function
Open CreateEmployee.cshtml view. Create CancelSave function in the top as following.
document.getElementById('TxtSalary').value = "";
    }
    function CancelSave() {
        $('#DivCreateEmployee').dialog('close');
    }
Before we continue and follow the step 10 first let’s understand what we are supposed to next.
-
End user click the Save Employee button.
-
Values in the controls must be validated in client side.
-
If all values are valid, all value will be transferred to server side.
-
A new employee record must get saved in the database.
-
CreateEmployee dialog box must get closed after that
-
A grid get updated with new values.
Validation
For validation we can use the same Validation JavaScript code we used in non-spa version of project.
Save Employee
We will create a MVC action method to save employee and invoke it using jQuery Ajax.
Transfer of data from client side to server side
Earlier this was handled easily and automatically with the help of Form tag and Submit button. Now we can’t follow that approach because it will leads to full refresh. Instead of that this time we are using jQuery Ajax way which will let us invoke Server side MVC action method without full page refresh.
Now the million dollar question is if call is manual, how data will be transferred from JavaScript to MVC action method.
Understand the problem
Whether it is JavaScript, .net or any other technology when you hear the word data what comes to your mind at first place?
Its variables. We use variables to hold data temporarily and after that we may dump it into some persistent storage like database.
In our case we are working with two technologies – JavaScript and Asp.Net MVC.
JavaScript is a one technology and Asp.Net MVC is another.
They cannot exchange their data or in simple words they cannot exchange their variable directly with each other.
You may wondering,Why they can’t?
Both of them have variables. Both the technologies support datatypes like float, int and char then why can’t they send variables directly to each other?
Answer is, they have it but they are not same.
Integer datatype in .Net is not required to be same as Integer datatype in other technology. They may be different in size or may be in some other attribute.
Take a real time example.
A human being have legs, hands, eyes etc.
A dog also have things in common.
Are they both same? Definitely no. A human eye cannot be replaced with dog eye and vice versa.
Similarly we have concept of variables in all the technologies but they are not same.Repeating the same sentence again “Integer in .net is different from Integer in Java”
Solution – a common data type
Industry have realized this problem in the past and thought about a datatype which will actually be same all over. A data type which will have the ability to hold any data, we call it “a most compatible data type” and that is string datatype.
String data type is all over and it can hold anything.
-
We can convert integer data to string type and store it string variable.
-
We can convert float data to string type and store it in string variable.
-
…
-
Any data can be stored in variable of type string.
Ultimate solution is “Every time something need to be sent from technology1 to technolgoy2, technology1 will convert the data into string type and send it technology2 because there is 100% surety that technology2 will understand string”.
Now this have become standard in the industry.
Problem – what about complex data?
Problem – what about complex data?
If yes what about complex data?
What if we want to transfer employee information from one technology to another?
In .Net “classes and objects” will be used to represent complex data.
Look at following example
Employee e=new Employee();
e.EmpName= "Sukesh";
e.Address= "Mumbai";
In JavaScript “JavaScript objects” will be used to represent complex data.
Look at following example:
var e={
EmpName= "Sukesh",
Address= "Mumbai"
};
Passing complex data from .Net to other technology means, passing Class Object from .net to other technology and passing data from JavaScript to other technology means, passing JavaScript objects from JavaScript to other technologies.
It won’t be possible directly. As per the standard first we will convert data (.Net object or JavaScript object) to string type and then it will be send.
Solution – A common data format standard
Just like before, industry identified a common standard here. It said there should be a common everybody should represent their data before they send. This is where XML comes to picture.
Every technology will convert its data to XML formatted string and then send it to another technology. Just like string, XML is considered as standard format hence every technology know about it.
Employee object created in above C# code may be represented in XML format as below.
<employee></employee><Employee>
      <EmpName>Sukesh</EmpName>
      <Address>Mumbai</Address>
</Employee>
So the solution is, “Technology 1 will convert its complex data to string data represented in XML format and then send that string to Technology2”
Problem – XML format issues
We have following issues with XML format
1. XML format increases the size of the overall string need to be sent.
More size of the string means more time it will take to transfer. It means less performance.
2. Second reason, which is the major reason is, XML is difficult to create and parse.
Let’s talk about it more.
-
As I said before, every technology must create XML string based on data and it will send that XML string across. Now in C# creating XML string from .Net object is easy with the help of XML Serializers.
But what about JavaScript. In JavaScript there is neither we have concept of serializer nor do wehave any readymade XML manipulation library. Hence when it comes to sending of data from JavaScript to other technology we have to manually create XML string from JavaScript object. Which is a very difficult task.
-
When a technology receives data from other technology it is always going to XML formatted string. Now in C# parsing XML string and creating .Net object out of it is going to very easy with the help of XML Deserializers.
But what about JavaScript. In JavaScript we neither have XML Deserializers nor have XML manipulation libraries hence parsing XML string is a very difficult task here.
Solution - JSON
In order to tackle the problems of XML format, industry came up with a new format called JSON. It’s an abbreviation for “JavaScript Object Notation”.
Employee object created in above C# code may be represented in JSON format as below.
{
  EmpName: "Sukesh",
  Address: "Mumbai"
}
Data represented in JSON format look like JavaScript object hence this format is named as JSON (JavaScript Object Notation)
-
As you can see its lightweight compared to earlier.
-
Readymade functions are available in JavaScript for converting JavaScript object to JSON formatted string and for parsing JSON formatted string to JavaScript object.
Following code explains creation and parsing of JSON string.
var e={
EmpName= "Sukesh",
Address= "Mumbai"
};
var EmployeeJsonString = JSON.stringify(e);//This EmployeeJsonString will be send to other technologies.
var EmployeeJsonString=GetFromOtherTechnology();
var e=JSON.parse(EmployeeJsonString);
alert(e.EmpName);
alert(e.Address);
Close dialog
For closing CreateEmployee dialog box we can use jQuery Api.
Update Grid
Grid updating can be done in one of the two ways.
1. With Partial View
-
Create a partial view for grid just like we did for CreateEmployee functionality.
-
Create a div with some id in EmployeeListview and display partial view (grid) inside it.
-
When Save Employee button is clicked get the updated grid in the form of partial view result and replace the inner HTML of the grid div with new PartialViewResult.
I believe whatever lab we have completed so far will give you a nice idea onhow to achieve this and hence I am keeping this as an assignment. Complete it and don’t forget to drop a comment about the experience.
2. With manual code
In this approach MVC action method will return single EmployeeViewModel instead of EmployeeListViewModel which will be received at JavaScript end and using JavaScript new row will be inserted into the gridmanually. (EmployeeViewModel will be sent as JSON string from MVC action method to JavaScript).
Step 10 – Create SaveEmployee Action
Now create a new action called SaveEmployee in MainController as follows.
[AdminFilter]
public ActionResult SaveEmployee(Employee emp)
{
    EmployeeBusinessLayer empBal = new EmployeeBusinessLayer();
    empBal.SaveEmployee(emp);

EmployeeViewModel empViewModel = new EmployeeViewModel();
empViewModel.EmployeeName = emp.FirstName + " " + emp.LastName;
empViewModel.Salary = emp.Salary.Value.ToString("C");
if (emp.Salary > 15000)
{
empViewModel.SalaryColor = "yellow";
}
else
{
empViewModel.SalaryColor = "green";
    }
return Json(empViewModel);
}
For now just take Json method as a way to send Json String from MVC action method to JavaScript.
Step 11 – Include Validation.js
Include Validation.js file created in one of the previous lab as follows.
@using WebApplication1.ViewModels.SPA
@model CreateEmployeeViewModel
<script src="~/Scripts/Validations.js"></script>
<script>
    function ResetForm() {
......
Step 12–Create SaveEmployee function
Open CreateEmployee.cshtml view. Create SaveEmployee function in the top as follows.
...
...

    function SaveEmployee() {
        if (IsValid()) {
            var e =
                {
                    FirstName: $('#TxtFName').val(),
                    LastName: $('#TxtLName').val(),
                    Salary: $('#TxtSalary').val()
                };
            $.post("/SPA/Main/SaveEmployee",e).then(
                function (r) {
                    var newTr = $('<tr></tr>');
                    var nameTD = $('<td></td>');
                    var salaryTD = $('<td></td>');

                    nameTD.text(r.EmployeeName);
                    salaryTD.text(r.Salary);

                    salaryTD.css("background-color", r.SalaryColor);

                    newTr.append(nameTD);
                    newTr.append(salaryTD);

                    $('#EmployeeTable').append(newTr);
                    $('#DivCreateEmployee').dialog('close');
                }
                );
        }
    }
</script>
Step 13– Execute and Test
Press F5 and execute the application.
What does JSON method do?
It will return JSONResult.
JSONResult is the one of the child of ActionResult.
In Day 6 we spoke about MVC request cycle. Let go through it again.
ExecuteResult is declared as abstract in ActionResult class. All the children’s of ActionResult class defines it in its own way. In Day 1 we spoke about ViewResult.In ViewResult class ExecuteResult method will do following things.
-
It will creates the object of ViewPageActivator class.
-
It will choose the correct ViewEngine and passes ViewPageActivator object as argument to ViewEngine’s constructor. ViewEngine create the object of View class
-
It will invoke the RenderView method of View which will render final HTML output the response.
When it comes to JsonResult, ExecuteResult method will,
-
Set the response content type to “Application/Json”
-
Using JavaScript Serializerit will convert the data passed to JSON formatted string
-
Writes the final JSON formatted String to response stream.
Step 1 – Create SpaBulkUploadController
Create a new AsyncController called SpaBulkUploadController
namespace WebApplication1.Areas.SPA.Controllers
{
    public class SpaBulkUploadController : AsyncController
    {
    }
}
Step 2 – Create Index Action
In the above controller create a new action method called Index as follows.
[AdminFilter]
public ActionResult Index()
{
    return PartialView("Index");
}
Step 3 – Create Index PartialView
Create a new PartialView called Index inside “~/Areas/Spa/Views/SpaBulkUpload” as follows.
<div>
    Select File : <input type="file" name="fileUpload" id="MyFileUploader" value="" />
    <input type="submit" name="name" value="Upload" onclick="Upload();" />
</div>
Step 4 – Create OpenBulkUpload method
Open Index.cshtml in “~/Areas/Spa/Views/Main” folder and create a JavaScript method called Index.cshtml as follows.
 function OpenBulkUpload() {
            $.get("/SPA/SpaBulkUpload/Index").then
                (
                    function (r) {
                        $("<div id='DivBulkUpload'></div>").html(r).dialog({ width: 'auto', height: 'auto', modal: true, title: "Create New Employee",
                            close: function () {
                                $('#DivBulkUpload').remove();
                            } });
                    }
                );
        }
    </script>
</head>
<body>
    <div style="text-align:right">
Step 5 – Execute and Test
Press F5 and execute the application. Complete the login Process
Navigate to Index action of Main Controller and click the BulkUpload link.
Step 6 – Create FileUploadViewModel
Create a new view model class called FileUploadViewModel in SPA folder of ViewModel class library.
namespace WebApplication1.ViewModels.SPA
{
    public class FileUploadViewModel
    {
        public HttpPostedFileBase fileUpload { get; set; }
    }
}
Step 7 – Create Upload Action
Create a new Action method called Upload in SpaBulkUploadController as follows.
[AdminFilter]
public async Task<actionresult> Upload(FileUploadViewModel model)
{
int t1 = Thread.CurrentThread.ManagedThreadId;
List<employee> employees = await Task.Factory.StartNew<list<employee>>
(() => GetEmployees(model));
int t2 = Thread.CurrentThread.ManagedThreadId;
EmployeeBusinessLayer bal = new EmployeeBusinessLayer();
bal.UploadEmployees(employees);
EmployeeListViewModel vm = new EmployeeListViewModel();
vm.Employees = new List<employeeviewmodel>();
foreach (Employee item in employees)
{
EmployeeViewModel evm = new EmployeeViewModel();
evm.EmployeeName = item.FirstName + " " + item.LastName;
evm.Salary = item.Salary.Value.ToString("C");
if (item.Salary > 15000)
{
evm.SalaryColor = "yellow";
}
else
{
evm.SalaryColor = "green";
}
vm.Employees.Add(evm);
}
return Json(vm);
}
private List<employee> GetEmployees(FileUploadViewModel model)
{
List<employee> employees = new List<employee>();
StreamReader csvreader = new StreamReader(model.fileUpload.InputStream);
csvreader.ReadLine();
while (!csvreader.EndOfStream)
{
var line = csvreader.ReadLine();
var values = line.Split(',');
Employee e = new Employee();
e.FirstName = values[0];
e.LastName = values[1];
e.Salary = int.Parse(values[2]);
employees.Add(e);
}
return employees;
}
</employee></employee></employee></employeeviewmodel></list<employee></employee></actionresult>
As you can see this time instead of redirecting we are returning JsonResult.
Step 8 – Create Upload function
Open Index view in ~/Areas/Spa/Views/SpaBulkUpload” folder.
And create a JavaScript function called Upload as follows.
<script>
    function Upload() {
        debugger;
        var fd = new FormData();
        var file = $('#MyFileUploader')[0];
        fd.append("fileUpload", file.files[0]);
        $.ajax({
            url: "/Spa/SpaBulkUpload/Upload",
            type: 'POST',
            contentType: false,
            processData: false,
            data: fd
        }).then(function (e) {
            debugger;
            for (i = 0; i < e.Employees.length; i++)
            {
                var newTr = $('<tr></tr>');
                var nameTD = $('<td></td>');
                var salaryTD = $('<td></td>');

                nameTD.text(e.Employees[i].EmployeeName);
                salaryTD.text(e.Employees[i].Salary);

                salaryTD.css("background-color", e.Employees[i].SalaryColor);

                newTr.append(nameTD);
                newTr.append(salaryTD);

                $('#EmployeeTable').append(newTr);
            }
            $('#DivBulkUpload').dialog('close');
        });
    }
</script>
<div>
    Select File : ......
Step 9 – Execute and Test
Create a text file for testing as follows.
Press F5 and execute the application.
Here we complete our 7 days of journey. We have completed a simple project using many features in Asp.Net MVC. We have also discussed about many theoretical concepts in detail.
Soon I will release two more articles on MVC. It won’t be part of the series but it includes couple of things which didn’t covered in these 7 days as a part of project
- Article 2 – Learn MVC Project in 7 days - Bonus day 1
Here we will create a SPA project again but with the help of Web API and angular
- Article 1 - Learn MVC Project in 7 days – Bonus day 1
Here we will speak about some MVC topics which are not covered in 7 days.
In case you want to start with MVC 5 start with the below video Learn MVC 5 in 2 days.
If you believe that something more need to be included please free to send me an email about same.
Your comments, Mails always motivates us do more. Put your thoughts and comments below or send mail to SukeshMarla@Gmail.com
Connect us on Facebook, LinkedIn or twitter to stay updated about new releases.
For Offline Technical trainings in Mumbai visit StepByStepSchools.Net
For Online Trainings visit JustCompile.com or www.Sukesh-Marla.com


 General
  News
News  Suggestion
  Question
  Bug
Bug  Answer
  Joke
Joke  Praise
  Rant
Rant  Admin
Admin 


