CMake is a cross-platform open-source tool for defining the build process for native applications independently of compilers and environments. This article provides an introduction to CMake through a series of examples to help you, as VC++ developers, to create and maintain CMake projects. Examples like building message, setting variables, adding subdirectories, adding libraries and executables, including and linking directories, adding library dependencies, and setting build dependencies. We will also look at building the scripts explicitly and building cross-IDE.
Introduction
One of the important changes in Visual Studio 2017 for native development is support for CMake. CMake is a cross-platform open-source tool for defining the build process for native applications independently of compilers and environments. CMake uses scripts (called CMakeLists.txt) to generate environment specific build files, such as Visual Studio projects, XCode projects, make scripts and others. Although CMake has had support for all versions of Visual Studio, starting with version 6, Visual Studio 2017 is the first version to support CMake. This means it is possible to create, edit, build, run and debug C++ code in Visual Studio 2017 without the need to explicitly generate VC++ projects, as that is taken care behind the scenes by the system.
This article provides an introduction to CMake through a series of examples to help you, as VC++ developers, to create and maintain CMake projects.
Overview of Support in Visual Studio 2017
Although this article is an introduction to CMake, it makes sense to start with a brief walk-through of the support for it in Visual Studio. For an in-depth discussion of the support, see CMake support in Visual Studio.
In Visual Studio 2017, you can open C++ code by using the open folder feature. For that, you need to have a CMake script, always called CMakeLists.txt, in the same location with your sources. If your code is split across multiple projects and sub-directories, you need to have one in each project directory. To open the code from such a directory, go to File > Open > Folder.
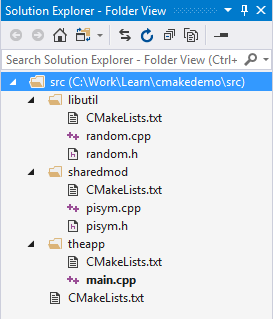
When you open a folder, you can see the contents of that folder, including the CMakeLists.txt file(s) in the solution explorer.
The main menu contains an additional item called CMake with different commands, such as building the scripts, managing the CMake cache, changing the CMake settings and others. Different commands, such as building and debugging the code, are also available from the context menu for the CMakeLists.txt files.

When you build the CMake scripts, VC++ project files are created stored in a temporary location, which are then used by Visual Studio to build, run and debug the code.
Defining an Example
Throughout the rest of this article, we will discuss how to build C++ code that is grouped in several projects: a static library, a dynamic library and an application. The static library is called libutil and contains utility functions (random.h and random.cpp). It is statically linked with the dynamic linked library called sharedmod (pisym.h and pisym.cpp), which in turn is linked with the main application called theapp (main.cpp).
The initial folder structure looks like this:
cmakedemo/
├── include/
|   └── libdef.h
└── src/
    ├── libutil/
    |   ├── random.h
    |   └── random.cpp
    ├── sharedmod/
    |   ├── pisym.h
    |   └── pisym.cpp
    └── theapp/
        └── main.cpp
The source code is located under the src directory, with each project having its own sub-directory. There is also an include directory, on the same level with src. CMakeLists.txt scripts need to be created in each of the src subfolders, as well as in the root.
cmakedemo/
├── include/
|   └── libdef.h
└── src/
    ├── libutil/
    |   ├── random.h
    |   ├── random.cpp
    |   └── CMakeLists.txt
    ├── sharedmod/
    |   ├── pisym.h
    |   ├── pisym.cpp
    |   └── CMakeLists.txt
    ├── theapp/
    |   ├── main.cpp
    |   └── CMakeLists.txt
    └── CMakeLists.txt
CMake Version
You can target a minimum version of CMake with the CMakeLists.txt scripts, by using the cmake_minimum_required command (at the beginning of the script).
cmake_minimum_required(VERSION major.minor[.patch[.tweak]] [FATAL_ERROR])
If the installed CMake version is lower than the specified version, the parsing of the scripts stops with an error. This command is optional, but when present, it is placed at the beginning of the top-level script, before any other command.
cmake_minimum_required(VERSION 3.6.2)
Visual Studio 2017 comes with its own distribution of CMake. It is located in the folder c:\PROGRAM FILES (X86)\MICROSOFT VISUAL STUDIO\2017\ENTERPRISE\COMMON7\IDE\COMMONEXTENSIONS\MICROSOFT\CMAKE\CMake\ (assuming the default installation location for Visual Studio). The version distributed with Visual Studio 2017 RTM is 3.6.20160606-g0391f-MSVC, which is basically a version of 3.6.2 that supports Visual Studio 2017. It is possible to have another installation of CMake. For instance, if you downloaded it from cmake.org and installed it in the default location, then you also have it under c:\Program Files\CMake\. When run from Visual Studio, the VS-distributed version is the one that is always used. Therefore, you must specify the minimum version as 3.6.2 and not a higher version. Otherwise, the build will fail with an error:
1> Working directory: C:\Users\M\AppData\Local\CMakeBuild\
   bfe38435-a2ed-1738-925f-b2cbf11bf883\build\x86-Debug
1> CMake Error at C:\Work\Learn\cmakedemo\src\CMakeLists.txt:1 (cmake_minimum_required):
1>   CMake 3.7 or higher is required.  You are running version
1>   3.6.20160606-g0391f-MSVC
Project Name
You specify a name and optionally version and language for an entire project using the project command.
project(<PROJECT-NAME> [LANGUAGES] [<language-name>...])
project(<PROJECT-NAME>
        [VERSION <major>[.<minor>[.<patch>[.<tweak>]]]]
        [LANGUAGES <language-name>...])
When you build the script, that will become the name of the Visual Studio solution.
project(cmakedemo)
Build Messages
It is possible to show message to the user during the building of the scripts by using the message command.
message([<mode>] "message to display" ...)
This takes an optional mode, indicating the type of message, and the text to output. The possible modes are shown in the following table. Notice these are case sensitive and must be written with upper cases.
| (none) | Important information |
STATUS | Incidental information |
WARNING | CMake Warning, continue processing |
AUTHOR_WARNING | CMake Warning (dev), continue processing |
SEND_ERROR | CMake Error, continue processing, but skip generation |
FATAL_ERROR | CMake Error, stop processing and generation |
DEPRECATION | CMake Deprecation Error or Warning if variable CMAKE_ERROR_DEPRECATED or CMAKE_WARN_DEPRECATED is enabled, respectively, else no message. |
| | |
| | |
The command-line cmake tool displays the STATUS messages on stdout and all the others on stderr.
message(STATUS "Setting MSVC flags")
Setting Variables
Build variables, cache and environment variables can all be set with the same command, simply called set. The syntax is similar for all these three types of variables. The variable name comes first, then the value and then additional possible arguments. To refer to a variable, you must enclose it between ${}, such in ${VARIABLE_NAME}. In case of environment variables, they must be specified within ENV{}, such as in ENV{PATH}.
Cache variables are meant for user settable value, but this command does not overwrite existing cache variables unless you specify the FORCE option. When you set a cache variable, you also need to specify a type, which can be one of BOOL, FILEPATH (path to a file), PATH (path to a directory), STRING or INTERNAL, and a string that describes the variable, which is shown in the GUI version of the tool.
set(<variable> <value>... [PARENT_SCOPE])
set(<variable> <value>... CACHE <type> <docstring> [FORCE])
set(ENV{<variable>} <value>...)
There are pre-defined variables that are used for various purposes. In our top-level script, we will use some of these:
set(CMAKE_CXX_FLAGS "${CMAKE_CXX_FLAGS} /EHc /std:c++latest")
set(CMAKE_ARCHIVE_OUTPUT_DIRECTORY "${CMAKE_SOURCE_DIR}/../bin")
set(CMAKE_LIBRARY_OUTPUT_DIRECTORY "${CMAKE_SOURCE_DIR}/../bin")
set(CMAKE_RUNTIME_OUTPUT_DIRECTORY "${CMAKE_SOURCE_DIR}/../bin")
Note: To the specified output directory, CMake implicitly adds the name of the configuration, such as Debug or Release. Therefore, if you specify the output to be C:\Work\Learn\cmakedemo\bin\, the actual output folder for the Debug configuration will be C:\Work\Learn\cmakedemo\bin\Debug\.
Variables can be set from the command line. You need to introduce them with the -D prefix and then provide a value.
cmake -DCMAKE_RUNTIME_OUTPUT_DIRECTORY c:\demo\bin
Adding Subdirectories
When your code is organized in multiple directories, you can add subdirectories to the build with the command add_subdirectory.
add_subdirectory(source_dir [binary_dir] [EXCLUDE_FROM_ALL])
The only mandatory argument is a directory name or path. This can be either an absolute path, or a relative path, in which case it is resolved starting with the current output directory. This directory must contain a CMakeLists.txt script, which will be processed immediately by the CMake, before it continues with the current input script.
add_subdirectory(libutil)
add_subdirectory(sharedmod)
add_subdirectory(theapp)
Adding Libraries and Executables
You can add libraries and executables to the build using the add_library and add_executable commands. These two have similar syntax:
add_library(<name> [STATIC | SHARED | MODULE] [EXCLUDE_FROM_ALL] source1 [source2 ...])
add_executable(<name> [WIN32] [MACOSX_BUNDLE] [EXCLUDE_FROM_ALL] source1 [source2 ...])
<name> is the name of the target to be built from the list of specified sources. It is a logical target name and must be unique within the project. The actual filename of the library or executable is based on this name but depends on the native platform. For library files, it is <name>.lib on Windows and lib<name>.a on other systems, and for executable names are <name>.exe on Windows and <name> on other systems.
For libraries, STATIC (archives of object files used for linking other targets), SHARED (dynamically linked libraries) or MODULE (plugins not linked into other targets but loaded dynamically at runtime) can be specified to indicate the type of the library. If none of these is specified, then STATIC or SHARED are implied, depending whether the variable BUILD_SHARED_LIBS is ON or OFF.
The list of source files may contain both source and header files. Note that only the files listed with the command show up in the project when you generate one for Visual Studio.
add_library(libutil STATIC random.cpp random.h)
If the number of files it too large to specify manually, or you want to bulk include them based on a pattern, you can use the file command to generate a list of files that match a pattern and store it in a variable that you later refer in the add_library or add_executable command. The following example defines a variable called headers that contains all the files in the current folder that have the extension .h.
file(GLOB headers *.h)
add_library(sharedmod SHARED pisym.cpp ${headers})
add_executable(theapp main.cpp)
Including and Linking Directories
Directories can be added to the list of include directories using the command include_directories and to the list of linking directories (where the linker looks for libraries) using the command link_directories.
include_directories([AFTER|BEFORE] [SYSTEM] dir1 [dir2 ...])

link_directories(directory1 directory2 ...)
The directory or directories specified with the include_directories command are added to the INCLUDE_DIRECTORY directory property for the current CMakeLists.txt script and all the INCLUDE_DIRECTORY target property for each target in the current CMakeLists.txt script. When SYSTEM is specified, the directory will be designated as a system include directory with the compiler.
include_directories(${CMAKE_SOURCE_DIR}/../include)
The directories specified with the link_directories are applied only to targets created after the command. Therefore, it is important to use this command before add_library or add_executable.
link_directories(${CMAKE_LIBRARY_OUTPUT_DIRECTORY})
Preprocessor Definitions
Preprocessor definitions can be added with the add_definitions command. The name must be prefixed with -D.
add_definitions(-DEXPMODULE)
Adding Library Dependencies
You can specify library dependencies or linking flags for a target using the command target_link_libraries. This command has multiple forms, but in this article, we will discuss only one:
target_link_libraries(<target> ... <item>... ...)
<target> must have been previously created with either add_library() or add_executable() and multiple targets can be specified. <item> can be a library name, a full path to a library file, a plain library name, a link flag or a debug/optimized/general keyword followed by another item. The keyword debug refers to the debug configuration, optimized to all other configurations, and general to all configurations and is optional.
The use of debug and optimized keywords preceding an item is useful for specifying different targets for different configurations, for instance linking with a library called mylibrary.lib for a release configuration and mylibraryd.lib for a debug configuration.
target_link_libraries(sharedmod debug libutil.lib)
target_link_libraries(sharedmod optimized libutil.lib)
Setting Build Dependencies
The build order of the targets is usually important, as some targets must be built before others. Dependencies between targets in terms of build order can be specified with the add_dependencies command.
add_dependencies(<target> [<target-dependency>]...)
All the targets specified with this command must be top level targets created with add_executable(), add_library() or add_custom_target().
add_dependencies(sharedmod libutil)
add_dependencies(theapp sharedmod)
Setting Properties
You can set values for named properties in a given scope using the set_property command. This command takes an optional scope and a mandatory PROPERTY option followed by the name of the property and its value or values.
set_property(<GLOBAL                            |
              DIRECTORY [dir]                   |
              TARGET    [target1 [target2 ...]] |
              SOURCE    [src1 [src2 ...]]       |
              INSTALL   [file1 [file2 ...]]     |
              TEST      [test1 [test2 ...]]     |
              CACHE     [entry1 [entry2 ...]]>
             [APPEND] [APPEND_STRING]
             PROPERTY <name> [value1 [value2 ...]])
We can use this command the set the startup project in a Visual Studio solution. For instance, we if we want the application theapp to be the startup project, we must specify the following command in the top level CMakeLists.txt script.
set_property(DIRECTORY ${CMAKE_CURRENT_SOURCE_DIR} PROPERTY VS_STARTUP_PROJECT theapp)
Putting It All Together
With all these commands discussed, we can put together the scripts for the main folder and each of the sub-folders, as shown below.
- Top-level CMakeLists.txt script:
cmake_minimum_required(VERSION 3.6.2)
project(cmakedemo)

message(STATUS "Setting MSVC flags")
set(CMAKE_CXX_FLAGS "${CMAKE_CXX_FLAGS} /EHc /std:c++latest")

set(CMAKE_ARCHIVE_OUTPUT_DIRECTORY "${CMAKE_SOURCE_DIR}/../bin")
set(CMAKE_LIBRARY_OUTPUT_DIRECTORY "${CMAKE_SOURCE_DIR}/../bin")
set(CMAKE_RUNTIME_OUTPUT_DIRECTORY "${CMAKE_SOURCE_DIR}/../bin")

add_subdirectory(libutil)
add_subdirectory(sharedmod)
add_subdirectory(theapp)

add_dependencies(sharedmod libutil)
add_dependencies(theapp sharedmod)

set_property(DIRECTORY ${CMAKE_CURRENT_SOURCE_DIR} PROPERTY VS_STARTUP_PROJECT theapp)
libutil CMakeLists.txt script:
add_library(libutil STATIC random.cpp random.h)

include_directories(${CMAKE_SOURCE_DIR}/../include)
add_definitions(-DEXPMODULE)
sharedmod CMakeLists.txt script:
include_directories(${CMAKE_SOURCE_DIR}/libutil)
include_directories(${CMAKE_SOURCE_DIR}/../include)
link_directories(${CMAKE_LIBRARY_OUTPUT_DIRECTORY})

file(GLOB headers *.h)
add_library(sharedmod SHARED pisym.cpp ${headers})

add_definitions(-DEXPMODULE)

target_link_libraries(sharedmod debug libutil.lib)
target_link_libraries(sharedmod optimized libutil.lib)
theapp CMakeLists.txt script:
include_directories(${CMAKE_SOURCE_DIR}/../include)
include_directories(${CMAKE_SOURCE_DIR}/libutil)
include_directories(${CMAKE_SOURCE_DIR}/sharedmod)

link_directories(${CMAKE_LIBRARY_OUTPUT_DIRECTORY})

add_executable(theapp main.cpp)

target_link_libraries(theapp debug sharedmod.lib)
target_link_libraries(theapp optimized sharedmod.lib)
Building the Scripts Explicitly
Although Visual Studio 2017 builds the CMake scripts automatically (or on demand), you can still use CMake without Visual Studio to generate Visual C++ projects and solutions. The following command shows how to use CMake for this purpose, assuming the code is located under the src folder (as shown in the beginning of the article).
cmake -G "Visual Studio 15 2017" src

-- The C compiler identification is MSVC 19.10.25017.0
-- The CXX compiler identification is MSVC 19.10.25017.0
-- Check for working C compiler: C:/Program Files
 (x86)/Microsoft Visual Studio/2017/Enterprise/VC/Tools/MSVC/14.10.25017/bin/HostX86/x86/cl.exe
-- Check for working C compiler: C:/Program Files
 (x86)/Microsoft Visual Studio/2017/Enterprise/VC/Tools/MSVC/14.10.25017/bin/HostX86/x86/cl.exe
-- works
-- Detecting C compiler ABI info
-- Detecting C compiler ABI info - done
-- Check for working CXX compiler: C:/Program Files
  (x86)/Microsoft Visual Studio/2017/Enterprise/VC/Tools/MSVC/14.10.25017/bin/HostX86/x86/cl.exe
-- Check for working CXX compiler: C:/Program Files
 (x86)/Microsoft Visual Studio/2017/Enterprise/VC/Tools/MSVC/14.10.25017/bin/HostX86/x86/cl.exe
-- works
-- Detecting CXX compiler ABI info
-- Detecting CXX compiler ABI info - done
-- Detecting CXX compile features
-- Detecting CXX compile features - done
-- Setting MSVC flags
-- Configuring done
-- Generating done
-- Build files have been written to: C:/Work/Learn/cmakedemo
"Visual Studio 15 2017" is the name of the generator that produces Visual Studio 2017 projects targeting the x86 platform. If you need to target the x64 or the ARM platforms, then you must use other generators, "Visual Studio 15 2017 Win64" and "Visual Studio 15 2017 ARM" respectively.
There are several important differences concerning the generated projects when using a regular CMake version or the one distributed with Visual Studio.
- CMake generates configurations that target a single platform, x86, x64 or ARM, depending on the generator that you specify, while the Visual Studio distributed CMake generates configurations for both x86 and x64, but not also ARM.
- CMake generates four configurations, Debug, Release, MinSizeRel, RelWithDebInfo (the last three being Release configurations), while the Visual Studio distributed CMake generates a Debug and a Release configuration, but for both targets, therefore also a total of four configurations x86-Debug, x86-Release, x64-Debug and x64-Release.
- CMake generates the projects in the current working directory, while the Visual Studio distributed version generates them in an AppData\Local folder as shown earlier. In both cases however, the output is in the same location, which is the one specified with pre-defined variables, such as
CMAKE_RUNTIME_OUTPUT_DIRECTORY, as shown above.
Building Cross-IDE and Platform
Although this article is focused on Visual Studio, the primary reason for using CMake is building cross-platform and cross-compiler applications. The same scripts we created for creating Visual Studio projects can be used for other IDEs. For instance, just by replacing the generator from "Visual Studio 15 2017" with Xcode, CMake will create an Xcode project.
cmake -G Xcode src
NOTE: In order to successfully build the project, the source code and the scripts require some changes though. For instance, std::optional used in the sample code is not supported in the LLVM toolchain available with the latest version of Xcode available at the time of writing this article. Also, the compiler options /EHc /std:c++latest should be replaced with -std=c++1z -fexceptions -g -Wall. Other changes are necessary, but these are beyond the scope of this article.
History
- 10th April, 2017: Initial version
Marius Bancila is the author of Modern C++ Programming Cookbook and The Modern C++ Challenge. He has been a Microsoft MVP since 2006, initially for VC++ and nowadays for Development technologies. He works as a system architect for Visma, a Norwegian-based company. He works with various technologies, both managed and unmanaged, for desktop, cloud, and mobile, mainly developing with VC++ and VC#. He keeps a blog at http://www.mariusbancila.ro/blog, focused on Windows programming. You can follow Marius on Twitter at @mariusbancila.


 General
  News
News  Suggestion
  Question
  Bug
Bug  Answer
  Joke
Joke  Praise
  Rant
Rant  Admin
Admin 


